


 100% Security Verified | No Subscription Required | No Malware

When it comes to photo editing, Adobe Photoshop always comes first to the mind of many people. Well, the reason is pretty obvious. This software can offer a wide range of features that can help editors create, enhance, restore, and manipulate pictures easily. Yes. That is right. So long as you’re familiar with the basics of Adobe Photoshop, you can certainly do a lot of wonderful things. But hold on. Before you tweak your images, make sure that you use an adjustment layer. Don’t worry. It’s very easy to add an adjustment layer in Photoshop. All it takes is just a click or two.
In this article, we will delve into the functions of the adjustment layer in Photoshop. We will also provide a short guide on how to enable and add an adjustment layer to Photoshop projects. Lastly, we will also discuss the adjustment layer in video editing. Continue reading below to learn more.
In this article
How to Add and Use an Adjustment Layer With Wondershare Filmora?
Many graphic designers use an adjustment layer in Photoshop when editing digital images. Why so? Simply because it’s a great way to preserve the original quality of the image while making color and tonal changes. That’s why you should also use this tool on your end. Can you do the same when editing video content? The short answer is absolutely yes. Wondershare Filmora allows you to add an adjustment layer to your project timeline. Do you wish to use this potent video editor and try its adjustment layer feature? If that is so, then read the details provided below to learn more.

Key Features
Wondershare Filmora has tons of amazing features that allow you to add an adjustment layer and make reversible video modifications. Below are some of them. Check out the list for more details.
- Adjustment layer: It allows you to add an adjustment layer to your video project and customize it based on your preferences. For instance, you may change a few basic settings or adjust the color settings.
- Simple and advanced video editing: It is equipped with numerous tools that can help you facilitate a variety of video editing techniques in a snap.
- High-quality creative resources: It offers a huge library of creative resources that you can access and use within the platform. Among these assets are stock images, video clips, audio bits, effects, filters, and many others.
- Ready-made video templates: It has tons of custom-tailored video templates that you can easily personalize according to your liking.
- Artificial intelligence: It provides access to a number of AI-powered tools that you can integrate into your video creation process. Among them are AI Voice Enhancer, AI Copywriting, AI Text-Based Editing, AI Smart Cut Out, and more.
- Flexible video export options: It allows you to render and export the video output in different formats. Among the supported file types are MP4, WMV, AVI, MOV, F4V, MKV, 3GP, MPEG-2, WEBM, GIF, and MP3.
Step-By-Step Guide
Wondershare Filmora is very convenient to use. If you need to add and edit an adjustment layer, you can do it in just a snap. Do you want to try it on your end? If that is so, check out the tutorial written below. Read the instructions very well and follow the indicated steps accordingly.
Step 1: Download the Wondershare Filmora app from its official website. Right after, install it on your computer.
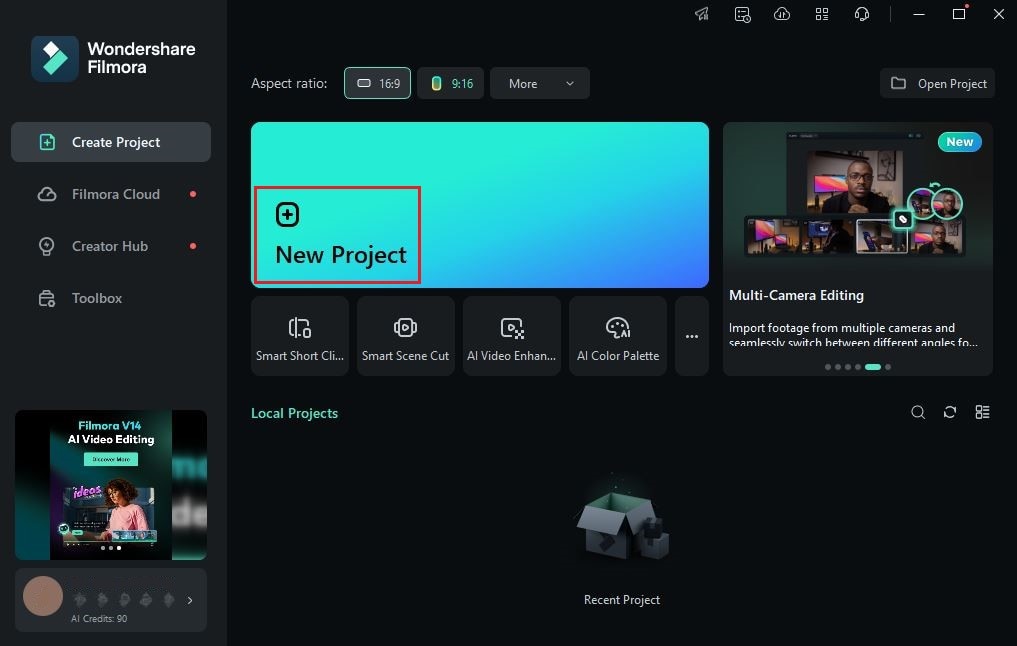
Step 2: Run the newly installed video editing software on your desktop afterward. Once it fully loads up, head over to the main dashboard and click New Project to start editing. Alternatively, scroll down a little to the Local Projects section and open an existing session if there is any available.
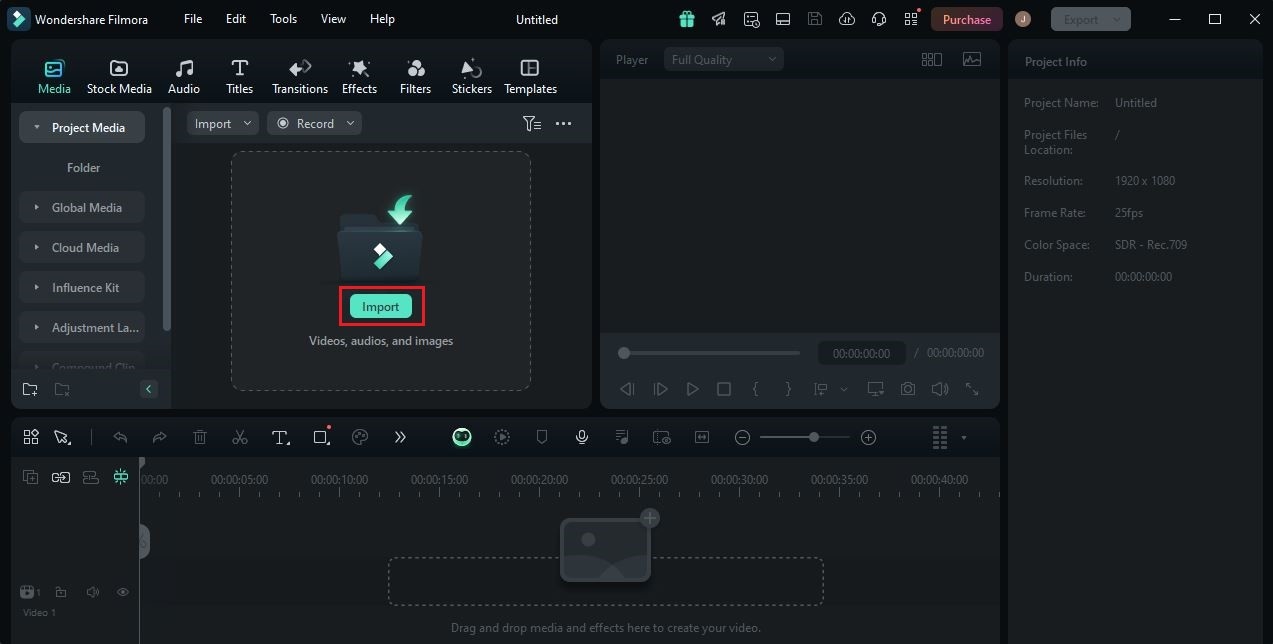
Step 3: After that, navigate to the Elements Panel and click Import under the Media tab. Select all the files you are going to use and upload them to the platform. Once completed, grab the assets one by one and drag them from the Elements Panel to the Editor Timeline.
Step 4: At this point, you can now add the adjustment layer to the project timeline before you proceed with the actual video editing. Don’t worry. It’s a piece of cake. To get started, head back to the Elements Panel and click the Media tab.
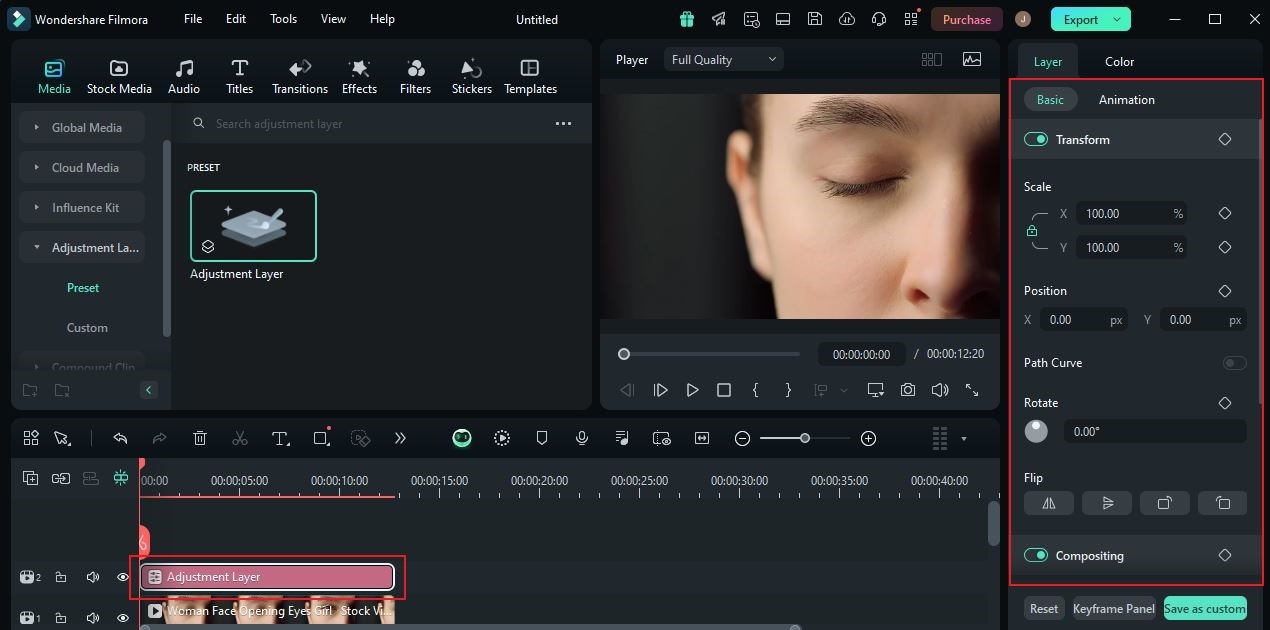
Step 5: Find and tap the Adjustment Layer option. Subsequently, select Preset or Custom based on your preferences. Once done, grab the adjustment layer you wish to use and then drag it all the way to the Editor Timeline. Drop the adjustment layer asset right above the video track you want to edit.

Step 6: Following that, click the Adjustment Layer asset and then navigate to the right-side panel to start the editing process. From here, you can access several options to edit the layer. Start with the Basic layer settings. Switch on the toggle button beside the Transform, Compositing, and Auto Enhance options to make fundamental changes to the adjustment Layer. On the one hand, tap the Animation tab and choose the option you prefer to use in case you want to add such effects.
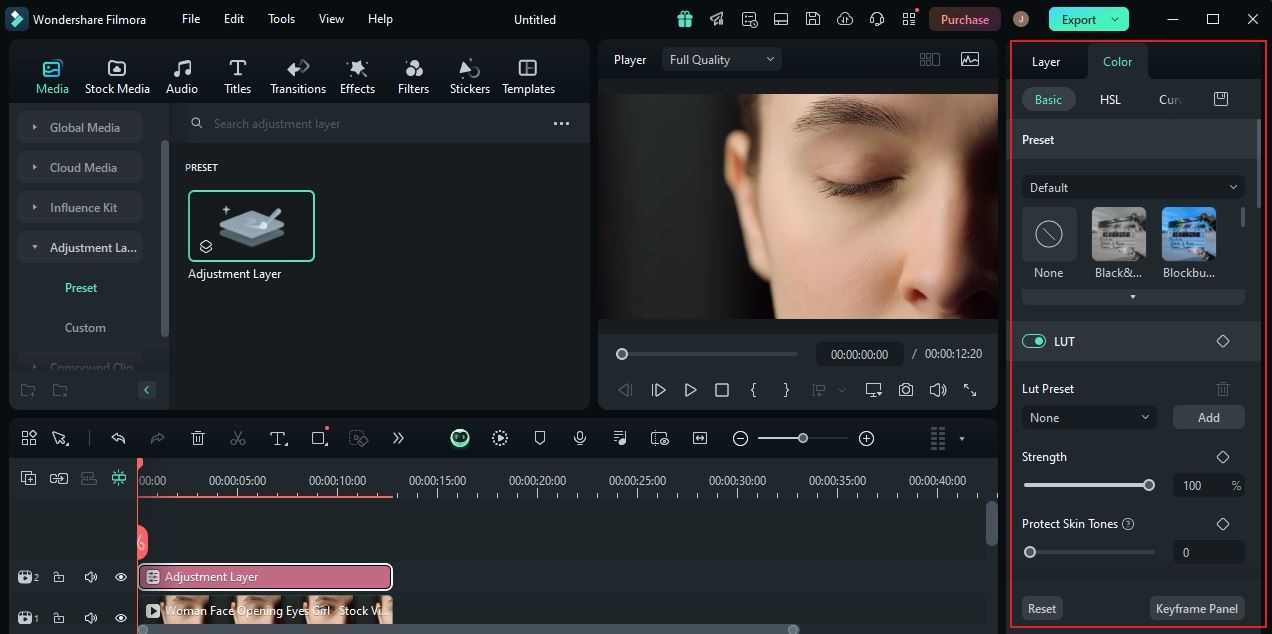
Step 7: Likewise, you can also modify the color settings of the adjustment layer and apply the result to your actual video clips. To do that, simply go to the Color tab. From the Basic settings, you can add a Preset and a color lookup or LUT. In case necessary, you can also edit the Layer Color and Light settings, make Adjustments, or add a Vignette. For more advanced customizations, click HSL, Curves, and Color Wheels. They provide access to the tools you need for color grading and color correction.
Step 8: Once done, play and review the output. Check if the adjustment layer has been effectively modified based on your preferences. If you are satisfied with the result, click the Export button right above the Preview Panel to render the video and save a copy to your computer. Otherwise, continue making changes until a desirable outcome is achieved.
Exploring the Role of the Adjustment Layer in Photoshop
As previously indicated, Adobe Photoshop is indeed the go-to software of most graphic designers out there. Yes. That is right. This application has a lot to offer in this regard. Therefore, it has instantly gained popularity across the globe. In terms of features, one of the best that you should use is the adjustment layer. Similar to Wondershare Filmora, you can also add and customize an adjustment layer in Photoshop. It’s basically a separate layer that intends to receive the modifications from your input and apply them to the image. If you wish to go back to the original configuration of your images, you can easily do that. All you have to do is delete the adjustment layer in your Photoshop project. Yes. It’s just as simple as that. Therefore, you should always use an adjustment layer in Photoshop as much as possible. Doing so will certainly streamline your creation projects and save you more time.
In actuality, the general concept and function of the adjustment layer in Photoshop are not that hard to understand. You can easily get yourself familiar with them in just a snap. However, take note that the adjustment layer in Photoshop actually comes with various types. Each of them serves a unique purpose in this regard. That’s why you should know how these adjustment layers exactly work. Don’t worry. It’s indeed a piece of cake. To help you get started, check out the list below. Read the items very carefully for more details.
Brightness and Contrast
Brightness and contrast are among the main elements of photo editing. They are the specific configurations you need if you wish to edit the highlights and shadows of your photos. Don’t worry. Adobe Photoshop gives you access to such calibrations. Moreover, you can also make such changes on the adjustment layer to protect your original material. The adjustment layer in Photoshop allows you to increase or reduce the brightness and contrast of your image. You just have to input your preferred percentage or move the slider to your desired level.

Levels
The levels tool is a special configuration that lets you balance the color register of your image. You can use it to light up certain sections of your images and bring out some details with more clarity. Similar to the Brightness and Contrast, the Levels tool can also be applied to an adjustment layer in Photoshop. That’s why you should add one to your project before you proceed with the calibration.
Curves
The best Photoshop tool that can help you edit and enhance the tone of the image is Curves. It allows you to modify tonal level, contrast, and color balance by simply plotting points around the panel. You can do the same procedure with an adjustment layer in Photoshop. Hence, make sure that you add one before you edit this image setting.

Exposure
Exposure deals with the amount of light that appears in your photographs. Yes. You can still edit this element after taking the photo. Therefore, do your best to set the exposure at the right level to ensure the quality of your images. Don’t worry. You can use an exposure adjustment layer in Photoshop in case you wish to explore this configuration on your end.
Vibrance
Do you need to edit the intensity of colors in your images? If that is so, the vibrance adjustment layer in Photoshop can certainly be of great help to you. You just have to specify your preferred Vibrance and Saturation percentage or drag their sliders to your desired level. Yes. It’s indeed a piece of cake.

Saturation and Hue
Last on the list is saturation and hue. In a nutshell, hue refers to the actual color being registered by your image. You can somehow modify it by simply specifying your preferred percentage or moving the slider to your desired level. The color changes as you edit the hue settings. Another thing is that you can also configure the purity and intensity of these colors. How so? It’s very simple. You just have to adjust the saturation setting. Yes. That’s it. Therefore, use this adjustment layer in Photoshop if you need to apply such changes to your image outputs.
How to Add and Use an Adjustment Layer in Photoshop?
Indeed, we cannot deny that the adjustment layer in Photoshop really has a special value to share with us. This element can be very useful when editing and enhancing our digital images. That’s why you should start exploring the power of the adjustment layer and make the most of it. Don’t worry. It doesn’t take a lot to add and use an adjustment layer in Photoshop. Do you want to give it a shot? If that is so, check out the list of tutorials below. Read the instructions very well and follow the indicated steps accordingly.
Create a New Adjustment Layer in Photoshop
With a click or two, you can easily create a new adjustment layer in Photoshop. Yes. That is right. To get you started, below is the guide that can help you.
Step 1: Launch the Adobe Photoshop application on your desktop.
Step 2: After that, import the image you want to use. Simply go to the top menu bar and then click File. From there, tap Open and then select the image from the local storage of your device.
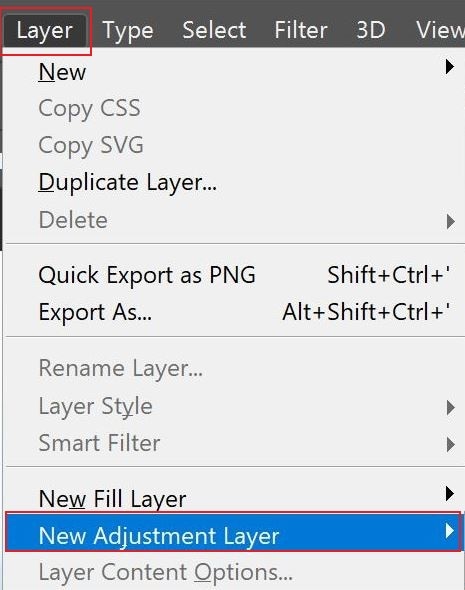
Step 3: At this point, you can now create and add an adjustment layer. To do that, head back to the top menu bar and click Layer. Choose New Adjustment Layer from the list of options. Finally, click the type of adjustment layer you want to use in your Photoshop project.
Step 4: Add a unique layer name afterward. Subsequently, specify your preferred Color, Mode, and Opacity level. Once done, tap OK. Immediately, the selected adjustment layer will be added to your Photoshop project.
Resize the New Adjustment Layer in Photoshop
How to change the size of a layer in Photoshop? Well, it’s very easy. If you need to make such changes with your adjustment layer, you can do it in a snap. To help you get started, check out the tutorial below.
Step 1: Inside your Photoshop workspace, go to the right-side panel and select the layer you want to resize from the options under the Layers tab.
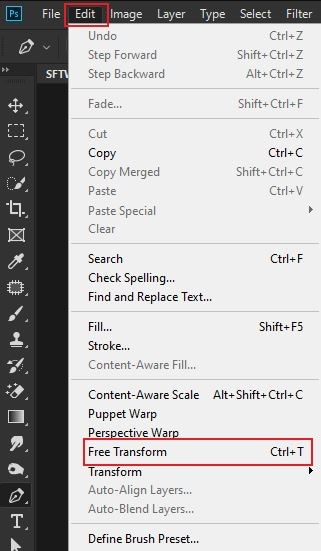
Step 2: After that., head over to the top menu bar and click Edit. Select Free Transform from the list of options.
Step 3: At this point, you can now resize the layer in your Photoshop project. Simply go back to the canvas and adjust the resizing points attached around the selected layer.
Change the Color of the Adjustment Layer
The property setting of the adjustment layer actually varies depending on the type of layer you add. Let’s say you insert a brightness/contrast adjustment layer. Of course, the property settings will offer configurations for brightness and contrast. What if you wish to change the color of the adjustment layer in your Photoshop project? In this case, you need to add the hue/saturation adjustment layer and configure it accordingly. Don’t worry. Changing the color of a layer in Photoshop is not that complicated. Below is a tutorial to help you get started. Check it out now.
Step 1: Add a new adjustment layer to your Photoshop project. Make sure that you select Hue/Saturation.
Step 2: The properties panel will open for the Hue /Saturation adjustment layer. In order to change the color of your adjustment layer, simply go to the Hue section and specify your preferred level. Either input a specific percentage or move its respective slider from left to right. To further polish the effect, do the configuration with the Saturation and Lightness section.

Conclusion
There is no denying that the adjustment layer in Photoshop can do a lot for graphic designers like you. You can make various changes to your outputs without affecting the original quality of your materials. That’s why you should always add an adjustment layer to your Photoshop projects. Likewise, practice the same procedure when editing your video content. Yes. Modern video editing applications nowadays offer the same features to users. Do you want to give it a shot? Then so, download Wondershare Filmora to your computer. It’s a powerful content-creation software equipped with almost everything you need for video editing, including the adjustment layers. Explore this platform on your end and make the most of its amazing features.
