While tricky, making a video loop can make your clips more engaging. For some content creators, the urge to use dynamic and unique visuals like looping videos is high. You can either create a meme or a mesmerizing visual for a presentation from a looped video.
Luckily, there are many ways on how to make a loop video, either using a PC, a Mac, a smartphone, or an online tool. In this guide, we’ll walk you through the easiest ways to create loop videos on any device and share some pro tips to help your loops look clean and seamless.

In this article
Part 1. What Types of Videos Are Good for Looping?
Creating a loop video means setting it to play continuously from its end back to its beginning, creating an endless cycle. Not all videos loop naturally. Some clips are inherently better suited for this effect than others. The right kind of content can turn a simple loop into something that works great.
Here are examples of video types that excel when looped:
- Short reactions or memes: Brief, impactful moments of surprise, laughter, or specific expressions are perfect for looping. They're designed to be consumed repeatedly. An ideal move for entertaining or viral content.

- Animated graphics: Animations with smooth transitions, seamless motion, or looping elements (like spinning icons, bouncing balls, or shifting backgrounds) work beautifully in a loop. They feel natural when repeated.

- Timelapses or slow-motion clips: Give people a continuous experience from your clips. A time-lapse of a sunset looping endlessly, or a slow-motion shot of a water droplet creating ripples, can be quite mesmerizing and artistic.

What can you do with a loop video?
- Background visuals for websites or events
Uninterrupted, seamless, infinite loop video can serve as interesting background elements. Imagine people focused on your subtle animation on a website's hero section or a visual playing on a screen at an event.
- Social media stories and reels
Social media platforms like Instagram and TikTok hold benefits from looped content. Interesting back-and-forth moves can significantly boost engagement. Make viewers watch them multiple times without realizing it.
Part 2. How to Make a Video That Loops on PC and Mac
Now, let’s get back to the main question: How do you make a video loop? For users who want more professional features, desktop software is the ideal choice. Wondershare Filmora is a super-recommended PC video editor to help you make a video on repeat.
Filmora supports you to easily duplicate clips, reverse them for a "ping-pong" effect, and export your looped creations in various formats. It also gives you flexibility by boasting a multi-track timeline, so that you can layer audio, add transitions, insert effects, and fine-tune every part of your video.

How to make a video that loops on Filmora:
Step1Import your video
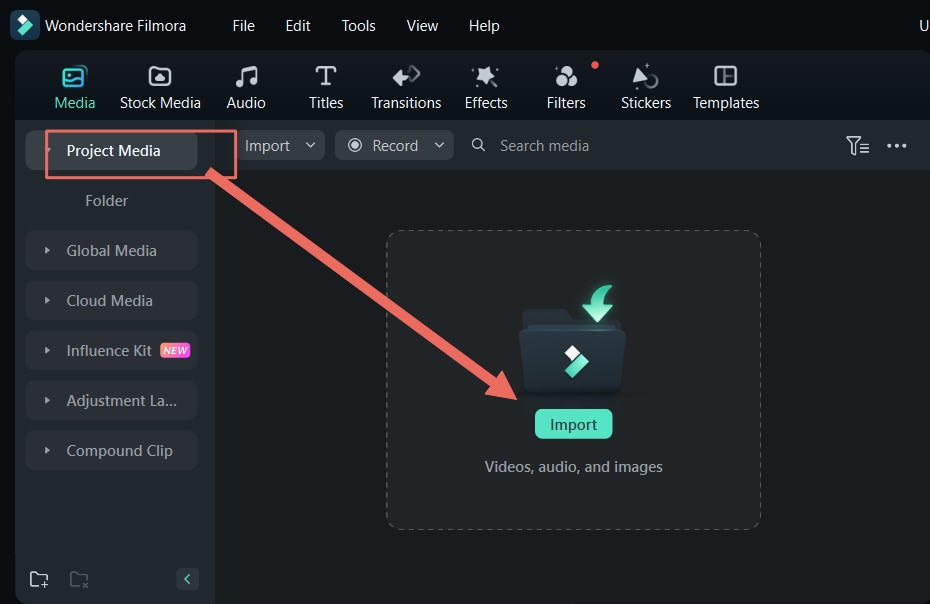
In Filmora, create a new project and import the video you want to edit. You can click Import or drag and drop the video file into the Media folder. Add it to the timeline.
Step2Duplicate the clip
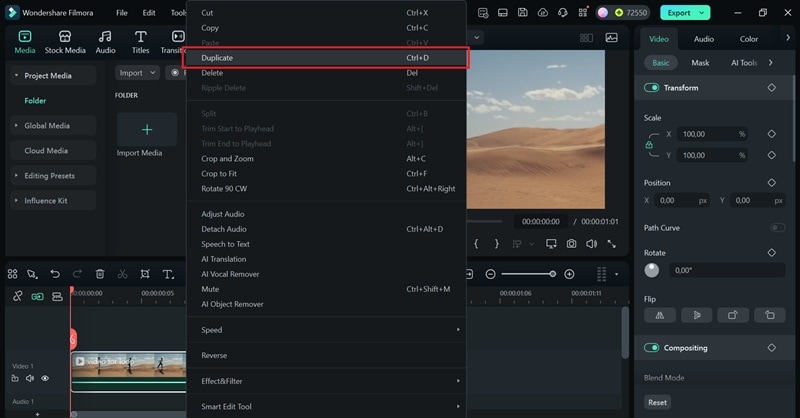
To create a loop, you'll simply copy and paste your video clip multiple times. Right-click the clip on the timeline and select “Duplicate.” Repeat this step to make more motion as many times as you want.
Step3Create a “ping-pong” loop effect (optional but recommended)
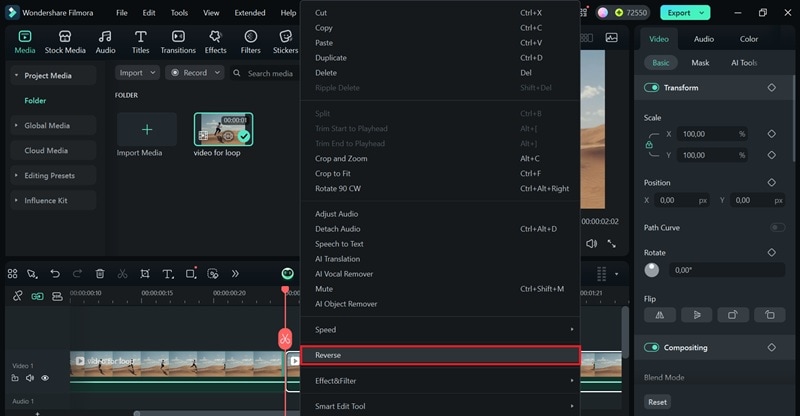
If you want to make a continuous loop that plays forward and then backward, duplicate your clip and reverse the second one. Place this reversed clip directly after the original on the timeline.
Step4Export your loop video
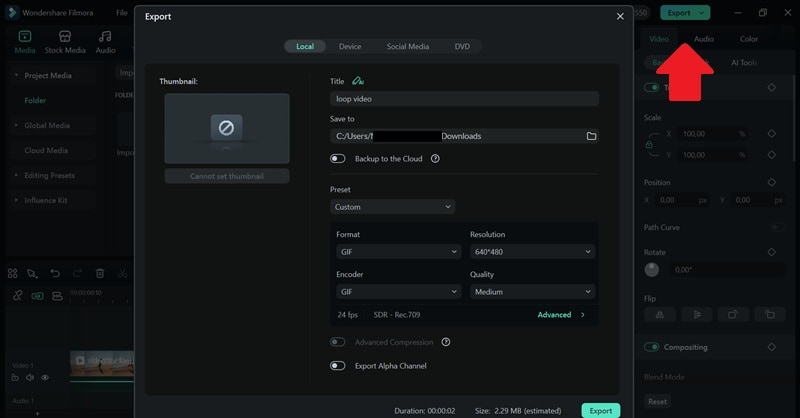
Once you're satisfied with your looped video, click the "Export" button. Select format and resolution, and close the step by clicking Export to save.
Note: If you want to make a looping animation for social media or messaging, you can export the video as a GIF format. Since GIFs play automatically and loop by default, they’re perfect for short, repeating clips.
Part 3. How to Create a Video Loop on iPhone and Android
For those who prefer editing on the go, the Filmora mobile app is ready to use right from your phone. It mirrors many of the desktop version's capabilities. So it's now so much easier to create engaging looped content from your phone.
How to make a video loop using the Filmora mobile app
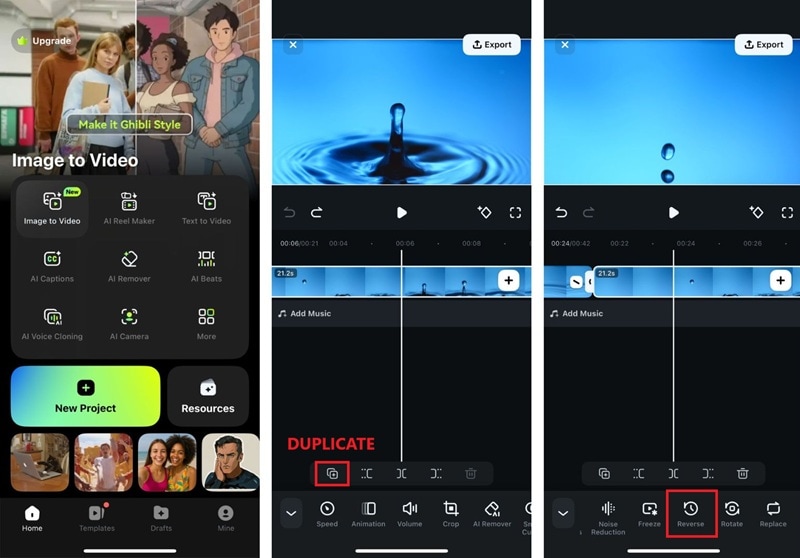
Step1Start a new project
Open the Filmora app on your phone and tap on "New Project." Select the clip from your device's gallery and import it.
Step2Add to the timeline and duplicate
Your video will appear on the editing timeline. Tap the video clip on the timeline, then look for options like "Duplicate" or "Copy." Tap it multiple times to create as many repetitions as you need for your loop.
Tip: You can also make a boomerang or ping-pong effect by tapping the Reverse button on the second clip.
Step3Export your looped video
Once your loop is what you’ve envisioned, tap the "Export" button. Choose your desired resolution and quality settings. You can save the video to your phone's gallery or share it directly to social media.
Part 4. How to Make a Video Loop Online
Online video loop makers are an easy option for quick edits, especially if you don't want to download any software. They are browser-based, accessible from any device, as long as you have an internet connection.
Though they often have limitations like file size limits or fewer customization options. Here are some popular online video loop makers:
1. Online Video Cutter
Online Video Cutter is an ad-free web-based tool that offers a dedicated loop video feature. It's known for its straightforward interface and efficiency.
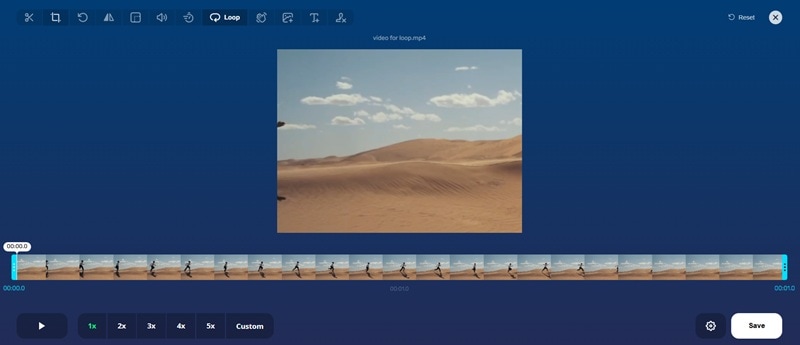
How to create a video loop online:
- Go to the Online Video Cutter loop video tool.
- Click the Open file button, then upload your video.
- Once uploaded, you'll see options to select how many times you want to loop the video.
- Click Save, and the tool will process your video. Download the looped file afterward.
2. Clideo
Clideo is a versatile online video editing suite. It includes a user-friendly up to 6x times or infinity online video looper.
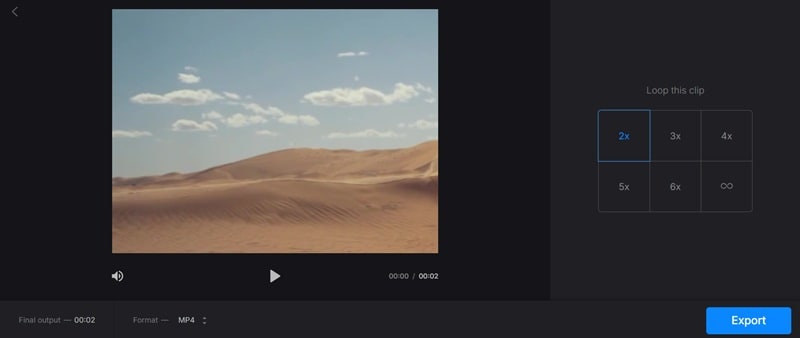
How to make a video loop online on Clideo:
- Visit the Clideo loop video page.
- Choose a file, then upload your video.
- After uploading, you can choose the number of times you want to loop.
- The tool provides a preview. Once you're satisfied, click "Loop" to process and download your looped video.
3. Kapwing
Kapwing is a comprehensive online video editing all-in-one creative platform. It's particularly popular and versatile among content creators.
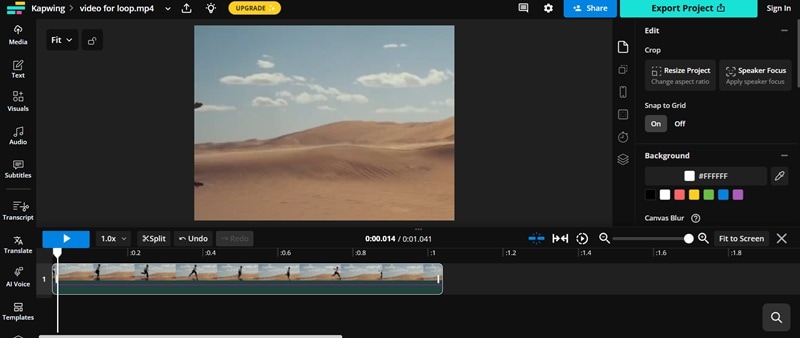
How to make a loop video online on Kapwing:
- Open the Kapwing loop tool.
- You can upload your video or start with a blank canvas.
- Choose any options to increase the loop count. Kapwing typically allows you to duplicate the video multiple times or apply a loop effect.
- Make your adjustments, like adding a caption of effects if needed.
- Click "Export Video", choose your output settings, and download your looped video.
Part 5. How to Loop a Video Using Video Players
Sometimes, you don't need to create a new loop video. You simply want a video to repeat while you're watching it indefinitely. And by that, you actually don't always need an editor. Most popular media players offer a built-in "loop" videos.
1. Windows Media Player
Windows Media Player is the classic media player for Windows operating systems. It surely includes a simple repeat function.
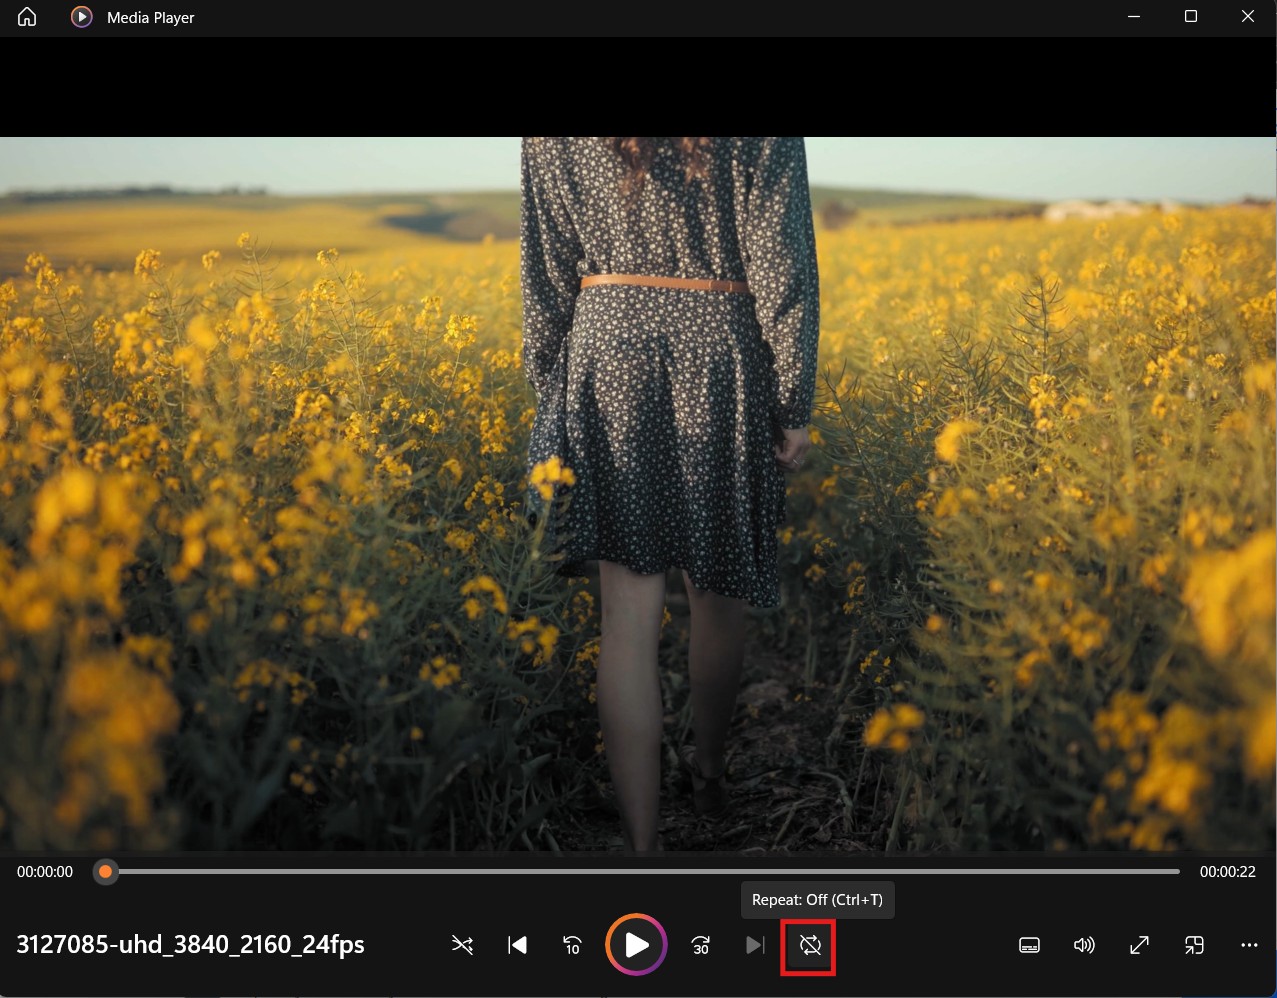
How to make a video play on loop on Windows Media Player:
- Open and play your video with Windows Media Player.
- Enable the Repeat button and press CTRL+T.
2. QuickTime
QuickTime is Apple's native multimedia player for macOS. Besides its clean interface, it also has a straightforward loop option.
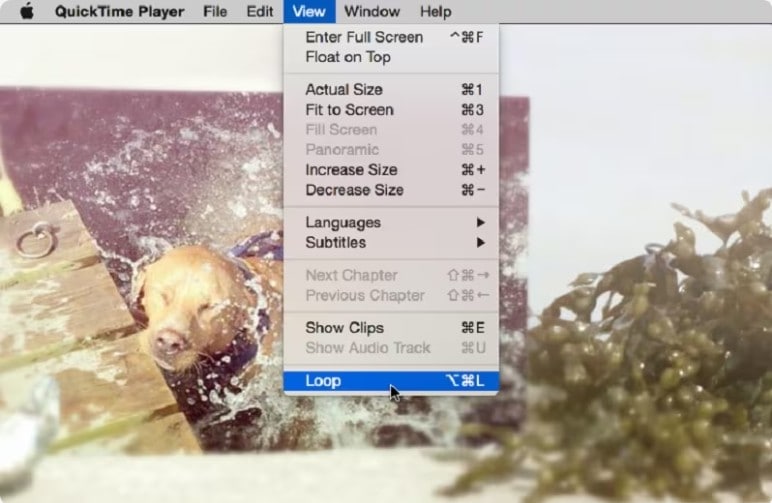
How to make a video play on loop on QuickTime:
- Open your video file using QuickTime Player on your Mac.
- Click "View" on the top menu bar.
- In the dropdown menu, select "Loop." Your video will now repeat indefinitely until you pause it or close the player.
3. VLC Player
VLC Media Player is a free, open-source, and versatile media player. It's highly available across multiple platforms. VLC is known for its ability to play almost any video or audio format and offers great looping options.
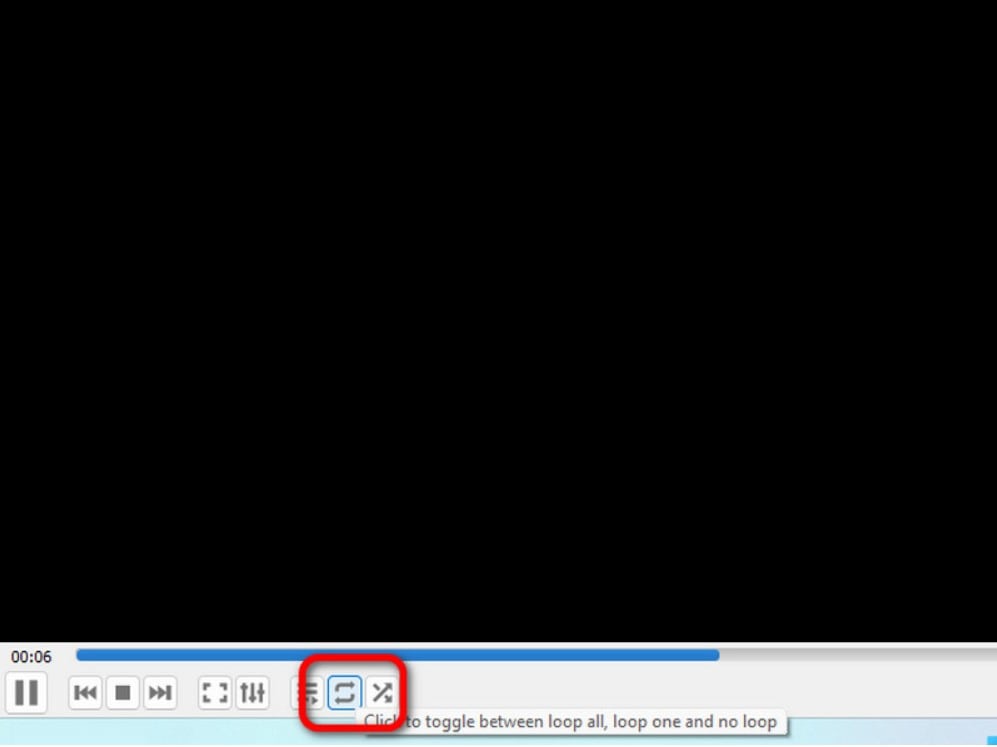
How to make a video play on loop on VLC:
- Play your video on VLC Player.
- Click the "Loop" button in the playback controls. Click it once to loop the current video. If you're playing a playlist, clicking it can loop the entire playlist.
Part 6. Pro Tips to Make Your Looping Video Look Seamless
Creating a loop video may seem easy, but what makes it an art is making it seamless. A truly seamless loop means the viewer can't tell where the video ends and begins again. This can be tricky, but you can go for that seamless effect to elevate your looping videos.
- Trim the video to end where it started visually
Identify a moment in your video where the scene, lighting, and action are almost identical to the very beginning of the clip. This is the most crucial step for a perfect loop. Trim the video precisely at this point. Ensuring it re-enters seamlessly when the loop restarts.
- Reverse and append the clip for a ping-pong effect
If a natural loop point is hard to find, a "boomerang" or "ping-pong" effect is a nice alternative. Take your original clip, duplicate it, and then reverse the duplicated clip. Immediately place the reversed clip after the original. This works best for clips where playing in reverse is smoother, especially with motion like walking or waving.
- Use music or beats to match the loop timing
If your loop includes music, try to choose a track that naturally loops. Carefully trim the music to match the video's loop point. Use beat-matching or fade-in/out effects so it doesn’t sound awkward when it starts over.
Conclusion
Making a video loop is simple. What's tricky is to enhance your content and turn it into engaging visuals. Whether you're aiming for a quick social media post or a mesmerizing background, the process is accessible on any device.
And there’s a method that fits your needs. From comprehensive editors like Filmora, convenient online tools, and mobile apps, you have various options! By understanding the types of videos best suited for looping and applying pro tips for seamless transitions, you can ensure your looped videos always capture attention and play smoothly.
FAQs
-
What’s the difference between a loop and a replay?
A "loop" is when a video is set to automatically play continuously from start to finish without any intervention. A "replay" generally refers to manually playing a video again after it has finished. -
How to make a video loop on Instagram?
Instagram's "Boomerang" feature is the most popular way to create short looping videos directly. It captures a burst of photos and stitches them into a mini-video that plays forward and then instantly reverses. -
Does Filmora support looped exports with transparent backgrounds?
Yes, Filmora supports exporting videos with transparent backgrounds. You'll typically need to export in formats like MOV (with an Alpha Channel) or as a GIF with transparency enabled.


 100% Security Verified | No Subscription Required | No Malware


