


 100% Security Verified | No Subscription Required | No Malware

Speeding and slowing down the speed of a video is a marvel in the video editing world. In the older days, this feat was accomplished only by the big-budget filming industry.
This article will dive into how you can access the modern-day features available in video editing software. From these features, you can alter the speed of your video easily. However, before we get into the step-by-step guide, let's understand what fast and slow-mo videos are.
In this article
Part 1. What Are Fast and Slow Motion Videos?
As the name suggests, fast-motion videos are the ones that have been sped up from their average speed.

Similarly, slow-motion videos are the ones that have been slowed down from their average speed. The slow-motion effect, also known as the slow-mo effect, is widespread in modern cinema.

Now that we know what Fast and slow-motion videos are. Let's understand their applications. Or how you can use them in your videos. Scroll below to learn more!
Part 2. Why Should You Change the Speed of Your Videos?
The answer to this question would be that it's a personal creative decision that will allow you to make your videos more engaging.
Fast Motion Videos
Fast-motion videos are used in many areas of filming. For example, you can speed up your videos to create a funny video or shorten its length.
The fast-motion effect has many applications, such as cooking tutorial videos. For example, the step-by-step process of a cooking tutorial can be too long to fit into a single video. Or it could also help you in cases where you want to keep the length of the video short.
The fast motion of the steps will allow the viewer to quickly grasp the whole process without watching the entire video.
Slow Motion Videos
You can also slow down your videos to give the viewers a more detailed perspective of a scene. Or you can also create a slow-mo video that offers a general surreal vibe.
A famous example is in action films. The producers of the first Matrix film used the Slow-mo effect in the famous bullet dodging scene.

You may wonder how the film producers made the slow-mo effect. The technology at that time was less developed than the recent day. So, even you can create a slow-mo effect.
Before we get into the editing process, let's first understand what you will need to change the speed of your videos!
Part 3. What Will You Need to Change the Speed of Your Videos?
You will need the following essentials to change the speed of a video:
1. Wondershare Filmora
To begin, you will need a good video editor. Wondershare Filmora is the best video editing software available. It has a very engaging system UI that allows inexperienced users to learn how to use it quickly. It also has a diverse collection of stock media. And not only that! It allows you to access reliable features to change the speed of a video.
You can change the speed of the video on Filmora by the speed adjustment panel or by the duration panel present above the timeline. It will adjust in just seconds with a few clicks. This feature makes Filmora more prior with editing tools.
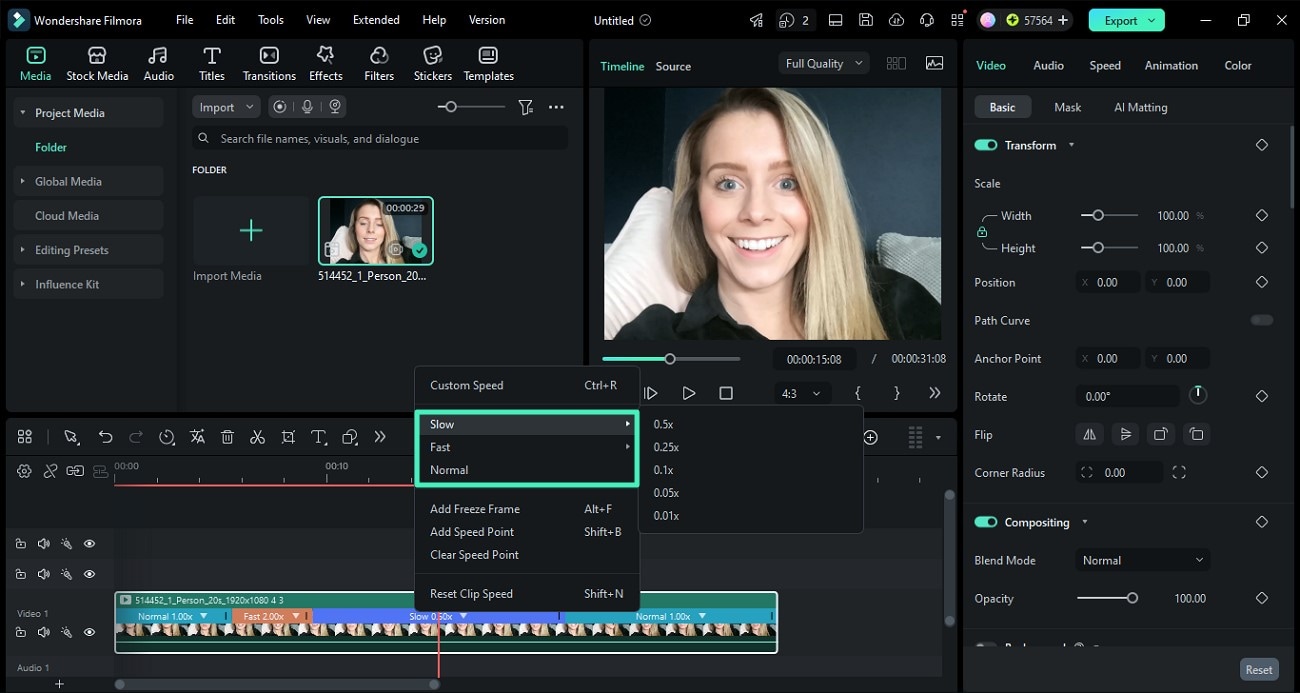
For the latest speed ramping workflow, please update to Filmora v15.5.10 or above—it now supports segmenting a clip and changing speed per section on the timeline. Guide: Apply Segmented Speed Control in Filmora
2. Video Clips
Well, it is evident that to change the speed of your videos, you will need video clips. But there are a few things you can keep in mind before adjusting the speed of a video.
Part 4. How Can You Change the Speed of Your Videos?
Here you will learn two ways in which you can change the speed of your videos. The two methods to change the speed of your video are mentioned:
- The speed adjustment panel.
- Duration panel settings.
Let's get started with the editing process. The first method we will look into is the Speed Adjustment panel.
1. Change Speed With the Speed Adjustment Panel
The Speed Adjustment panel is the speed adjuster in the Wondershare Filmora software. This feature will give you a drag bar to adjust the speed of your video.
You can move the bar to the right to increase the speed of your video. Similarly, you can move it to the left to decrease the rate.
But before we use this feature, we will need to download the Filmora video editing software. So please scroll below to learn how to download it!
Step1 Download Filmora
First and foremost, you must have access to Filmora. For this, download Wondershare Filmora. Then, activate this app or software on your PC.
Step2 Import The Video Files
The next step after downloading Filmora is to import your video clips. To accomplish this, follow the steps outlined below:
- Locate and select the Import icon on the top left side of the Filmora Home Interface.
- It takes you to your computer's library.
- Select the videos to be edited and then click OK.

You can also import the files by another method. After you have opened Filmora, you can restore the Filmora Window size and import by dragging and dropping the clips:
- Drag the cursor to select the video clips you want.
- Then, drop them in the Filmora import window.

Filmora supports various formats for your video clips. They include the Mp4, AVI, MOV, GIFs, and more.
After you have imported your video clips, add them to the timeline as shown below!
Step3 Add The Video Clips to The Timeline
After you've imported clips in the Import window, drag them onto the timeline. Follow the steps outlined below to accomplish this:
- Drag the clips into the import window and select them.
- Then, insert them into the timeline.

Now that we have our video clips in the timeline, we can start adjusting the speed.
Step4 Open the Speed Adjustment Panel
The speed adjustment panel, or the Uniform Speed, is the feature of Filmora that allows you to change the speed of your video. For example, to open the Unifrom Speed panel, do as follows:
- Double-click on the video clip.
- In the pop-up column, scroll down till you see the Unifrom Speed option and click on it.
- The speed controls will be shown in the import window.

In the speed control panel, you can see the speed adjuster slider. A number will usually mark this at the end. This number tells you the current speed your video is calibrated in and how fast or slow the motion effects will be.
1.00 is always the average speed. 0.5 being half and 2.00 being double the average speed. To control the speed through the slider, you will need to do the following:
- To increase the speed: Type in the number you want your rate to be. Or, drag the slider to the right as you wish.
- To decrease the speed: Type in a number less than the standard 1.00, or you can drag the slider to the left as you wish.
The number of your speed can be an inconvenience if you have no prior experience. Instead, render the video and play it from the beginning with the changes that you made. It gives you a better idea of the speed of your video.

Step5 Detach The Audio
The corresponding audio also gets affected when you slow down or speed up a video. In this scenario, you can also choose to detach the audio beforehand. It allows you to maintain the original playback speed. To detach the audio, follow the steps as mentioned:
- Right-click on the video clip.
- In the pop-up column, scroll down to the Detach Audio option and click on it.

It will create an audio file in a separate audio tab in the timeline. You can adjust this audio according to your liking. You can edit the detached audio by:
- Double-click on the audio file.
- A settings menu will open in the import window.
- Adjust the Fade options for your Audio.
- Drag the Fade out slider to the right to Fade out your Audio.
- To Fade in your Audio, drag the Fade in slider to the right.

You can also remove the background noise and the pitch of the audio if you want. You can also replace the video's original audio with a new one. Click on the audio file and press Del on the keyboard to delete it. To add new audio, do as mentioned ahead:
- Click on The Audio icon above the import window.
- Browse The Audio that matches the vibe of your video.
- Drag and drop it below your video clip.

Doing so would have created alternate audio for your video. Play the video from the start and confirm your changes.
Step6 Save Your Project
Saving a project on Filmora is straightforward. First, you need a few steps to proceed with it. Then, when you are done making changes to the video, simply follow as guided ahead, and you'll be good to go.
- On the Filmora home interface, Go to > File > Save Project.

- Select the Library/Folder where you want your project to be stored.
- Type in the text box to change the name of your project.

- Click on Save.
That's about it! You have now saved your project. Now let's move on to export our video.
Step7 Export Your Video
After we are done with saving our project, we will now move on to export our video.
You can export your video to many of the available video formats. And not only that, but you can also export your video to local files and a specific device. You can also export your video directly to YouTube, Vimeo, and DVD format.

To export your video, all you have to do is the following steps:
- Click on Export.
- Type in the Video name.
- Select the Directory you want your file to be stored in.
- Select the Video Format.
- Select the Resolution of your Video.
- Click on Export.

Wait till Wondershare Filmora finishes exporting your video. Then, another window will pop up for a reminder when the shipping is done.
These were the methods by which you can change the speed of your video using the Speed Adjustment panel. Now let's move on to the following method to adjust the speed via the Duration panel.
2. Change Speed via the Duration Panel
The duration panel is one the most valuable features of Wondershare Filmora as it allows you to change the video speed by duration adjustment.
This feature is typically helpful when you have a space between video clips and want to fill it. By measuring the time between the two clips, you can adjust the duration of your video.
It will ultimately hasten the speed of your video. The hastening in rate will depend upon the gap. The smaller the gap, the faster the video will be. Similarly, the greater the gap is, the longer the video will be.
Apart from the Speed Adjustment Panel, the Duration Panel has the advantage of editing the speed of your video by simply typing in the text.
Step1 Import Video Clips to Timeline
After downloading Filmora, the next step is importing your video clips. To do so, follow the steps outlined below:
- Locate and click the Import icon in the upper left corner of the Filmora Home Interface.
- Choose the videos to be edited, then click OK.
Now that you have imported files into Filmora, you can add them to the Timeline. Notice the steps mentioned ahead:
- Drag the clips into the import window and select them.
- Then, insert them into the timeline.
You can begin the editing process now that the clips are in the timeline.
Step2 Open The Duration Panel
The Duration Panel comes attached to the Unifrom Speed Panel. To access the Duration Panel, follow the steps ahead:
- Right-click on the video clip.
- In the pop column, scroll below to Unifrom Speed.
It will open the uniform speed panel in the import window. Below the speed of the controls, you can notice The Duration Panel.
Step3 Change The Speed of The Video
In The Duration Panel, you can see the average speed of your video clip. Now, if you want to reduce the speed of your video, you have to increase the duration of your video. Similarly, if you're going to increase the speed of your video, you would have to decrease the duration.
Slow Down The Video
To slow down the video clip, follow the steps mentioned below:
- In The Duration Panel, Increase the time of the video.
- Type in a number bigger than the normal value

Speed Up The Video
To increase the speed of your video, follow as guided ahead:
- In The Duration Panel, decrease the time of the video.
- Type in a number smaller than the normal value

Congratulations! You have successfully learned how to change the speed of your video by Filmora. Now, you can use both the Speed Adjustment Panel and The Duration Panel to adjust the speed of your video.
Conclusion
Changing the speed of your video can be helpful in many filming scenarios. Adjusting the speed in the older days was a marvel in the video editing industry. But the technology in the present day has allowed the typical user to edit the speed of a video.
By following the steps mentioned in this article, you can now change the speed of your video by Wondershare Filmora.
