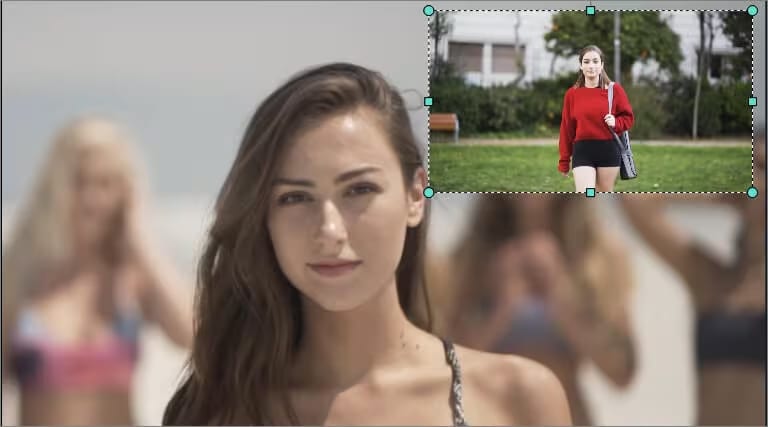
Producing intriguing videos is more crucial now since people are surrounded by content in every facet of their daily lives. A good method that can be adopted to improve your video storytelling is the Picture in Picture (PIP). In any kind of content creation, including vlogging, tutorials, or commentaries in gaming or sports, the PIP effect will likely take your videos to the next level. In this article, the reader will find a detailed overview of picture-in-picture Premiere pro and how it can be used and created in Adobe Premiere Pro and Filmora, as well as detailed instructions for each program.
In this article
Part 1: An unbiased review of Picture-in-Picture in Premiere Pro
Benefits
- Advanced Editing Features: Designed for professional video editing with numerous options for size, position, as well as the operations with effects.
- Flexible Layering: Actually, it is very convenient to stack several video tracks so that it becomes possible to combine videos in the PIP with the rest of the content effortlessly.
- Comprehensive Effects Library: They also add that Premiere Pro has many other effects and transitions provided with the program, which can also be used to make your PIP video look more professional, for instance, adding shadows, borders, or animations to the picture.
- Keyframe Animation: By considering keyframes you can make various properties animate over time and this enhances the creation of movements and transitions to your PIP video.
- Color Correction and Grading: Thanks to the available tools in Premiere Pro, it is possible to make solid changes to colors which would make the overall picture more unified in both the primary and the PIP video.
- High-Quality Output: Videos can be exported in numerous formats with high resolution perfect for professional purposes without losing quality.
Limitations
While Adobe Premiere Pro is a powerful tool for creating picture-in-picture (PIP) videos, it does have some limitations that users should be aware of:
- Steep Learning Curve: While using Premiere Pro has its numerous strengths, the features of the interface and tools which may take a lot of time to learn and adopt in the practice.
- Limited Pre-Made Templates: The range of templates and effects in Premiere Pro is significantly smaller and the client apparently has to draw up his or her own graphics.
- Audio Syncing Challenges: Despite the editing option of audio, synchronizing the audio tracks for the PIP videos might necessitate some fine-tuning procedures than the simple Video editing software.
- Limited Mobile Compatibility: As for now, Premiere Pro version is not optimized well for tablet and mobile phone usage, wherein there are no default features that allow one to edit PIP videos.
Although Premiere Pro is an excellent software for professional video processing, several drawbacks make it unsuitable for beginners or for those who expect to get a PIP video as soon as possible.
Part 2: How To Create Adobe Premiere Picture In Picture Videos
Creating a picture-in-picture (PIP) video in Adobe Premiere Pro allows you to place one video within another, creating an engaging and professional look. This effect is commonly used for tutorials, vlogs, gameplay videos, and presentations where one video acts as the primary content while another provides supplementary information or commentary.
Step-by-Step Guide to Create Picture-in-Picture (PIP) Videos in Premiere Pro
Step1Reposition the Main Clip
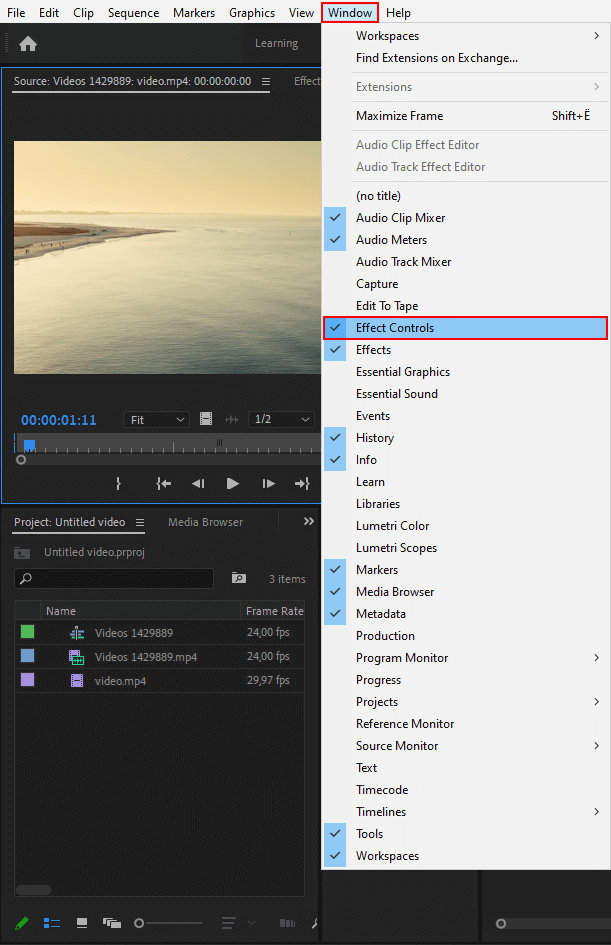
First, launch Adobe Premiere Pro and import the video that you want to edit by simply dragging it to the Project Panel. On the Timeline, select the main clip and then switch to the Effect Controls panel (in the Window Menu).
To bring in the second video and place it to the left of the first, change the Scale and Position values. For instance, you can place the main video in the centre or at one end and then the second clip will play next to it.
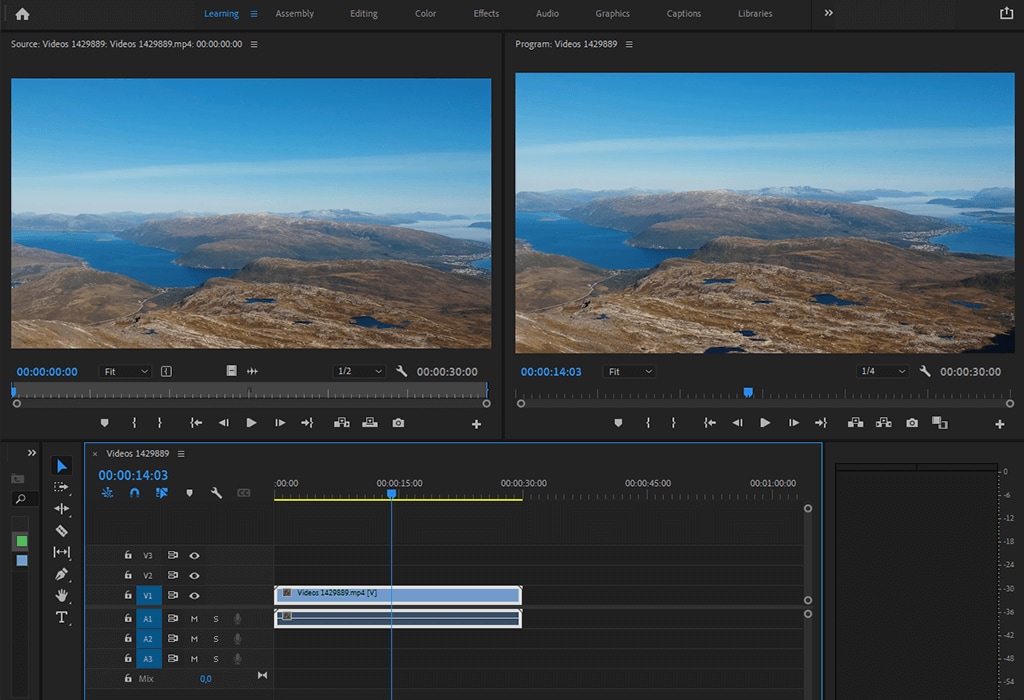
Step2Drag and Drop the Secondary Video
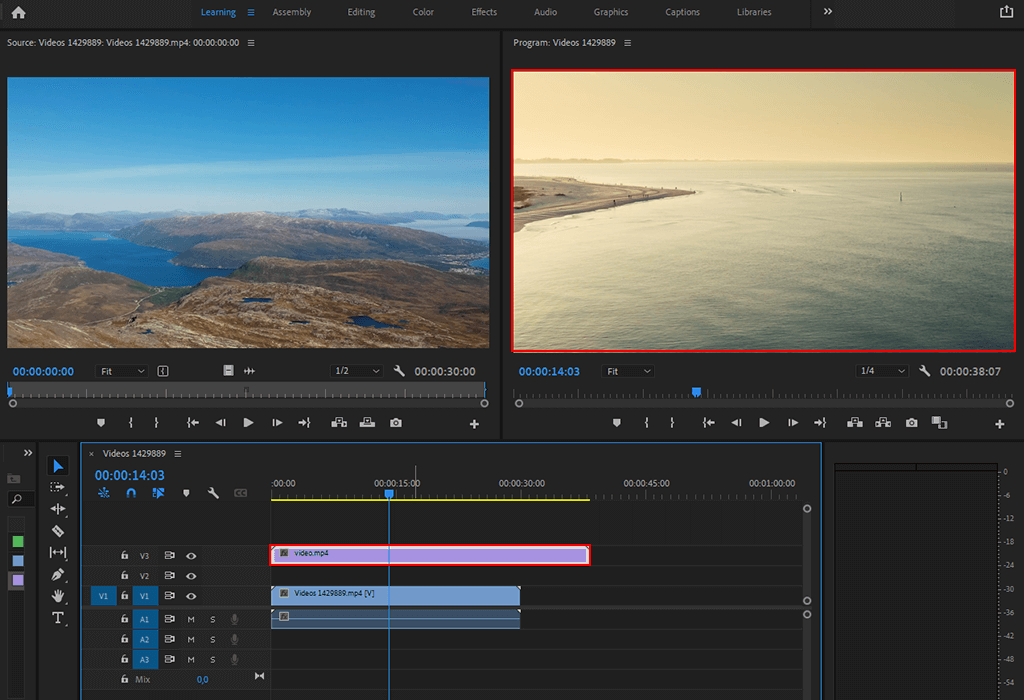
Move the secondary video and place it above the primary video but at a two layer higher than the one of the primary video clip. This makes PIP video stand out while at the same time keeping the main video in the background.
Continue editing this scene since you should be aiming to match it perfectly to the PIP frame.
Step3Open the Effects Control Panel
If you wish to fine tune the PIP effect then one has to open the Effects Control Panel.
To access the Effects tab, open the Workspace window and click on Window - Workspace - Effects. This panel offers you a number of effects to enhance the PIP video including size changes, frame addition and transition.
Go to the smaller video clip that you have added and check its effects under the Effect Controls Panel.
Step4Resize the Secondary Image
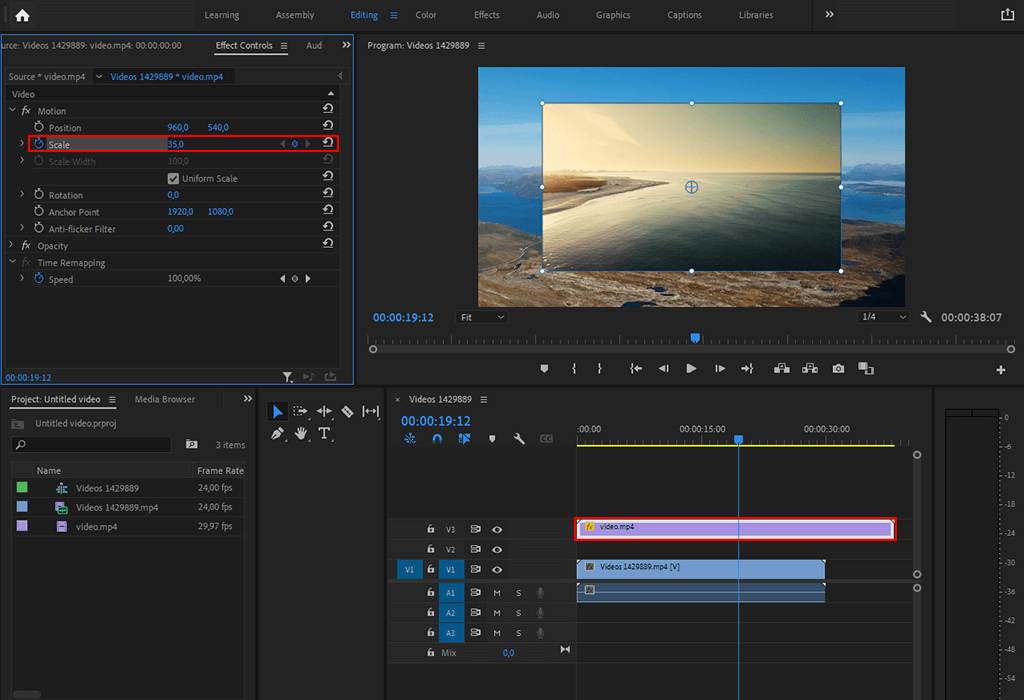
To place the second video on the corner of main footage, open the Effects Control Panel for the second video and change the scale to around 35-40% of original size. To move the clip into one of the corners, without eliminating the main video, adjust the Position controls.
This will make sure that the second clip is plopped in the right place on the screen that has been targeted.
Step5Add a Stroke to the Top Video
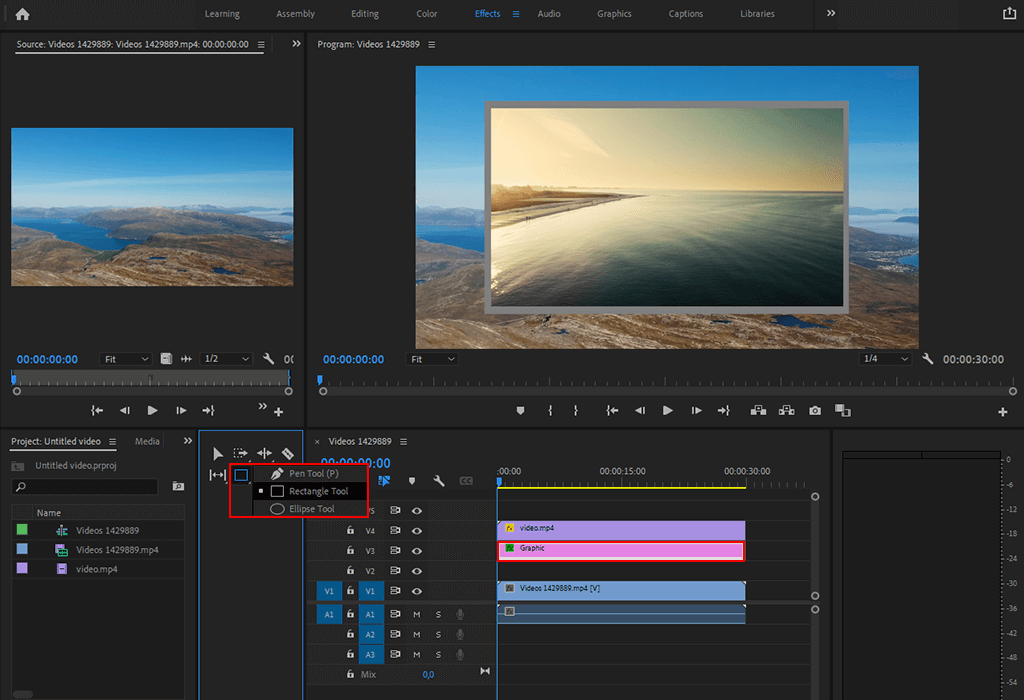
To make your PIP video look more professional, you can add a stroke to make your image be more distinct from the main video.
To do so, move to the Graphics tab, and select the Rectangle Tool or the Pen Tool from the toolbar to draw a rectangle around the smaller PIP video. This adds a frame to the video, so it becomes more easily distinguishable from the other elements of the page.
Step6Adjust the Stroke Opacity
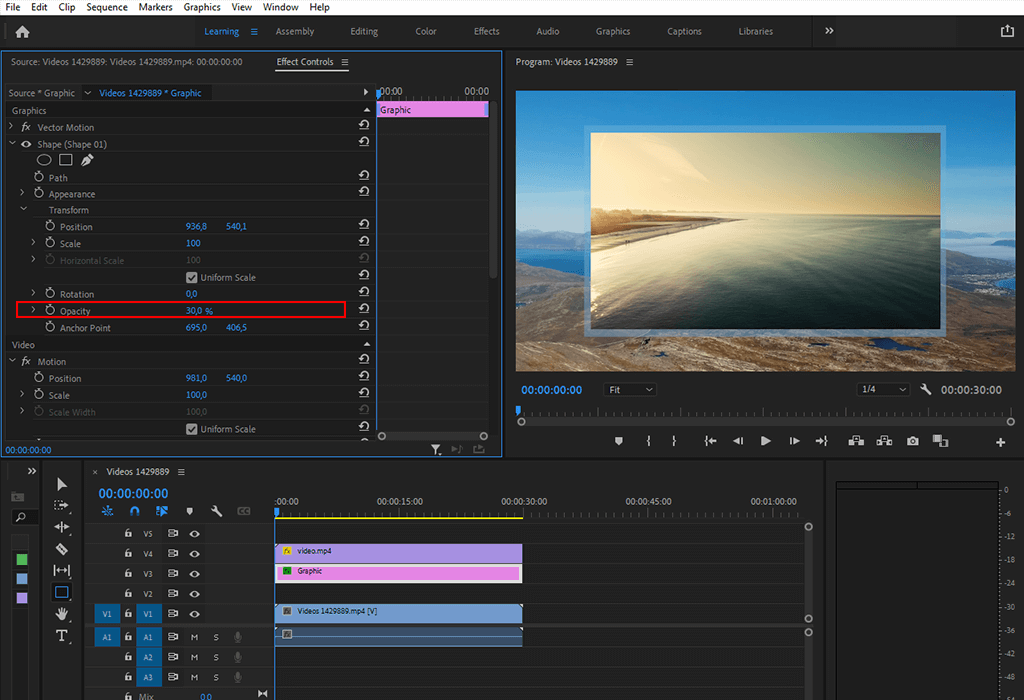
To put the finishing touches, the opacity of the stroke is adjusted to fit the rest of the video well.
Reducing the opacity of the stroke will make the overlay less obtrusive but still neat to the eye of the viewer, as well as help create a contrast between two videos.
With the help of the Effects Control Panel drag the stroke’s opacity to the level that you wish to have.
Bonus: Free LUTs and Overlays for Further Customization
After successfully creating your PIP video, you can continue improving it by adding LUTs (Look-Up Tables) and overlays. These tools allow you to:
- Enhance colors and adjust the white balance of your video.
- Apply creative effects like smoke, glitch, or lens flares to make your video stand out.
These are particularly helpful if you're creating content in specific genres, such as cinematic or gaming videos.
- Superb video stabilization with low distortion.
- Vast video/audio effects and creative assets.
- Powerful AI for effortless content creation.
- Intuitive, professional yet beginner-friendly.
- Works on Mac, Windows, iOS, and Android.

Part 3: Step-by-step guide to Making PIP Video in Filmora
Step1Go to Filmora, and create a new project
Open Filmora and click on the New project link to create a new project. Depending on requirements you may set the aspect ratio and projection settings.
Step2Import Media Files
Select to browse and import files from the computer, camera, or any other connected device. You should always click and drag the videos or images you want to incorporate into the media library.
Step3Add the Background Video to the Timeline
Drag the main background video from the Media Library to the timeline at the bottom of the screen. This video will serve as the base for the PIP effect.
Step4Add the Overlay (PIP) Video or Image
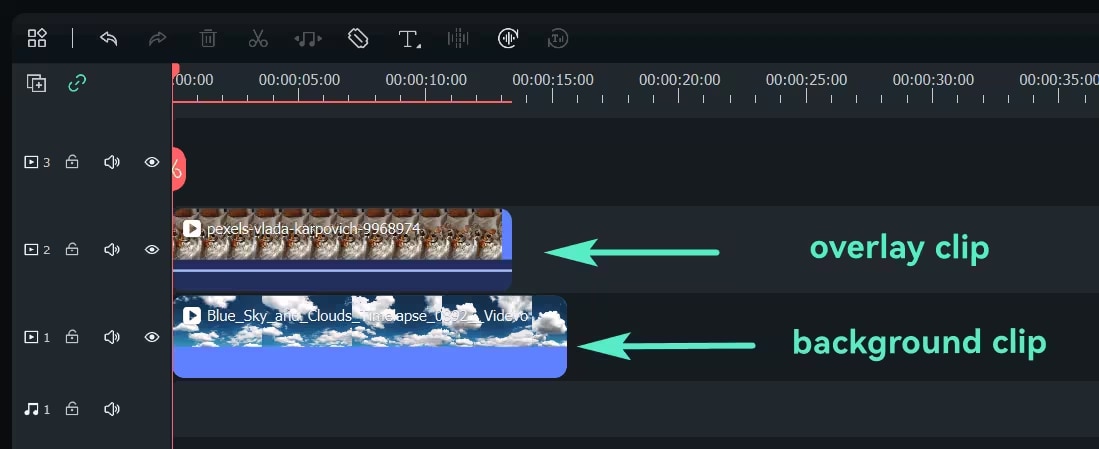
Select the media you want to display as the smaller, overlaid video. Drag this video or image from the Media Library to another video track, positioned above the background video in the timeline.
Step5Adjust the Size and Position of the PIP Overlay
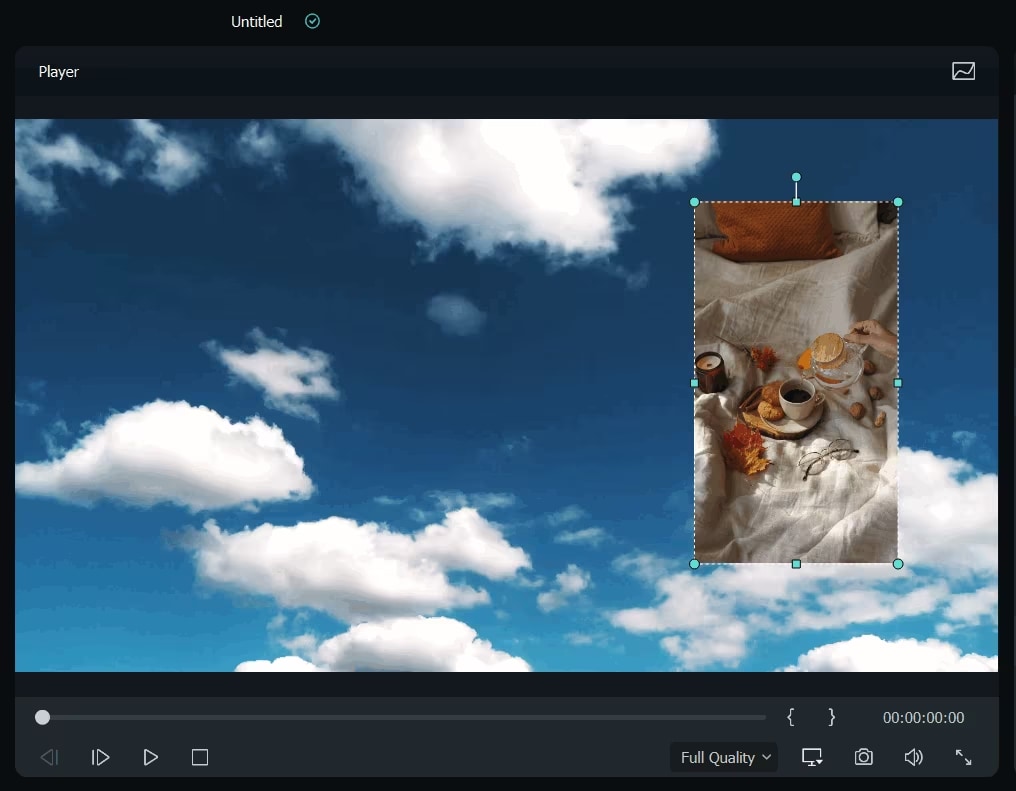
Click on the overlay clip in the timeline to select it. In the Preview Window, resize the overlay by dragging its corners and move it to your desired position on the screen (e.g., top-right corner).
Step6Adjust Blending Mode
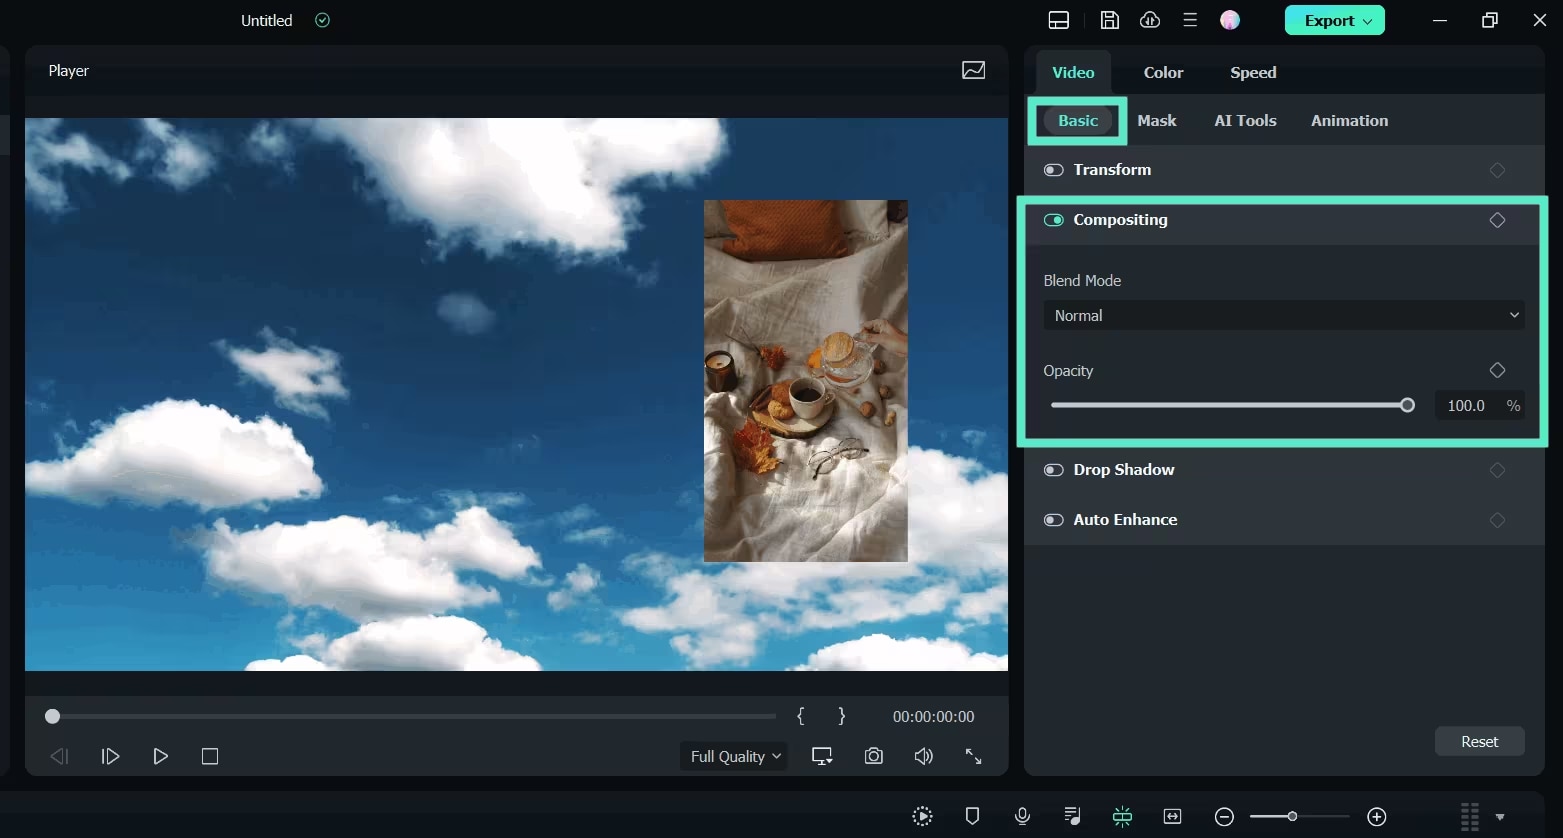
For advanced effects, select the PIP video, go to the Basic tab in the Video Edit Panel, and scroll down to the Compositing field. Choose a blend mode (e.g., multiply, screen) and adjust the opacity to get your desired look.
Step7Change PIP Shape with Mask
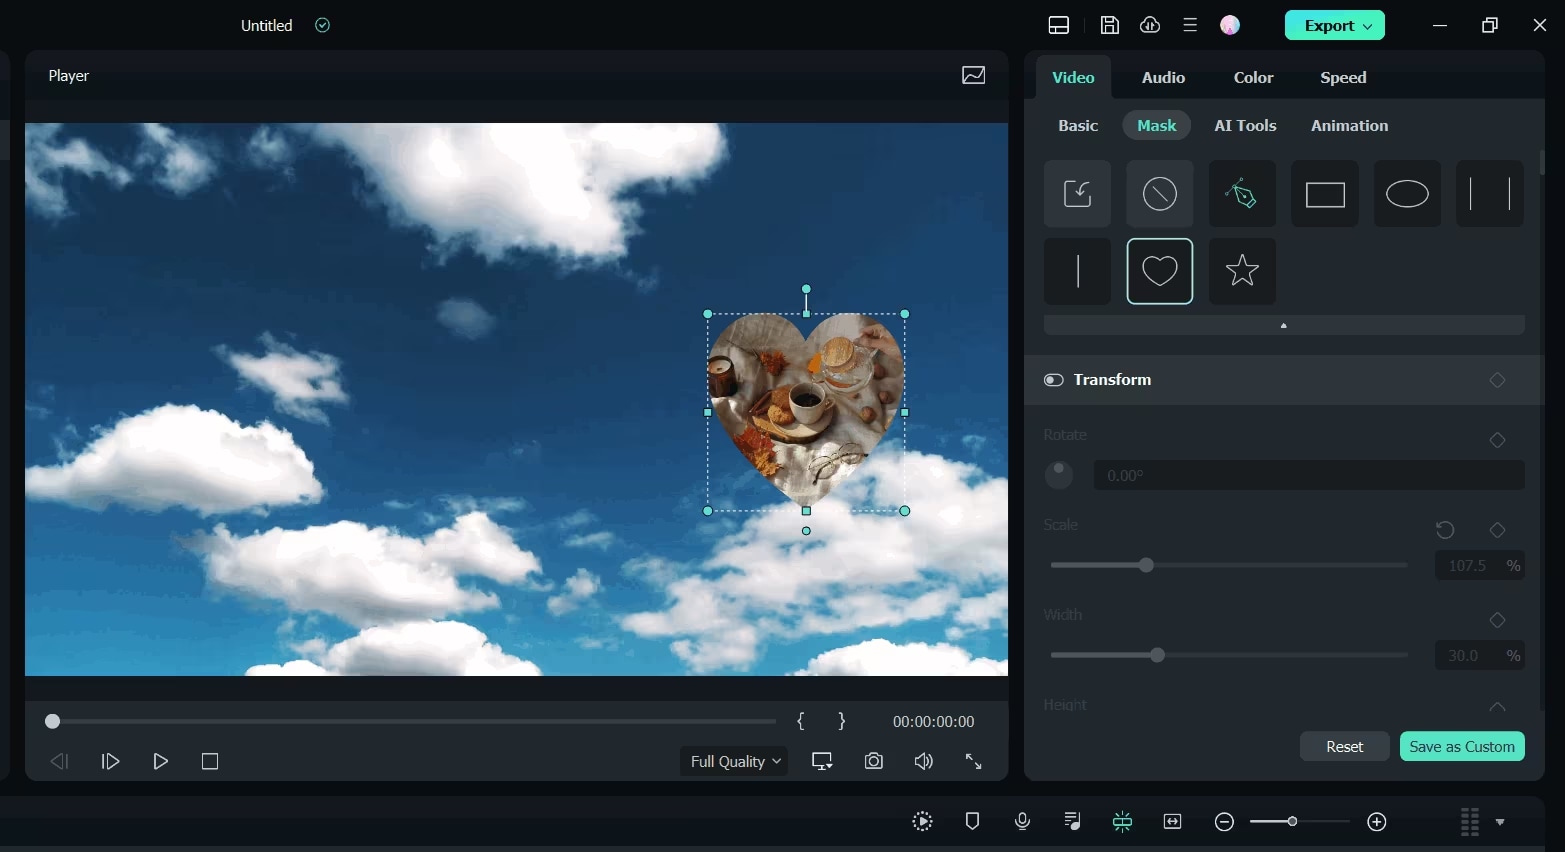
To change the shape of the PIP video, go to the Mask tab and apply a preset mask. You can also import custom masks or add keyframing for dynamic mask effects.
Step8Add Animation and Motion
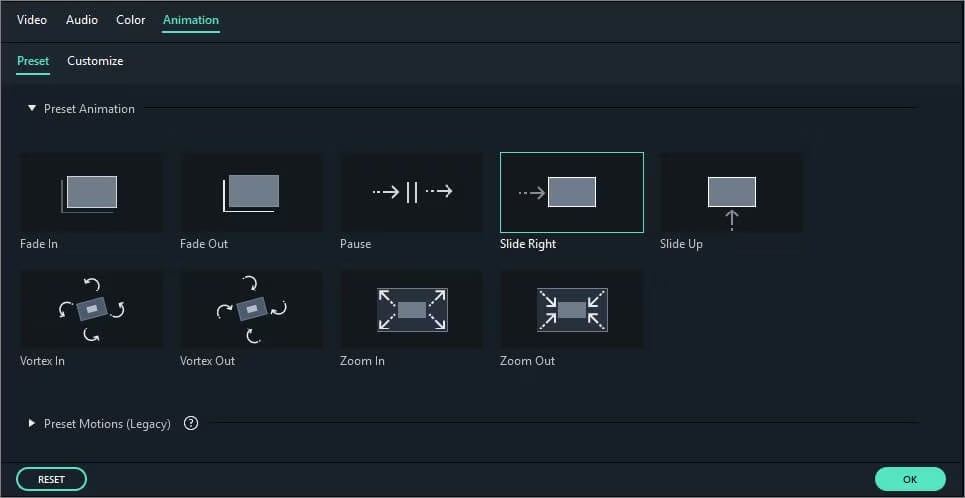
Double-click the PIP video in the timeline and switch to the Animation tab. Choose from Filmora’s motion presets or animations, and apply them by double-clicking or right-clicking on the desired effect.
Step9Preview and export the PIP Video
Press the Play button in the Preview Window to review how the PIP effect looks. Make any necessary adjustments to the size, position, or timing of the overlay.
When you're satisfied with the result, click the Export button in the top toolbar. Choose the format, adjust the resolution, and save the video to your preferred location on your computer.
You've successfully created a PIP effect using Filmora on your PC.
Conclusion
Picture in Picture is one of the best strategies for improving one's content and, at the same time, capturing the attention of the viewers. When deciding between Adobe Premiere Pro and Filmora, the PIP effect is another level that makes your videos more professional and detailed. Using the instructions of the given examples on how to do picture in picture on premiere pro and Filmora, you can use this technique in your video tutorials, movies, or even personal creative videos. Begin using the PIP effect right now, and see how your video production rises to the next level soon!


 100% Security Verified | No Subscription Required | No Malware

