Social media is changing, and so is how we learn. While long videos lose appeal, short-form content like Instagram Reels offers teachers a powerful way to make lessons fun, digestible, and engaging.
Yes, creating educational reels can feel overwhelming—especially if you're new to video. But what if you could quickly make reels that:
- Capture attention (without fancy editing)
- Simplify complex topics (in under 60 seconds)
- Boost student participation (with interactive elements)
This guide will provide simple tips to help you create engaging reels that inspire and make learning more exciting for your students.
In this article
Part 1: Tips for Form in Creating Educational Reels
If you want to make high-quality educational reels, it's not just about having great content—you also need the right tools to keep things looking professional and consistent. In that case, you can rely on Wondershare Filmora.
Filmora is an all-in-one video editing tool that makes it easy to create polished and professional-looking reels, even if you're not an editing expert. This is perfect for teachers who want to learn how to make educational reels that stand out.
Plus, Filmora is easy on the wallet, so you can create great content without breaking the bank! It's also super flexible—you can use it on both computers and mobile devices, which means you can edit videos whenever and wherever you want. Now, let's check out some tips for making effective educational reels!➗✖️➕➖

Tip 1: Appropriate Length (Most Important)
One important factor for making an engaging educational reel is to keep it short and focused. The right length can depend on how complex your content is and where you're posting it. Generally, for educational reels on Instagram, a length of 30 to 60 seconds is ideal. If your video is too long, you might lose your audience's attention, and if it's too short, your message might not get through.
That's where Filmora's Smart Short Clips feature comes in handy! With just a few clicks, you can automatically shorten longer videos without missing any key points. This tool helps you find the highlighted points and cuts out the extras, making it easy to keep your video clear and engaging.
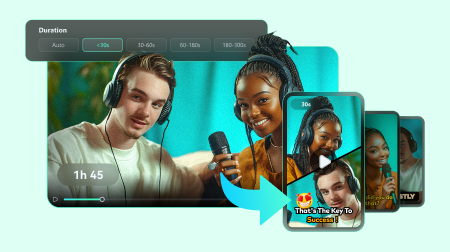
Key Features:
- Easily paste video links from your YouTube.
- Advanced AI tools for trimming videos, including speech-to-text, content reorganization, and automated scoring.
- Automatic layout tweaks, animated subtitles, AI soundtracks, sound effects, and customizable templates.
- Includes vocal enhancement, premium fonts, B-roll resources, precise timeline editing, and conversion from horizontal to vertical formats, plus scheduling options.
- Expand your audience by repurposing your existing videos
- Create viral-Worthy content strategically and automatically
- Powerful AI for effortless content creation.
- Ensure mouth movements match the audio in character animations.
- Intuitive, professional yet beginner-friendly.

Now, let's see how to create educational reels on Instagram using Filmora's Smart Short Clips feature!
Step 1. Open Filmora and access the Smart Short Clips
First of all, make sure you have the latest version of Filmora, V14. It comes with all the new features and updates, including the Smart Short Clips tool.
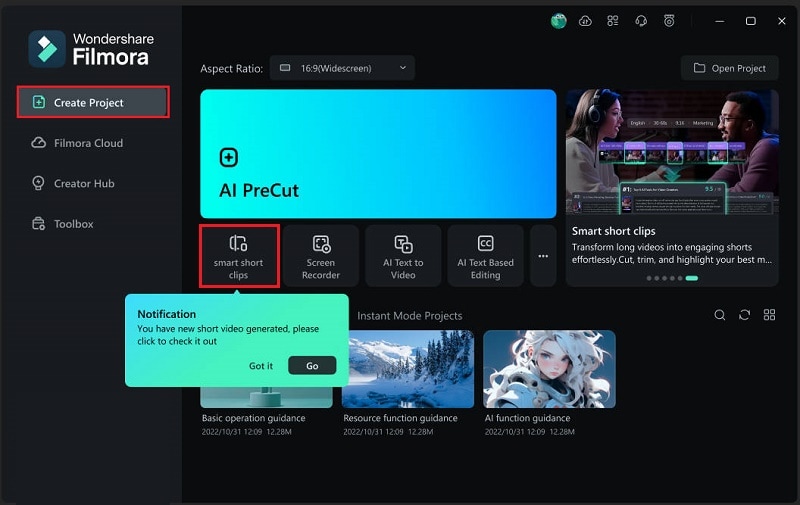
Once you've got Filmora installed, just double-click the icon to open it. Then, check out the control panel on the left side and click on "Create Project". From there, select "Smart Short Clips" from the menu that pops up.
Step 2. Import your video and generate smart short clips
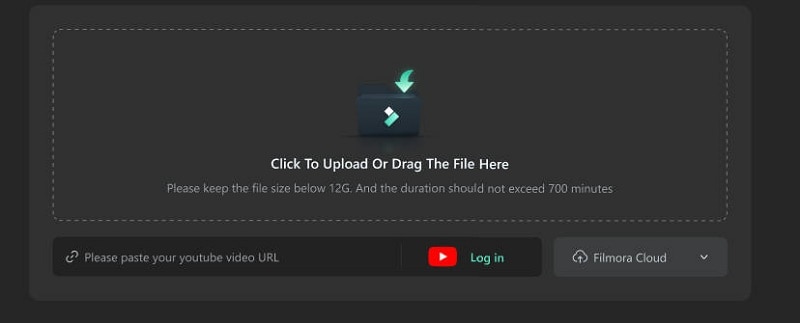
Then, simply upload your video by clicking the Filmora icon or dragging your file into the upload box. You can also paste a YouTube video URL, but keep in mind your account needs to be verified as per the API agreement.
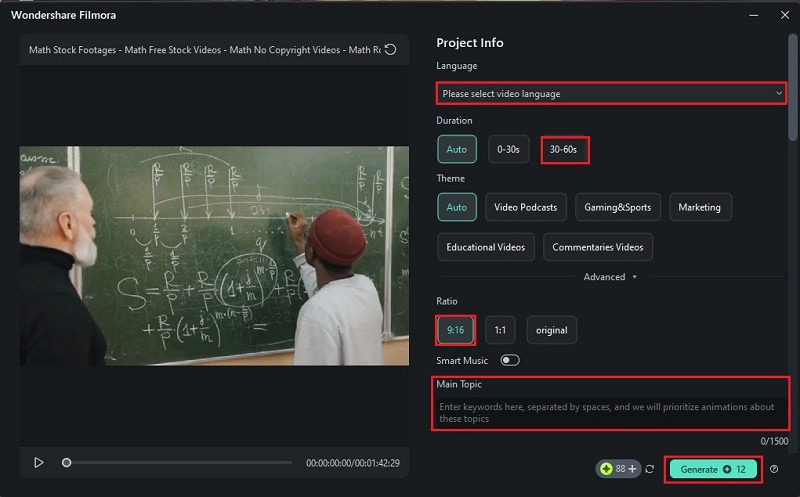
Next, adjust the settings to your preference. Select the "Language" and double-check the reel's "Duration". As previously mentioned, for educational reels, the ideal length is 30 to 60 seconds, so set it accordingly. You can also decide your "Ratio" and explain the subject of your video in the "Main Topic" box. Once you're happy with everything, click "Generate" to start the process and Filmora will analyze the content and suggest shorter versions of your reel.
Tip 2: Creative Editing and Layout
Once you've got your reel to the right length, it's time to make it visually interesting! Thankfully, Filmora's editing tools let you jazz up your educational reels with creative touches. You can change colors, fonts, and styles to match your teaching materials or the platform you're using.
Follow this simple guide to further edit your educational reels with Filmora's Smart Short Clips feature:
Step 1. Go to the editing interface
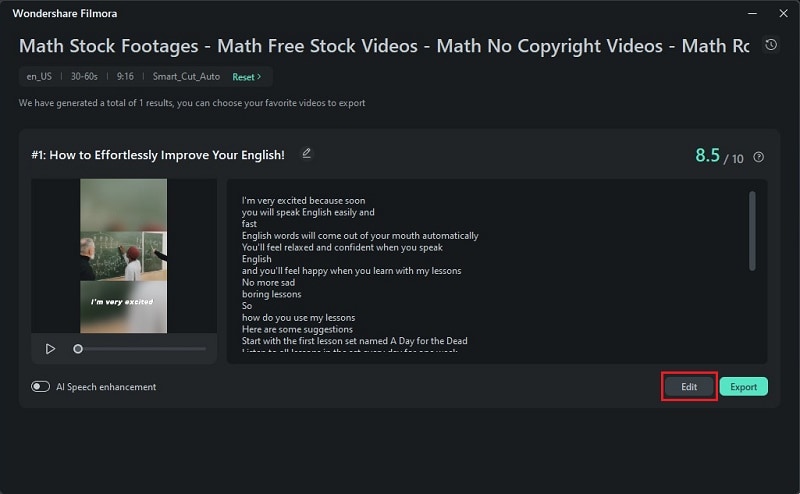
After you create the reel, in the next window that pops up, click the "Edit" button to fine-tune your reel. When you do, it will automatically open the specialized mode for editing short videos.
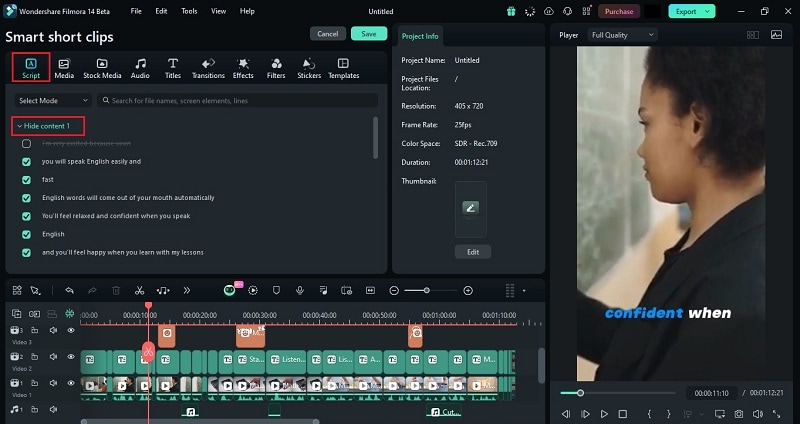
Here, you can make any changes to the script as needed. If you go to the "Script" tab, you'll see the option to "Hide Content" by simply clicking the checkbox.
Step 2. Create Title Text
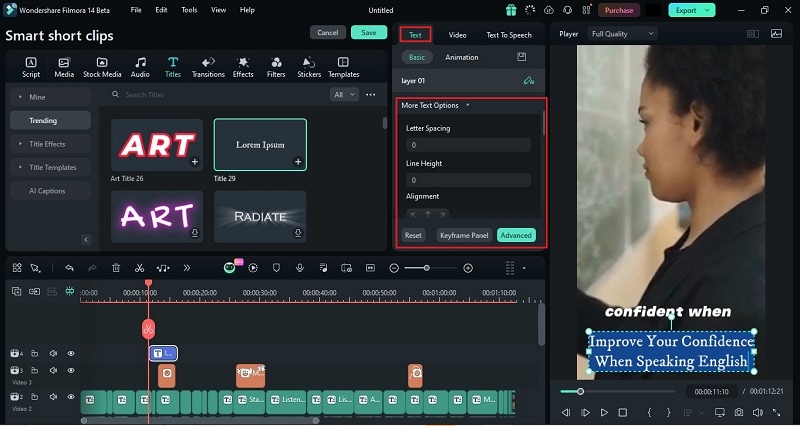
To make your video more visually appealing, you can add a title text at the beginning. Just go to the "Title" tab, browse through Filmora's collection, and choose one that matches your teaching style. Once you've picked one, drag it onto the timeline where you want it to appear in the video. Then, type your title in the description box and check how it looks in the preview screen.
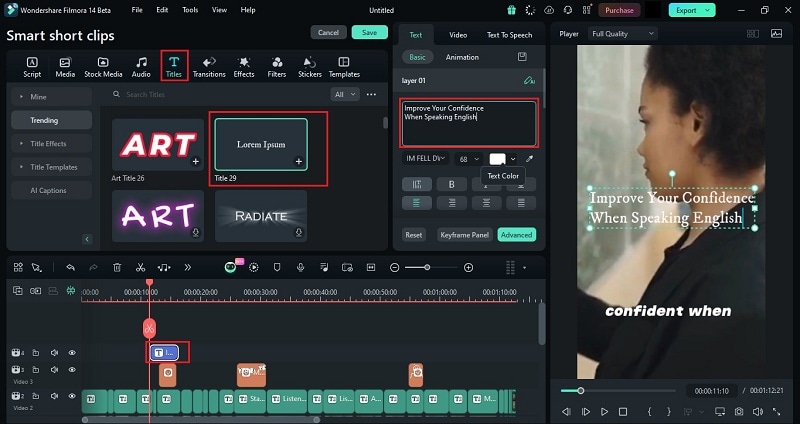
You can easily move your title text around by dragging it with your mouse in the preview window. If you scroll down in the "Text" settings, you'll find plenty of options to customize your title, like adjusting "Letter Spacing", "Line Height", and more. Feel free to tweak it as much as you want!
Step 3. Apply Effects
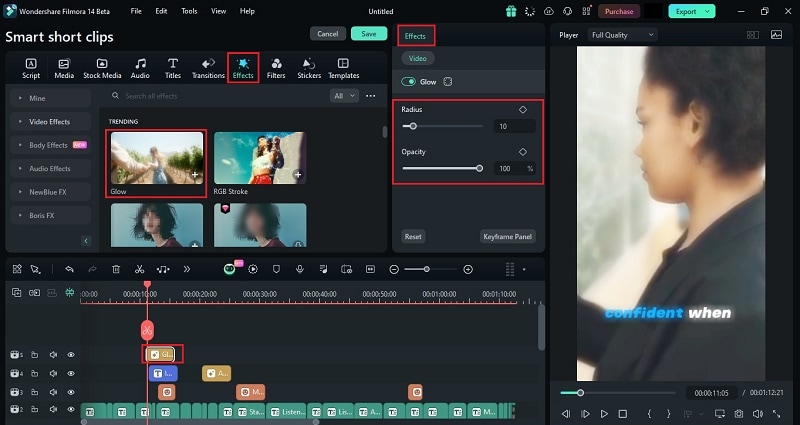
Effects can make your video more engaging by adding a professional touch and visual flair. To apply effects, head to the "Effects" menu and pick one from Filmora's collection. Once you've decided on an effect, drag it to the timeline where you want it to appear. You can also customize the effect by going to the "Effects" settings and adjusting options like "Radius" and "Opacity".
Step 4. Use transitions
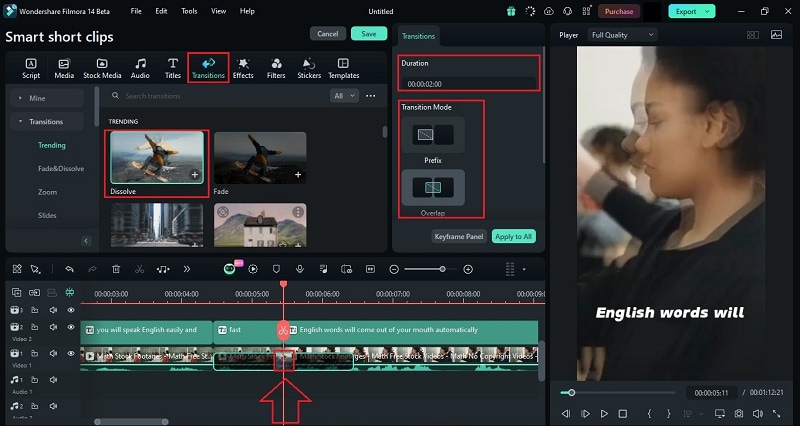
After that, don't forget to use transitions as they are important to help smooth out changes between scenes, making your video flow better. To add a transition, go to the "Transitions" menu and pick one from Filmora's collection, like the classic "Dissolve".
Then, drag it onto the timeline where you want the transition to happen, usually between scenes. In the transition settings, you can adjust the "Duration" or customize how it appears using the "Transition Mode".
If you're logging in from a Mac, check this guide.
Tip 3: Clear Audio
Clear audio is just as important as good visuals in educational reel content. Background noise or extra filler words can really distract your viewers and make your reel less effective. Luckily, Filmora makes it easy to clean up your audio.
With Filmora's Audio Denoise tools, you can:
- Get rid of unwanted background sounds.
- Adjust the volume of your voiceover for better clarity.
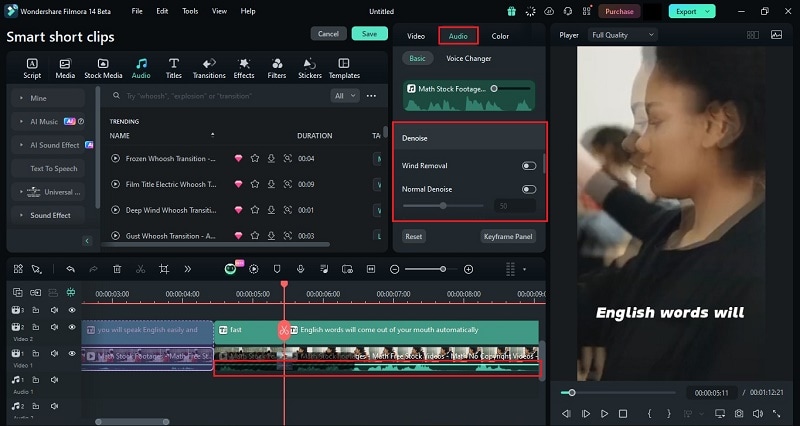
To use this feature, click on the clip in your editing timeline where you want to apply the audio denoise. This will open the audio settings on the right side. Scroll down to find the "Denoise" option. You have options to activate "Wind Removal" or adjust how much denoise you want by moving the slider under "Normal Denoise". For more details on each mode, check out Filmora's complete AI Audio Denoise guide.
Once you're satisfied with everything, just click the "Save" button at the top of the screen.
Tip 4: Multi-Platform Compatibility
Once your educational reel is ready, Filmora makes it simple to share across multiple platforms. Whether you're posting on Instagram, TikTok, or YouTube, Filmora allows you to export your videos in the best formats for each platform.
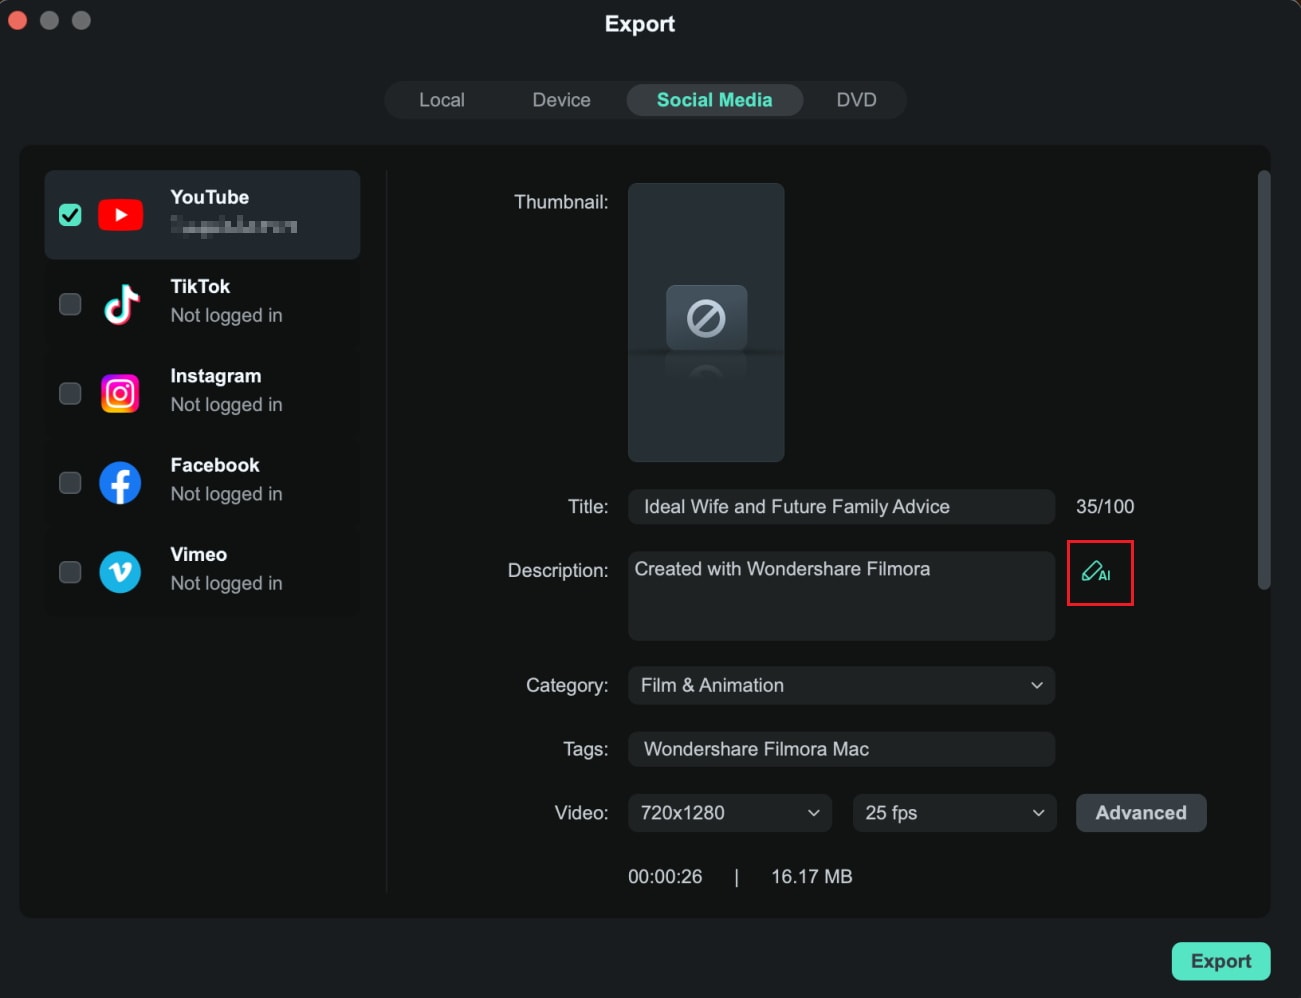
You can also enable the "Schedule" toggle to schedule and plan your posts. This way, you can focus more on creating educational content while your posts go out automatically at the right time.
With these handy tools, you won't have to stress about making educational reels anymore. Filmora makes the whole process simple and fun, helping you create professional and effective reels with ease!
Part 2: Tips for Content in Making Educational Reels
Now that you've got the editing down, let's jump into some tips for the content! Because let's face it: no matter how cool and eye-catching your educational reels are, if the viewers don't find them valuable or engaging, they're not going to come back for more. It's all about keeping your audience interested and eager to learn from you again!📅📈📊💬
So, let's make sure your content is not just good, but truly memorable with these few tips:
Tip 1: Select the Audience You're Targeting
Think about who your video is for. Who do you want to reach, and what should they learn from your content? It's really important to adjust your message to fit what they need and like. For example, if you're making an educational reel for high schoolers about math, show how math applies to real life, like budgeting or cooking. For younger kids, use fun animations and simple language.

Tip 2: Add Interactive Content
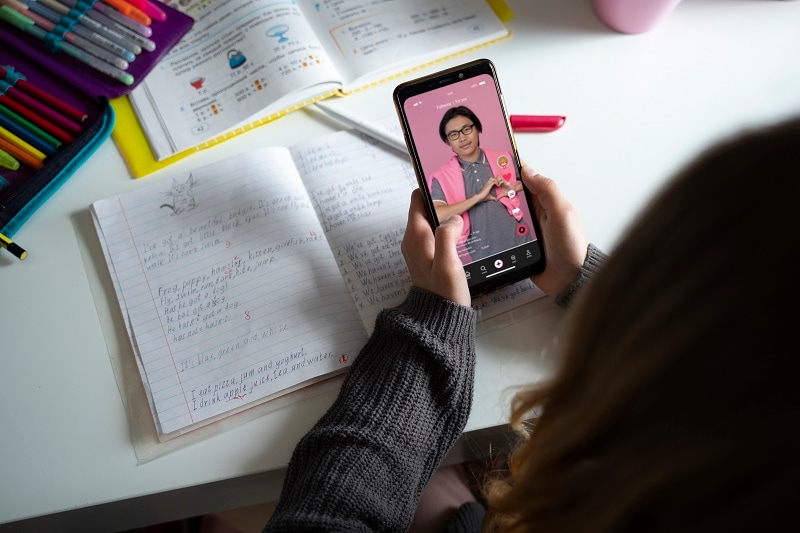
If you're creating educational reels on Instagram, you could ask a question related to your topic and invite viewers to comment with their answers. This adds a fun twist by including questions or challenges to get your viewers involved.
For example, if you're talking about environmental awareness, ask, "What's one small change you make to help the planet?" Encourage viewers to comment with their answers. This not only builds engagement but also helps grow a community around your content. Plus, more interaction boosts your reel's visibility on Instagram!
Tip 3: Regularly Update Content
Don't forget to update your content regularly! It's important to review and refresh your videos to include the latest information and trends.
For example, if you're making educational reels for students about science experiments, check to see if there are new experiments that are popular or have been discovered recently. If you did a reel last semester on simple chemistry experiments, you might want to add some new ones that use cool materials or techniques.

Pro Tip: Want to turn your compelling content into engaging videos in minutes? Try Filmora's AI Text-to-Video tool! This smart feature instantly transforms your scripts into professional-looking videos - perfect for busy creators. Check out the video tutorial below to see how it works!
Part 3: Educational Instagram Reel Ideas & Templates
If you follow the three tips mentioned above, you'll definitely boost your educational reels on Instagram. But if you're feeling a bit stuck on ideas, no worries! There are tons of websites out there that offer Educational Instagram Reel Templates to make things easier for you. So, here are some fun and creative ideas to grab your students' attention and make learning engaging!
Educational Instagram Reel Ideas
- Quick Tips: Share bite-sized tips related to your subject. For example, you could create a reel with three quick study hacks that help students prepare for exams.
- Fun Facts: Create a reel that shares interesting facts about your subject. For instance, if you teach history, share surprising historical events or figures that students might not know about.
- Mini Challenges: Encourage students to participate by setting up a challenge. For example, ask them to share their favorite book and why they love it. You can then feature their responses in your next reel!
- Q&A Sessions: Answer common questions students have about your subject. You could gather questions from your followers and create quick responses in a series of reels.
Educational Instagram Reel Templates
- Filmora: Filmora's Smart Short Clips feature has a ton of templates that make creating educational reels super easy. Before generating your reel, scroll down to the "Templates" section. Browse through the options and choose the one that works best for your content!

- Instagram: Instagram itself has built-in reel templates that make it super easy to create engaging content quickly. To check them out, start by creating a new post and head over to the "Reel" section. At the top, you'll see the "Templates" option—click on it, and you can browse through all the available templates. Find one that matches your content, and you're good to go!

Conclusion
Instagram reels offer an exciting opportunity for teachers and educators to make learning fun and interactive. Throughout the article, we have shared helpful tips to keep your educational reels engaging, provided creative ideas, and pointed out where to find templates to make the process easier.
However, to create high-quality reels, it's not just about great content—you also need the right tools to ensure your videos look polished and professional. Wondershare Filmora is a perfect choice, especially with its Smart Short Clips feature that helps you trim longer videos without losing key points.
Along with Filmora's advanced editing tools, you can easily create stunning visuals and have great-sounding audio, so there's no need to stress about making educational reels on Instagram—it's all taken care of!


