[Top 10] Best and Fast Ways to Turn Image into Gif
An easy yet powerful editor
Numerous effects to choose from
Detailed tutorials provided by the official channel
There are in fact ways to turn an image into GIF easily We'll be showing off a couple of some of the easier ways below, including in-depth tutorials of some of the best methods so that you will no longer have to be troubled.
These tutorials, of course, will focus on teaching you how to create GIF from photos If that's something you're interested in, continue reading
Part 1 Why GIF?
Before we move on to the tutorials, let's do a brief account on GIF files We've also answered some of the more common questions regarding using a GIF image maker below for your edification
But, first: Why GIF? Well, it all comes down to what you're looking for A lot of people use GIF files to create animated icons that they can use for their accounts. Some just genuinely want to create a GIF file that they can share with their friends and families (either for a laugh or something else) GIF files are a convenient vessel for doing this because they have a lot of flexibility and are accepted by most platforms
01Why Gif from My Images Are Blurry?
One of the biggest issues people tend to have when turning an image into GIF is that they come out of the process with a blurry end-product. No one wants that But, how are you supposed to avoid it? Well, it all depends on the tool that you're using and your initial picture For the former, it's best to review the upload requirements of your chosen GIF maker to get a better end result. For the latter, it's best to pick a good, high-quality GIF creator for a better outcome
02There Are Jaggy Strokes Around Gif?
Another issue that you might suffer from while trying to create GIFs from photos is jaggy or raggedy strokes around the GIF when converted. These occur often with GIF makers that support transparency If you find these happening to you, adjust the transparency settings to get rid of the white pixel outline around your converted GIF.
Part 2 How to Add an Image to a GIF?
Now it's finally time for the tutorials that we promised at the beginning of this article These tutorials will range from online to software solutions — so that you can get a clear idea of what you can expect from all these different GIF makers. To be more specific, we'll be demonstrating with an online images to GIF converter, how to create animated GIF photoshop, and how to easily turn any image into GIF with the photo GIF creator, Wondershare Filmora Video Editor.
01Image to GIF: How to Turn Photos into Animated GIFs
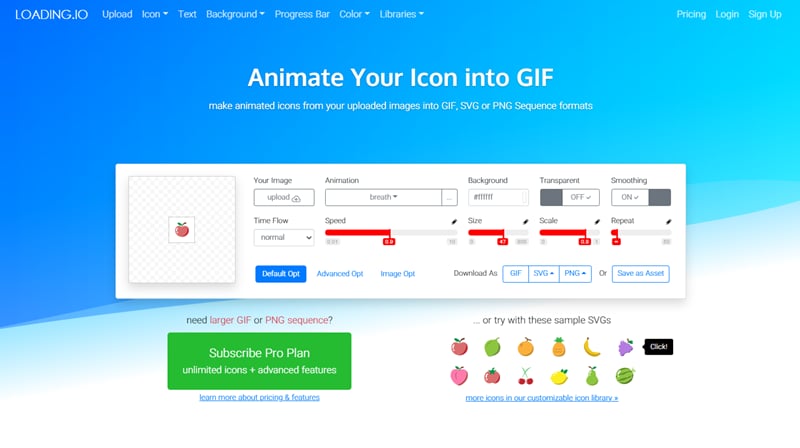
For our first tutorial, we're going to be demonstrating how to create GIF from photos with an online photo GIF creator More specifically, we'll be demonstrating with Loading.IO, which is an online tool that you can use to create animated icons for your profiles or on your video content It comes with several animation options and other settings that you can use to quickly create GIFs from photos
Step 1: Go to Loading.IO
Of course, we start off this tutorial by opening the GIF maker. In this case, since the tool is hosted online, that's as easy as opening the link that we've provided below It will take you directly to the online GIF creator.
URL: https://loading.io/animation/icon/
Step 2: Upload Photo
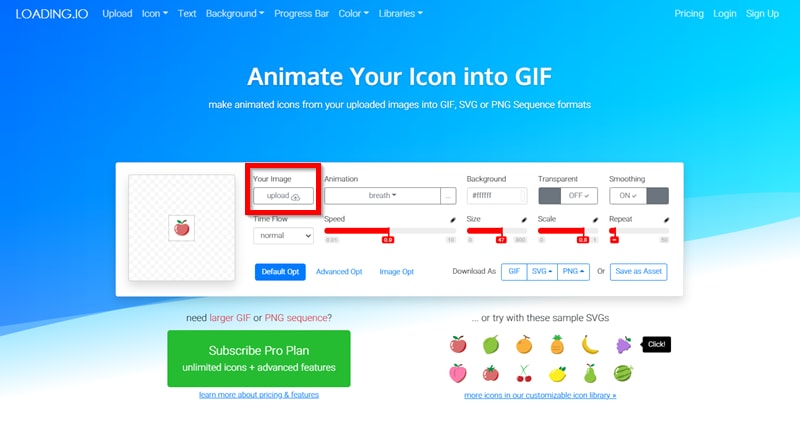
Once on-site, it's time to upload the photo that you want to turn into a GIF As this is an icon creator, you should pick a photo with the proper parameters
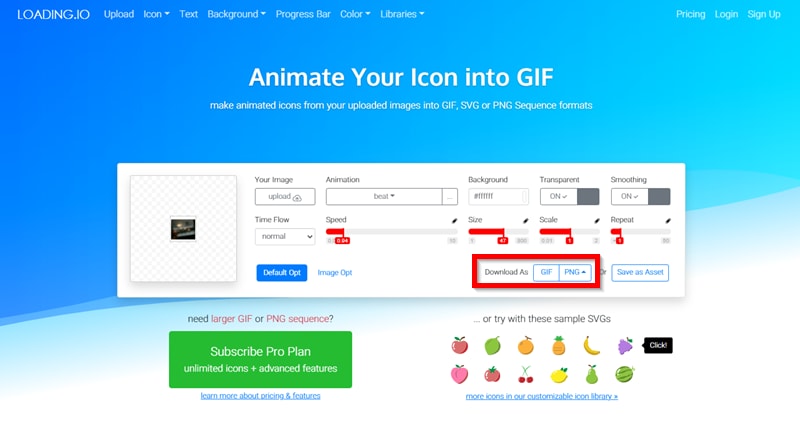
To upload your icon for animating, select the 'Upload' button and browse your computer or your Google Drive for the image in question.
Step 3: Choose animation Style
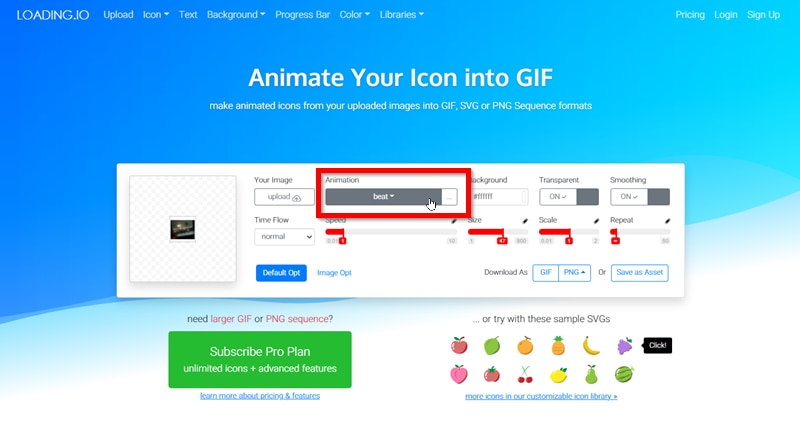
Next, choose how you want the uploaded photo to be animated Loading.IO offers a couple of animations that you can choose from Including the 'beat' animation, which is what we choose for our example
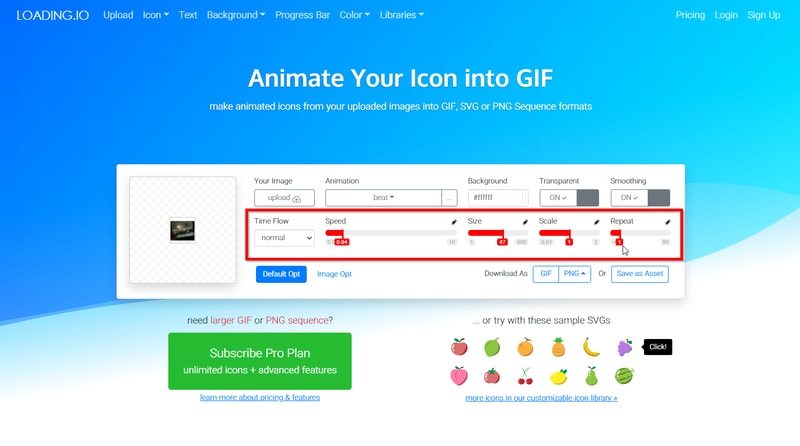
This step is technically optional, as there are default settings already prepared if you have no other specifications for your image-turned GIF. But, if you want, you can adjust certain settings for a better outcome
For example, you can speed up the animation with the 'Speed' slider. Or, you can increase the number of times the GIF loops by adjusting the 'Repeat' slider. Test out a couple of settings to get the best result
Step 5: Download as GIF
To wrap things up, it's time to download your finished animation Loading.IO gives several options for this. But, of course, in our case, we choose to 'Download As: GIF'
02How to Make an Animated GIF in Photoshop [Tutorial]
For the next tutorial, we'll be showing you how to use Photoshop to create and edit an animated GIF This process is fairly lengthy and is not recommended for beginners. But, it is a very professional method of creating an animated GIF — one that will allow you to control every step of the process (which may be exactly what you want)
Step 1: Import Images into an Image Stack
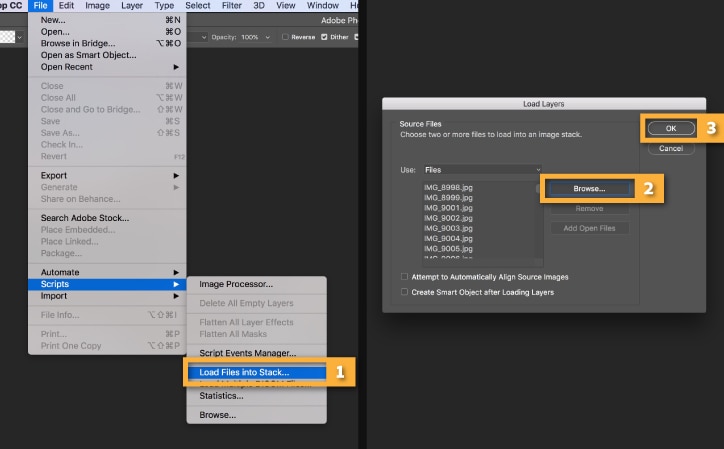
First, starting on a new product, upload the images that you want to turn into a GIF into a photoshop 'Image Stack'. This can be done by clicking the 'File' tab and selecting the 'Scripts > Load Files into Stack…' option
Afterward, a pop-up window will appear where you will be prompted to browse your computer for the aforementioned images Click 'OK' when done
Step 2: Organize Layers
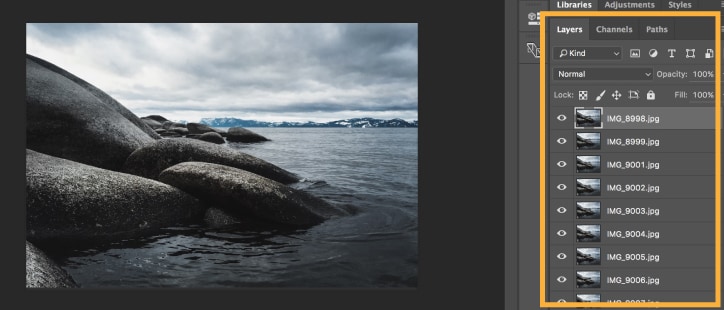
Check the 'Layers' panel for the images that you uploaded and organize them based on how you want them to appear for your animated GIF
Step 3: (Optional) Import Video
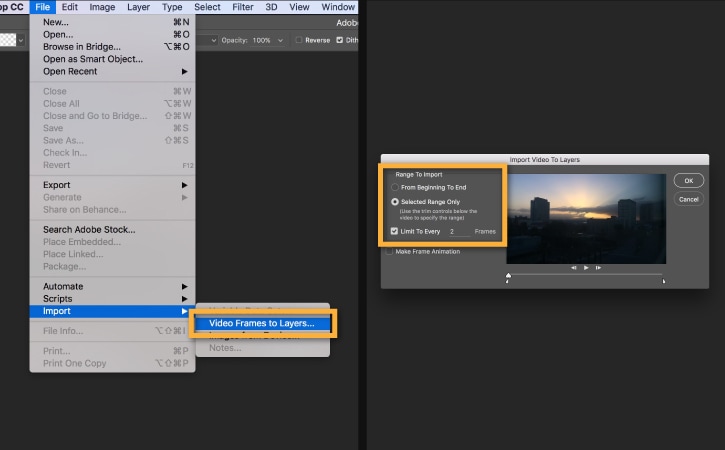
If you want to work on a video to turn into a GIF instead, you can do such by selecting the 'File' tab and clicking on the 'Import > Video Frames to Layers…' option. This will get you to the same place shown in Step 2
Note: Just be careful that you do not transfer an image that is too long Photoshop may not be able to properly break it down, if so.
Step 4: Open Timeline Then Create Frame Animation
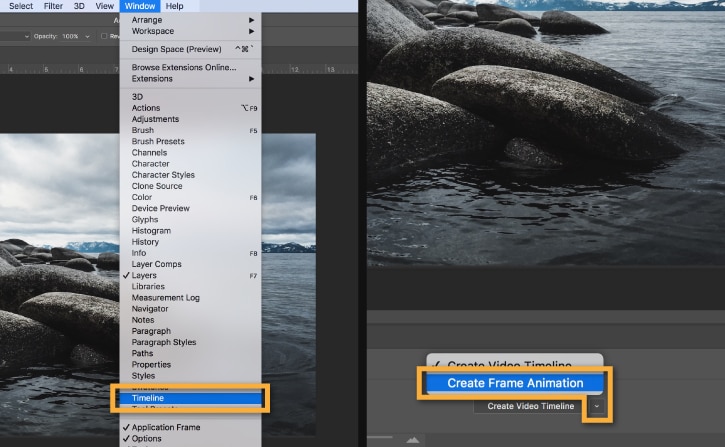
Next, in order to start working on your animation, open the Timeline Window This can be done by clicking the 'Window' tab and selecting 'Timeline'
With the 'Timeline' Window now open, select the 'Create Frame Animation' option to begin working
Step 5: Make Frame from Layers
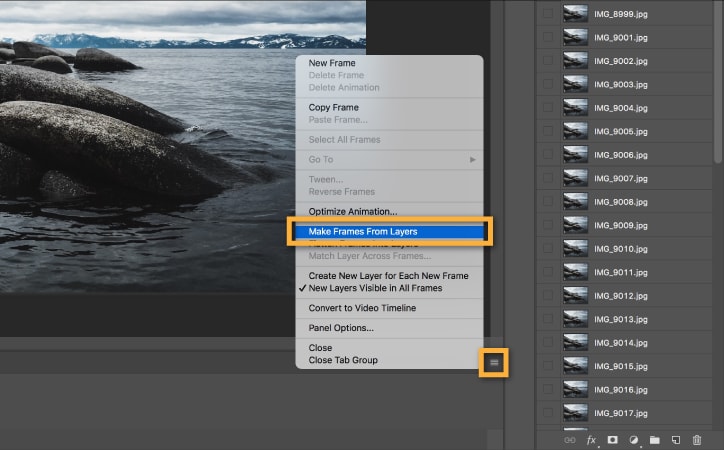
In order to transfer your uploaded images from the 'Layers' panel to your timeline, select the 'Menu' option on the top-right hand corner of the 'Timeline' window and select the 'Make Frames From Layers' option
Step 6: Preview Animation and Adjust as Needed
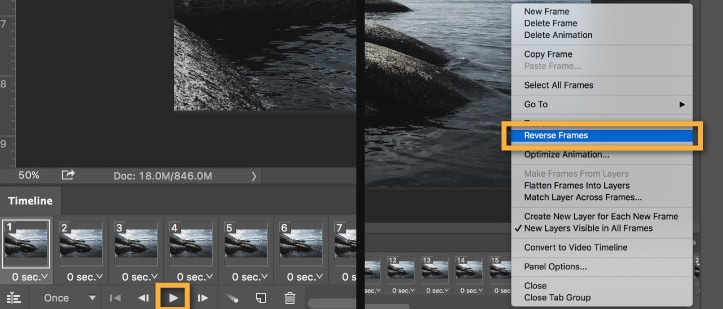
To preview your animation, click the 'Play' button This is the best time to check that your frames have been organized correctly If they are not, you can adjust them by dragging and dropping them on the timeline.
OR, you can use the 'Reverse Frames' option if your animation has been completely flipped around
Step 7: Create an Animation Loop
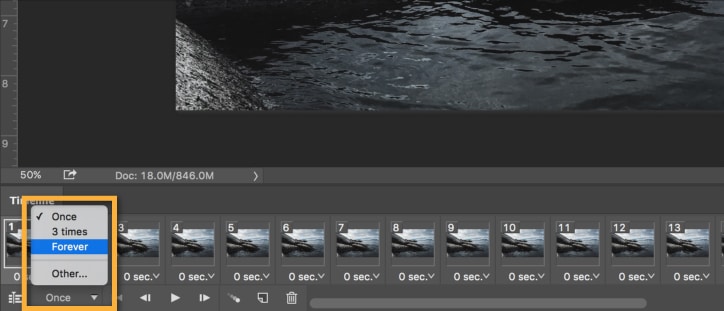
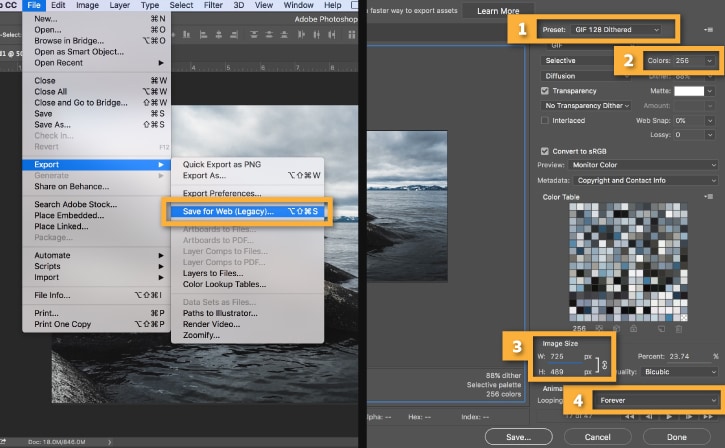
In order to be a proper looped GIF, the animation should repeat endlessly You can make sure of this by changing the 'Repeat' option to 'Forever' (as is shown in the image below).
Step 8: Export Finished Animation to Gif
In order to finish turning your image into GIF, you'll need to export it in the proper format This is possible by selecting the 'File' tab and then clicking the 'Export > Save for Web (Legacy)...' option
A pop-up window should appear where you can control export settings Do so in order to ensure that you have the best outcome
03How To Make an Animated GIF in Wondershare Filmora Video Editor (Fast & Easy)
For Win 7 or later (64-bit)
For macOS 10.12 or later
For our last tutorial, we'll be showing you how to make an animated GIF with the use of Wondershare Wondershare Filmora Video Editor. Filmora is a video editor, one that is used by professionals all over to produce high-quality content And, of course, as a video editor, it works just as well as a GIF maker. One that you can use to create images into a GIF easily
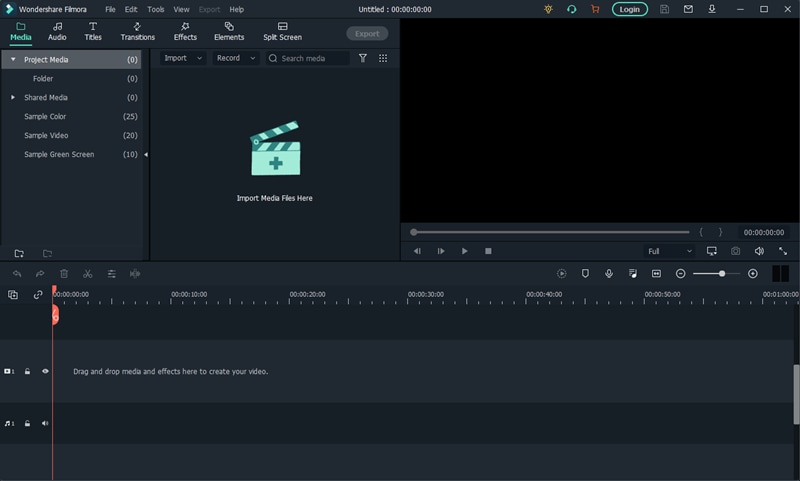
Step 1: Launch Filmora
First, download and install Filmora If you want to follow along with this demonstration, you can Wondershare offers a FREE trial where you can test out all of the software's functions before making a commitment
Step 2: Upload Video to Turn into GIF
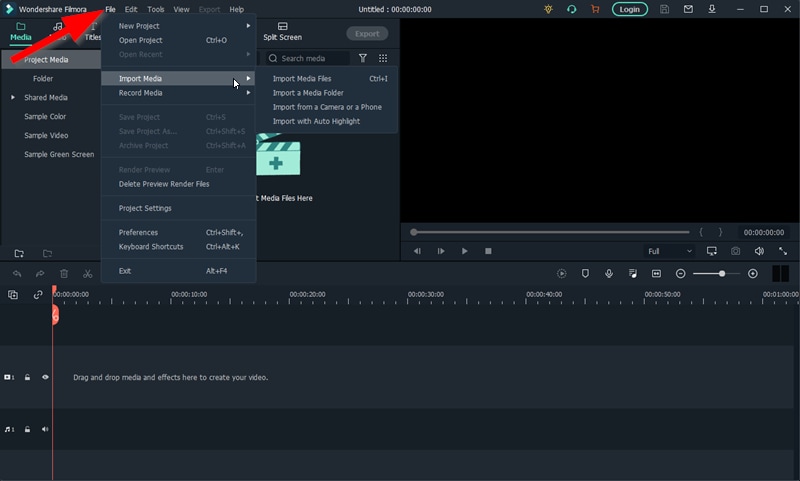
For this next step, we do something akin to what we did earlier with Photoshop. And that is to upload images or a video to fit into a timeline
This process is started by first uploading images, which you can do by clicking the 'File' tab and selecting the 'Import Media > Import Media Files' option
Step 3: Drag Media to Timeline
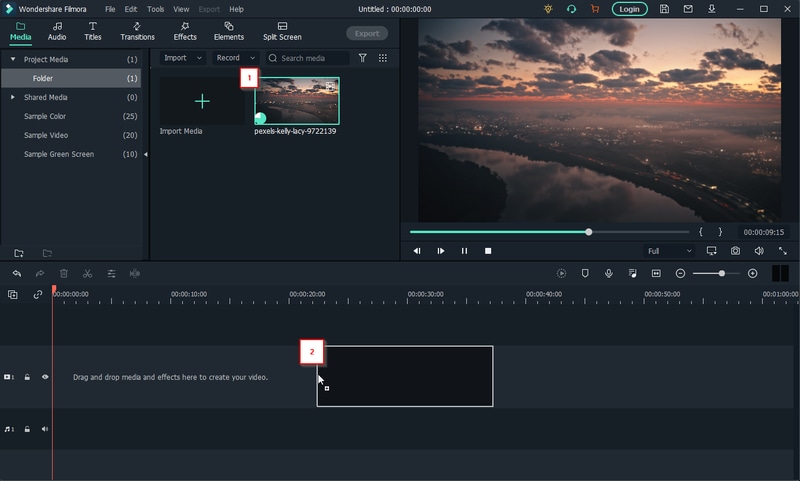
With Filmora, the 'Timeline' window is already open Also, you won't have to do anything complicated to get your media onto the said timeline. Just drag and drop it from the Media library (as is shown in the image below).
Step 4: Edit or Adjust GIF
Before moving forward, you should take this chance to make adjustments to the media that you uploaded into your timeline There are many things that you can do at this stage so feel free to experiment
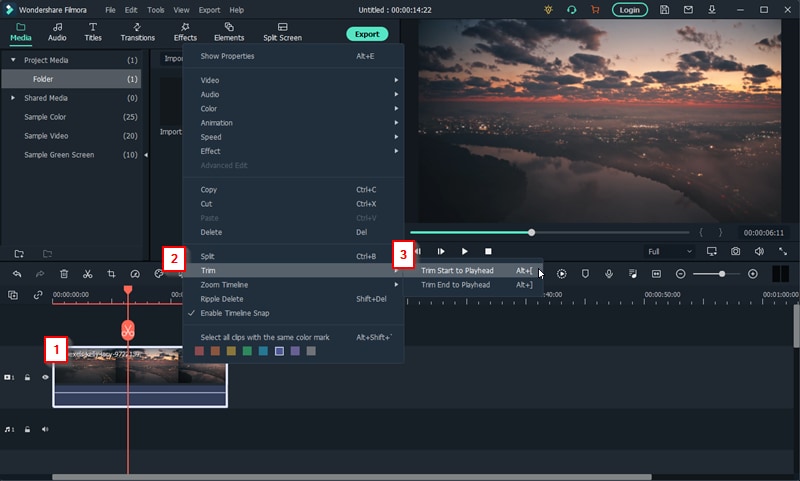
For our example, we cut down the video that we uploaded by using the 'Trim' option (which you can find by right-clicking on video media).
Step 5: Export into GIF
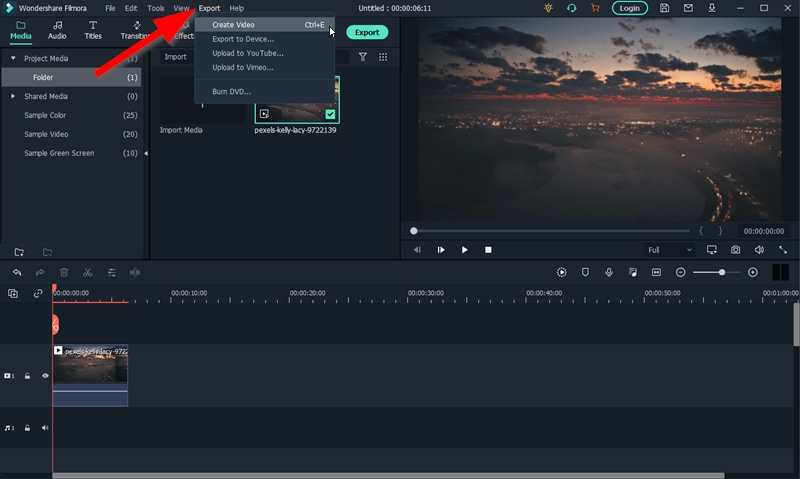
Finally, to finish us off, we export our finished GIF This can be done by selecting the 'Export' tab and then clicking the 'Create Video' option A pop-up window will appear where you can adjust export settings
● Key Takeaways from This Episode →
● GIFs are fun and easy-to-share content It's accepted by most platforms and can even be used to create professional, animated icons to be added to video content
● The process of turning an image into a GIF can be a bit tricky. But, don't worry, so long as you start with high-quality media and use a reliable Photo-GIF Creator, then you should be fine
● If you're struggling with turning your images into GIFs, check out one of the tutorials that we've offered We specifically chose the three GIF creators that we demonstrated to offer multiple methods that you can choose from


