
One of the most common features of video editing tools is the option to cut or trim video. Editing videos involves cutting off parts and moving them around or removing other parts from your footage. Today, we'll discuss some of the most common commands you can use to cut and trim videos in FFmpeg.
Keep in mind that using FFmpeg isn't for everyone. You need to pay attention to detail and understand the basic concepts behind command line tools. Before we get to the actual steps, let's learn a thing or two about FFmpeg.
In this article
What is FFmpeg and How to Install It

FFmpeg is one of the best multimedia frameworks that can play, filter, stream, mux, demux, transcode, encode, and decode any type of content. It can run and compile in different environments and operating systems, including Windows, macOS, Linux, etc.
It is designed for end users and application developers to provide the best software for free. FFmpeg is equipped with different tools for analyzing, playing, or converting different libraries or media files. Developers can also use it for different applications since it has different libraries, including libswresample, libswscale, libavdevice, libavfilter, libavformat, libavutil, and libavcodec. What's great about FFmpeg is that it supports some of the oldest formats and up to the latest ones.
Before using FFmpeg to cut videos, you must install it on your device. For this article, we've decided to show you how to install FFmpeg on Windows. Here are the steps:
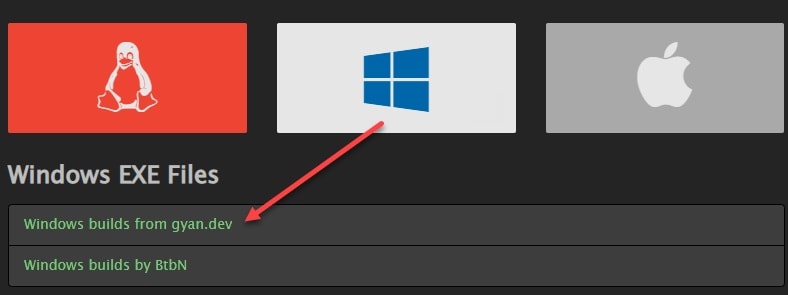
Step 1: Go to the FFmpeg download page and hover your mouse over the Windows icon. Select "Windows builds from gyan.dev."
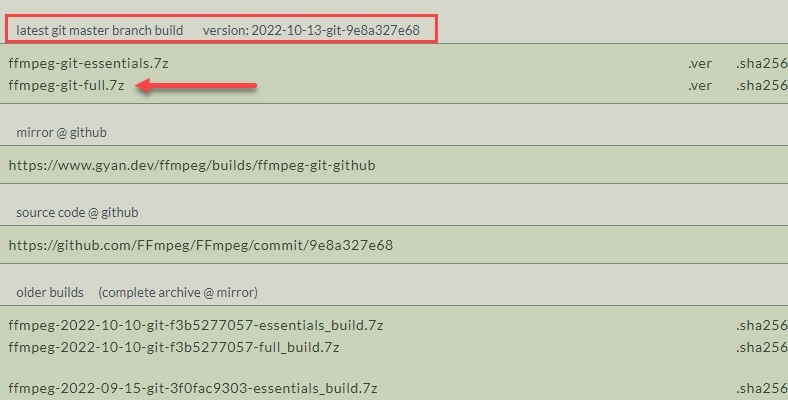
Step 2: When the git master builds page opens, find the latest version of FFmpeg and click on the link to download it. Select the location where you want to save the file.
Step 3: After the download is complete, extract and rename the folder to "ffmpeg."
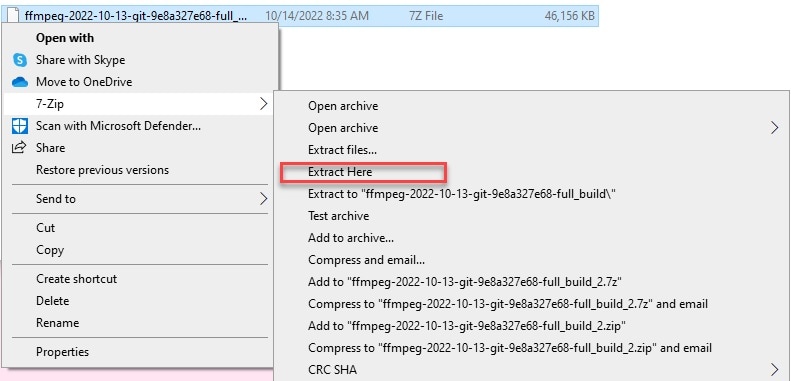
Move the folder to your desired location.

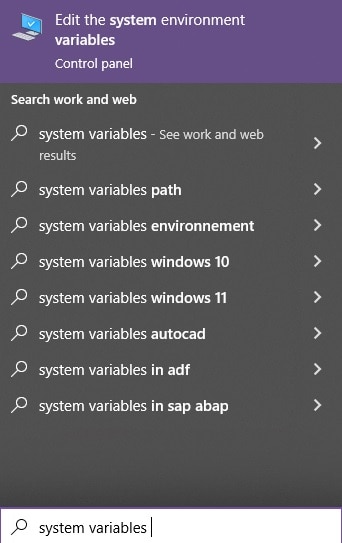
Step 4: Click on Start, type "system variables," and click on "Edit the system environment variables."
Step 5: Click the Advanced tab and select Environment Variables.
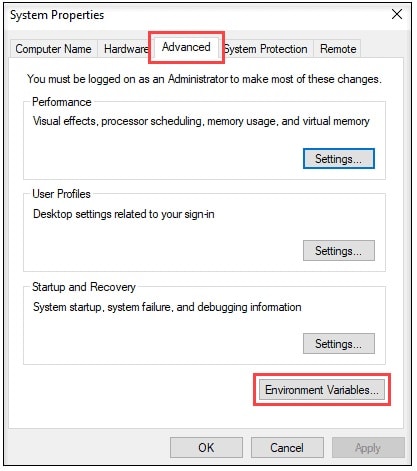
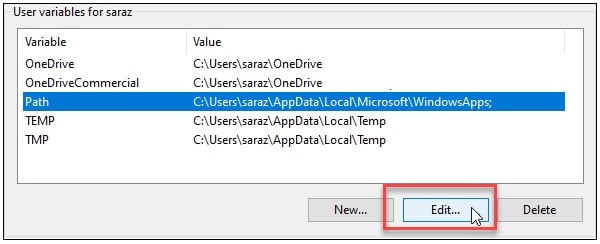
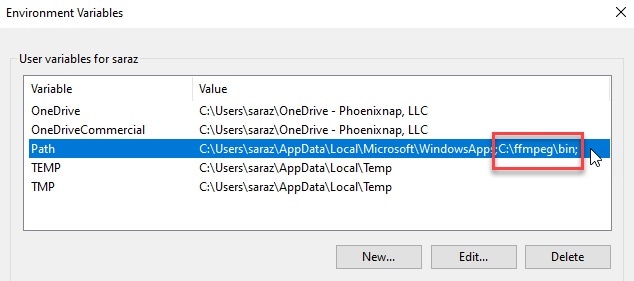
Step 6: Click on Path and select Edit.
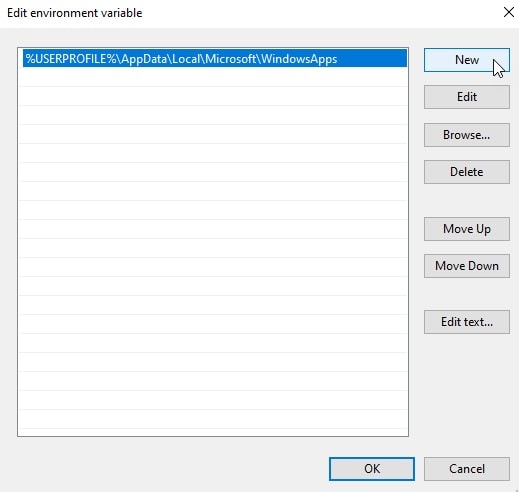
Step 7: Click New in the side menu.
Step 8: Add "C:\ffmpeg\bin" and click OK.
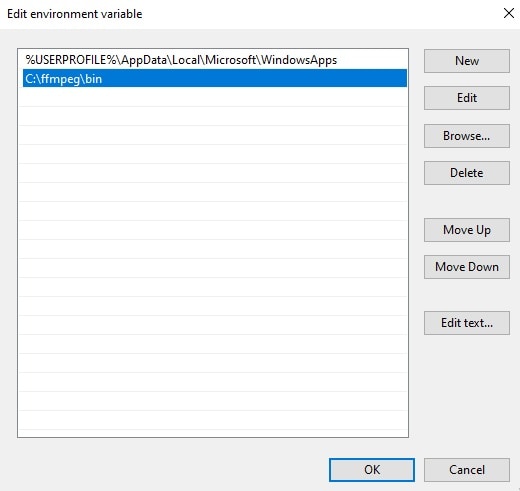
Step 9: You will see the extension in the path.
How to Use the -ss Parameter to Find the Start Time
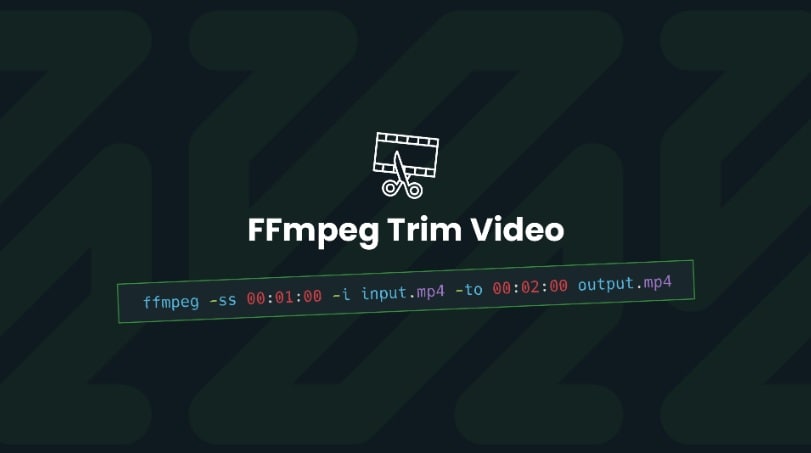
If you want to cut/trim a part of a video in FFmpeg starting from one time signature to another you can use the -ss parameter to seek the desired values. For example, if you want to extract the part of the video from the 10th second to the 20th second, you will first have to direct FFmpeg to find the 10th second.
Here's a command you should use: ./ffmpeg -ss < time> -i < inputvideo>
The time is specified as HH:MM:SS. (HOURS:MINUTES:SECONDS). To search for the 10th second of a video clip, you should type 00:00:10.
How to Use -t and -to, to Find the End Time
You must also input the end time to cut the video effectively in FFmpeg. You can use two commands: the -t and -to parameters. The -t parameter allows you to add the time of the extracted clip. You can use it by typing -ss 50 -t10, and this command instructs FFmpeg to cut/trim 10 seconds of the video starting from the 50th second.
On the other hand, the -to parameter instructs FFmpeg on where the endpoint of the extraction is. For example, you can type -ss 50 -to 60 to extract the 10 seconds between the 50th and 60th second.
How to Cut Videos in Ffmperg Without Re-encoding

You can use multiple methods to cut/trim videos with FFmpeg without re-encoding. Each of them has its own advantages and disadvantages. It's up to you to pick the option that works better for you. Here's the first one.
Cutting Videos With FFmpeg With Copy and Input Seeking
One of the simplest command lines you can use to cut/trim videos with FFmpeg without re-encoding is this one: ffmpeg -ss 00:00:03 -i inputVideo.mp4 -to 00:00:08 -c:v copy -c:a copy trim_ipseek_copy.mp4
This command line has simple parameters. You are simply telling FFmpeg to read your video aloud. In this example, the video in question is called "inputVideo.mp4." This command line also instructs the program to extract 5 seconds from the video, starting from the 3rd second up to the 8th second.
Furthermore, this command line instructs the program to copy both the video and the audio and skip re-encoding. Adding the -ss command before the -i command is known as "input seeking," and it works fast because the program jumps from one I-frame to another to get to the seek-point.
However, since this operation seeks to jump between multiple I-frames, FFmpeg won't accurately jump to the exact time or frame you want. It will look for the nearest one and start the copy operation there.
Cutting Videos With FFmpeg Using Output Seeking
This method for cutting videos in FFmpeg without re-encoding is known as "output seeking," and here's a basic command line on how to use it: ffmpeg -i inputVideo.mp4 -ss 00:00:03 -to 00:00:08 -c:v copy -c:a copy trimmedVideo.mp4
The issue here is that there are independently encoded I-frames during video compression. The predicted frames can differ depending on the other decoded frames. If you pick a start time that aligns with the Predicted Frame, copying will start from that frame.
In other words, the copies and decoding frames might be missing from the output, resulting in glitched or black output video.
How to Trim/Cut Videos in Ffmperg With Re-encoding
When you don't use the "-c copy" command when trimming videos in FFmpeg, the program will re-encode the output audio and video automatically according to the chosen format. This method means the whole trimming operation will last longer than other methods.
However, it also means you will get more accurate results because FFmpeg re-encodes the start and the video with I-frames. In our example, we will instruct FFmpeg to work on a video named "inputVideo.mp4" and remove the 5 seconds from the 3rd second to the 8th second. We will use libx264 for re-encoding.
Here is the command you want to use: ffmpeg -i inputVideo.mp4 -ss 00:03 -to 00:08 -c:v libx264 -crf 30 trim_opseek_encode.mp4
This command can also be used to re-encode specific bitrates, change the resolution, or re-encode video quality. Remember that this method requires a lot of resources and time because you're doing a re-encode.
How to Remove/Extract Audio From a Video With FFmpeg
There are two ways you can remove audio from a video. First, you can extract audio and remove or remove the audio from the video, leaving it silent.
Extracting and Saving an Audio File
If you want to extract audio from your video and save the audio file, here's the command you should use: ffmpeg -i input.mp4 -vn output.mp3
Here's an explanation of what's going on in this command line and where you can add your inputs. The "input.mp4" is the path to your input video file; you should replace it with your own. -vn is the command that disables video processing and removes video completely.
The "output.mp3" is the placeholder for the audio output Image name and the extension. In other words, type the name and the extension you want to see as your output file.
Muting/Removing Audio From a Video
The best method for completely recomposing audio from a video while keeping the video is to use the -an function. This option disables audio processing. Here's the command line you should use: ffmpeg -i input.mp4 -an -c:v copy output.mp4
The -an command disables audio processing, while the -c:v copy command copies the video without re-encoding. This means the video's original quality is preserved, and the process is quicker.
A Simpler Alternative to Cutting Videos - Filmora
FFmpeg can be an effective tool for cutting videos. However, it's not the most user-friendly solution for these tasks. Since this is command-line software, you should have some experience working with similar solutions. Users should at least be familiar with the command prompt and its operations to understand how FFmpeg works.
Suppose you're looking for a more straightforward option that doesn't involve any command lines, and we recommend trying out Wondershare Filmora. This video editing software stands out because it's simple and offers advanced editing features. It has many AI-driven features that take care of everything for you. Users only have to guide the tool in the right direction, and everything else is automated.
Apart from cutting and trimming, Filmora is equipped with a full range of editing tools, including audio adjustments, effects, filters, transitions, animations, etc.
- Superb video stabilization with low distortion.
- Vast video/audio effects and creative assets.
- Powerful AI for effortless content creation.
- Intuitive, professional yet beginner-friendly.
- Works on Mac, Windows, iOS, and Android.

How to Cut/Trim Videos Using Filmora
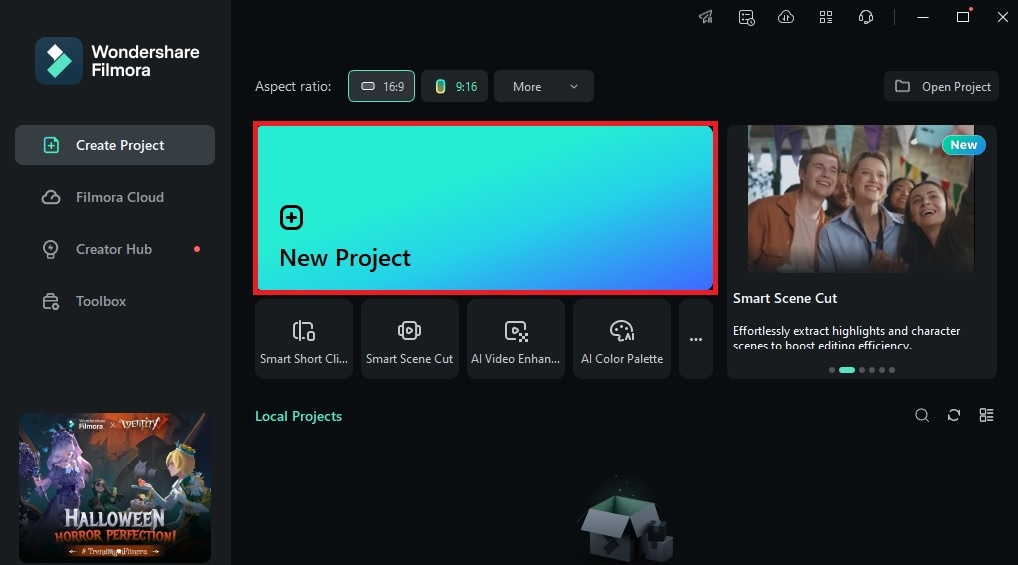
Step 1: After downloading and installing Filmora, launch the software and click New Project.
Step 2: Click Import, select the video you want to edit, and click Open.
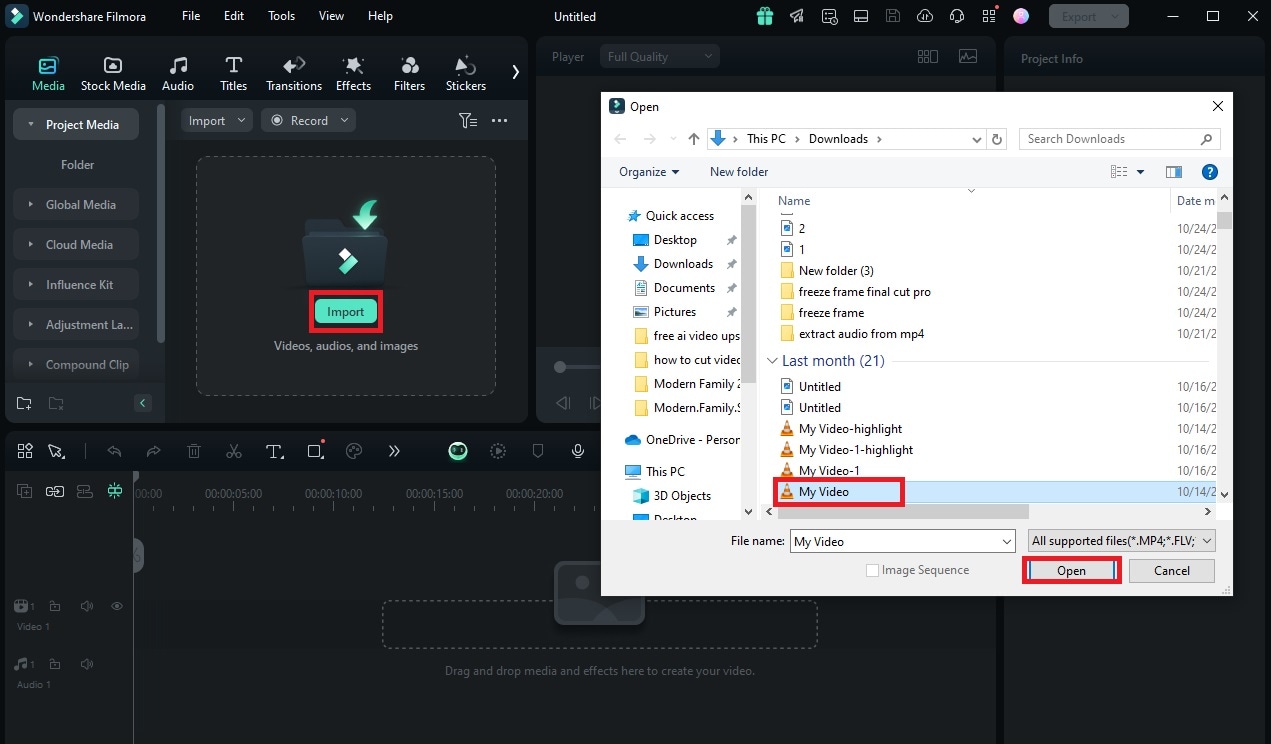
Step 3: Drag and drop the video from the media panel to the timeline.
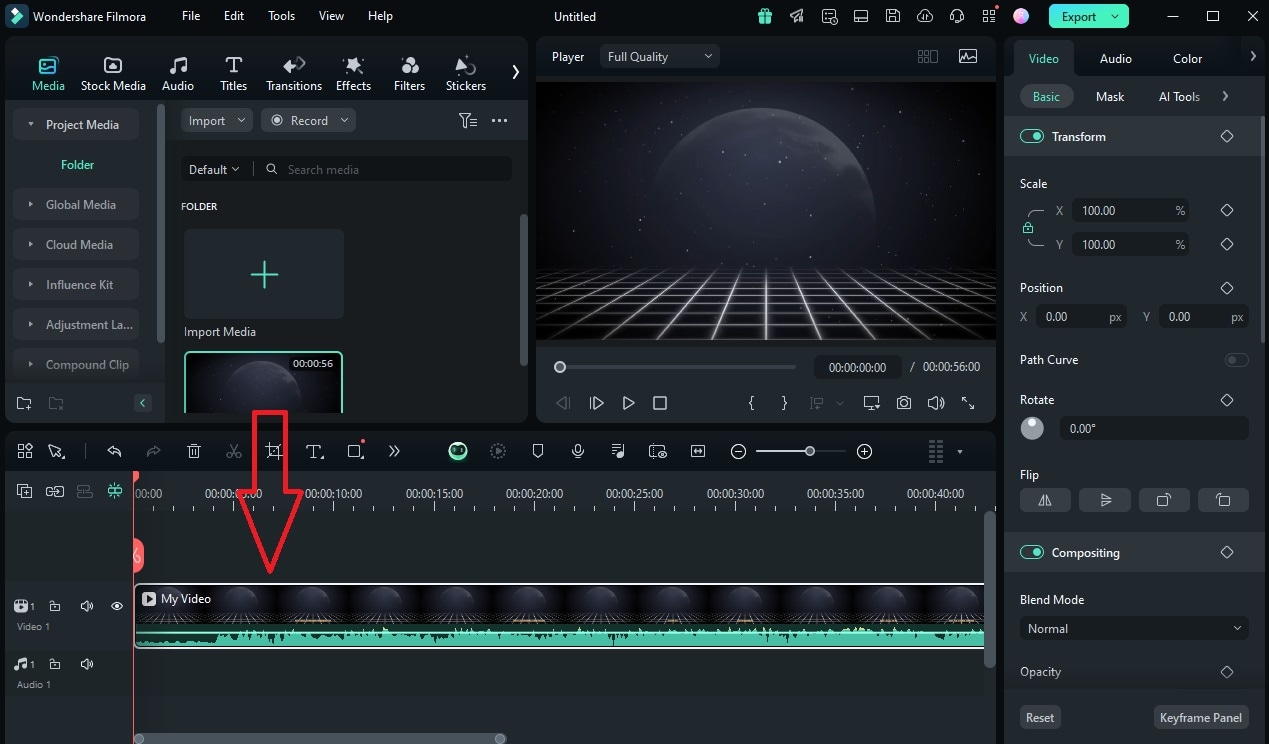
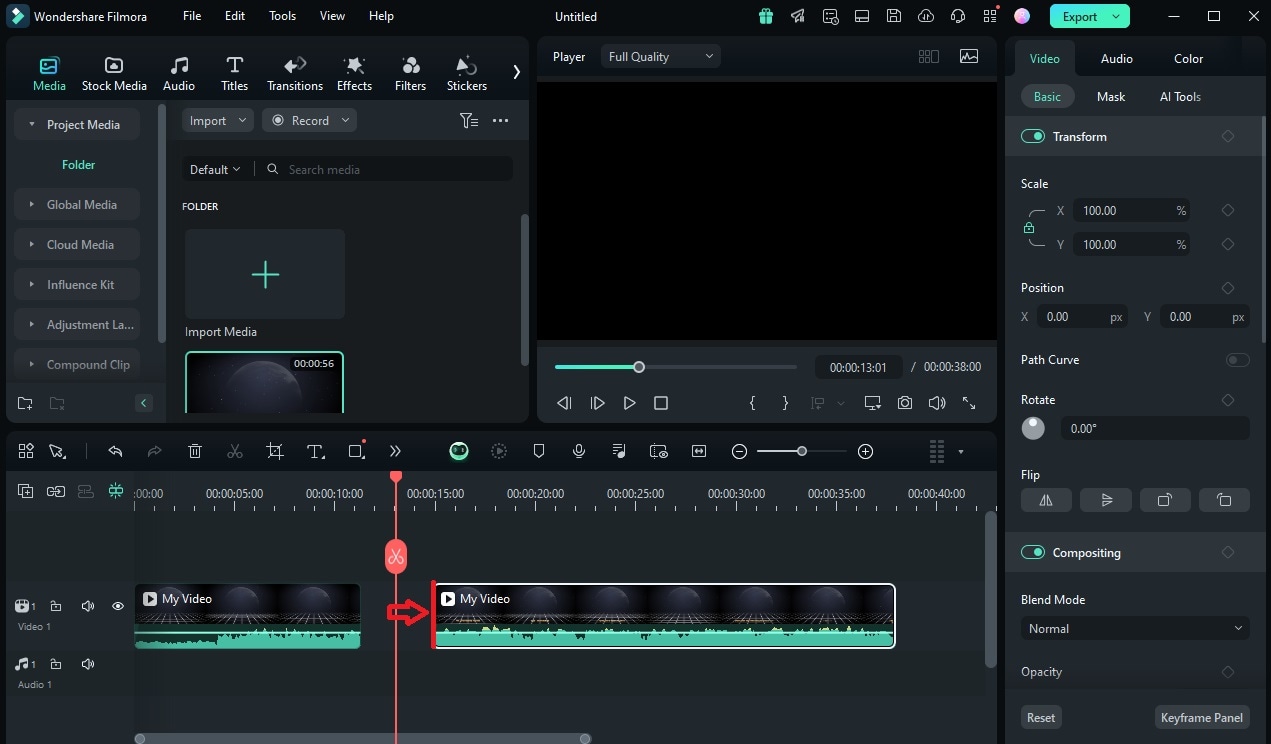
Step 4: Drag and move the playhead to the area where you want to cut the video.
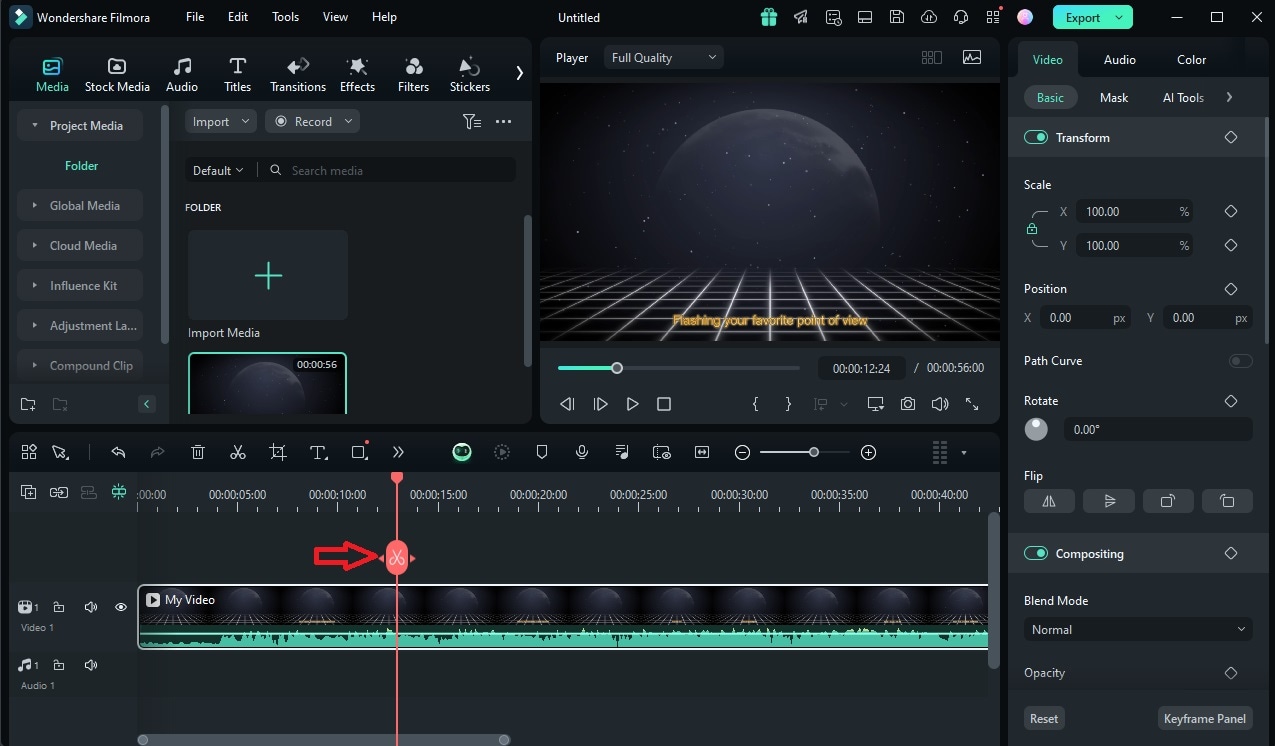
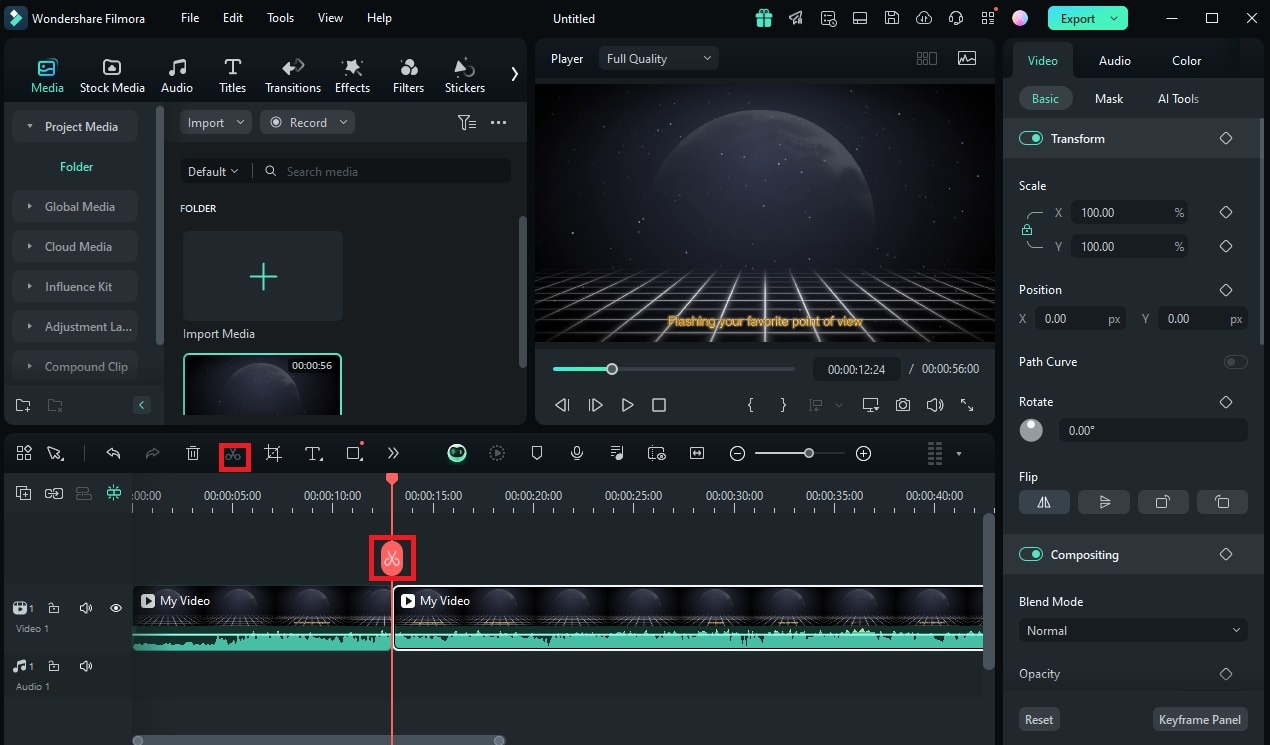
Step 5: Click the Split icon on the playhead or the one above the timeline. Your video will be split into two parts. You can repeat the process as many times as you like.
Step 6: Grab the edge of the video and drag it to the side to trim the video.
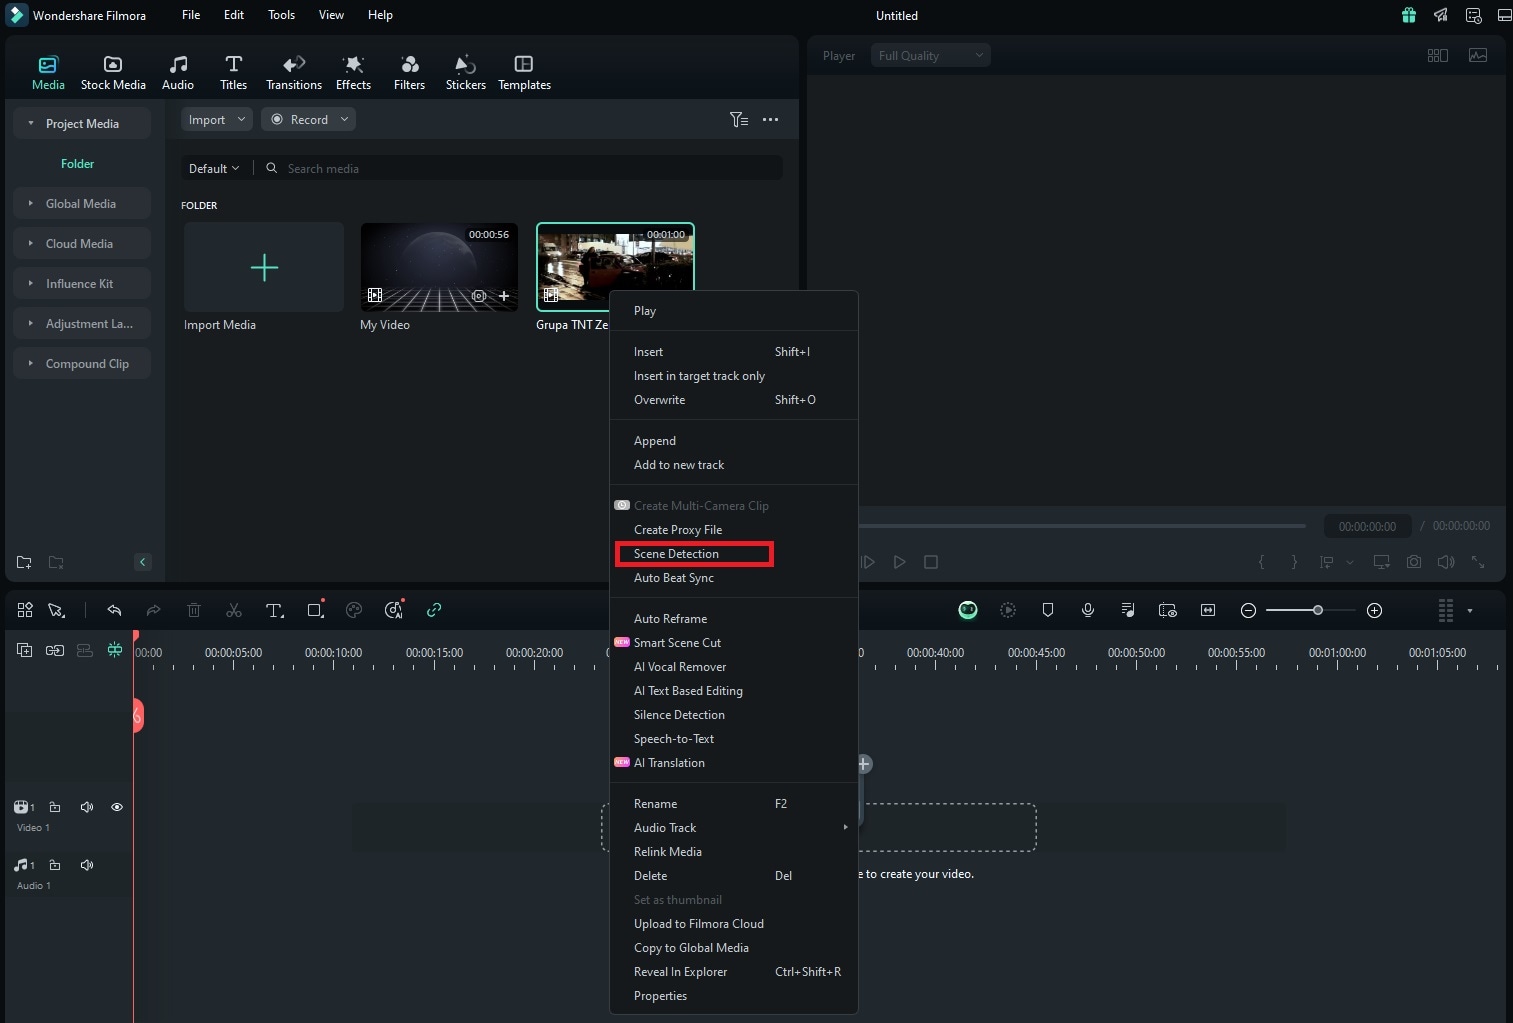
Step 7: To split the video into different segments, use "Scene Detection." Simply right-click the video in the media panel and select Scene Detection.
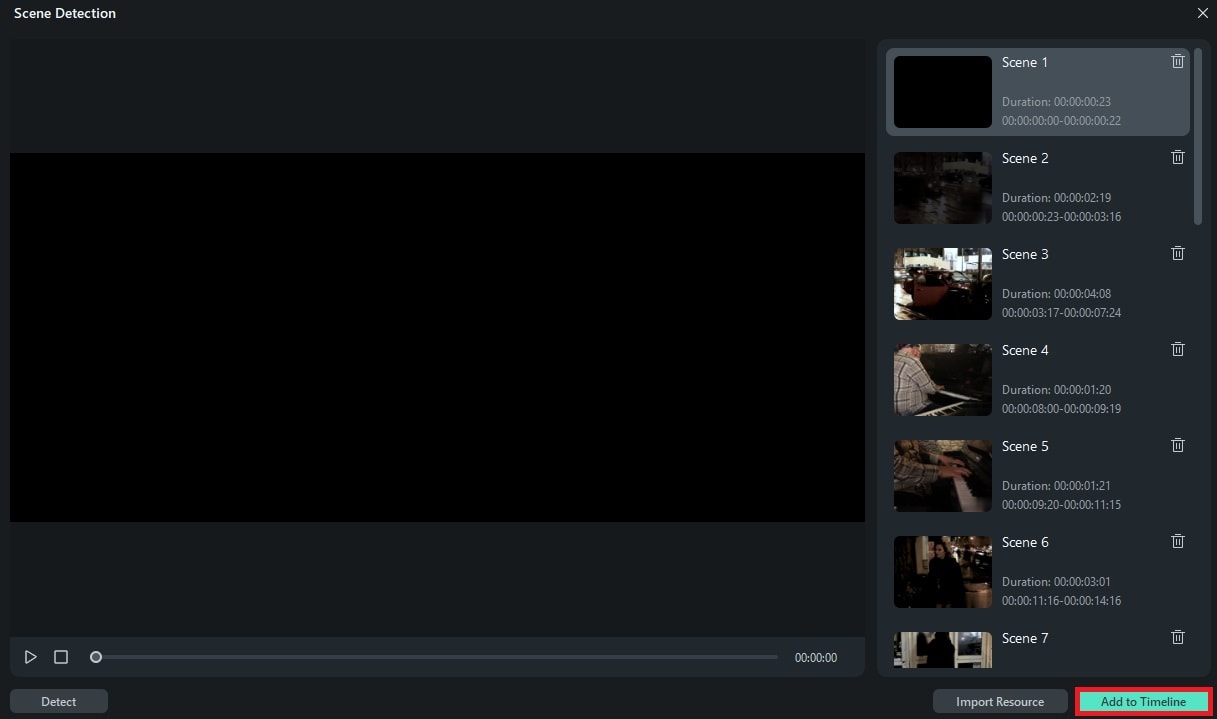
Step 8: You can see all the detected scenes on the right. Select and preview them on the right and click the trash icon to remove them instantly. When ready, click Add to Timeline.
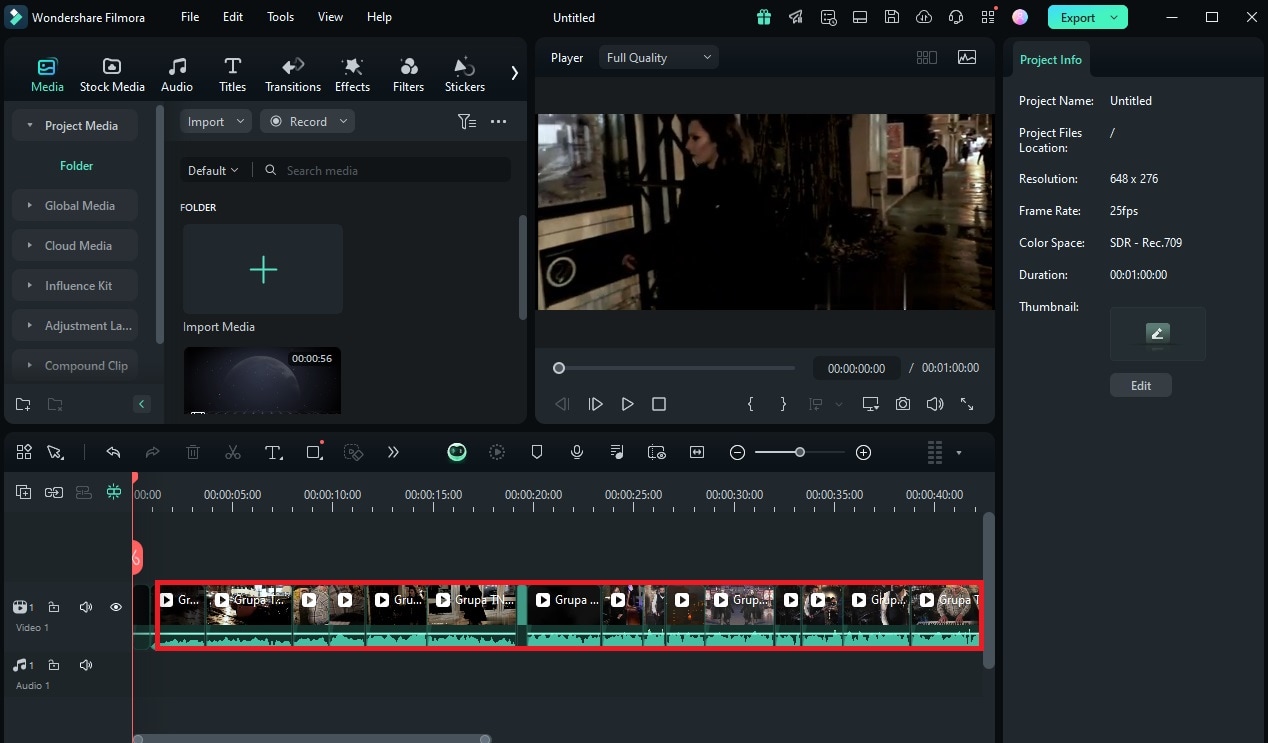
Step 9: The whole video will be added to the timeline in separate sections. If you don't like a specific section, select it and press "Delete" to cut that scene.
Conclusion
FFmpeg is an excellent tool for developers who want to edit and create videos and editing functions for their apps. It can also be used for resizing, merging, cropping, etc. However, it has a steep learning curve and isn't ideal for all users.
If you want a simpler alternative to generating, recording, and editing videos, we recommend video editing software like Filmora. Most people want a simple solution that allows them to easily handle their edits.


 100% Security Verified | No Subscription Required | No Malware

