Converting a sequence of images into a video is a reliable way to create time-lapses, slideshows, or animations. One of the most versatile tools for this task is FFmpeg.
FFmpeg (Fast Forward Moving Picture Experts Group) is an open-source command-line utility that has various libraries and programs for handling multimedia data. And it offers a range of customizable options to convert image sequence to high-quality video.
So, if you’re wondering how to convert ffmpeg image sequence to video, this comprehensive guide will walk you through the steps to execute the task regardless of your skill level.

In this article
How To Convert FFmpeg Image Sequence to Video
Converting a sequence of images into a video with FFmpeg is a powerful way to create slideshows, time-lapses, or animations. Before diving into the conversion steps, it’s helpful to know which image sequence formats FFmpeg supports and how to prepare your images properly.
Supported Image Sequence Formats
FFmpeg supports a wide range of image sequence formats, including JPEG (.jpeg, .jpg), PNG (.png), TIFF (.tiff, .tif), BMP (.bmp), GIF (.gif), PPM (.ppm), PGM (.pgm), PBM (.pbm), PNM (.pnm), and WebP (.webp).
To convert an image sequence into a video using FFmpeg, you'll need to follow a series of steps. While these steps might be tricky for users with no technical background, we’ve explained it in the simplest way possible to help you understand how it works.

Step 1. Preparing Your Image Sequence
- Naming Convention: Ensure your images are named in a sequential order. For example, image-001.png, image-002.png, image-003.png, etc. This helps FFmpeg recognize the order of images.
- Consistent Format: Make sure all images are of the same format (e.g., all .pngor .jpg) and have the same dimensions.
Step 2. Installing FFmpeg
Before you proceed, make sure to install the FFmpeg tool on your system. You can check this by running the command:
On Windows: Press Windows + R on your keyboard. Then, enter ffmpeg.exe -version and click enter.
On Mac: Open the “Terminal Window” and type “ffmpeg-version”.
If FFmpeg is not installed, download and install it from the official FFmpeg website.
Step 3. Convert Image Sequence to Video
If you have a series of images named sequentially, (e.g., image-0001.png, image-0002.png, etc.), enter the following command into ffmpeg tool;
ffmpeg -framerate 25 -i image-%03d.png-c:v libx264 -r 30 -pix_fmt yuv420p output.mp4This is what the above command means;
- -framerate 25: Sets the input frame rate to 25 frames per second. Adjust this value based on how fast you want the video to play.
- -i image-%03d.png: Specifies the input file pattern. %03d is a placeholder for sequential numbers with zero padding (e.g., 001, 002).
- -c:v libx264: Uses the H.264 codec for video compression, which is widely supported and provides good quality.
- -r 30: Sets the output frame rate to 30 frames per second. This can be adjusted as needed.
- -pix_fmt yuv420p: Sets the pixel format to yuv420p, which ensures compatibility with most players.
- output.mp4: The name of the output video file.
However, if your images are not sequentially numbered but have a consistent extension (e.g., .png), you can use a glob pattern to convert them to videos. The command for using “Glob Pttern” is;
ffmpeg -framerate 30 -pattern_type glob -i ".png" -c:v libx264 -pix_fmt yuv420p output.mp4Step 4. Advanced Options
- Specifying Start Frame: Use -start_number if your sequence starts from a number other than 001.
ffmpeg -framerate 25 -start_number 100 -i image-%03d.png-c:v libx264 -r 30 -pix_fmt yuv420p output.mp4- Adding Audio: Adding audio to your video is a great way to make it more interesting to watch. You can add an audio track with the -i option. Here is the command;
ffmpeg -framerate 25 -i image-%03d.png-i audio.mp3 -c:v libx264 -c:a aac -r 30 -pix_fmt yuv420p output_with_audio.mp4- Looping Images
To loop each image for a specific duration, use the -loop and -t options:
ffmpeg -loop 1 -t 5 -i image1.png-loop 1 -t 5 -i image2.png-loop 1 -t 5 -i image3.png-filter_complex "[0:v][1:v][2:v]concat=n=3:v=1:a=0" -c:v libx264 -pix_fmt yuv420p output.mp4- Adding Transition Effects
To add fade-in and fade-out effects between images:
ffmpeg -i image1.png-i image2.png-i image3.png-filter_complex "[0:v]fade=t=in:st=0:d=1,fade=t=out:st=4:d=1[v0]; [1:v]fade=t=in:st=0:d=1,fade=t=out:st=4:d=1[v1]; [2:v]fade=t=in:st=0:d=1,fade=t=out:st=4:d=1[v2]; [v0][v1][v2]concat=n=3:v=1:a=0,format=yuv420p[v]" -map "[v]" output_with_fades.mp4Tips for FFmpeg Sequence of Images to Videos
- Ensure all images are in the same directory where you run the FFmpeg command.
- Adjust the -framerate and -roptions to control the speed and smoothness of the video.
- If you encounter issues with playback on certain devices, ensure the pixel format is set to yuv420p.
Why Do I Fail To Convert Image Sequence to Video in FFmpeg?
There are several reasons that you may fail to convert image sequence to video in FFmpeg. In this part, we’ve highlighted some of the common reasons for this problem and the best solution to fix it.
-
Incorrect images file size
This is one of the main reason you might fail to convert image sequence to video on ffmpeg. Perhaps the images in the image sequence are too small or too big, ffmpeg will be unable to accurately calculate and determine how the images are related.
cat jpg2mp4.sh test -d "$1" || exit tmpdir=$(mktemp -d -p .) counter=0 find $1 -iname '.jpg' | while read.jpgdo convert -resize 1440x1080 .jpg$tmpdir/IMG_$(printf "%04d" $counter).JPG counter=$((counter + 1)) done echo ffmpeg -i $tmpdir/IMG_%4d.JPG test.mp4-
Non-Sequential File Naming
Ffmpeg may also fail to convert an image sequence to to video if the images are not sequentially numbered or there are gaps in the numbering.
Also, if there are gaps, you can rename the files or use a glob pattern to include all files.
-
Empty or Corrupted Input Files
If some of the image files are empty or corrupted, it can also cause ffmpeg to not convert image sequence to video.
-
Incorrect Command Syntax
There might be a syntax error in the FFmpeg command.
Here is a corrected example command incorporating some of the solutions mentioned:
ffmpeg -framerate 25 -start_number 100 -i image-%03d.png-c:v libx264 -r 30 -pix_fmt yuv420p output.mp4This command sets the input woframerate to 25 fps, starts from image-100.png, uses the H.264 codec, sets the output framerate to 30 fps, and uses the yuv420p pixel form
Two Easier Way to Convert Image Sequence Without using FFMPEG
As mentioned earlier, users with no technical background might find it difficult to use ffmpeg to convert image sequences to video. This is why we recommend using the Wondershare Filmora video editing software for the conversion.
Filmora Video Editor is an advanced video editing software that’s designed to facilitate various video editing tasks, including the conversion of image sequence to video. This tool boasts many interesting features, including ready-made templates , green screen, motion tracking, and more.
Also, Filmora has built-in AI tools, such as AI video interpolation, AI Music Generator, AI Portrait Cutout, AI Thumbnail Maker, and lots more that can help you enhance video editing tasks.
Key features of the image sequence to video feature in Filmora
- Direct Import: Easily import a folder of sequentially numbered image files (e.g., JPG) directly into the project timeline without complex conversion processes.
- Speed Control: Adjust the playback speed of the image sequence to create time-lapse or slow-motion effects.
- Cloud Integration: Import images directly from cloud services like Google Drive and Dropbox, simplifying the workflow.
- Export Options: Export the final video in multiple formats (e.g., MP4, MOV, AVI) and resolutions to suit different project needs.
Step 1: Install the Filmora Video Editor app on your Mac or PC and launch the app.
- Click on “Create New Project” and Click the "Import" button and navigate to your image folder. Then, you can import the “Image sequence” that you want to convert to video. Select the first image of your sequence and check the "Image Sequence" box.

Step 2. Once you’ve successfully imported the image sequence, drag-and-drop them to the “Timeline”. Then, start adjusting the settings according to your requirements.

- You can add effects, titles, and lots more to enhance the quality of the video output.
Step 3. After the customization, click on “Export” and select the video output format.

- You can also adjust the frame rate of the video. Then, choose the oath you want to save the file and select “Export”.

🤩 Post You Might Be Interested In:
AI Image to Video tool in Filmora
For an even faster and more convenient way to turn your photos directly into dynamic videos, Filmora offers a dedicated AI Image to Video tool. This feature automates much of the editing process, applying transitions, effects, and music based on professionally designed templates. Here's how to use it:
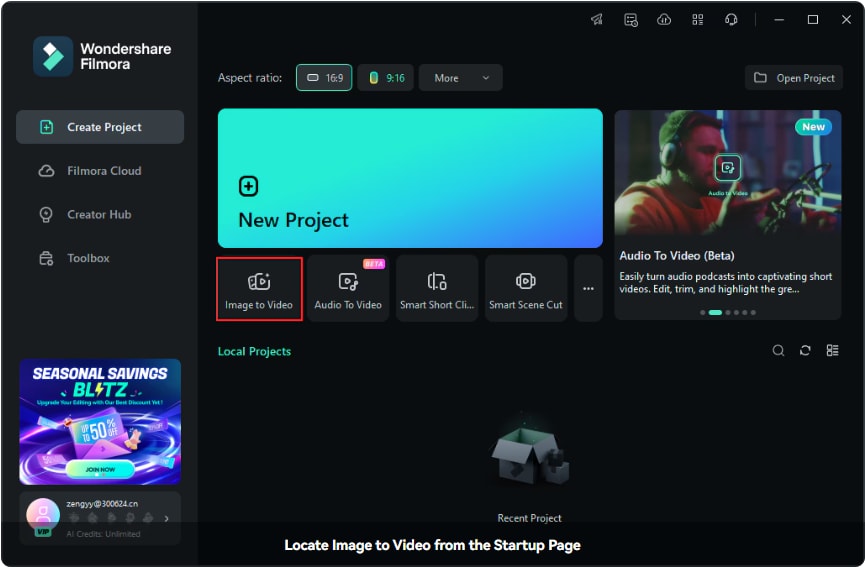
Step 1: After launching Filmora, you can find the AI Image to Video feature directly on the home screen under the Toolbox section (as shown in the screenshot). It is the first option displayed.

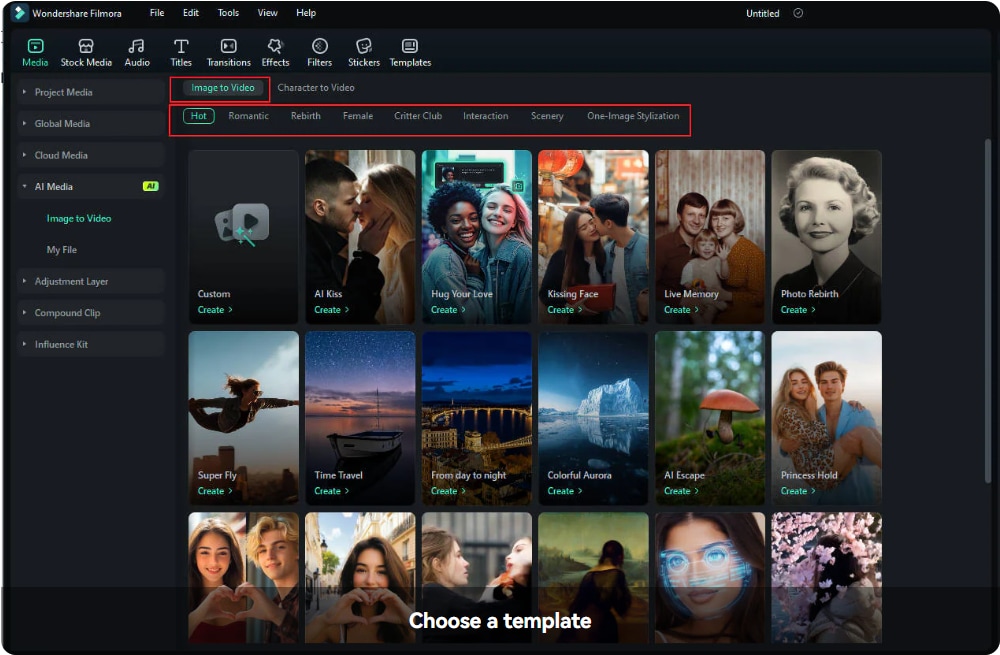
Step 2:Browse through the available templates under the Image to Video section and click Create under your selected template to proceed.

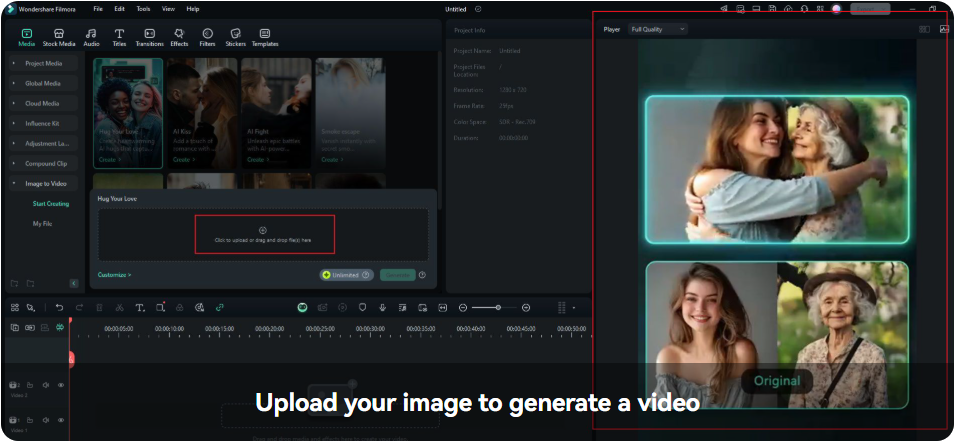
Step 3: Once you click on a template, a preview of its effects will appear in the Player on the right. This helps you visualize the result before proceeding. Drag and drop your images into the upload area or click to browse files on your computer.

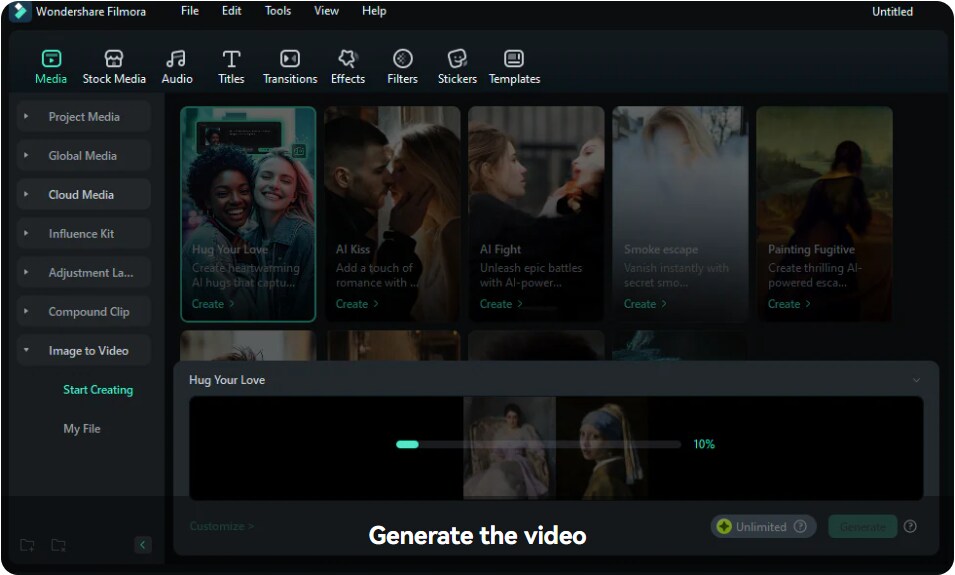
Step 4: Once your images are uploaded and settings are finalized, click Generate to create your video. A progress bar will appear as the AI processes your inputs. It may take anywhere from tens of seconds to 3 minutes to generate the video.

Conclusion
Converting an image sequence to a video using FFmpeg is not difficult if you understand the steps to operate. All you need is to follow the steps we’ve shared.
However, if you want a simpler way to convert image sequence to video without ffmpeg, the Filmora Video Editor iw what you need.


