Do you want to turn your video clip into a sequence of images? Maybe, you want to create a GIF or edit the video frame by frame. Well, if your answer is yes, you are in the right place!
Converting a video to image sequence seems like a hard task. However, there are tools and software available that can help you do it in just a few clicks.
This article is going to explore four effective ways to convert video to sequence of images. We will walk you through their step-by-step guide to make it more simple for you!
Let's dive in!
In this article
Part 1. How To Convert Video To Sequence of Images in Filmora FREE [Best Way]
If you want a reliable and efficient way to convert MP4 to image sequence, Wondershare Filmora checks all the boxes. It can easily extract images in various formats, including JPEG, PNG etc., and lets you do detailed analysis, create animations and more.
The plus point is that you don't need to learn Filmora. It is designed for every user. Whether you are a beginner or a pro, you can easily use it.
Furthermore, Filmora is not just limited to extracting images; it has many other features too. You can say it is a complete editing toolkit for your basic and even advanced projects.
Advantages of Video to Image Sequences Conversion in Filmora
- Snapshot Functionality: Capture specific frames from the video using the snapshot feature, allowing for precise extraction of still images.
- Export as Image Sequence: Convert the entire videos to image sequences by selecting the Image Sequence option in the export menu, enabling the creation of high-quality stills.
- Multiple Format Support: Export images in various formats, such as PNG or JPEG, to suit different project needs.
- Automatic Frame Detection: Filmora automatically detects and organizes frames, simplifying the process of converting videos to images.
- High-Quality Output: Maintain the original quality of frames during extraction, ensuring that images are suitable for professional use.
Steps to Convert Video to Image Sequence Using Filmora
First, download and install the Filmora software on your PC/laptop. Then, follow the instructions given below:
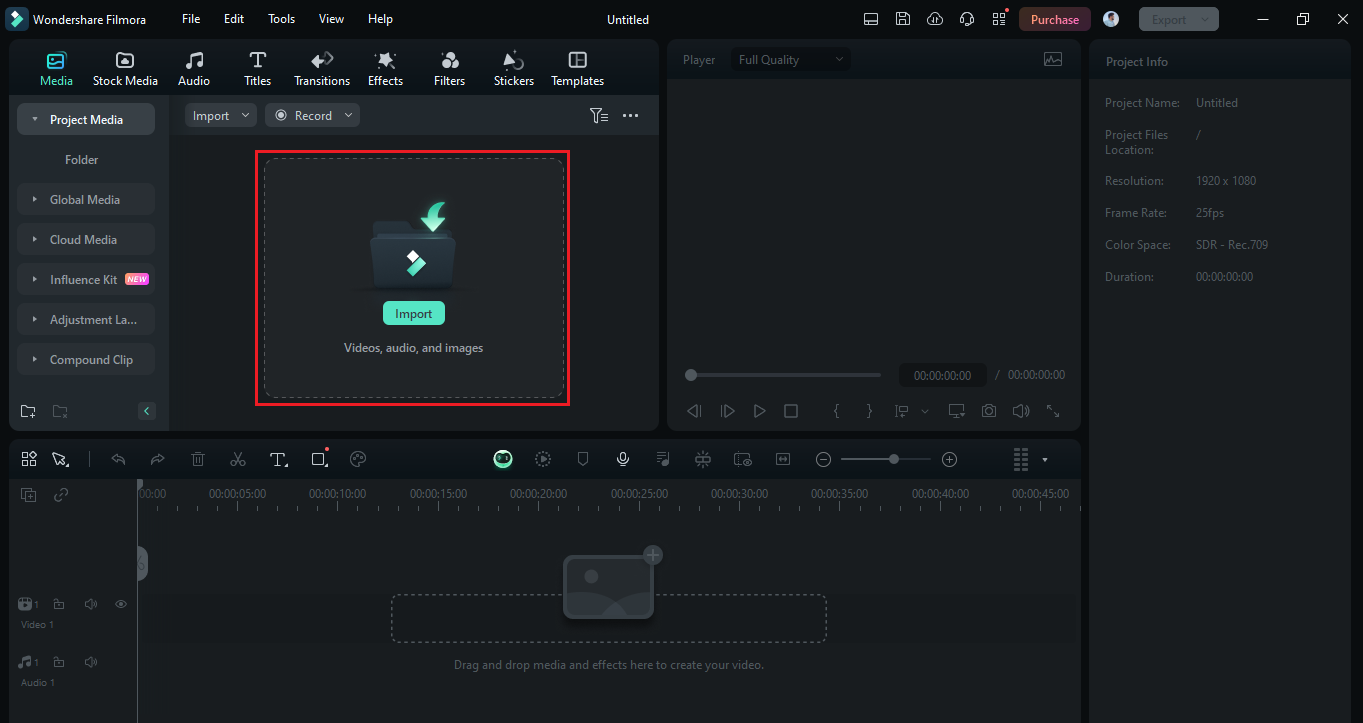
Step 1: Open the Filmora software on your computer, click on "Import," and open the video. You can also drag and drop it here.
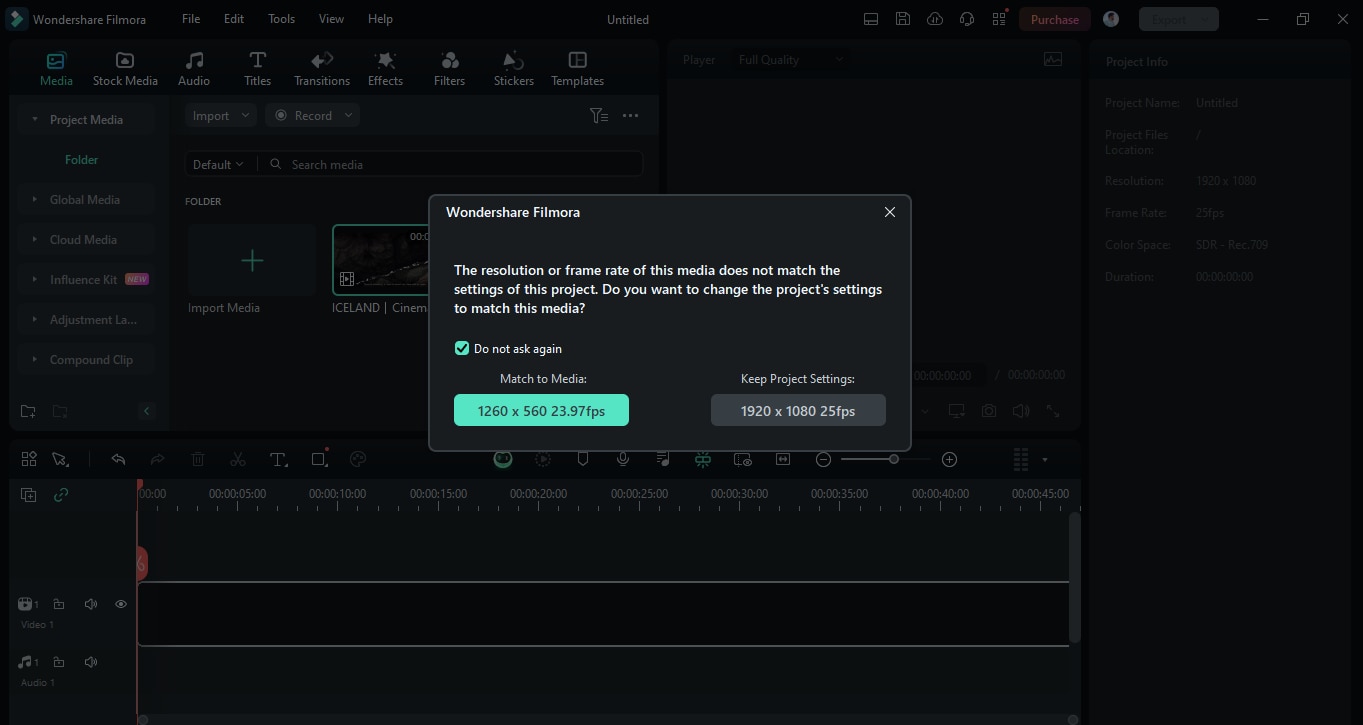
Step 2: Once your video is imported to Filmora, drag it onto the timeline and select the resolution you want.
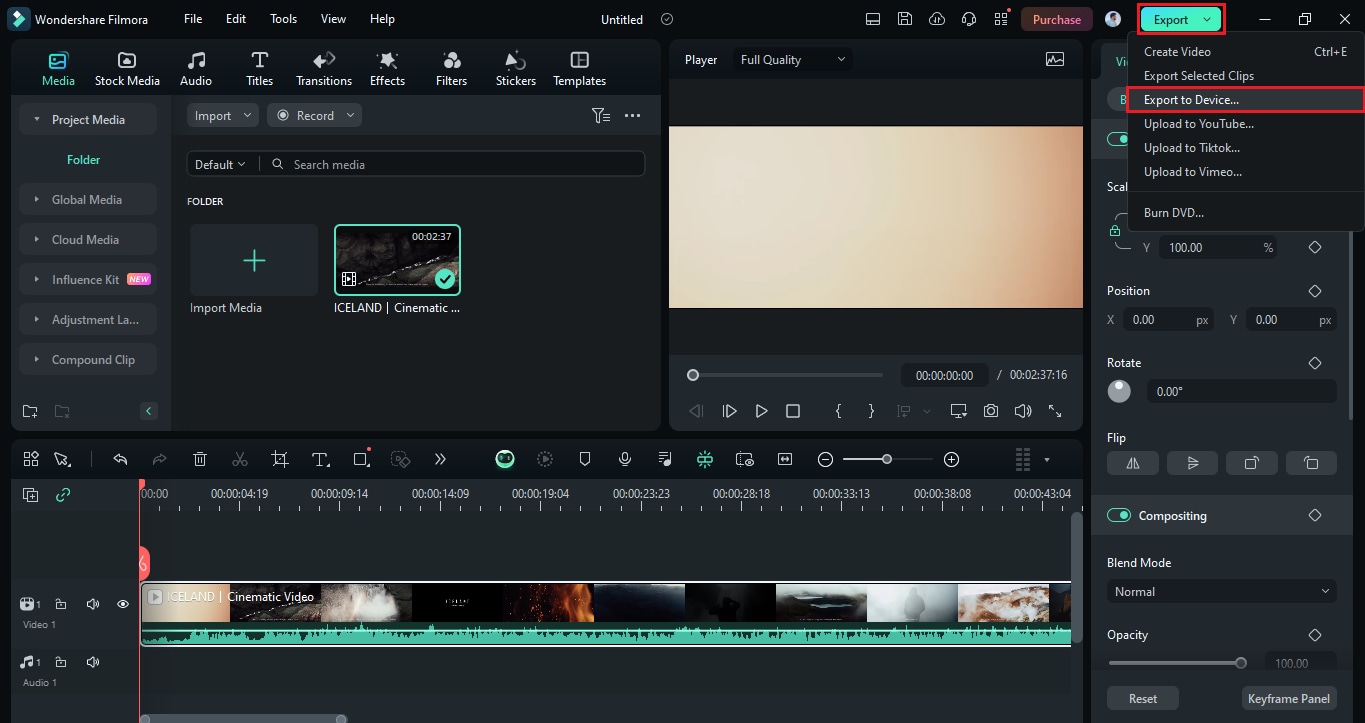
Step 3: Click the "Export" on the top-right and then select the "Export to Device" " option. You will see a pop-up appear on your filmora interface.
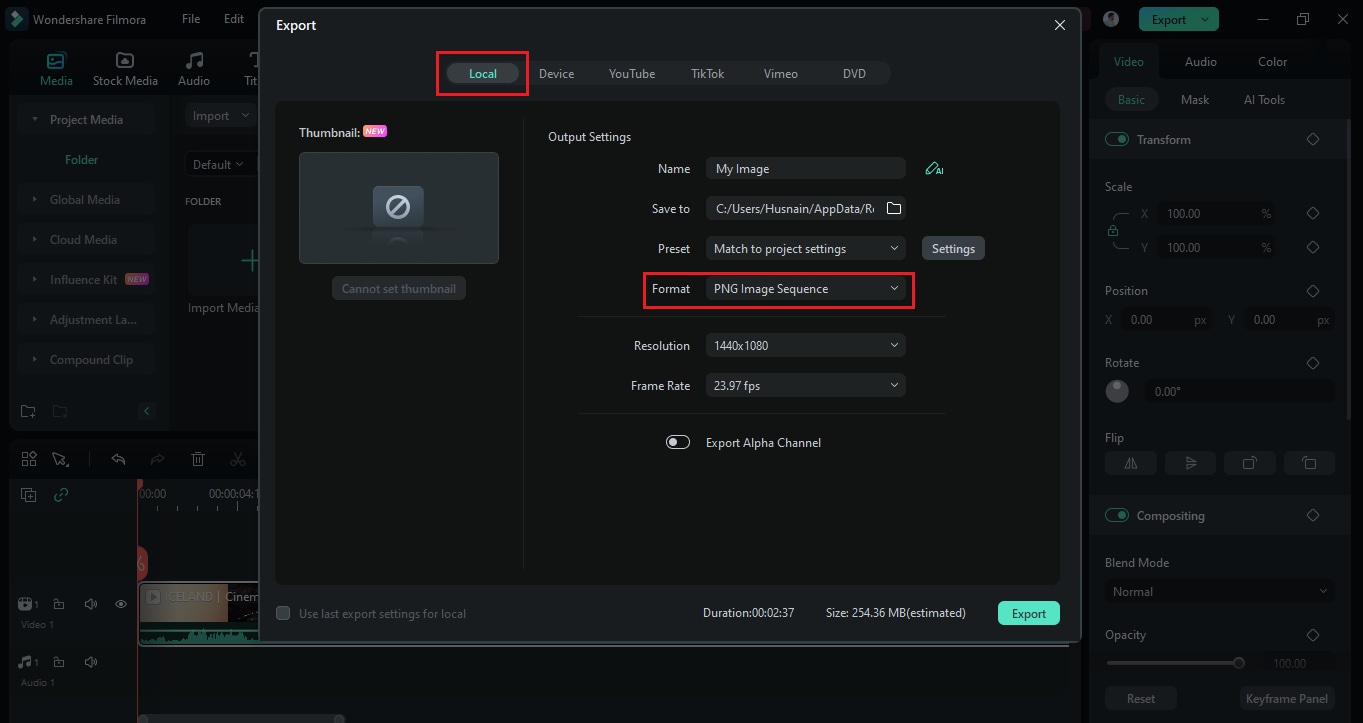
Step 4: Select "Local" from the top menu bar. Then, select the output format as "PNG Image sequence" or “JPG Image sequnce” You can also change the frame rate and resolution (If needed).
Step 5: Once output customization is done, click the "Export" button, and Filmora will start converting your video to image sequence.
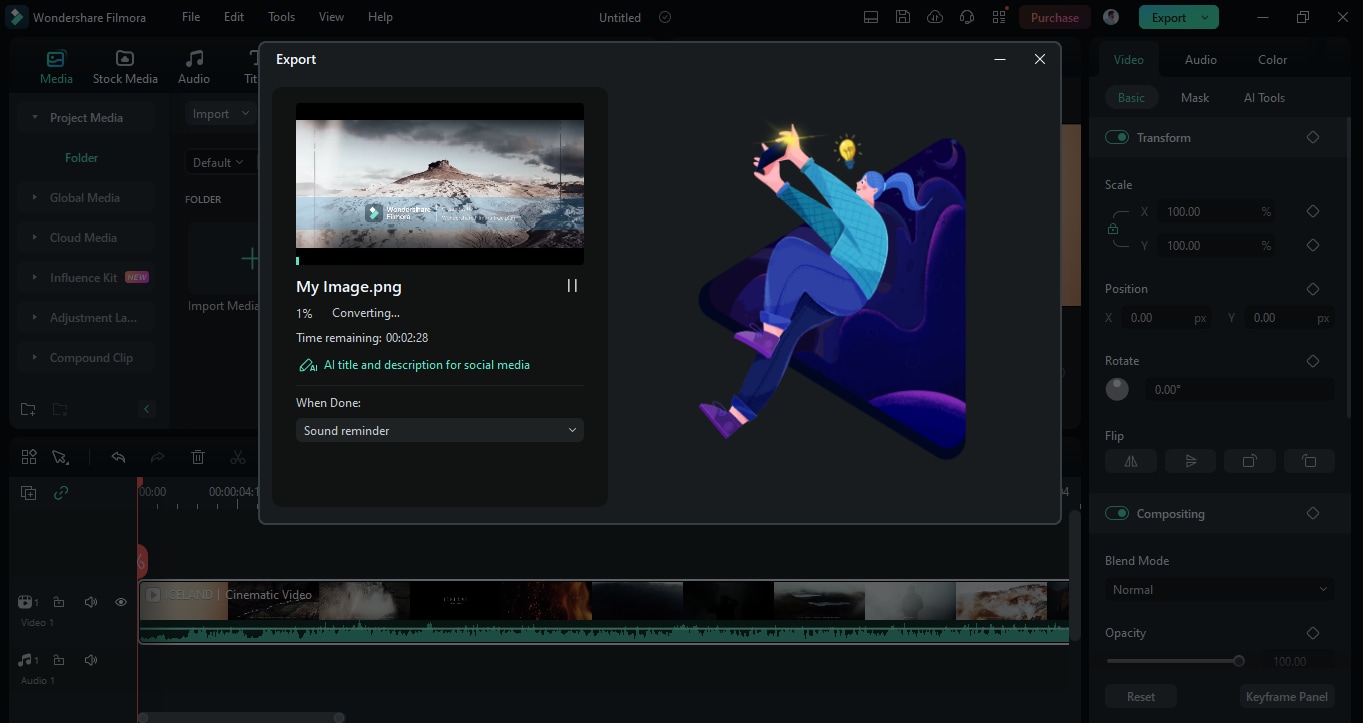
So, this is how to convert video into image sequence using Filmore. However, there are a few things that you should keep in mind while conversion.
Key Tips:
- Make sure to choose the appropriate image format (PNG for lossless quality and JPEG for smaller files).
- Set the desired frame rate (e.g., 24fps, 30fps).
- Make sure you have enough storage space to save the extracted images.
- For large videos, consider using a local software solution rather than online tools.
Now, let's move forward and explore how to turn video into image sequence using alternative options.
Part 2. Convert Video to Image Sequence Without Professional Software
Sometimes, we don't want to use the professional tools just for the simple tasks. In this situation there are easy and quick options that you can go for. This section will explore the three alternatives of professional software to convert video to sequence of images.
These alternatives are as follows:
- VLC (free media player with cutting, merging and extracting capabilities)
- FFmpeg (free, command-line tool)
- Online converters (though these may not handle large image sequences well)
Let’s move forward and explore these in detail!
Way 1. Turn Video Into Image Sequence in VLC
VLC is one of the most popular media players in the world. It is available for almost every OS, including Windows, Mac, Linux and even for Android and iOS.
However, this media player is not just limited to playing your video file. It is a multipurpose tool that helps you convert audio/video files, download streaming videos and even extract images from a video.
Moreover, you also get various editing options. VLC allows you to change the output image format, color depth, color mode and more. It supports almost all video formats, so you can convert any video to sequence of images.
Steps to turn video into image sequence using VLC
You can follow the instructions below to convert video to sequence of images with VLC:
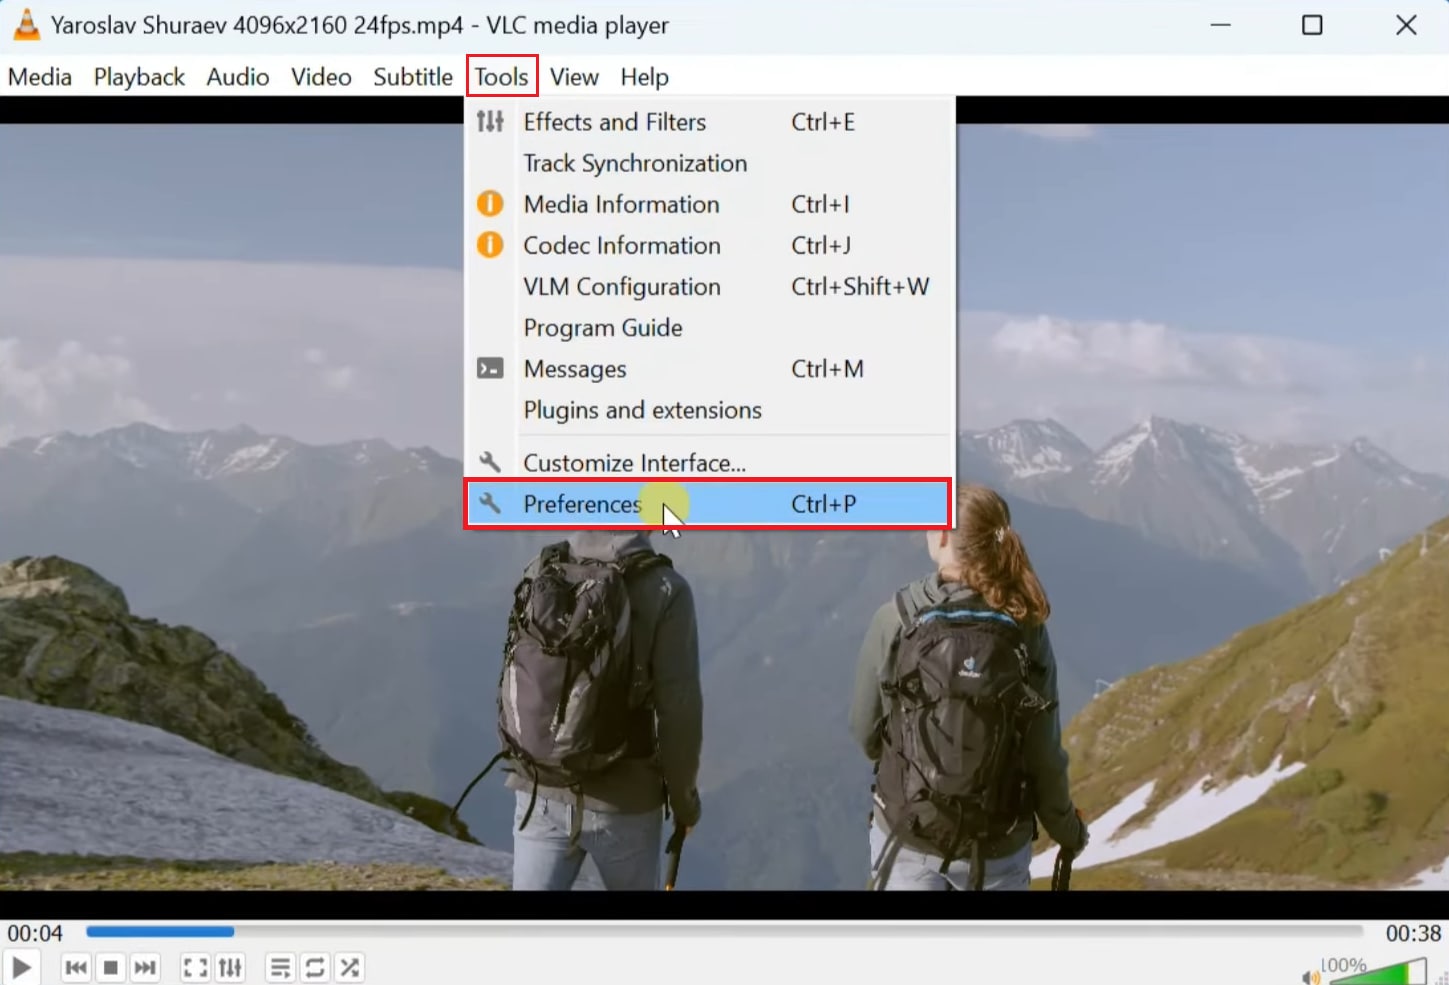
Step 1: Open your video with VLC. Then, select " "Tools" " from the VLC menu bar and select "Preferences."
Step 2: Next, select the "All" option, scroll down and in the "Video" section, select "Filters" > "Scene Filter."
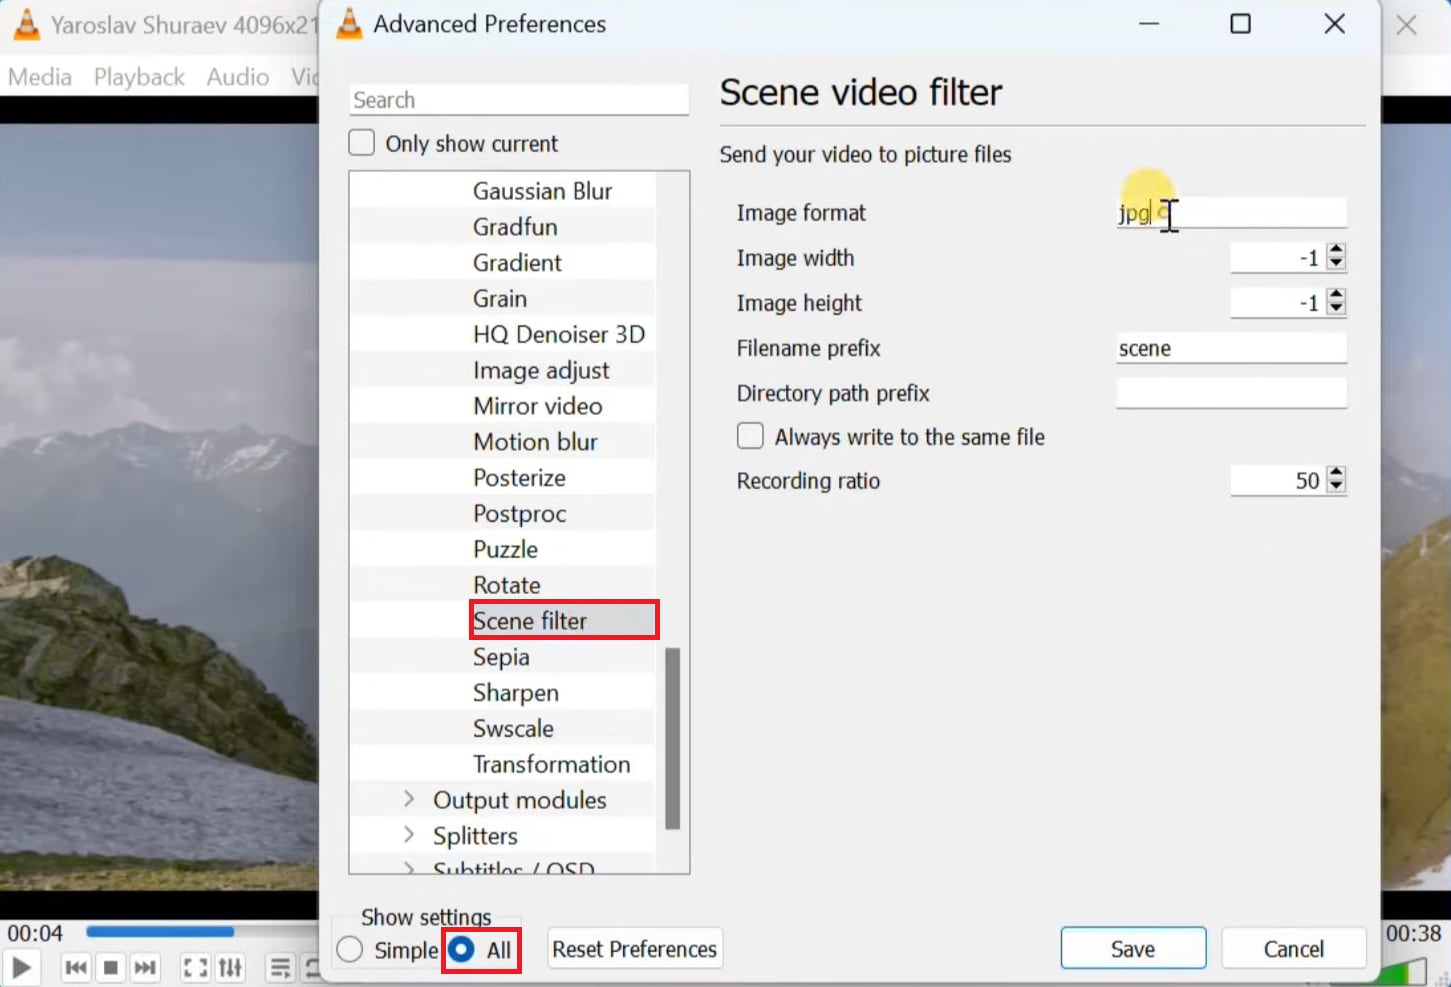
Step 3: Here, change the image format to "PNG" or any other format you want. You can also change other settings (if required).
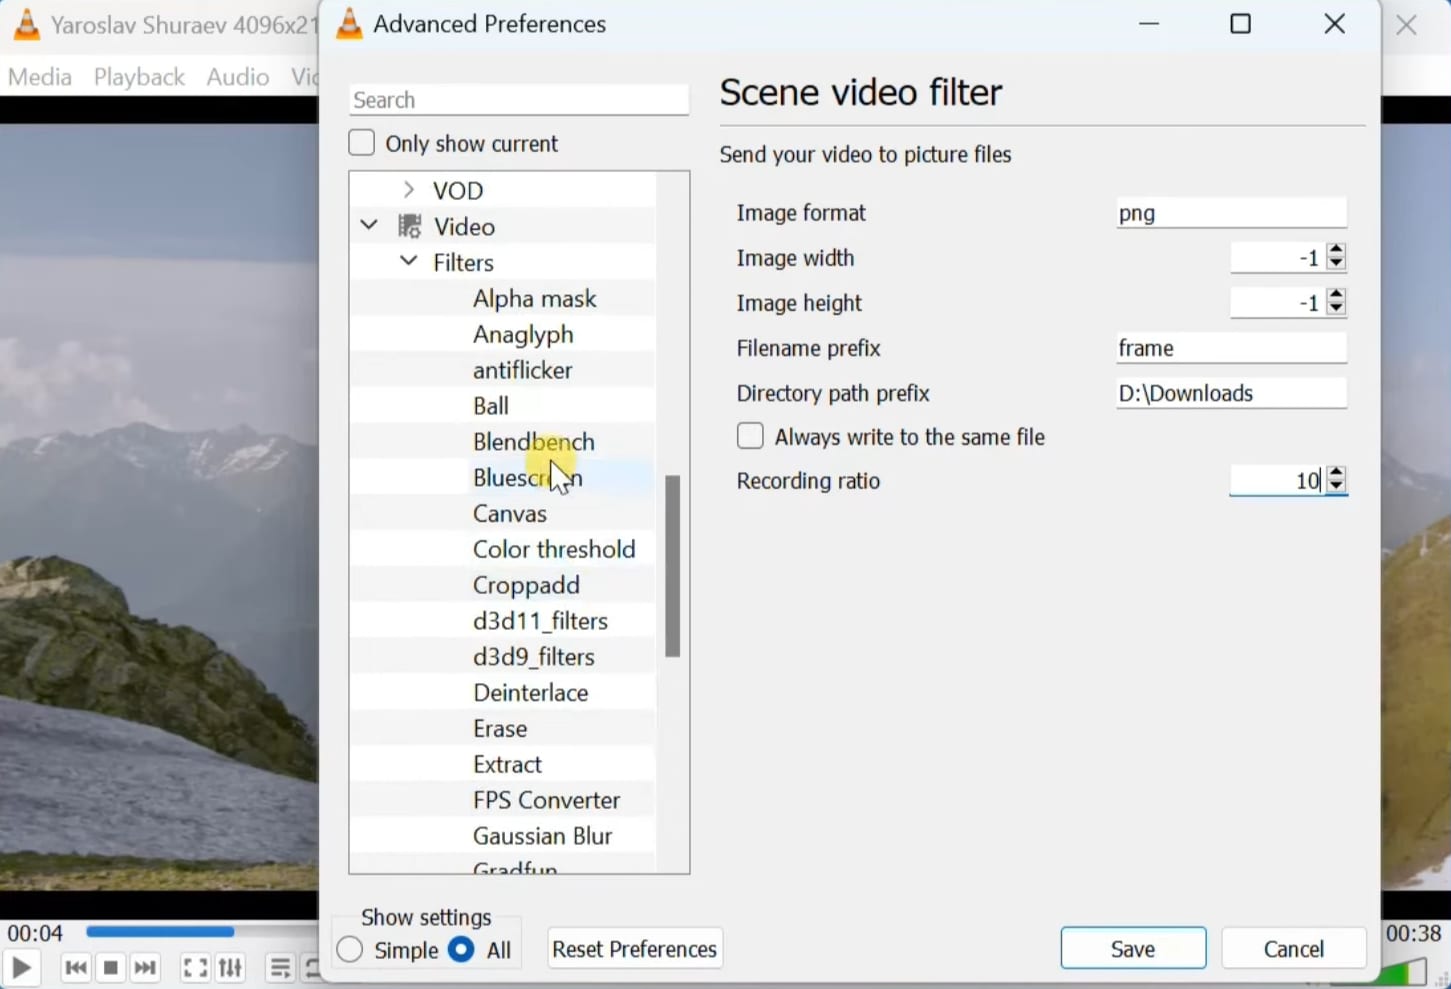
Step 4: Next, click the " "Filter" option again and choose " "Scene video filter." Then, click the "Save" button and proceed.
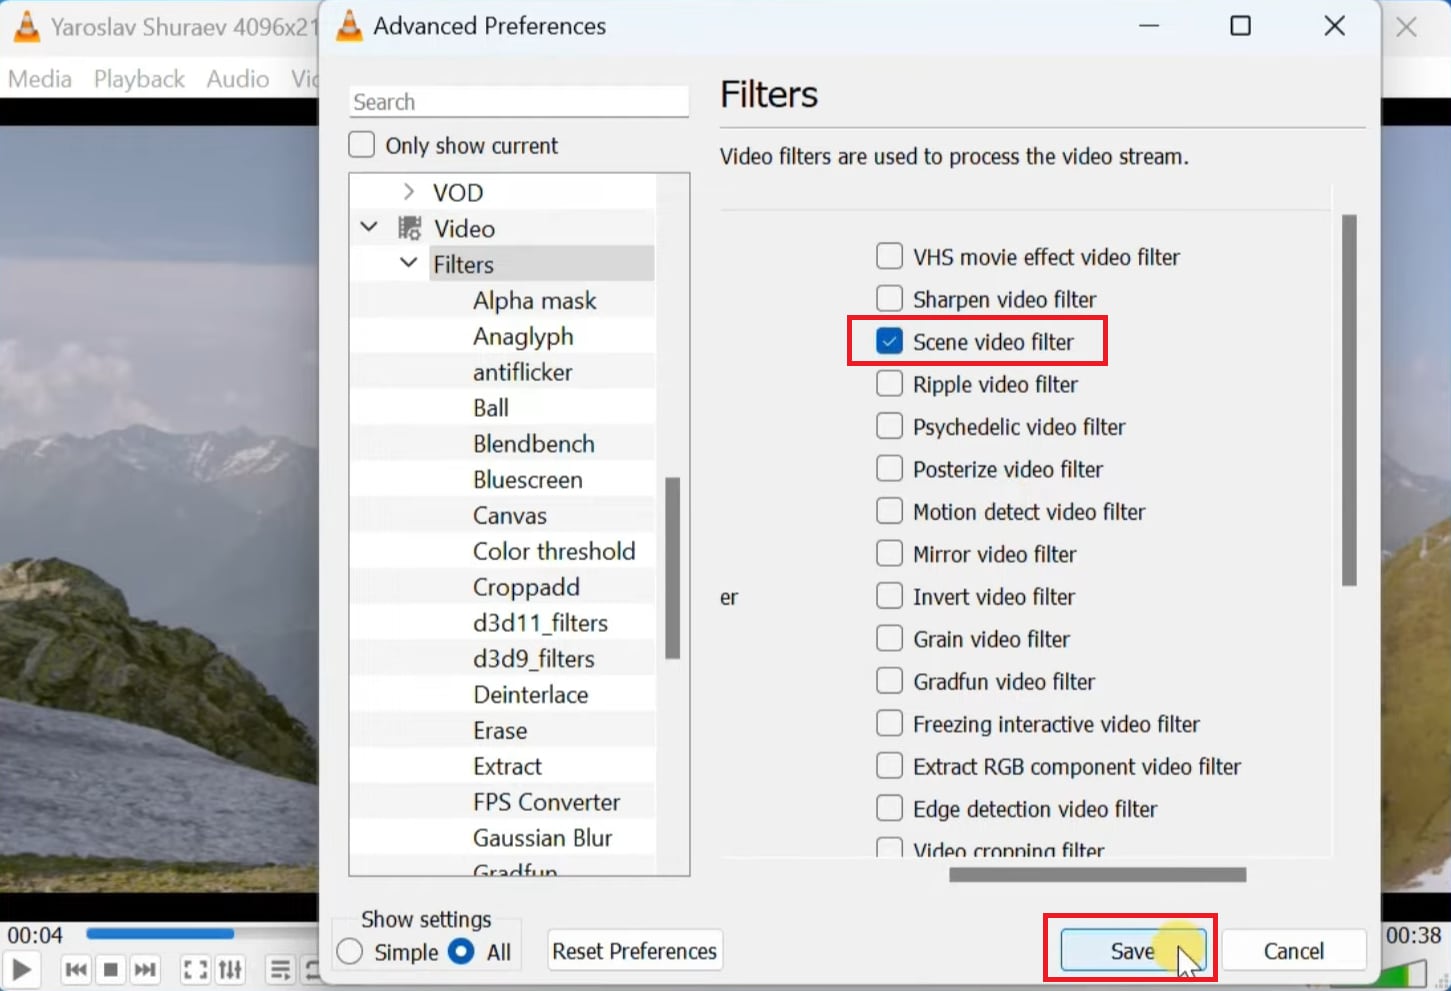
Step 5: Next, close the VLC media player, open it again and select the video that you want to convert. VLC will automatically start saving its frames.
Once done, you can view them in the folder you selected.
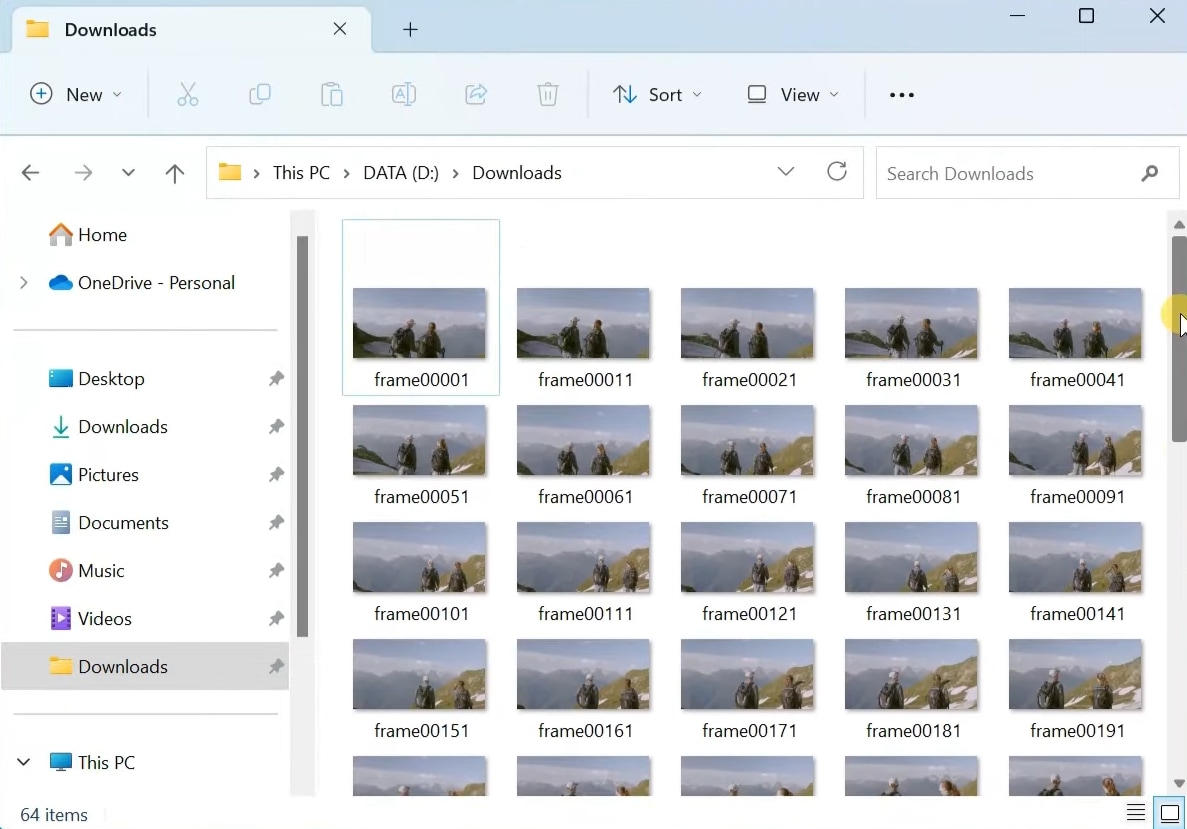
So, this is how you can use VLC media players to extract frames from your video. However, if you don't use this software, you can try another method.
Way 2. Convert Video to Image Sequence With FFmpeg
Using FFmpeg is another approach to convert a video to image sequence. It is a free command-line tool that you can use to convert your audio/video files.
With this tool, you can also change the format of your videos, add effects, edit the video, extract image frames, and more.
However, you should be familiar with the command-line system to use FFmpeg. Otherwise, it is going to be very techy for you.
Steps to convert video to image sequence with FFmpeg
Here is how you can convert video to image sequence with FFmpeg:
Step 1: Open the official website of FFmpeg on your brower and download it on your computer.
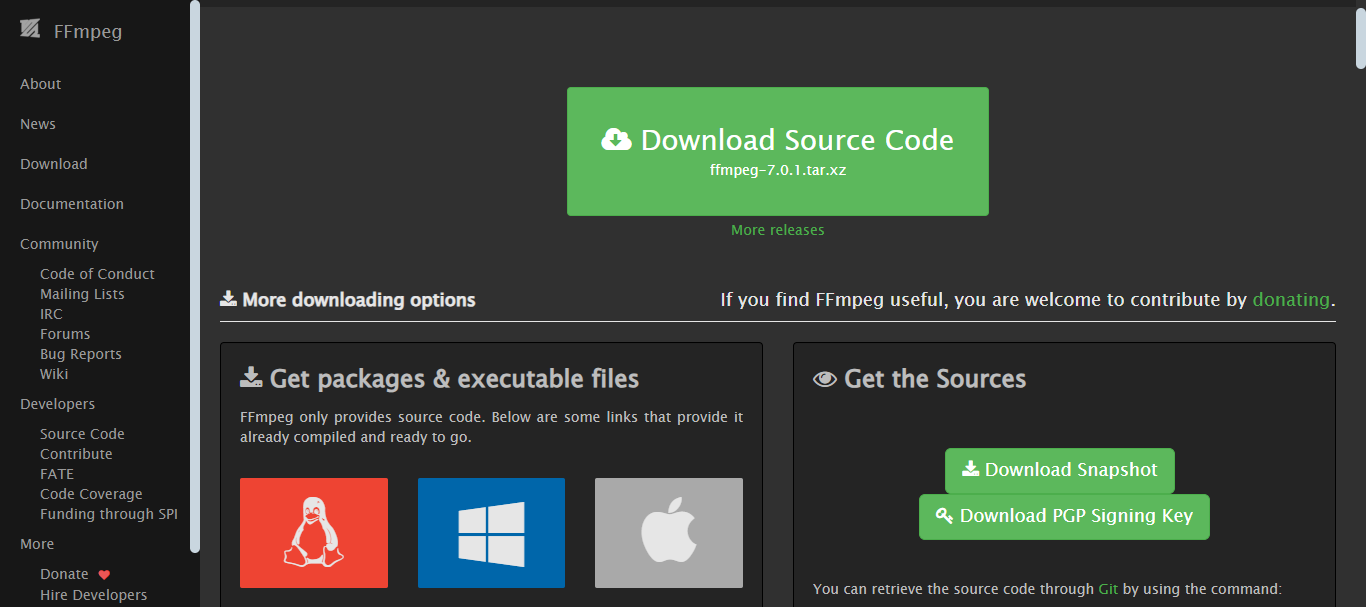
Step 2: Open Command Prompt by clicking the "Start" Button and searching for Command Prompt, or use the shortcut "Windows key + X" to open it. Then press C, and type this command:
ffmpeg -i input.mp4 -pix_fmt rgba output_%04d.png
- Type the name of your video file in place of the input.
- Type the name of your output files in place of the output
- .pngis the image format that converts an MP4 to PNG image sequence. You can replace it with the format of your choice.
- pix-fmt rgba is used to add color space, and %04d is for naming convention.
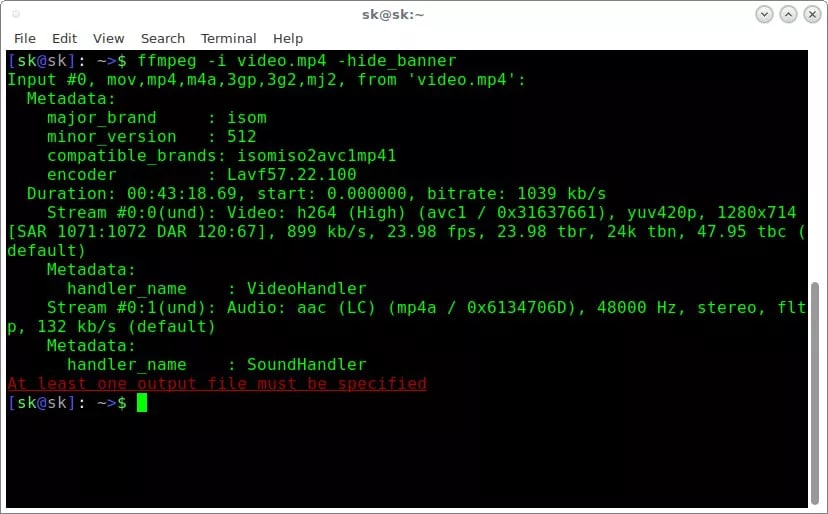
Step 3: Once everything is ready, click "Enter." FFmpeg will convert your MP4 to image sequence.
This method can be quite difficult for those who are not into tech. Therefore, you can go for any online tool or use VLC to convert video to a sequence of images. Let's explore the online converter with its step-by-step guide.
Way 3. Export Video to Image Sequence Using an Online Converter
If you don't want to use professional tools or software, an online converter can also be an excellent option. With an online tool, you can quickly and easily export video to image sequence. However, among so many tools, it is quite confusing to select the reliable one. But don't worry, we have selected a popular one for you - "Ezgif."
You just need to upload your video, and this online converter will convert it to an image sequence. This method is an ideal solution for those who don't want to download or install any extra software.
Steps to export video to image sequence using an online converter
You can follow the instructions given below to export video to image sequence online:
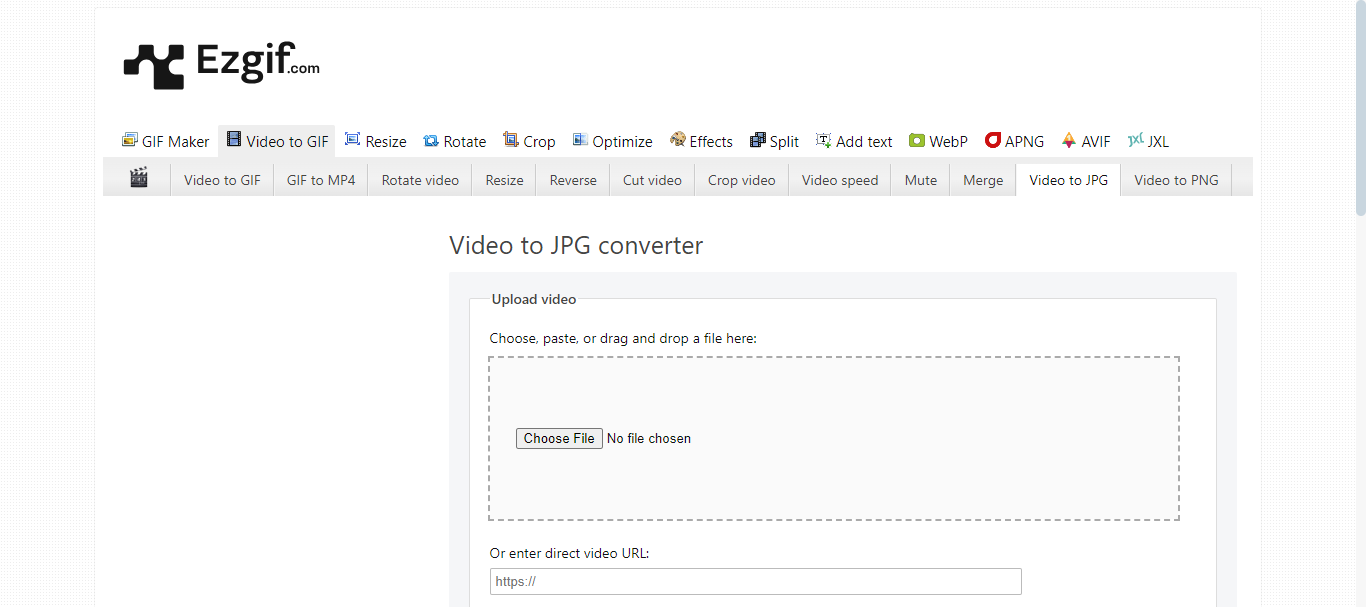
Step 1: Visit the official website of Ezgif on your browser. Select and upload the video you want to convert from your computer. You can also drag and drop it here.
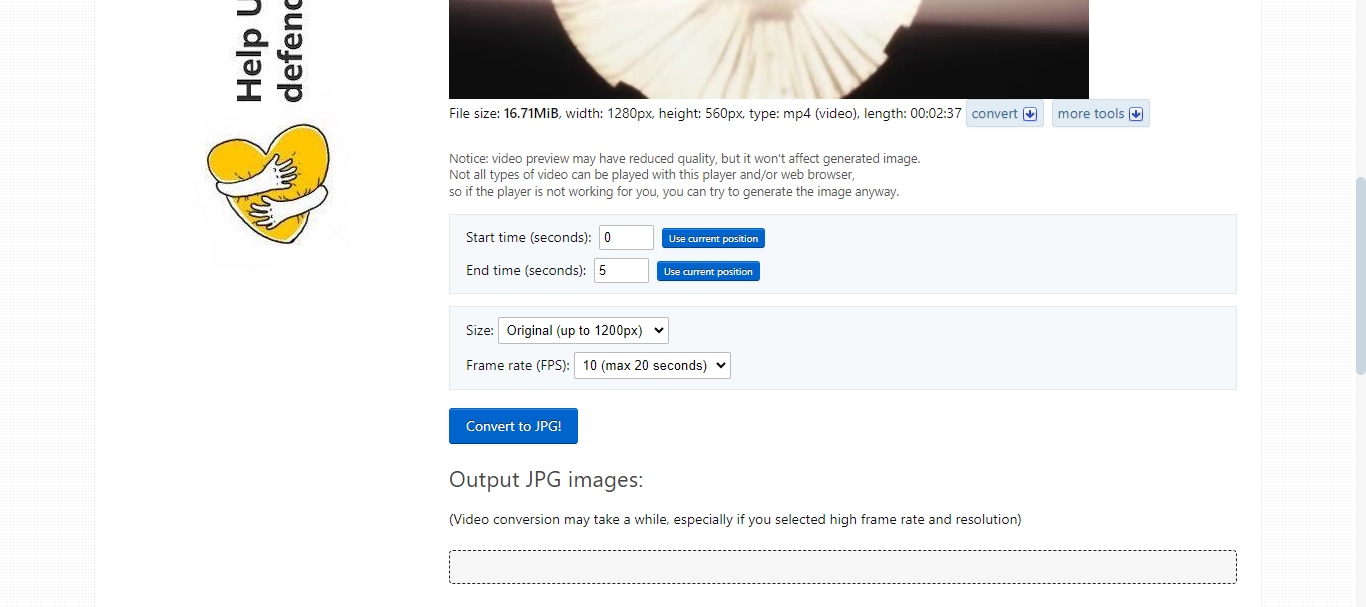
Step 2: Customize the output options according to your needs. Then click the "Convert to JPG" button.
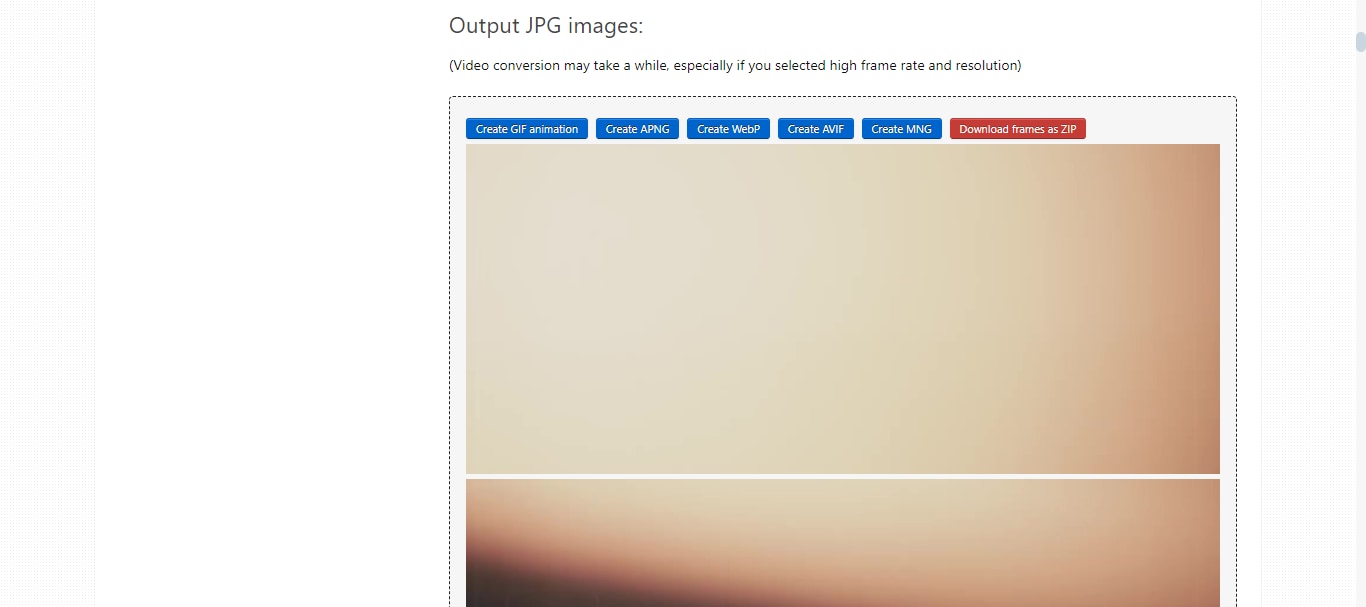
Step 3: You will see the output JPG images just below. Click the "Download frames as ZIP" " button. The ZIP file containing your frames will be downloaded to your computer.
Did you see this is the quick solution to convert video to image sequence? However, online conversion is not possible for large files. Also, the download link can contain bugs and viruses. So, it is safe to go for other options like Filmora and VLC.
Now, let's move forward and explore some scenarios where these image sequences are needed.
Part 3. What are the Use Cases of Converting Video to Image Sequence?
Converting video to an image sequence has many uses. Here are some common examples:
- Animation and Visual Effects: Animators and visual effects artists often convert video to images. It allows them to do detailed frame-by-frame editing.
- Photography and Art Projects: Artists and photographers can use this technique to capture specific frames for inspiration or creative projects.
- Education and Tutorials: Image sequences can help educators illustrate steps in a process clearly.
- Marketing and Social Media: Marketers can create engaging content by extracting key video moments for promotions or social media.
- Quality Control: Film and video professionals can inspect individual frames for quality assurance.
Conclusion
Wrapping it up! Converting videos to image sequences can be a useful skill. In this guide, we have explored four effective ways with their step-by-step guides.
However, the best method depends on your specific needs, technical skills, and available software. Free tools like FFmpeg and VLC can be effective for simpler conversions.
On the other hand, professional video editing software like Filmora offers the most control. It allows for high-quality and precise conversions. By choosing the right tool for your needs, you can easily convert your videos into image sequences.


