
The current digital environment favors consumption of content through silent scrolls. People frequently prefer silent videos while commuting, in meetings, or before going to bed, making audio optional. Presently, high-quality captions replace audio.
They no longer serve accessibility solely but ensure better performance. With captions, silent scroll videos become more accessible. No longer are captions used in silent scroll videos through CapCut if audio is present to report word-for-word. Visual storytelling is transformed.
To creators of TikTok, Instagram Reels, and video shorts, captions serve as visual 'hooks' to aid in stopping the scroll. This guide provides a comprehensive deep dive into how to add captions on Capcut, from manual craftsmanship to cutting-edge AI automation and introduces the advanced tools that are setting new industry standards.
In this article
Part 1: Why Add Captions
Before diving into the "how," it is vital to understand the "why." Captions serve three distinct masters: Engagement, Accessibility, and SEO.
The Engagement Factor
Human brains process visual information 60,000 times faster than text, but when text and audio are synchronized, it creates a "dual-coding" effect. This reinforces your message, making it stick in the viewer's memory far longer than audio alone.
Global Accessibility
Subtitles act as an inclusion bridge. They help the deaf, hard of hearing, and those learning a new language, particularly when there are difficult accents or fast speaking. In the new creator economy, they turn your content borderless.
The Hidden SEO Advantage
Social media algorithms become more complex with every update. Creating a caption and description provides a transcript for your video and gives the platform a way to categorize the video. Keywords help the algorithms sort your content and allow your video to be shown to the best demographic.
Part 2: How to Add Captions in CapCut
There is a manual method or a more traditional method for adding captions in CapCut. This is most suited for identifying the form of short video intents and punchlines. Also, use this method for adding a more specific aesthetic to your video.
Step 1: Project Initialization

Open CapCut and click "New Project." When your clips are on the timeline, use the two finger "pinch to zoom" method on your initial clips in your video. This expands in the timeline so you can adjust text captions with a precision of a millisecond.
Step 2: Creating the Text Layer
Navigate to the Text menu at the bottom of the screen and tap "Add Text." A text box will appear on the preview screen.
Step 3: Formatting and Timing
Type your first line. Keep it short—ideally no more than 3 to 5 words. Once the text is on the timeline, represented by a brown bar, drag the edges to align with the audio waveform.
- Pro Tip: Look for the "spikes" in the audio waveform; these indicate where a person starts speaking. Aligning your text bar to these spikes ensures a seamless viewing experience.
Part 3: How to Add Auto Captions in CapCut
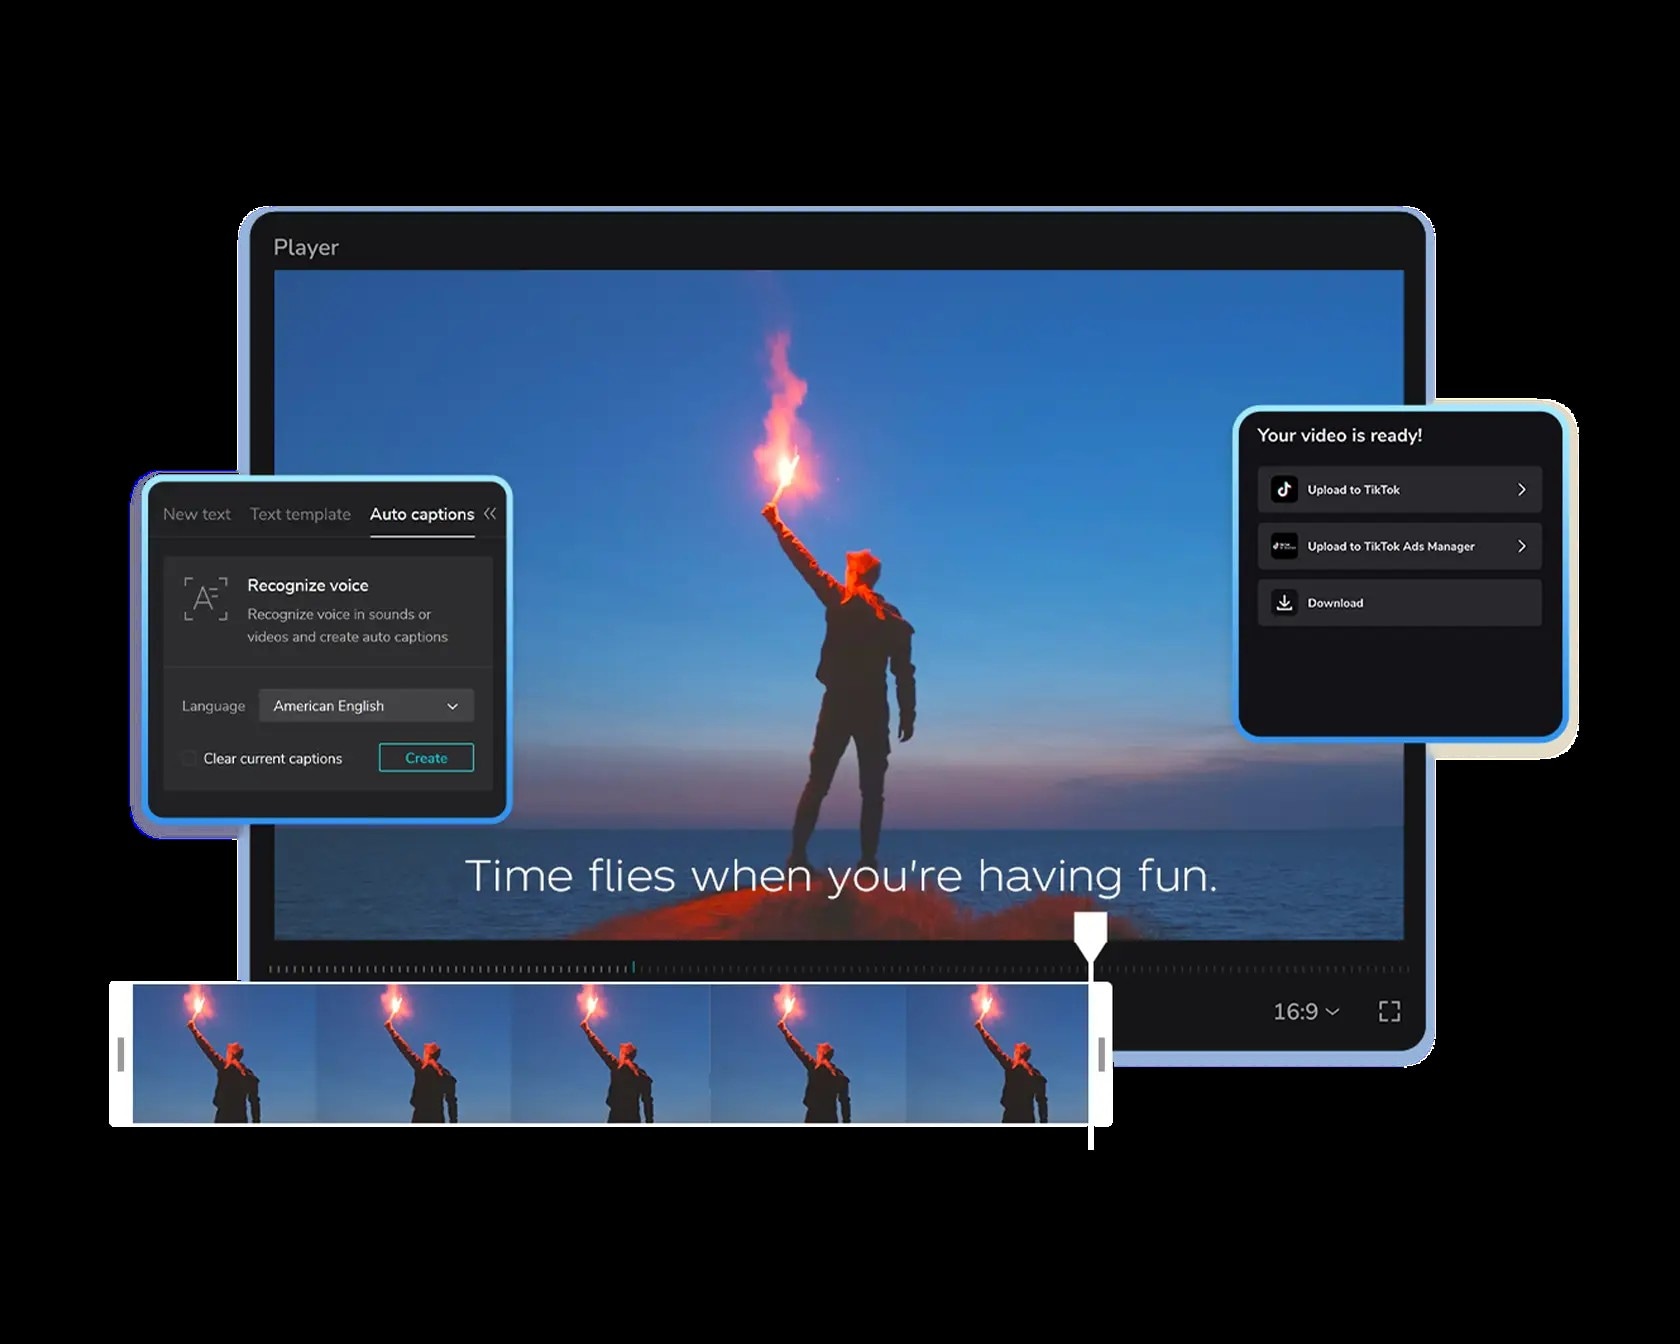
For vlogs or interviews, manual entry is unsustainable. CapCut’s Auto Captions feature utilizes advanced Speech-to-Text (STT) technology to handle the heavy lifting.
The Automated Workflow
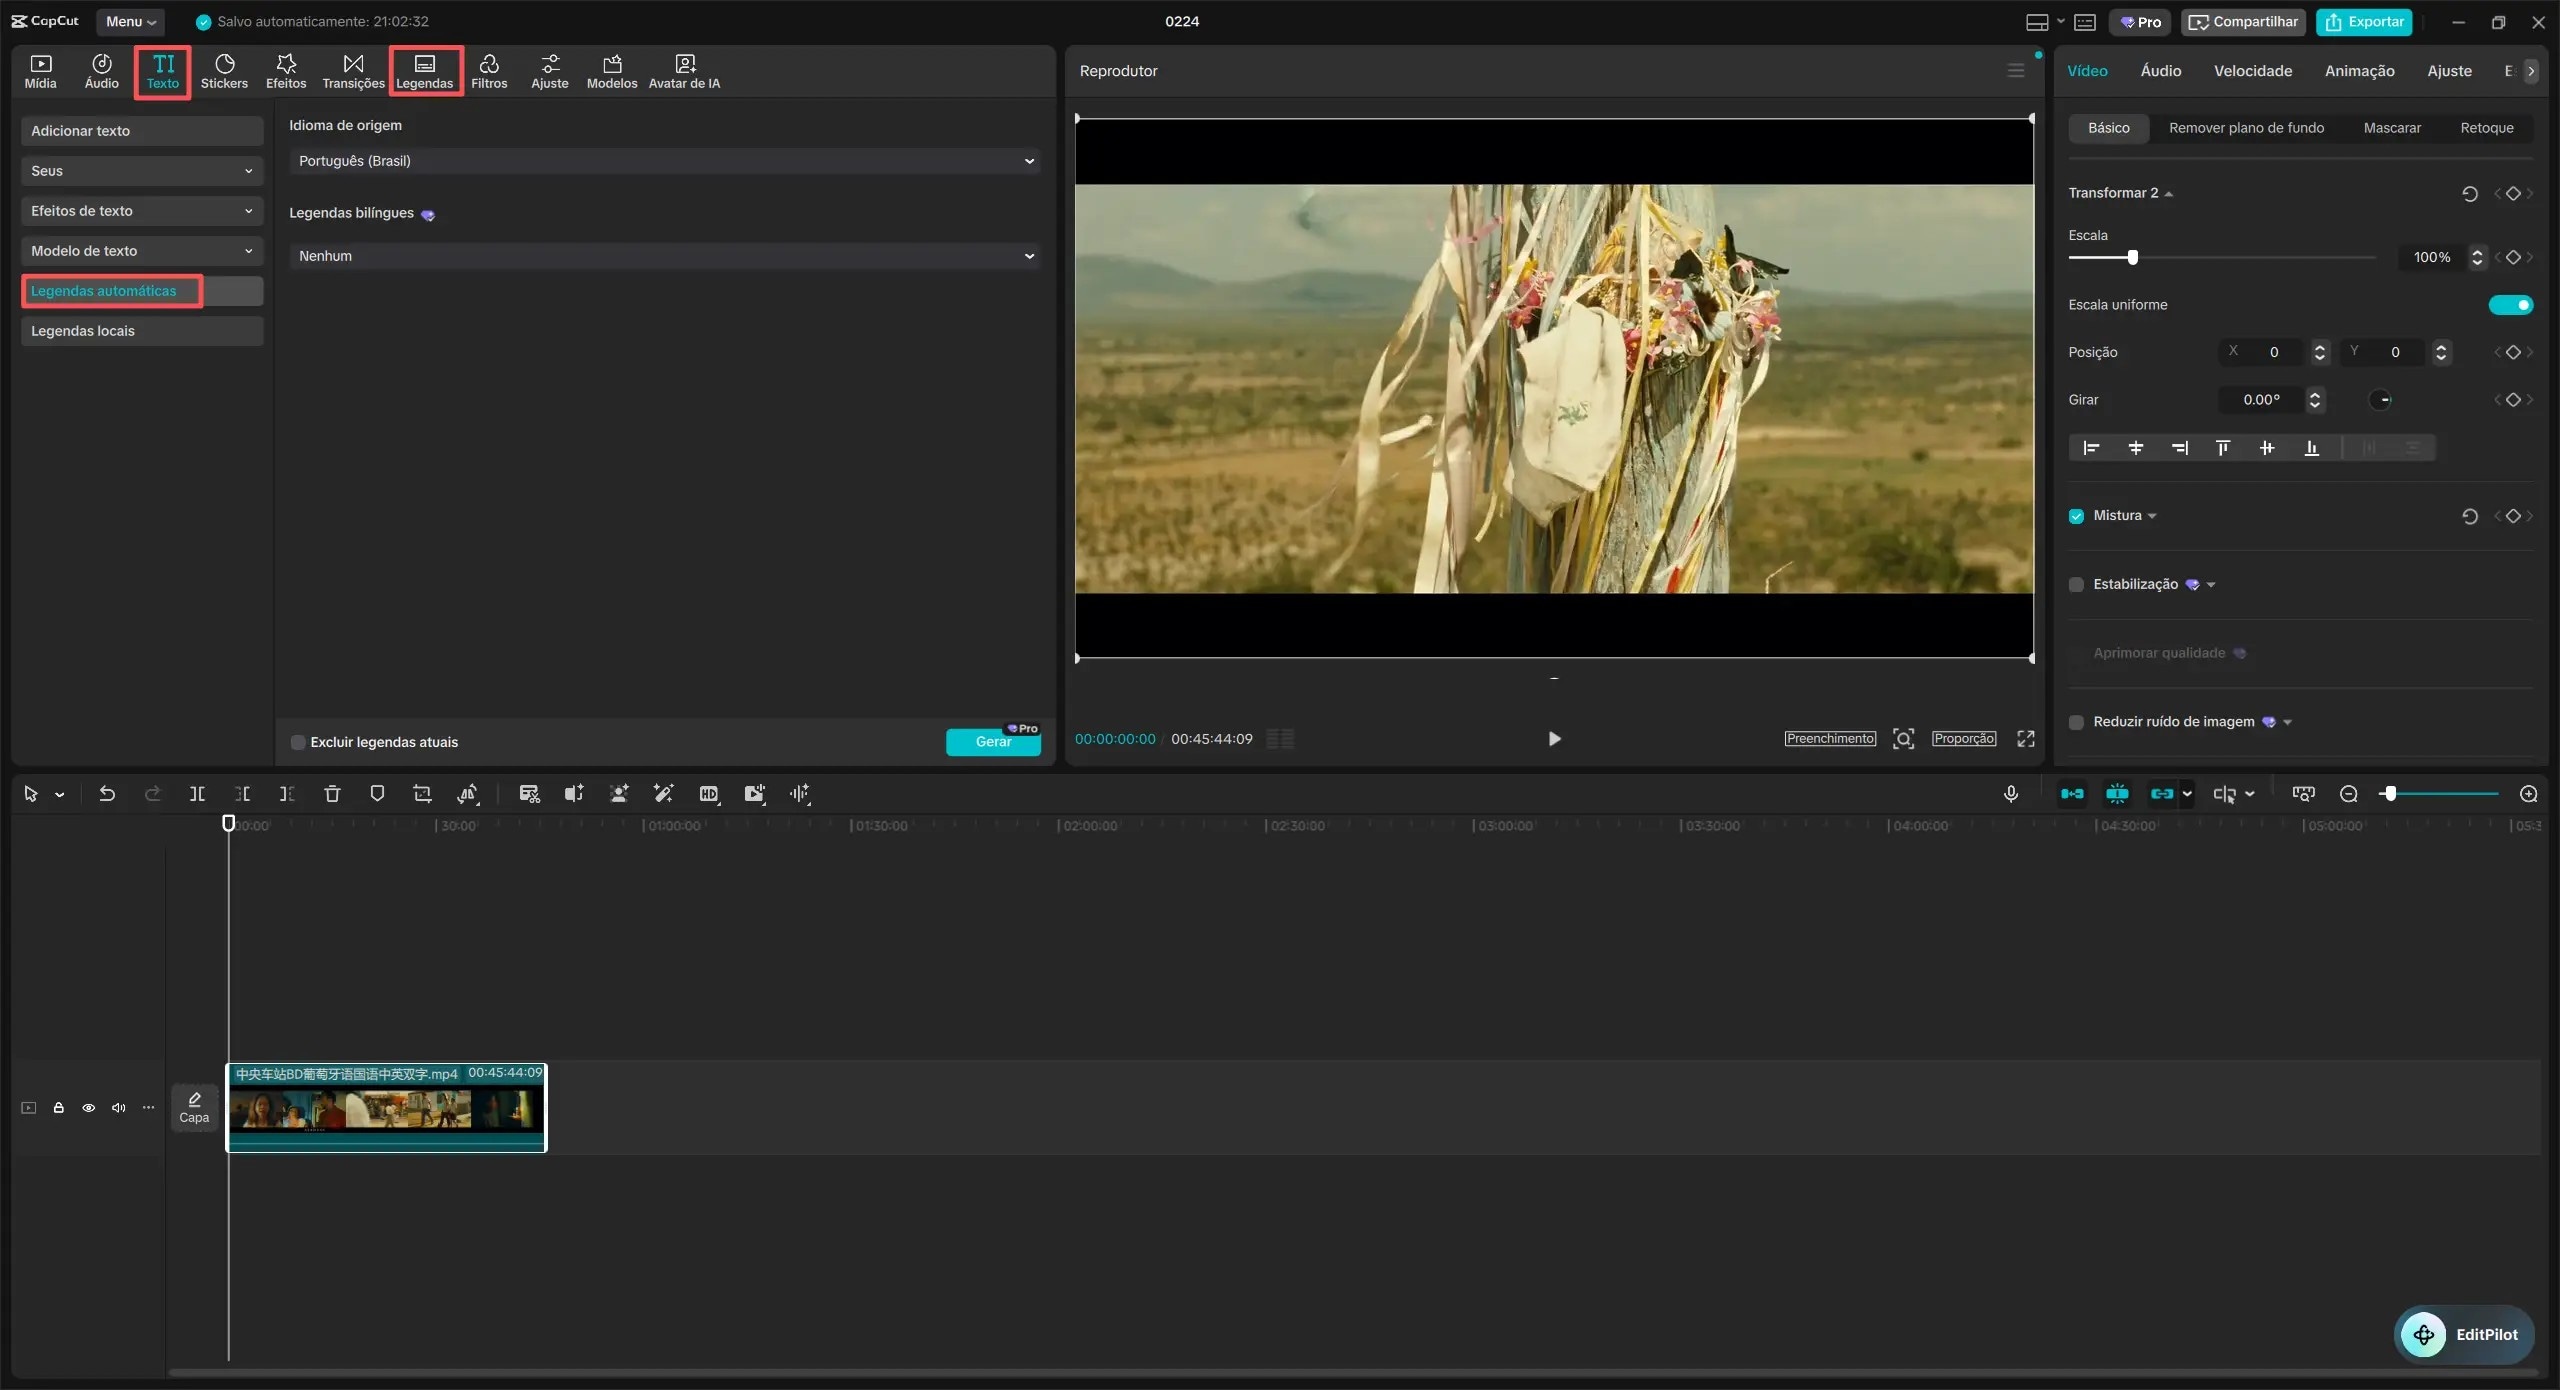
- Select Tool: Within the Text menu, choose Auto Captions.
- Choose Source: You can generate text from the "Original Audio" or a "Voiceover" track.
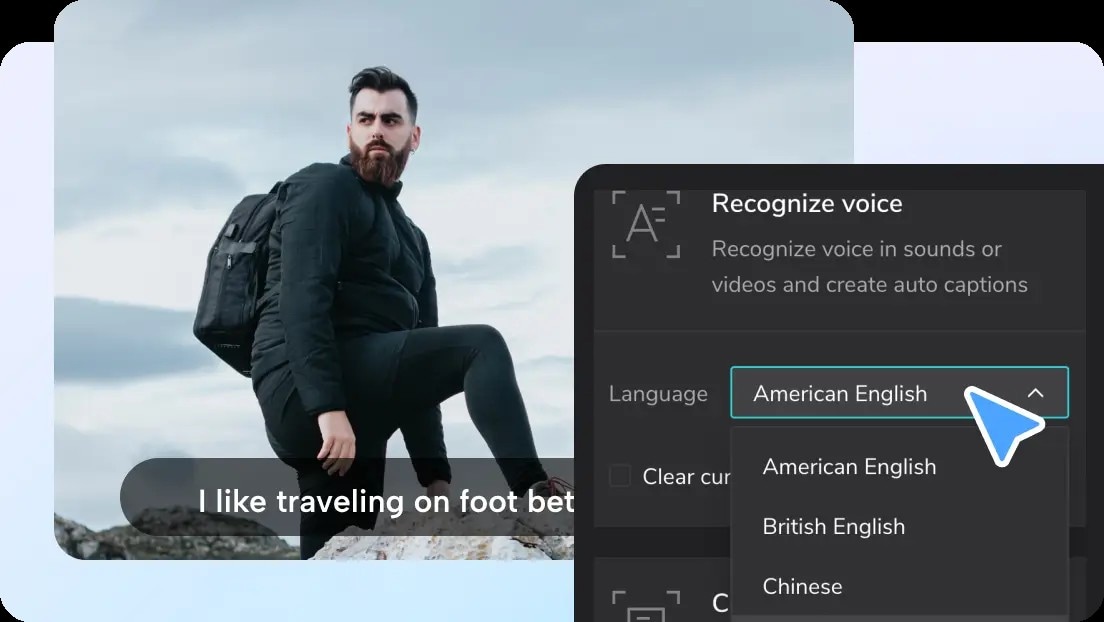
- Refine: Choose your language and click Start.
The Limitations of Standard AI
While powerful, standard auto-captions often struggle with technical jargon, loud background music, or overlapping voices. This is where most creators get stuck—the "correction phase" can often take longer than the recording itself if you don't use the right tools.
Part 4: Common Problems & Workflow Killers
As you move from hobbyist to professional, you will encounter "productivity walls" in basic editing apps:
- The Sync Drift: Cutting a video clip later in the process often leaves captions "floating" in the wrong place.
- Style Drift: Trying to maintain the same font, size, and shadow across 100 clips is a nightmare without a unified system.
- The Dead Zone: Captions often end up behind the "Like" button or account name on TikTok, making them unreadable.
Addressing these issues is about more than just efficiency. It's about maintaining your reputation as a company. When captions fall behind and out of sync, or even end up behind portions of UI, it shows a neglect of detail that causes viewers to lose interest.
Part 5: Better Way to Create and Edit Subtitles with Filmora
For creators who find CapCut’s manual corrections too time-consuming, Wondershare Filmora offers a suite of Professional Subtitle Upgrades designed for high-volume editing.
1. The Unified Subtitle Editing Panel
Video scripts become extremely accessible with the Unified Panel. The entire list of dialogue for your video is organized neatly. You can set up "Text-to-Speech", animations, and adjust any issues with dialogue scripts seamlessly for the entire project, all from one simple area. It is a spreadsheet for video scripts!
2. Smarter “Apply to All” Control
One of the most requested features by pros. You now have granular control over bulk changes:
- Apply to current track only: This default option ensures that if you change the font of your main dialogue, your "Header" or "Call to Action" text on other tracks remains untouched.
- Apply to all text: Use this when you want a total brand refresh for the entire project.
3. System-Based Default Fonts for Maximum Clarity
Filmora utilizes system-based fonts, like San Francisco or Segoe UI, ensuring captions look sharper and are optimized for mobile readability.
4. Better Cursor Positioning & Visual Feedback
Filmora ensures that when you edit text, the playhead jumps to that frame automatically so you can see your changes instantly.
5. Advanced 3D Text & Keyframe Animation
To compete with top-tier creators like MrBeast, flat text isn't enough.
- 3D Perspective: Use the Rotation Offset, from 0–360°, to tilt text into a 3D plane, making it feel like it’s part of the physical environment.
- Detailed Keyframing: You can now animate the Glow intensity, Shadow blur, and Stroke thickness over time. This allows your captions to "pulse" or "glow" in sync with the beat of your background music.
How to Use Auto Caption in Filmora
Filmora's Auto Caption feature helps creators turn spoken words into readable captions automatically. It supports two main workflows: Speech to Text for generating editable subtitle tracks, and Dynamic Captions for creating animated captions that highlight spoken words in real time.
1. Create Captions with Speech to Text
Step 1: Create a Project and Import Your Video
Launch Filmora, click New Project, import the video you want to caption, and drag it to the editing timeline.

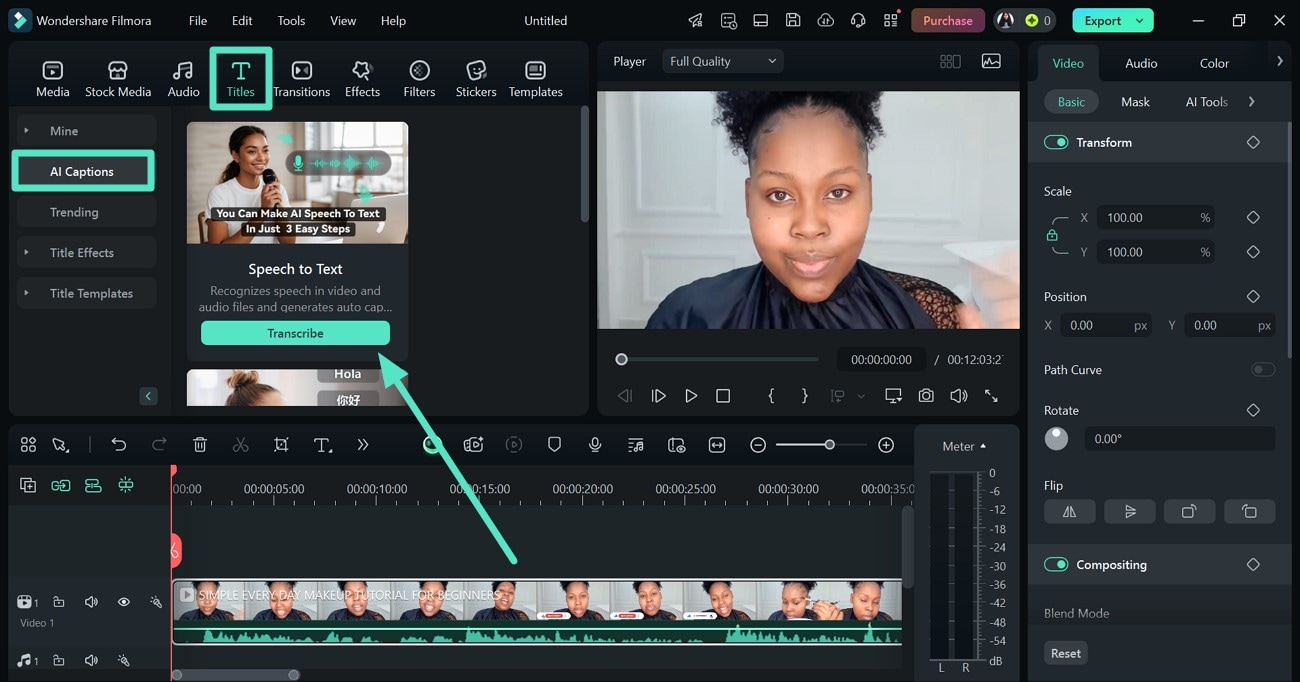
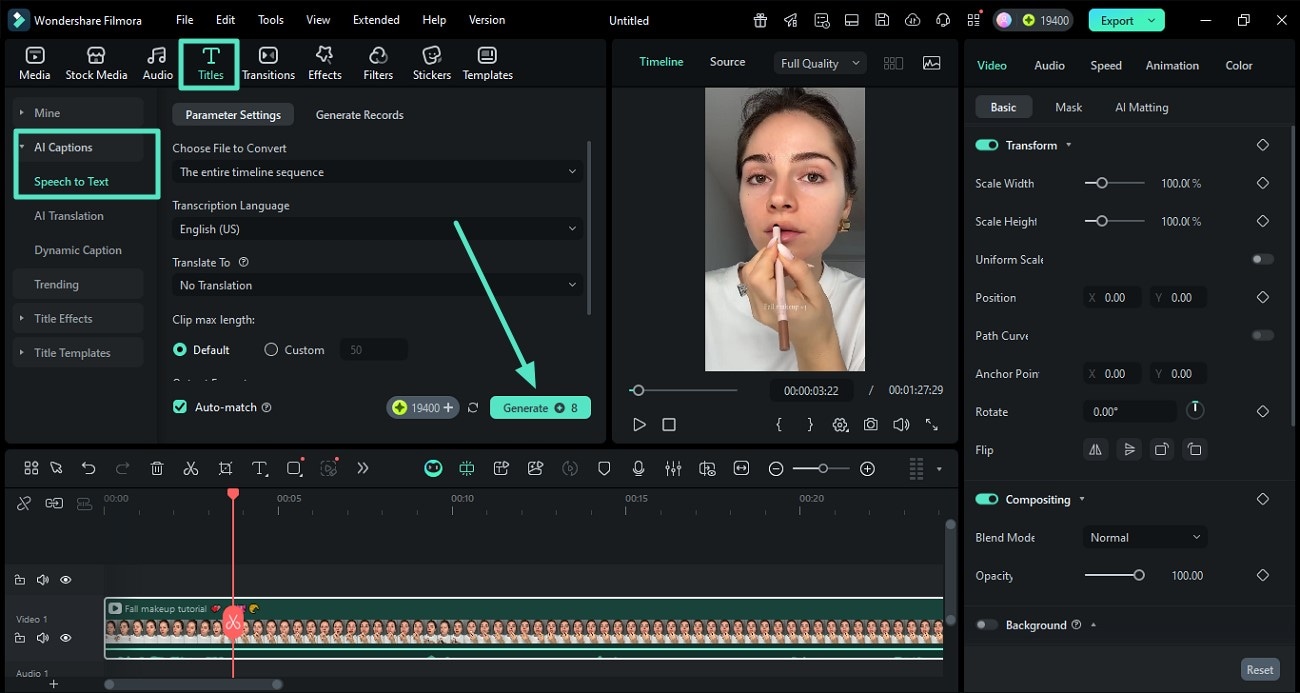
Step 2: Choose the Speech to Text Feature
Go to the Titles menu and select Speech to Text. Choose the transcription language and output settings, then click Generate to create captions automatically.
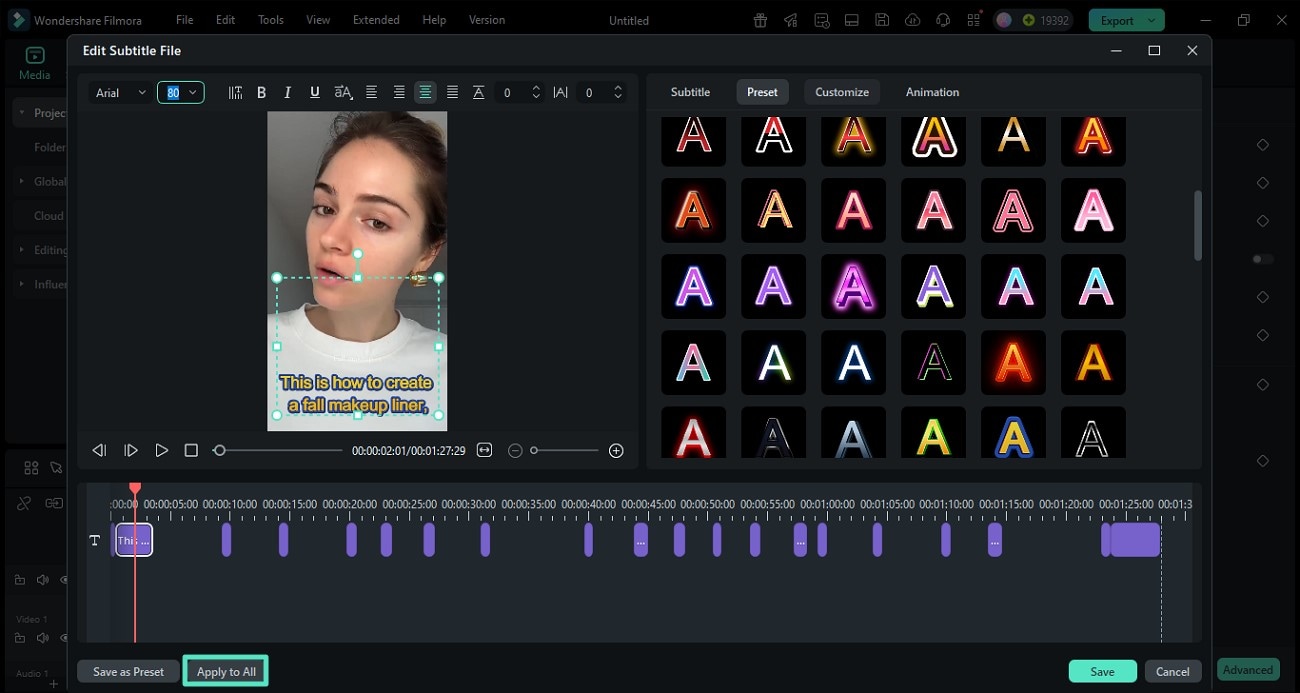
Step 3: Edit and Customize the Captions
After the captions are generated, double-click the text track to edit the subtitle content. You can adjust fonts, colors, presets, and animation styles, then click Apply to All to keep the whole subtitle track consistent.
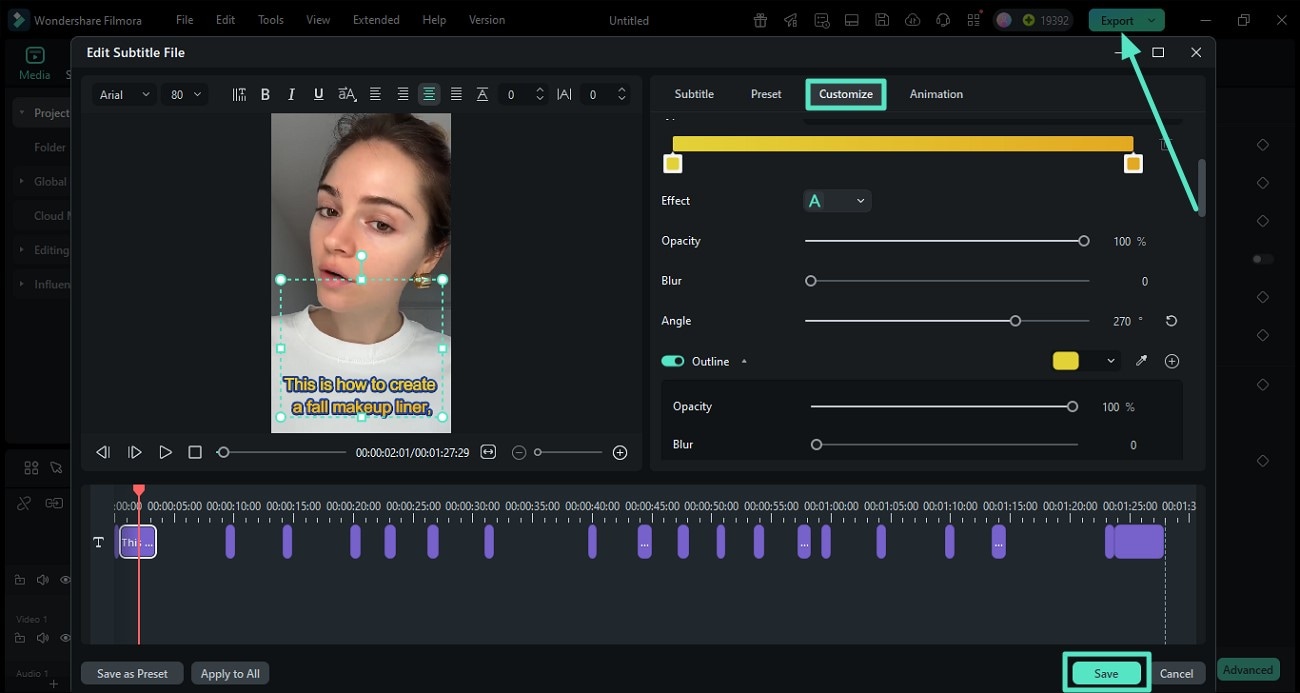
Step 4: Export the Captioned Video
Once the subtitle style is complete, save your edits and click Export to download the finished video with captions.
2. Create Animated Captions with Dynamic Captions
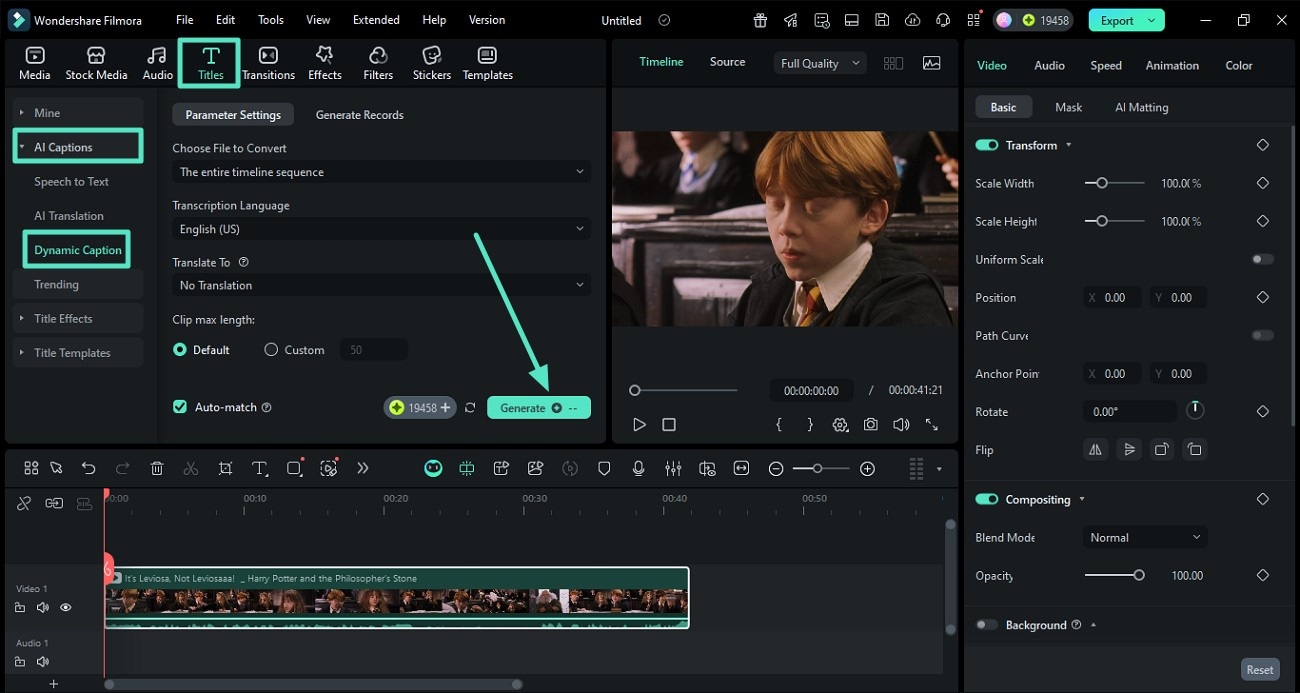
Step 1: Access Dynamic Captions
Import your video into Filmora, open the Titles section, choose AI Captions, then select Dynamic Caption. Pick the subtitle language, choose whether to add translation, and click Generate.
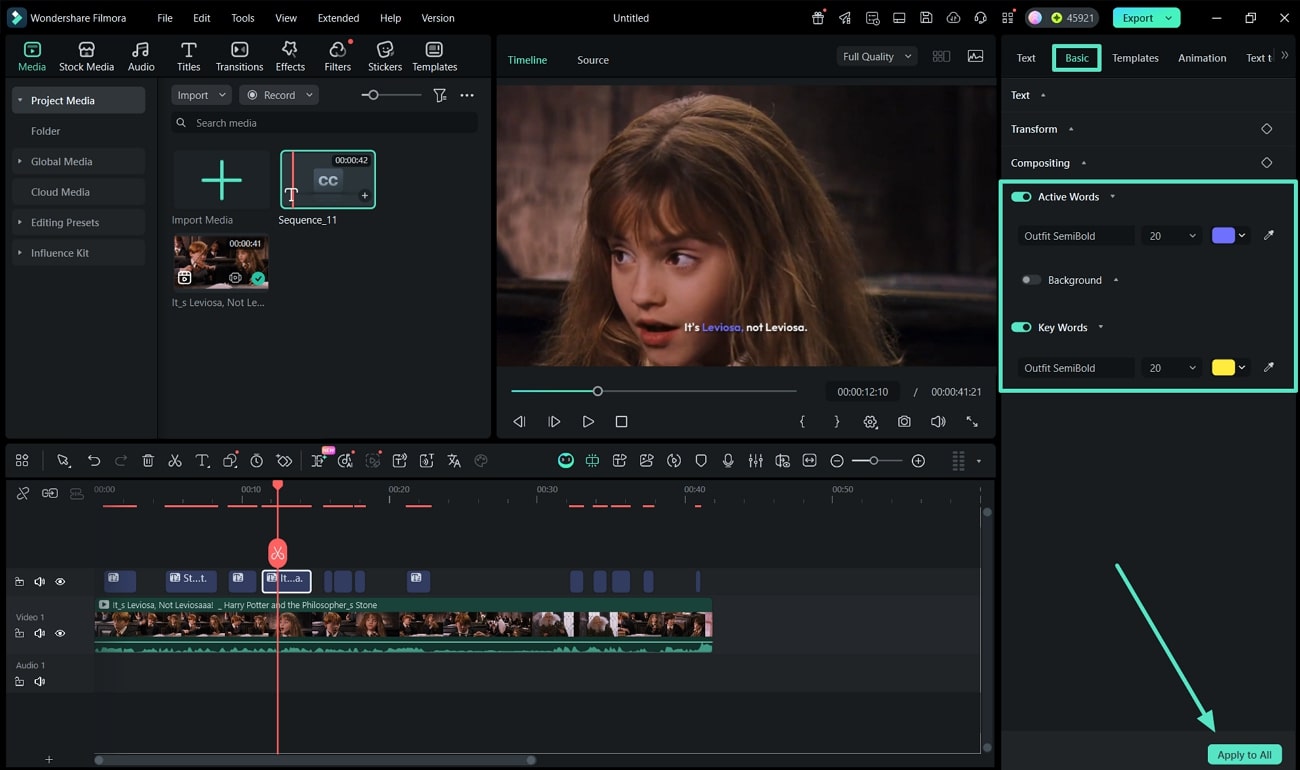
Step 2: Customize Active Words and Keywords
After Filmora generates the dynamic captions, open the Basic panel to adjust the style of active words and keywords. You can change font, size, color, and other visual settings, then apply the design to all captions.
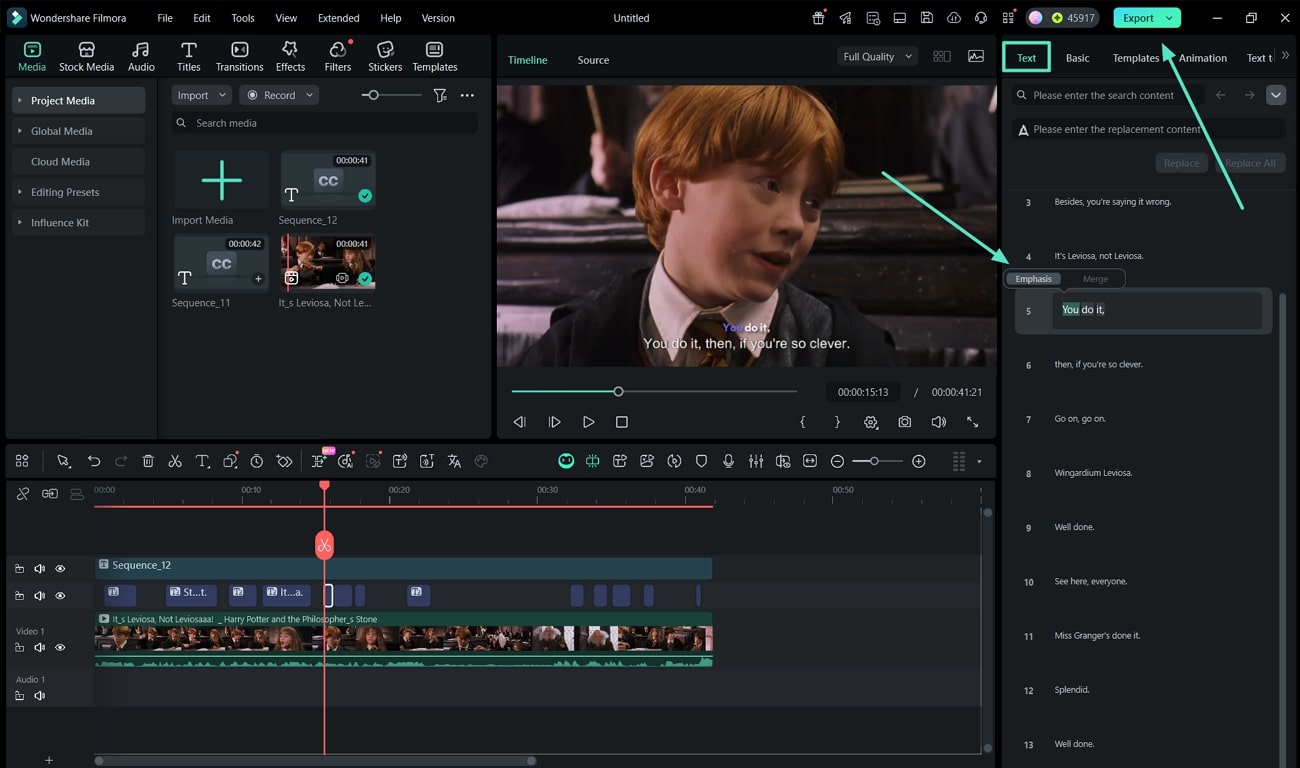
Step 3: Highlight Spoken Words and Export
Go to the Text panel, select the words you want to emphasize, and click Emphasis to highlight them. When the captions look right, click Export to save the final video.
6. Subtitle Character Limit Indicator
Safety is important. The width of your text is monitored in real-time and there is a counter. The indicator will turn red if your sentence is so long that it will not fit on the screen. This is to make sure that your captions aren’t cut off by your phone, or the app’s user interface.

 secure download

Part 6: Pro Tips for Better Captions on Social Media
Having the right tools only takes you so far. The real magic is developed in capturing attention and creativity. Whether you are using CapCut for quick edits or Filmora for professional-grade projects, use these industry-standard practices:
- Safe Zone Awareness: Always keep captions in the middle-third of the screen to avoid the UI clutter of TikTok and Reels.
- The 60/40 Rule: If your video is bright, use a 40% opacity black background behind your text to make it pop.
- Leverage Filmora’s 3D Text: Use Filmora’s 3D templates to add depth to your "hooks," making them more visually engaging than standard flat text.
- Emoji Substitution: Replace nouns with emojis, such as "Check out this 💎", to add modern visual flair.
Conclusion
Mastering captions is the fastest way to professionalize your content. While CapCut provides a great foundation for beginners, the future of high-level editing lies in AI-driven efficiency. By utilizing tools like Filmora, you can reduce your workload by hours while significantly increasing your visual quality.
secure download 