Do you want to engage your audience with eye-catching video titles? Dynamic text in videos can take visual storytelling to another level. It’s perfect to keep the audience hooked from the beginning to the end.
But how do you add text to a video? This article will make it easy!
We will share a complete guide on how to add text to video on iPhone/iPad/Mac. Whether you’re looking for quick solutions or professional tools, we have you covered!
Let’s get started!
In this article
Part 1. How to Add Text to a Video on iPhone/iPad/Mac Using Filmora
Are you looking for an easy solution to add text to an iPhone video? Wondershare Filmora can be your go-to! You can also use it on iPad and Mac for a one-stop video editing solution.
It offers advanced editing tools for precise control over text personalization. You can also layer multiple elements to custom-create precisely the text style you need.
Why Choose Filmora to Add Text to Videos?
Here’s why Filmora offers the best way to add titles to videos.
- Choose from Various Styles: Filmora offers diverse text styles to match your video’s theme, such as catchy openers, 3D tiles, Captions, and balloon dialogues.
- Advanced Text Editing: Filmora lets you add shadows and borders, adjust the backgrounds, and even add curved shapes.
- Animate Your Text: You can choose from 80+ animations and use keyframing to create dynamic titles.
- Covert Speech to Subtitles with AI: How to add captions to videos on iPhone/iPad/Mac? You can automatically generate captions from audio with Filmora!
How to Make Your Text Stand Out Using Filmora
Ready to use Filmora to add engaging text to videos? Here’s how to use it on iPhone, iPad and Mac.
Editing Text On iPhone/iPad
Filmora’s iOS app makes it easy to add text to iPhone videos. Before we get into the details, here’s a general overview of the steps.
- Add your video clips to Filmora.
- Select the Text tool and select the Add text button
- Write your text and customize the font style, color, border, and size.
So, how to add text to an iPhone video?
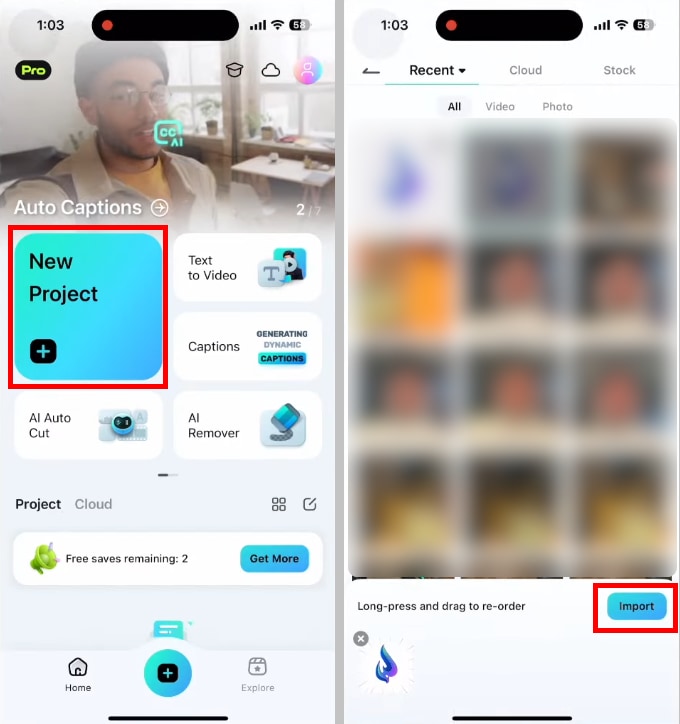
Step 1. Tap “New Project” from the main screen and select your video clips.
Step 2. Click “Import” at the bottom right to add the video to the timeline.
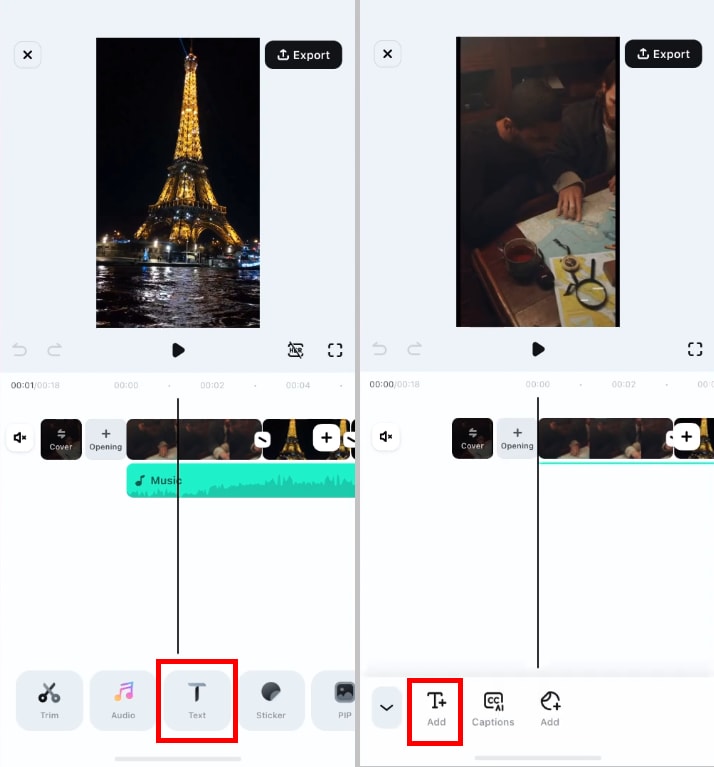
Step 3. Tap the “T” icon. You can find it in the toolbar at the bottom. Press the “Add Text” button and write your text.
Step 4. Drag the text box freely to adjust its position in the video. Drag the “Size” slider or the edges of the text box to resize the text.
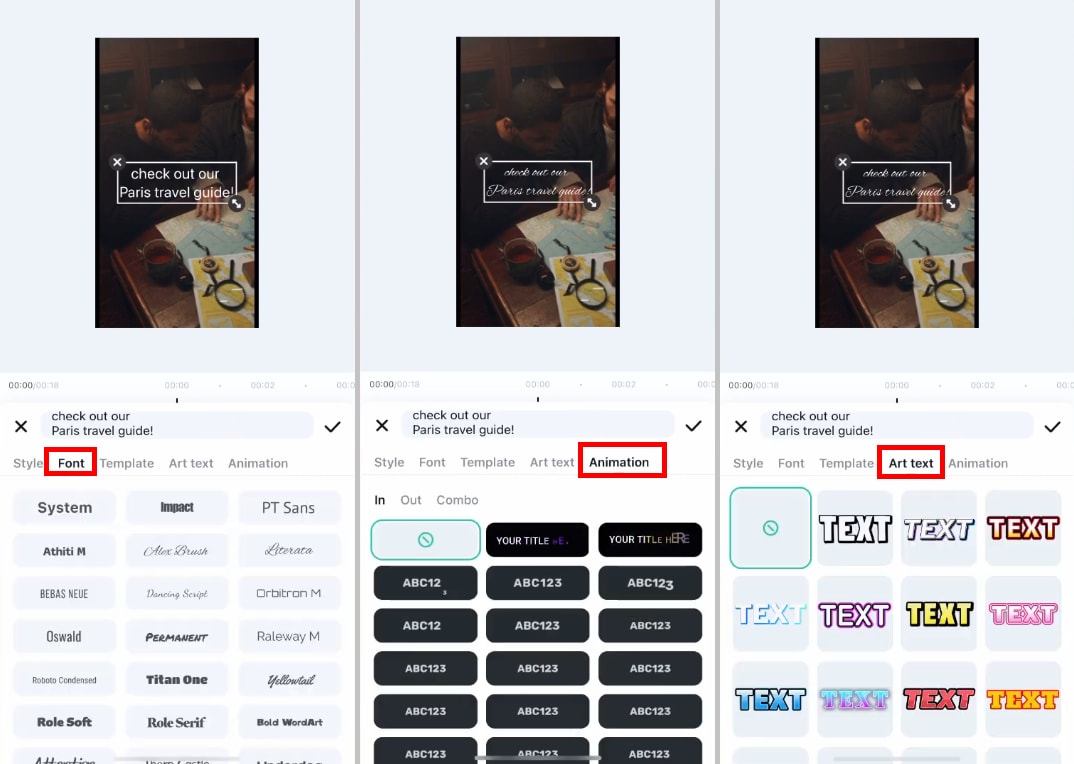
Step 5. Select the “Style” tab and choose a preset style. Then, adjust the color and properties for Border, Background, Shadow, and more.
Step 6. Tap “Font” and select your desired style. Then click “Animation” and select an animation type from the “In,” “Out,” and “Combo” presets.
Step 7. If you want to skip the manual customization, you can use presets from the “Template” and “Art text” tabs.
Editing Text On Mac
Filmora’s Mac version offers more title presets and advanced text customization. Here’s how to add text to videos on a Mac using it.
- Go to the Titles tab.
- Browse through the various text categories and choose your desired style.
- Add text to the timeline and double-click to open the editing panel.
- Write your text. Then customize its font, size, color, and alignment.
Let’s break down these steps into detail.
Step 1. Starting a New Project
Launch Filmora and click “New Project” to start with the video editing.
Step 2. Accessing the Titles
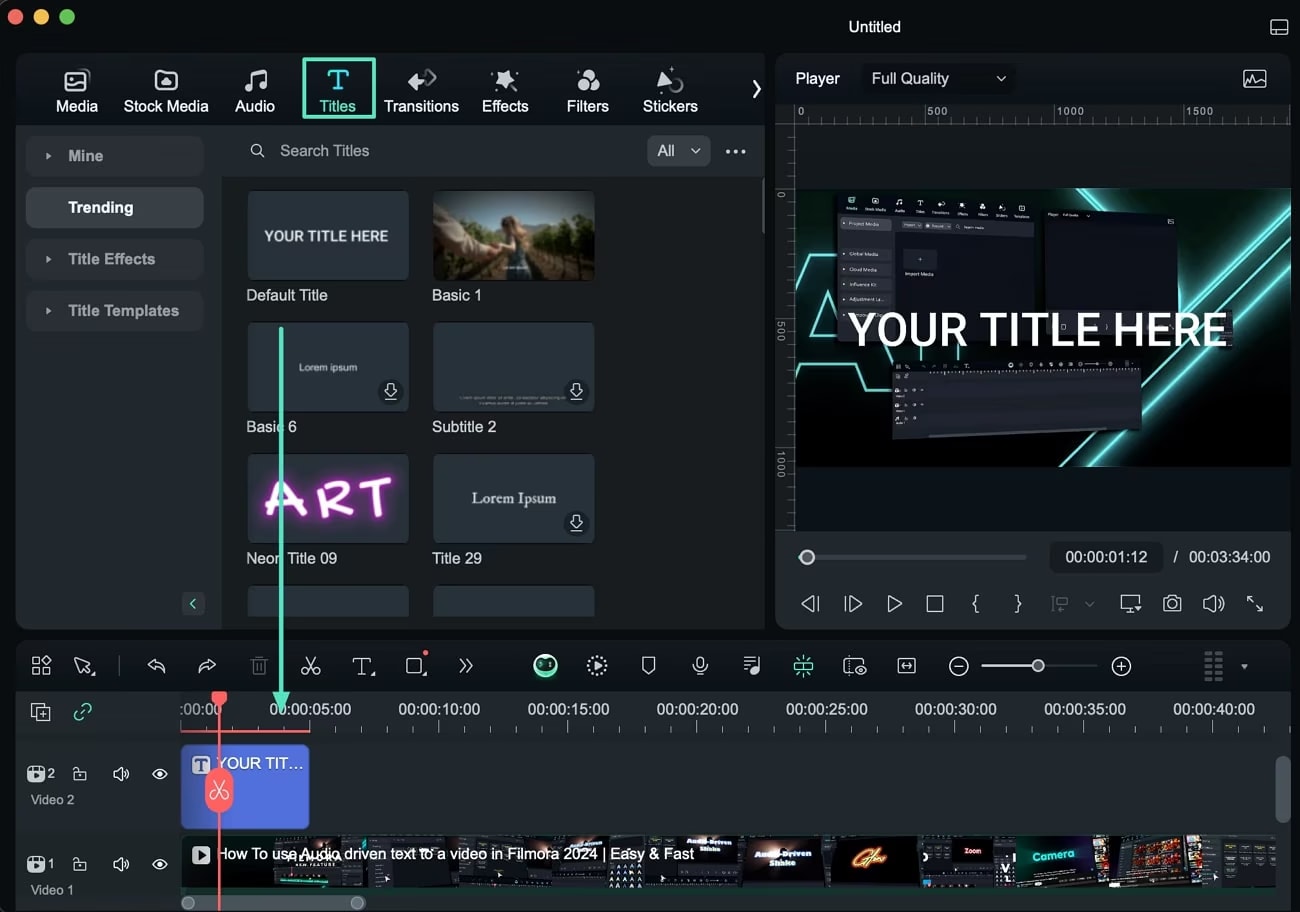
- Click the “Titles” tab from the top left to access the various text presets.
- Drag and drop the desired preset to the timeline where you want the text to appear.
Step 3. Adjusting the Text Duration
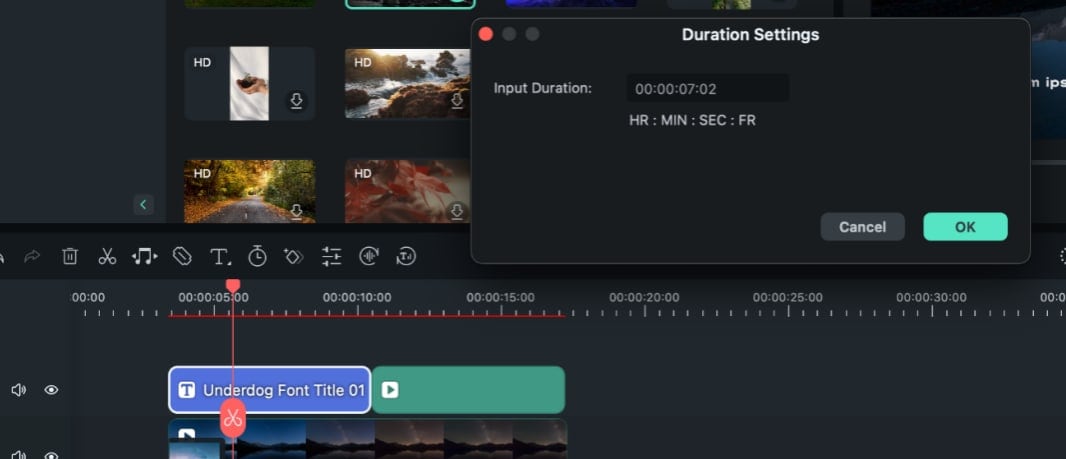
- Click the edge of the text clip and drag it to adjust its duration. Alternatively, click the “Duration” icon for precise settings.
Step 4. Editing the Text Content
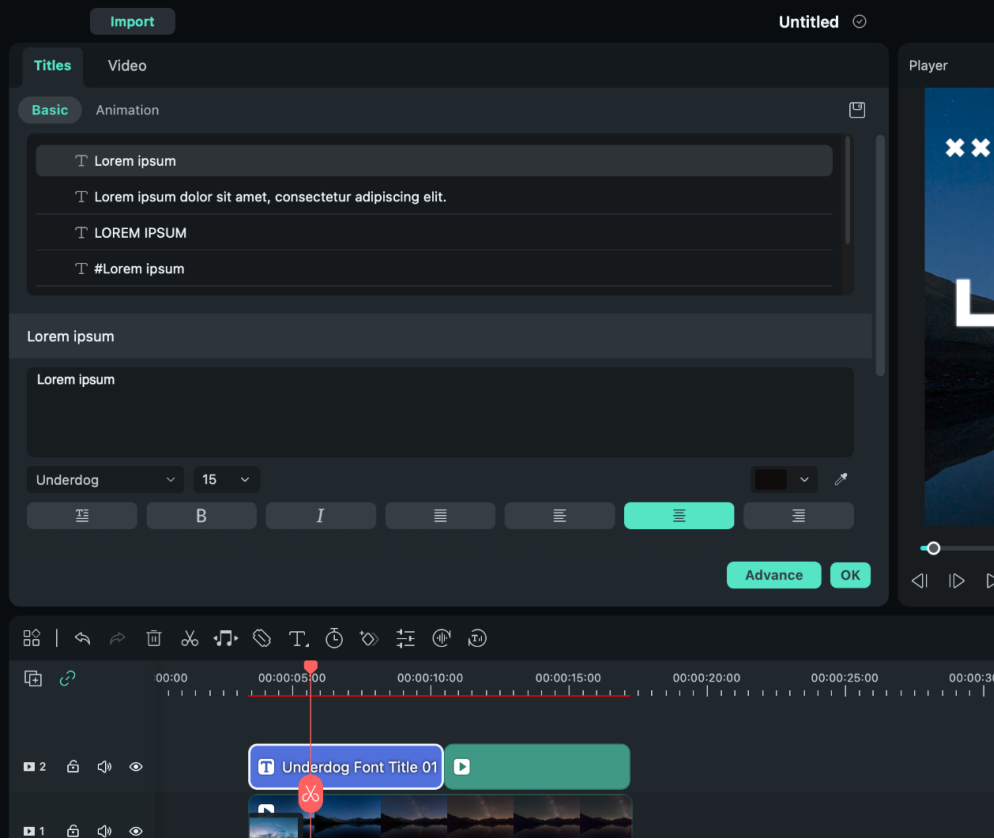
- Double-click the text track in the timeline to open the editor.
- Go to the “Basic” tab and type your desired text in the text field.
- Click the “Font” dropdown to change its style. You can find it below the text box.
- Customize your text using bold, italic, and alignment options under the Font dropdown.
Step 4. Animating the Text
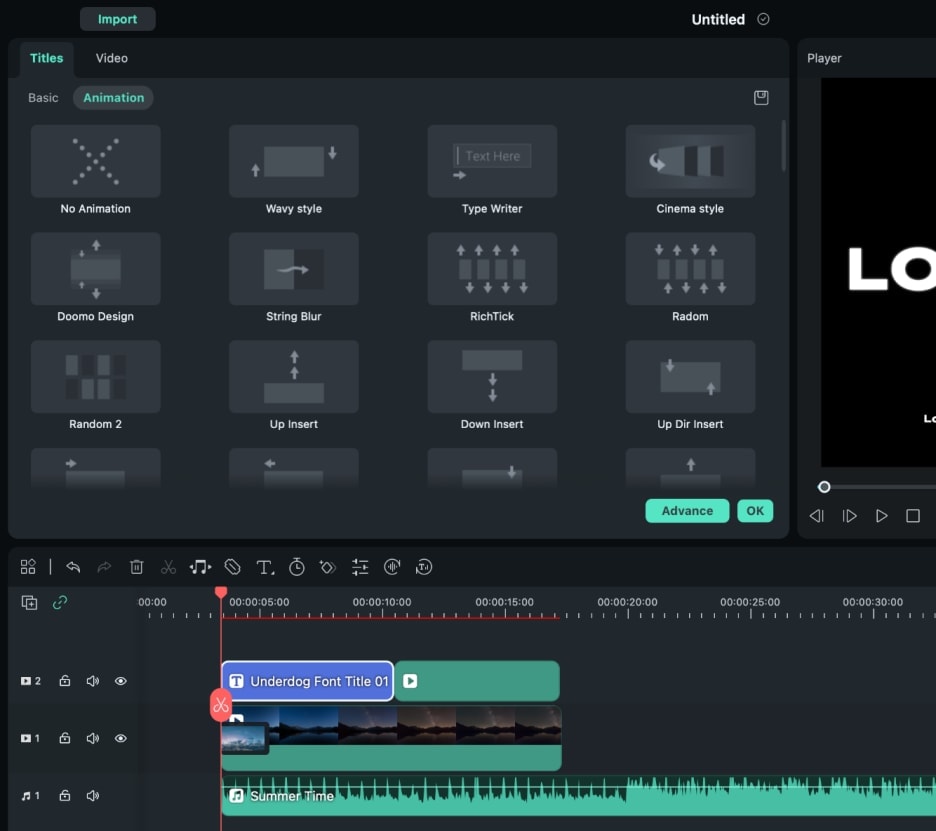
Select the “Animation” tab in the text editor. Double-click the animation to preview it. Then click “OK” to apply it.
Step 5. Advanced Style Customization
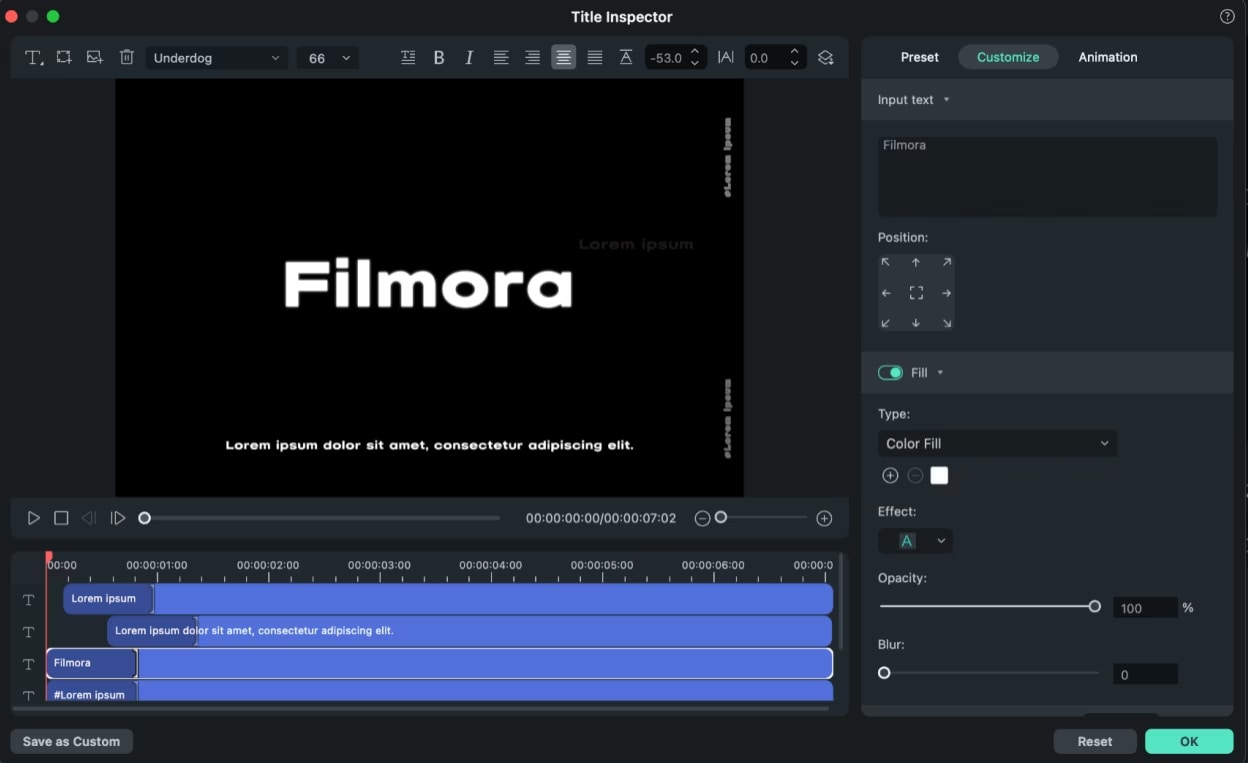
- Click the “Advanced” button in the editing panel. A new window will appear.
- Type your text in the “Input Text” box.
- Move down and adjust the settings for Text Fill, Border, Shadow, etc.
Besides titles, you can also add captions to your videos with Filmora. Let’s see how.
Can You Automatically Add Text for Video Captions on Mac?
If you’re wondering how to add captions to videos on iPhone/iPad/Mac, Filmora offers the perfect solution! It automatically recognizes and converts your video’s audio into text.
Here’s how it works.
- Add your video to the timeline.
- Access the Speech-to-Text feature from the toolbar.
- Adjust the Speech-to-Text parameter settings and click OK.
- Edit and Customize the text as needed.
Let’s review these steps in detail.
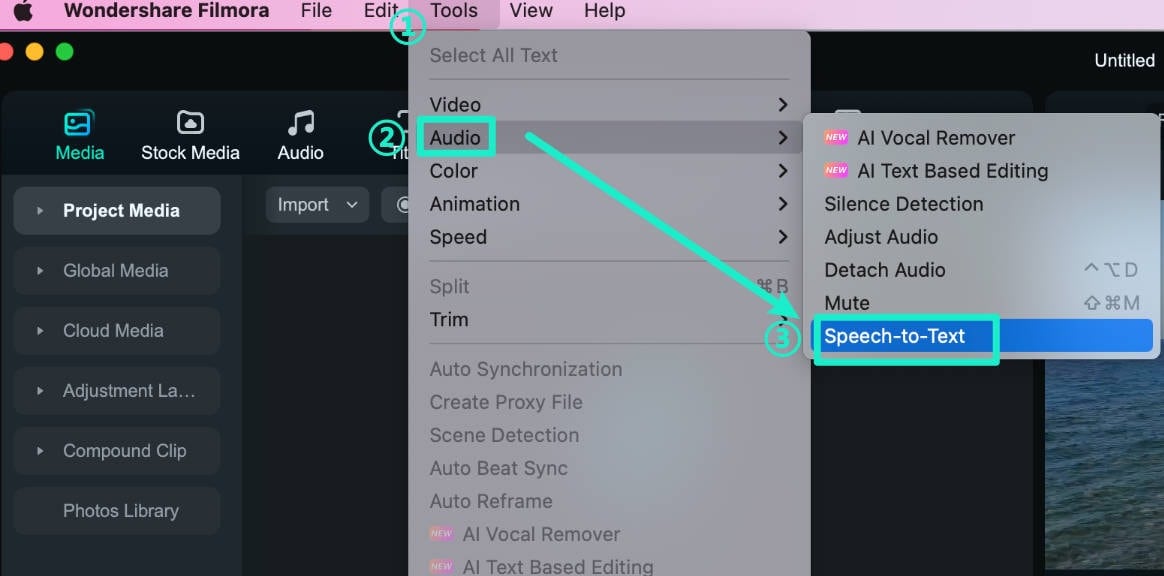
Step 1. Selecting the Speech-to-Text feature
Drag your video to the timeline. Click the “Tools” menu from the top and choose “Audio > Speech-to-Text.’
Step 3. Adjust the Settings
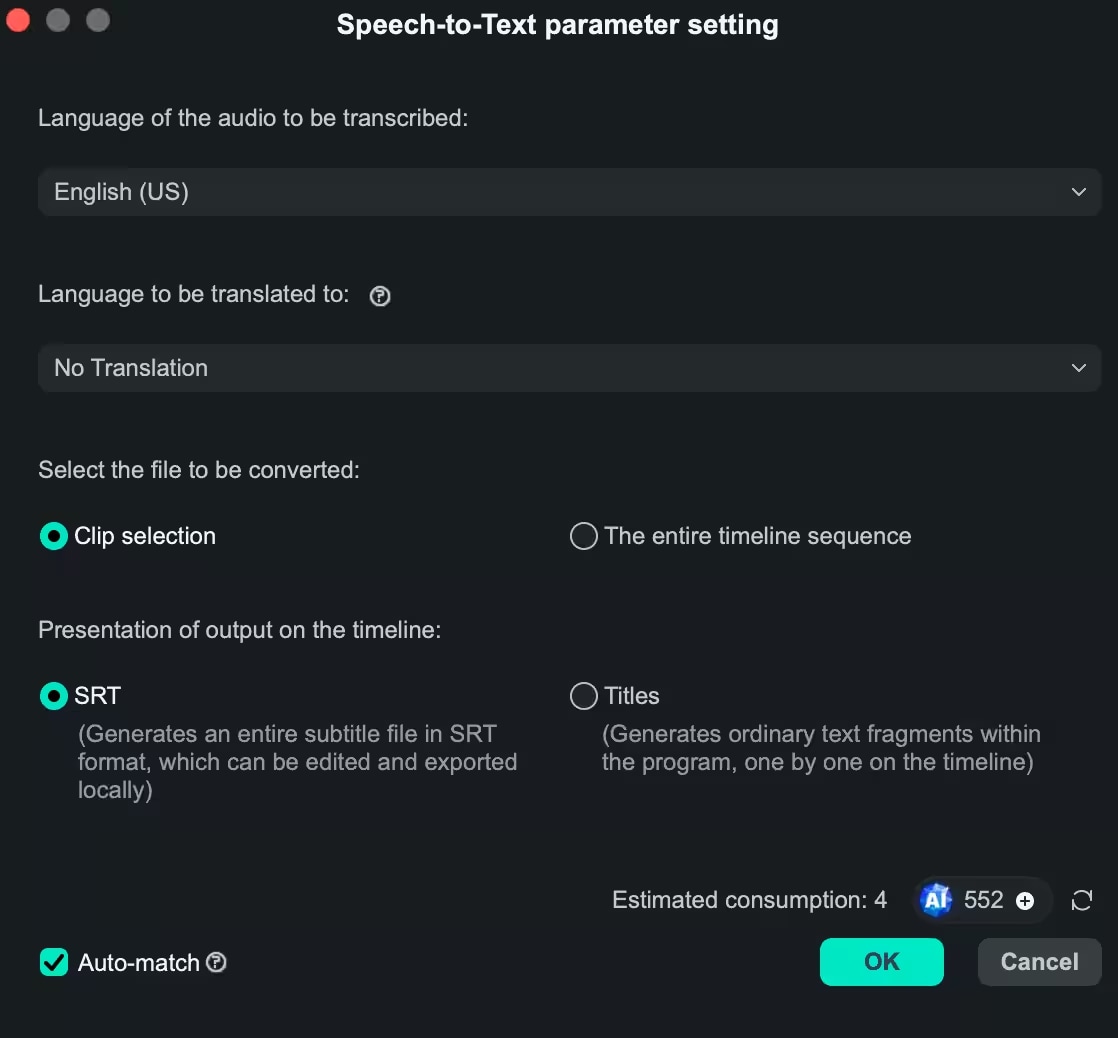
A settings window for the Speech to Text will open. From here,
- Select the video language from the language dropdown.
- Select the option to convert the file from “Clip selection” or “The entire timeline sequence.”
- Check “SRT” and click “OK” to create and add captions to the timeline.
That’s how to add text to videos on Mac for Captions!
Part 2. How to Add Text to a Video Using Built-in Editing Tools on iOS and Mac
Are you looking for a download-free solution to add titles to your videos? The built-in editing and annotation tools on the Photos app offer a quick solution!
Here’s how to add text to videos on Mac and iOS using it.
- Open the Photos app. Select the video to edit.
- Tap the Edit button. Then select the Text icon.
- Add your text and adjust the font, size, color, and position.
Let’s break these down into detailed steps.
On iPhone/iPad
First, you need to find the Markup editor and then add text to iPhone videos using it.
Accessing the Markup Editor
You can add text using the markup editor in the Photos app. Here’s how to find it.
Step 1. Open the Photos app. It is located on your Home screen and looks like a colored pinwheel in a white box.
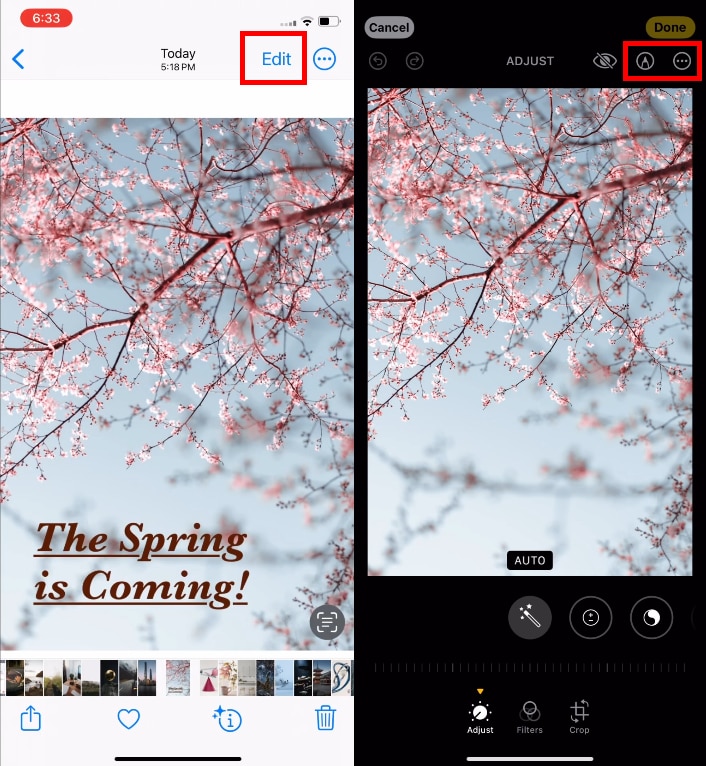
Step 2. Open the video you want to edit and tap the Edit button.
Step 3. Tap Markup. This is the marker-shaped icon on the pop-up menu. Taping it will open your video in the Markup editor.
Step 4. If you don’t see Markup, tap the three dots for “More” and select the Markup icon from the list.
Adding Text to Video
Here’s how to add text to an iPhone video using the Markup editor.
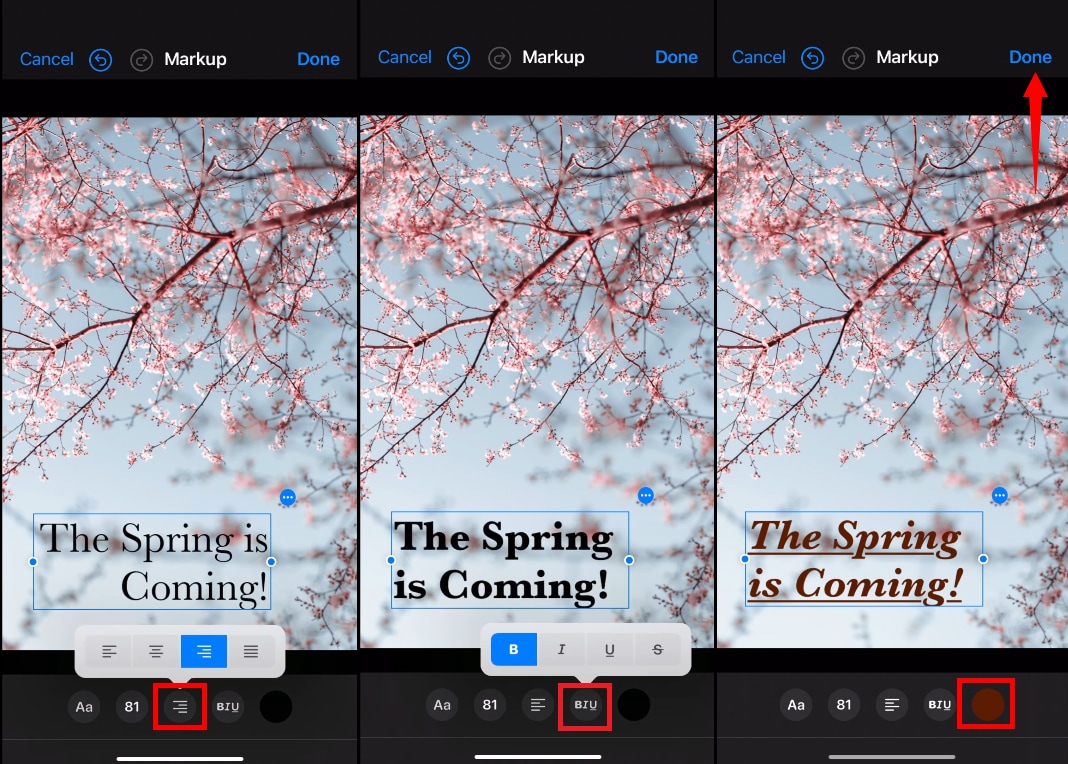
Step 1. Tap the “+” button from the lower part of the screen. Select “Text” from the options.
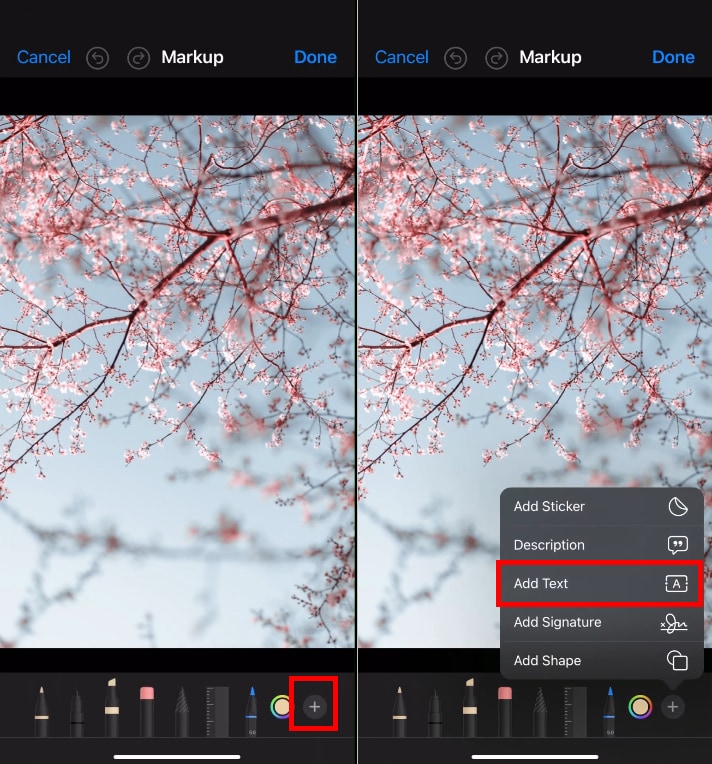
Step 2. Double-tap the text box and write your desired text. Then,
- Press the “Aa” icon in the bottom right and select the font style.
- Drag the slider to change the size of the text.
Step 3. Press the three horizontal lines for the “Alignment” button to align the text.
Step 4. Select the text color from the six options at the bottom of the screen. Then tap “Done” from the top left of the screen. Then tap “Done” again to save your video.
That was easy, right? Now, let’s see how to do it on Mac.
On Mac
Open the Photos app on your Mac. Double-click on the video you want to edit. Then, follow the instructions below to get started.
Finding the Markup Editor
Here’s how to access Markup Editor on Mac.
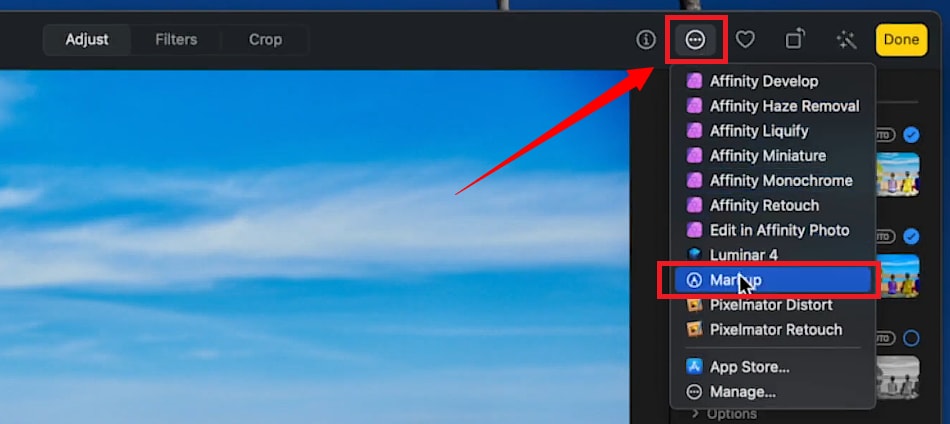
Step 1. Click “Edit” from the top right.

Step 2. Click the icon with three dots inside a circle.
Step 3. Select “Markup” from the list.
Adding Text to Video
Now, let’s see how to put words on the video!
Step 1. You can see all the markup tools at the top left. Press the “A” icon to add a text box. Double-click the text box and type in your desired text.

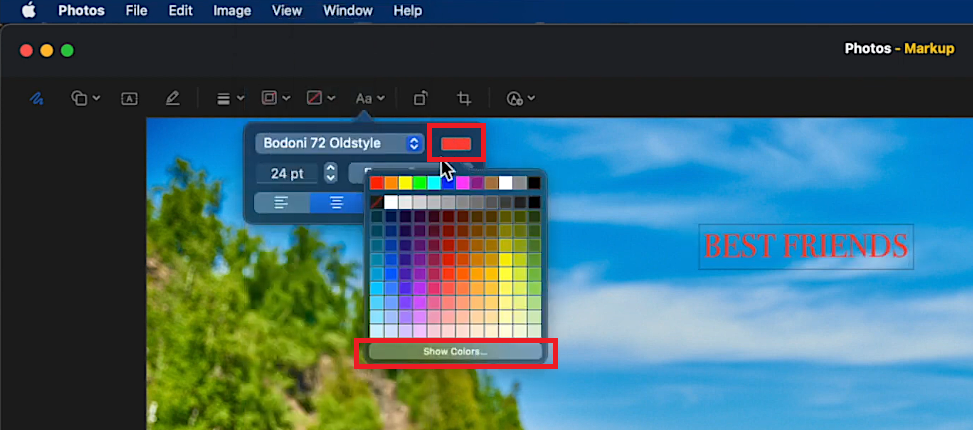
Step 2. Select the text and click the “Aa” button from the toolbar. Then click the dropdown and select a font you like.
Step 3. Choose a size for the text and style it with Bold (B), italic (i) and Underline (U) options.
Step 4. Align the text from alignment options, including Right, Middle, Left, and Justified.

Step 5. Click the Square icon at the top and choose a background color. Then click “Show colors” to adjust the background’s opacity.
Step 6. You can also add a border to the text with the “Border” tool. Click “Save changes” once you’re done.
The Limitations of Adding Text with Photos App
Now you know how to write on a video on iPhone/iPad/Mac with Photos. Let’s look at its key limitations.
- It offers limited customization, font types, and advanced text effects.
- You cannot animate the text to make it fade or scroll over the video.
- You cannot adjust the duration of the text. It stays on the screen for the entire video.
- There are no layering options for advanced text editing.
Let’s move on to the next solution for adding text to videos on iOS and Mac.
Part 3. How To Add Text to Video Using Screenshot and Markup Tools
Another workaround to adding text to video is using the markup tools for screenshots. This lets you add text to individual video frames and re-inset them into the video using a video editor.
Here’s a look at how to add text to videos on iPhone, iPad, and Mac using it.
- Take a screenshot of the video frame where you want to add text.
- Use the Markup tools to add text and annotations to the screenshot.
- Add the frame to the video using a video editing tool.
Now, let’s explore these steps for iOS and Mac.
On iPhone/iPad
Here’s how to write on a video on iPhone and iPad using screenshots.
Taking a Screenshot on iOS
Play the video and pause it on the frame where you must add the text. Then, here’s how to take the screenshot for your iOS device.
iPhone
- Press the power and volume up button at once.
- Or, quickly press the power button and the Home button.
iPad
- Press the top button and any of the volume buttons.
- Alternatively, press the Home button and the top button.
Adding Text to Screenshot on iOS
Use the following steps to add text to the video frame you captured.
Step 1. Once you take the screenshot, tap the captured image in the lower right corner before it disappears. It will open in the markup editor.
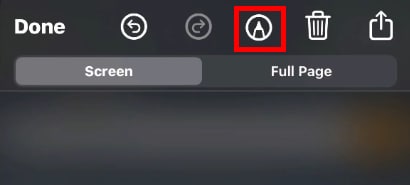
Step 2. Press the “Pen” tool at the top of the screen. This will reveal the markup tools at the bottom of the screen.
Step 3. Tap any of the markers and adjust the ink opacity. Then, use it to add handwritten text to the screenshot.
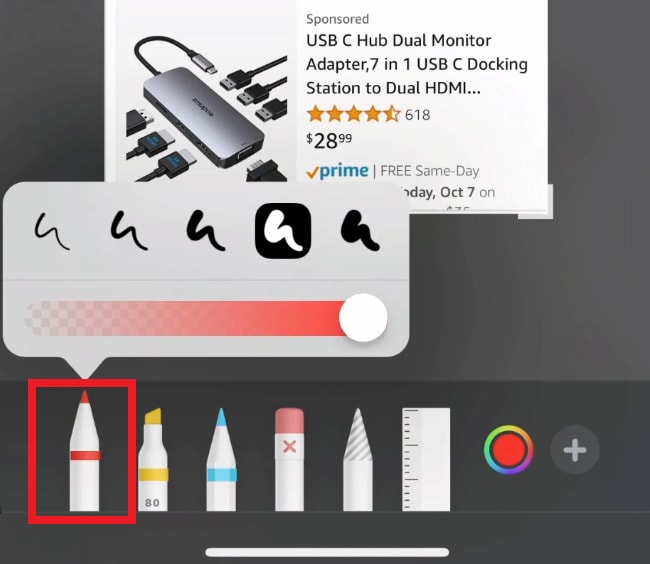
Step 4. Click the “Color wheel” icon and choose the desired color for the markers.
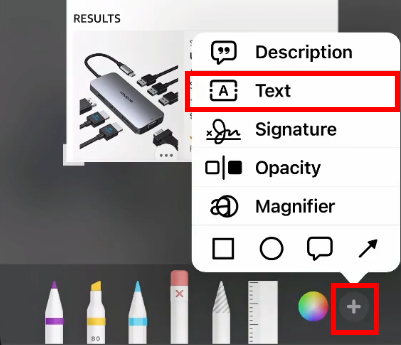
Step 5. Click the “+” icon at the bottom and choose “Text.” This will add a text box. Double-tap it to write your desired text and customize it.
Step 6. Tap the “Done” button in the top left to save the screenshot with text.
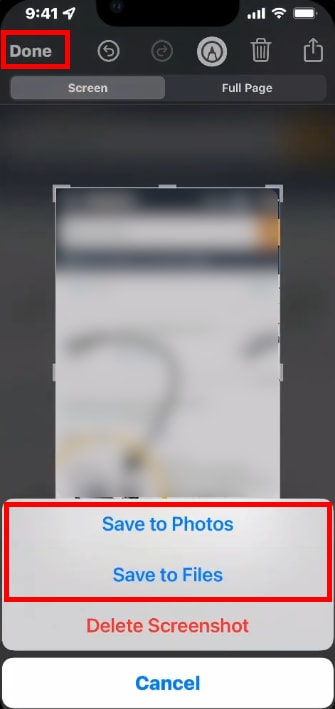
That’s it. You can now import the screenshot to a video editing app and insert it in your desired clip section.
On Mac
Here’s how to add text to videos on Mac using the Screenshot and markup tools.
Taking Screenshots on Mac
Use the following ways to take a screenshot on Mac.
- Full Screen: Press Shift + command + 3.
- Portion of Screen: Use Shift + command + 4. Click and drag to select the region. Release to capture a screenshot.
- Window Capture: Press Shift + command + 4. Then press the Spacebar and click the opened window.
- Screenshot App: Shift + command + 5 to open the Screenshot app. Use the toolbar to capture any part of your screen.
Adding Text to Screenshot on Mac
Click the captured screenshot at the lower right before it disappears. Then, use the following steps to add text to it.
Step 1. Once the screenshot is opened, you can find various annotation tools at the top.
Step 2. Click the icon with “A” inside a square box. It will insert a text box to the screenshot. Double-click the text box and type in your text.

Step 3. Click the “Aa” icon and customize the font style, size, color, etc.
Step 4. Click the black square icon from the top. Select a color for the text background.
Step 5. Click the “Border” tool from the top to adjust the color of the text border.
Step 6. Select the tool with four horizontal lines to adjust the thickness of the box outline.
Step 7. Once you have added the text, click the ’Done” button at the top right to save it.

The Limitations of Adding Text with Screenshot and Markup Tools
Here are the limitations of adding titles to videos using this method.
- Static frames only: You can only add text to a single frame at a time.
- Lengthy process: Annotating and re-inserting the screenshot to video is time-consuming.
- Requires a video editor: You will need a video editing tool to add the screenshot to the video seamlessly.
That’s all about how to write on a video on iPhone, iPad, and Mac. Regardless of the method you use, the readability of the text matters to enhance video engagement. Keep reading for some tips on making your text stand out!
Part 4. Pro Tips for Creating Engaging Text for Videos
If you want your text to engage the audience, it is essential to make sure it has the most impact. How can you do that? Here are some helpful tips!
1.Avoid Overcrowding
Don’t add all the little details about the video’s storyline. Less is more. Highlight key points and let it spark the audience’s imagination.
2.Pay Attention to Text Size
Your text should be easy to read, even for those who are hard of sight. But you don’t want the text size to be so large that it compromises your video’s visuals.
3.Choose a Readable Font
You may be tempted to get creative with font styles. But stick with standard fonts that are easily readable, such as Open Sans, Helvetica, Georgia, etc.
4.Consider the Background
Don’t place text over distracting backgrounds. These can be background with fast movements or complex and busy scenes.
5.Consider the Reading Time
The duration of the text’s appearance should depend on its length. Read the text at an average pace to understand the appropriate reading time.
Part 5. Why Add Text to Videos: Benefits for Engaging Content Creation
Now we’ve covered everything about how to add text to video on iPhone/iPad/Mac. But why does adding text to videos matter? Here are some essential reasons to consider.
1.Enhances Accessibility
Adding text makes your video easy to understand for a broader audience. This includes those with hearing impairments and who speak a different language.
2.Boosts Engagement
Most people watch videos without sound in public. If your video has titles or captions, they feel encouraged to keep watching until the end.
3.Increase Retention
Key points highlighted with the text are easier to understand and retain for longer. Viewers can remember your video and return to rewatch whenever needed.
4.Improves Clarity
Text can help simplify complex ideas that are hard to understand from audio alone. It can also provide clearer instructions when creating video tutorials.
5.Facilitate Learning
Text can help enhance the engagement of education videos. You can use annotation tools to make it easy for viewers to follow along.
Conclusion
And that’s a wrap for how to add text to video on iPhone/iPad/Mac! You can use the integrated annotation tools in iOS and Mac or an easy solution like Wondershare Filmora. It lets you add any type of text, choose from various presets, and customize the text to your liking. Regardless of your chosen method, use our guide to add text to videos and boost engagement!


 100% Security Verified | No Subscription Required | No Malware

