
PowerPoint is one of the most loved presentation tools on the market. You can completely customize your experience and get the message across if you learn all of this tool's features and master your skills. One of the features that may come in handy is learning how to trim videos in PowerPoint, which is probably why you clicked on this guide.
If you want to make your presentation more engaging and get the ultimate experience, you've come to the right place. We'll present everything you should know about trimming your videos in PowerPoint to help you get the ultimate experience.
We'll also present an alternative solution if you find PowerPoint too overwhelming. Without further ado, let's jump into the guide.
In this article
How to Trim a YouTube Video in Powerpoint
PowerPoint allows you to add a video directly from YouTube to your PowerPoint presentation. However, many users don't know how to trim the embedded video, which is why we're here to help. You can check out the steps below to learn how to trim YouTube videos in PowerPoint and get the ultimate experience.
Step 1: Open the desired YouTube video and click the Share option.

Step 2: Next, select Embed from the available options.

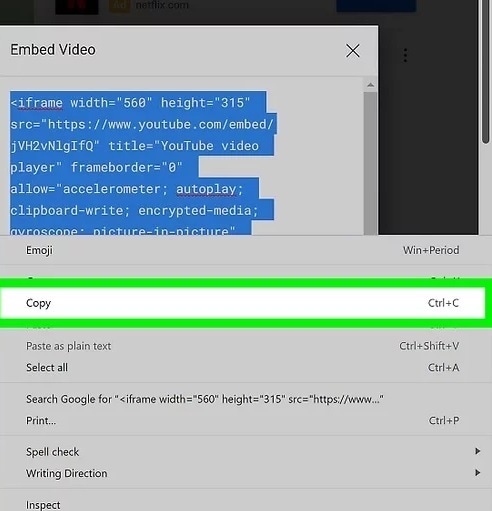
Step 3: Select and copy the script in the image below.
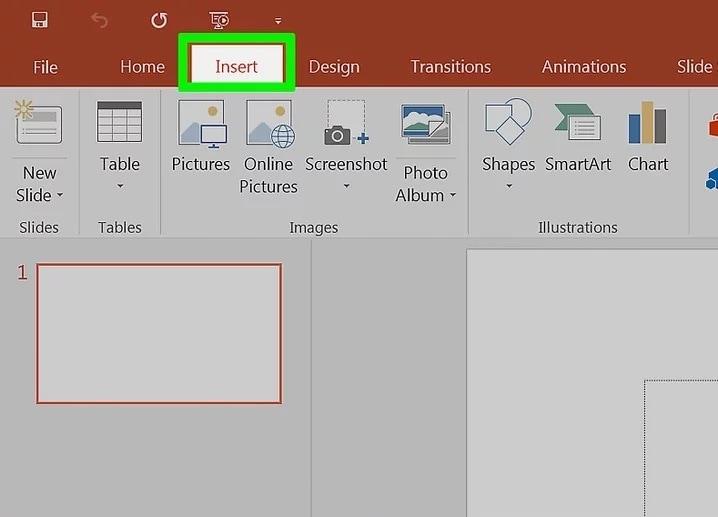
Step 4: Open PowerPoint and select the Insert option from the top menu.
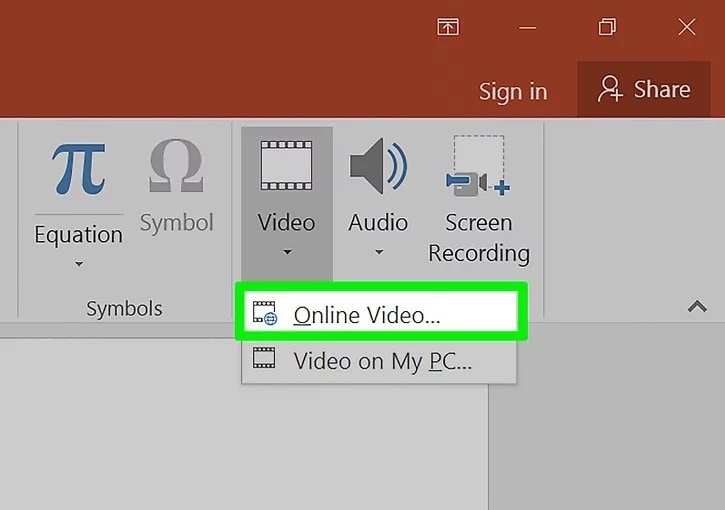
Step 5: Head to Video - Online Video.
Step 6: Paste the script in the From a Video Embed Code section.
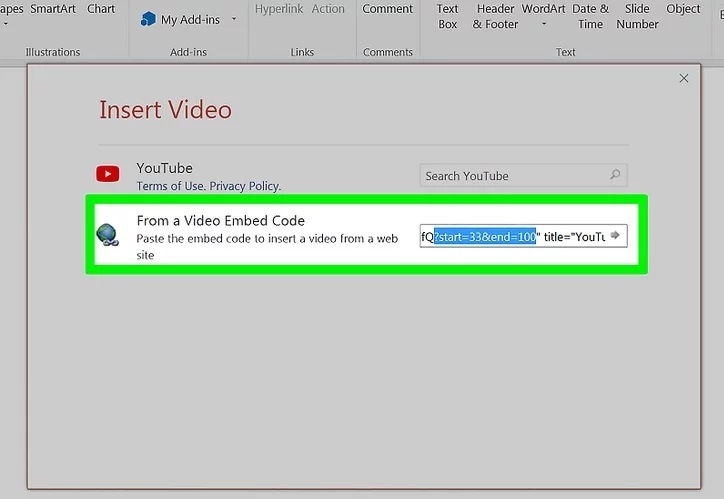
Step 7: Determine the timestamp you want to use and place the end=__&start=__ code after the HTML link, as presented in the image below.
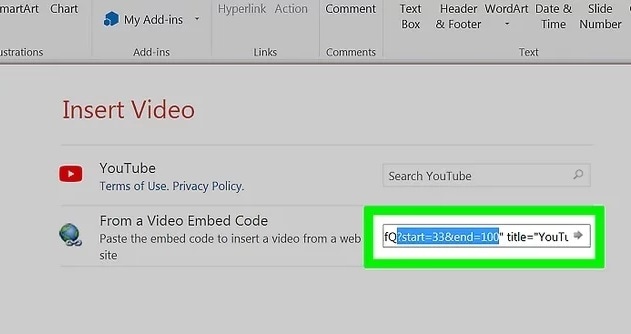
Step 8: Press Enter to finish the process.
You can preview the video and see whether you've trimmed it correctly.
How to Cut a Video in Powerpoint on Windows
Step 1: Head to Insert - Video - Video on My PC, and select the desired clip.

Step 2: Click on the video and head to the Playback option from the top bar, as presented in the image below.

Step 3: Click the Trim Video option.

Step 4: Drag the points to the desired time to trim your video in PowerPoint.
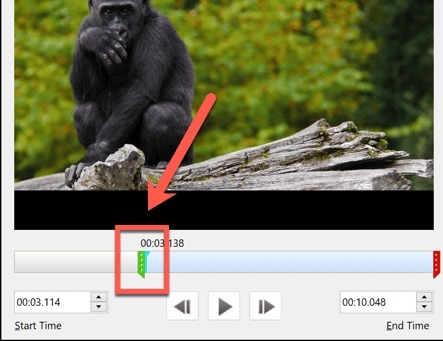
Once you complete these steps, you can press the Play button and see whether you're satisfied with the results. Press OK to complete the process and get a trimmed video into your PowerPoint slides.
How to Trim Videos in Powerpoint on Mac
Step 1: Insert your video and click on it.
Step 2: Head to the Playback section from the top bar, as presented in the image below.

Step 3: Head to the Trim Video option and drag the bars until you get the desired results.

Step 4: Click OK to apply the changes
As you can see, trimming your PowerPoint video on a Mac device will only take you a few minutes.
Easily Trim Videos with the Professional Tool: Filmora
While PowerPoint's built-in Trim Video feature is quick for basic cuts, it often lacks the precision and non-destructive editing needed for professional presentations. If you're seeking frame-by-frame accuracy and tools that won't affect the video's original quality, Wondershare Filmora is a more powerful and precise alternative.
It's a universal and easy-to-use video editor that everyone can master to deliver professional results. Aside from precise trimming capabilities, the platform is powered by AI features that can help you get the best visuals and create astonishing presentations. Wondershare Filmora will provide everything you need to create unique content and add it to your PowerPoint presentations.
Key Features:
- Smart Short Clips — The platform can automatically create short clips from long-form content and prepare it for social media platforms or other sharing purposes.
- Quick Split Mode — You can split your recordings precisely and improve editing efficiency. It'll help you set the frames better and edit accordingly.
- Automatic Scene Detection — Wondershare Filmora can cut or trim your videos using automatic scene detection. It'll cut your video according to the frames, so you won't have to chop your recordings manually.
These are just some of the features that can help you boost your video trimming efficiency and get the desired results. To get insight into all the tools and solutions, we advise you to head to the official Wondershare Filmora platform and download the tool to your desktop device.
- Superb video stabilization with low distortion.
- Vast video/audio effects and creative assets.
- Powerful AI for effortless content creation.
- Intuitive, professional yet beginner-friendly.
- Works on Mac, Windows, iOS, and Android.

How to Trim Videos in Filmora?
Step 1: Open the Filmora platform and click on the New Project option from the main menu.

Step 2: Next, import your video by dragging and dropping it onto the platform. You can also click the Import button and choose your file from the available options.
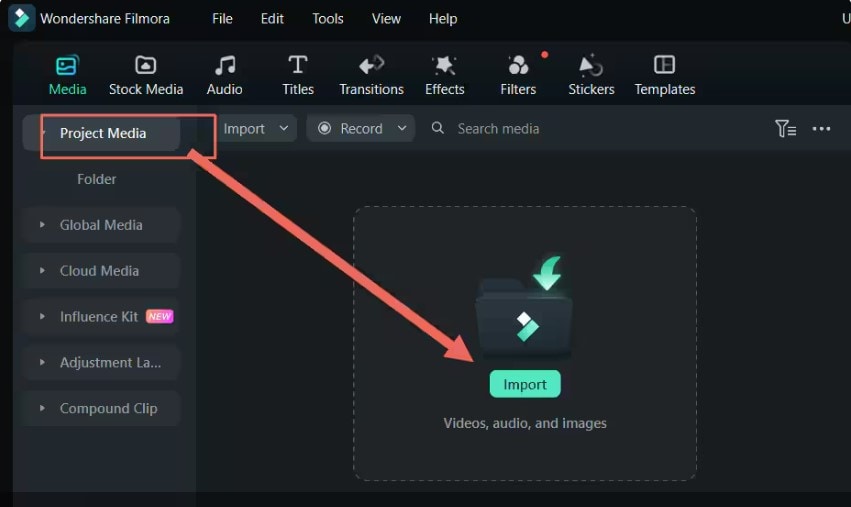
Step 3: Drag the video to the timeline.
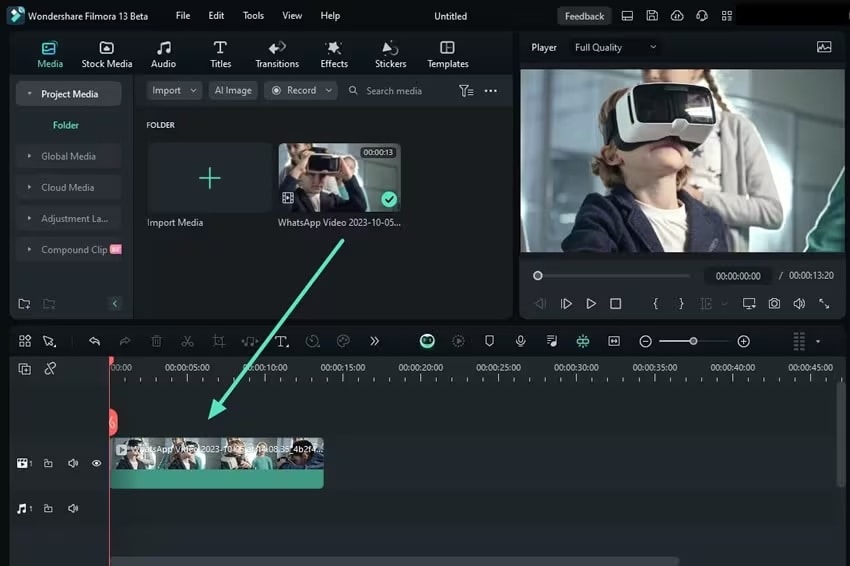
Step 4: Drag the edge of your video to trim it.

When you release the edge, the platform will cut your video and support your experience. You can then preview your content and begin the professional video editing experience on the platform.
Conclusion
Trimming your videos is crucial for getting the ideal content and highlighting the crucial elements. We've presented everything you need to know about trimming your videos in PowerPoint to prepare you for the best experience and teach you how to easily manipulate your video content.
However, if you're seeking a non-destructive editing environment and want to reach professional results, we advise you to check out Wondershare Filmora. This solution comes with a precise trimming tool everyone can use. Aside from this, you'll access advanced features, such as quick splits, AI tools, and more, that will enhance your experience and help you reach your desired goals.


 100% Security Verified | No Subscription Required | No Malware


