
 100% Security Verified | No Subscription Required | No Malware


 ChatGPT
 Perplexity
 Gemini
 Claude
 Grok
Grok
In situations where you need to quickly convert a video format, trim a lengthy clip, or add subtitles to a recording, finding the right tool is essential. For content creators and tech-savvy users looking to efficiently edit and convert videos, these tools can streamline the workflow significantly. One such tool is FFmpeg, which is an open-source multimedia framework used to decode, encode, de-mux, and play virtually any video and audio.
The program includes a vast collection of libraries to process multimedia of various formats. It works primarily as a command-line tool for processing and converting media files. In this article, we will discuss how to install FFmpeg and use its various editing and conversion functionalities.
In this article
-
- Process 1: Batch Converting MP4 to MP3 with FFmpeg
- Process 2: Trimming a Video Using FFmpeg
- Process 3: Cropping Video Through FFmpeg
- Process 4: Extract Audio From Video Using FFmpeg
- Process 5: Resize the Video With FFmpeg
- Process 6: Speed Up and Slow Down Videos
- Process 7: Convert Video to GIF
- Process 8: Compress a Video
Part 1. Installing FFmpeg on Windows, Mac, and Linux
Before moving to video editing, it is essential for you to first learn how to install this tool on your Windows, Mac, or Linux. The steps differ slightly by operating system, so the following platform-specific instructions walk you through installation:
Installing FFmpeg on Windows
If you are a Windows user, read the steps mentioned below to learn how to install this command-line tool on your operating system:
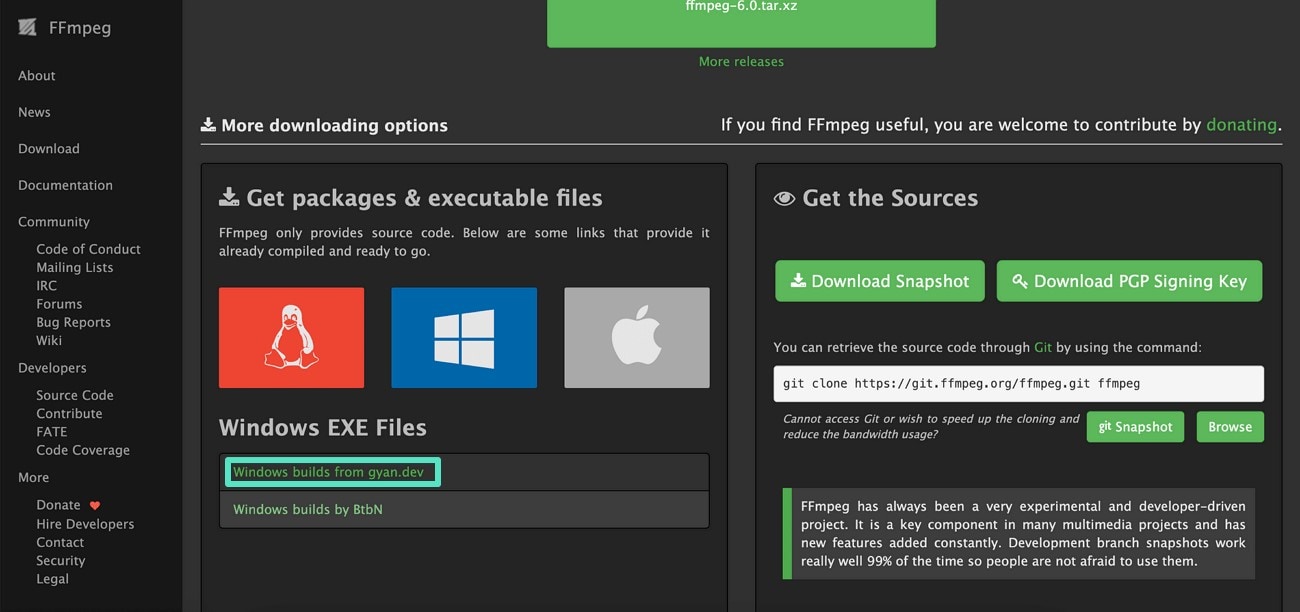
Step 1. Start by accessing the official website of FFmpeg and head to its "Download" page. Here, locate and click the "Windows Builds From Gyan.dev" option to initiate the process before learning how to use FFmpeg
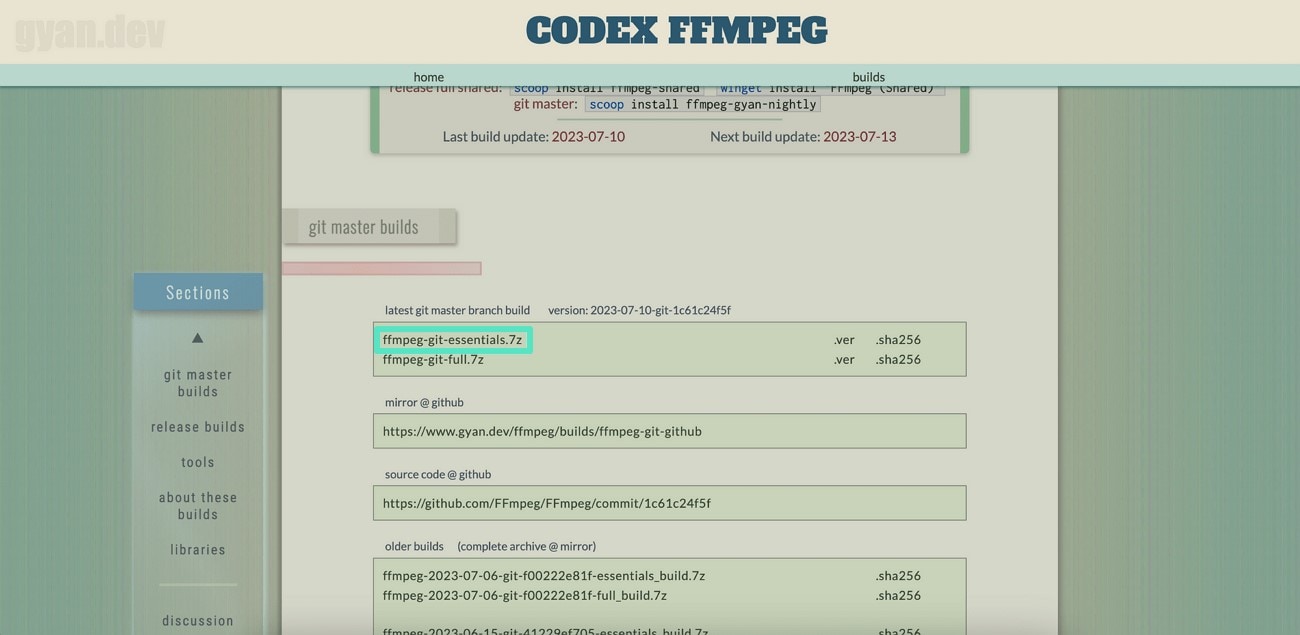
Step 2. Next, choose the desired version of your tool from the options provided and click on it to begin the download.
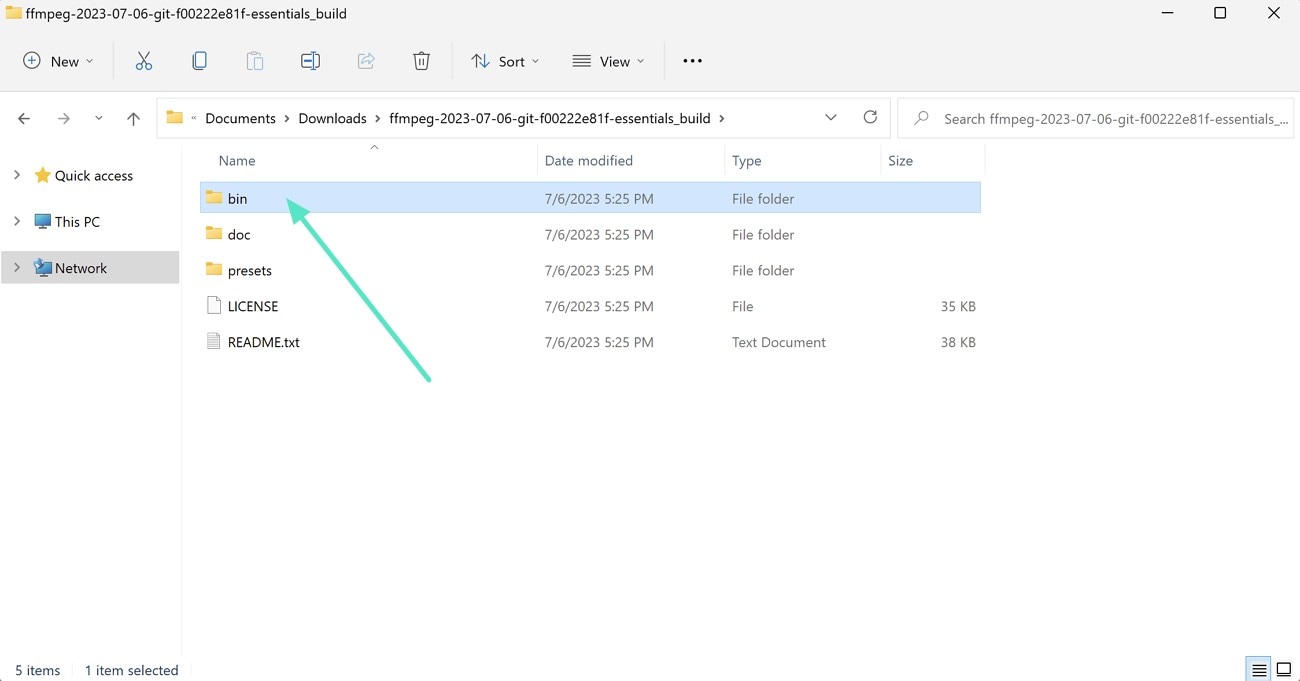
Step 3. When the download is completed, extract the folder in your preferred location. Next, copy the directory of the "Bin" folder to add it to the PATH environment variable.
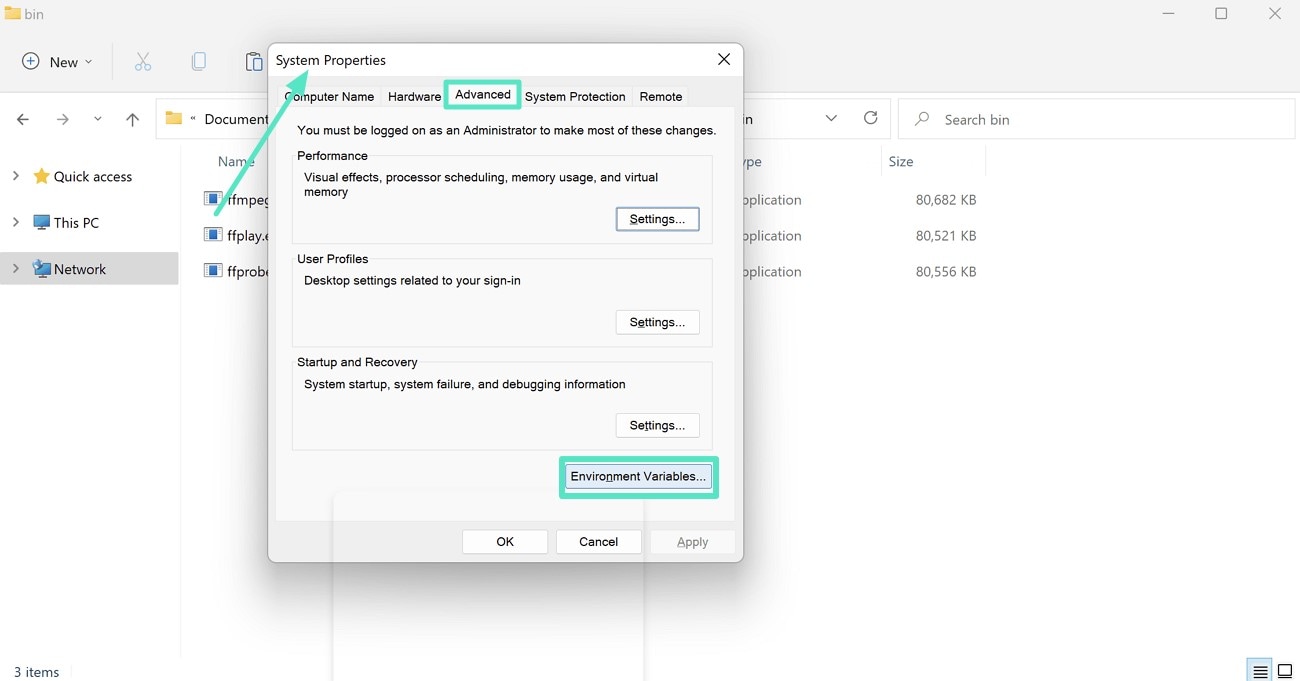
Step 4. Access its "System Properties" menu and click the "Environment Variables" button located under the "Advanced" tab.
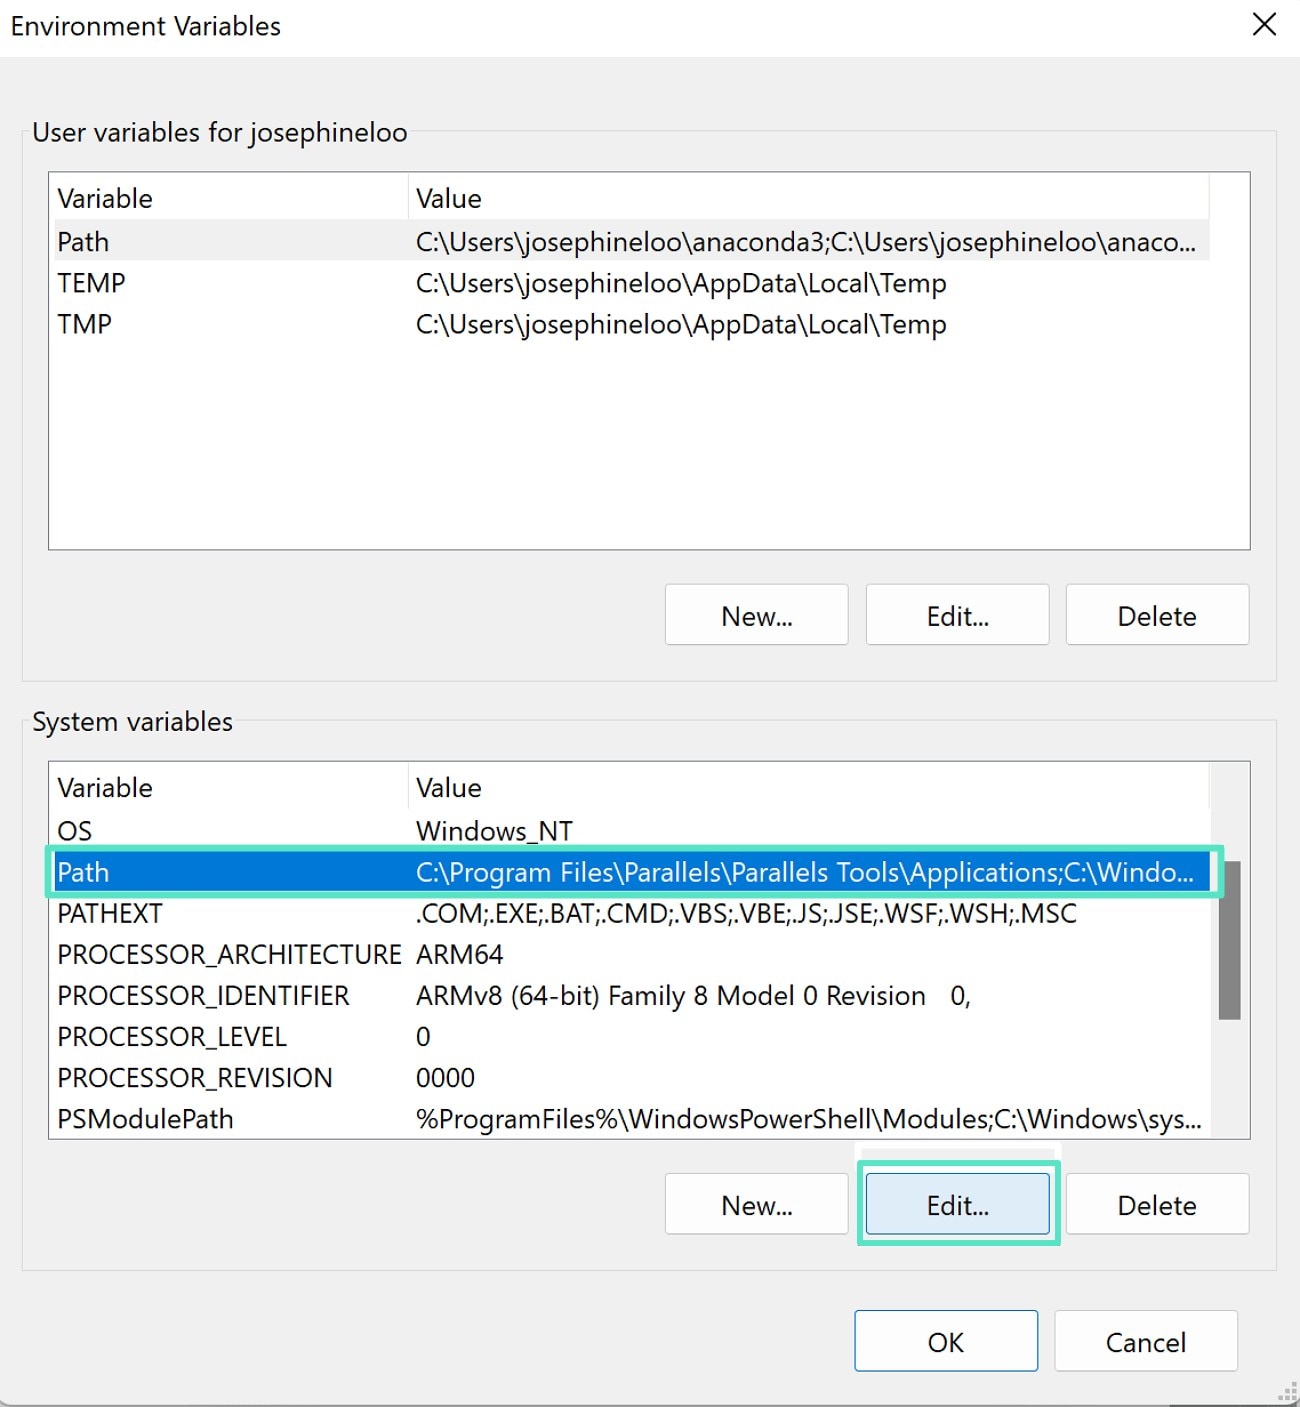
Step 5. In the following window, access the "System Variable" section and click on the option. Next, locate the "Edit" button at the bottom and click on it.
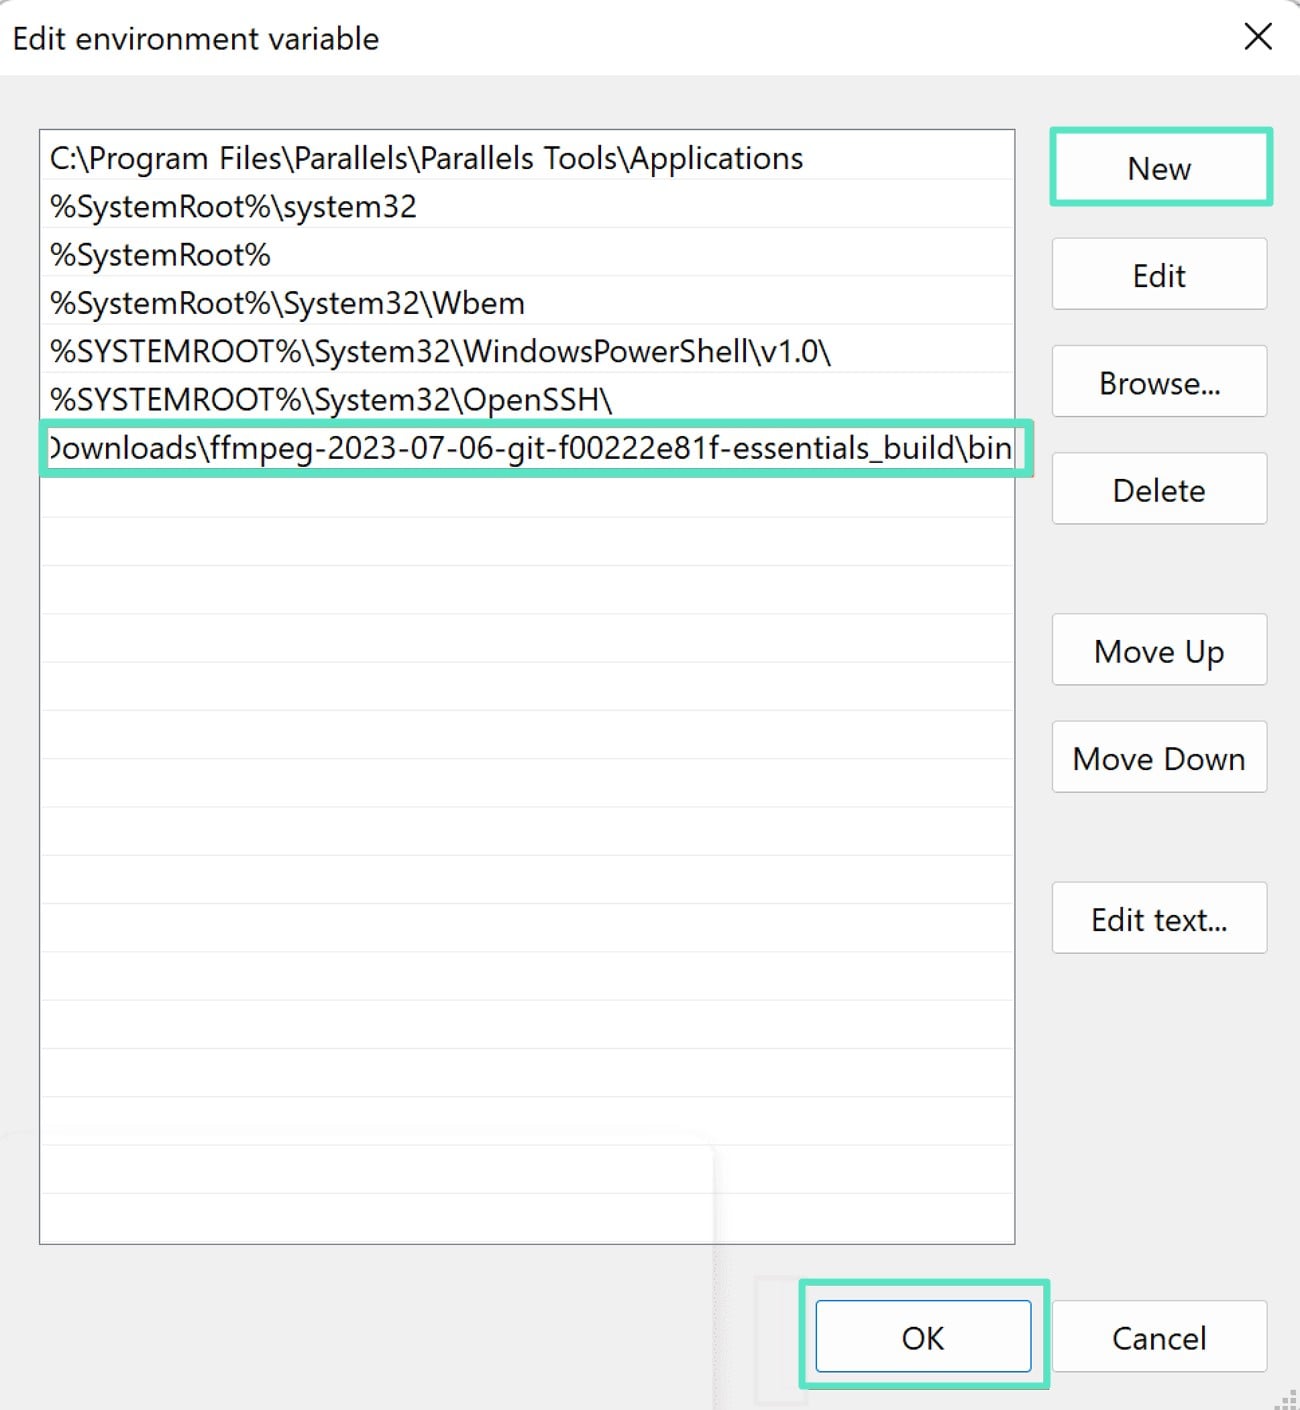
Step 6. Press the "New" button in the "Edit Environment Variable" window, paste the path to the bin directory, and then click "OK" to save your changes.
Step 7. Verify whether the tool has successfully installed by opening the Command Prompt, typing "FFmpeg" and pressing the Enter key. If installation was successful, you will see FFmpeg's version, build details, and a summary of supported codecs and formats.

How to Install FFmpeg on Mac?
Before learning how to use FFmpeg on Windows, let's have a look at the guide to download and install FFmpeg on Mac devices:
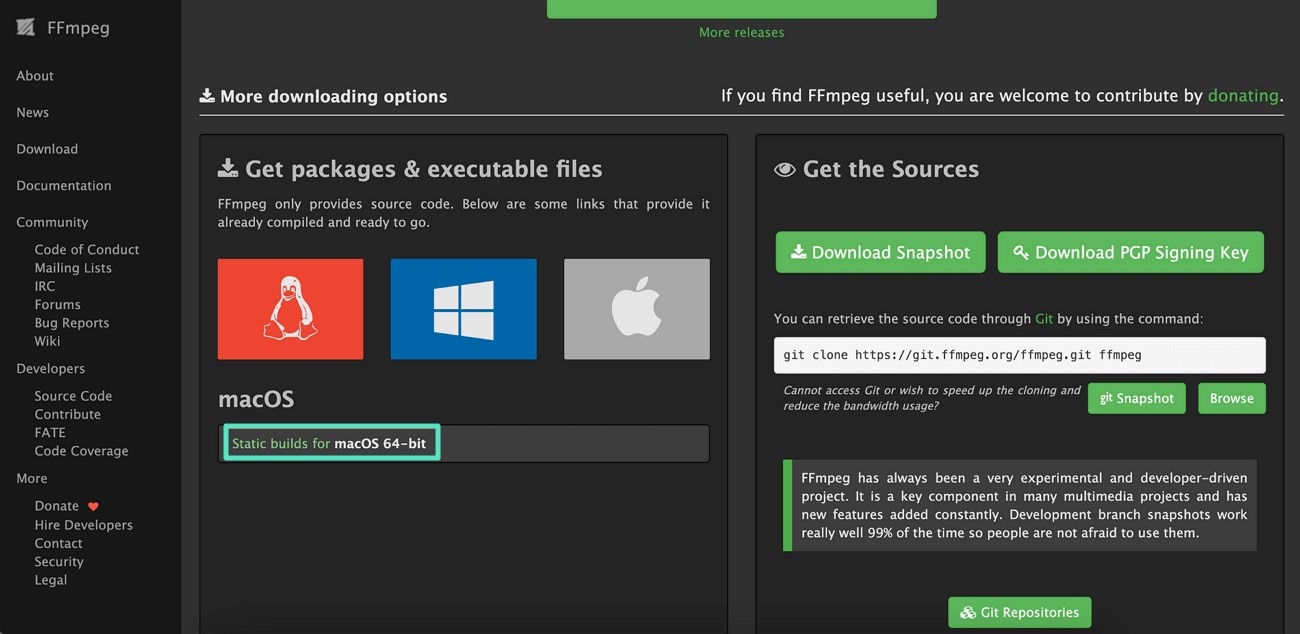
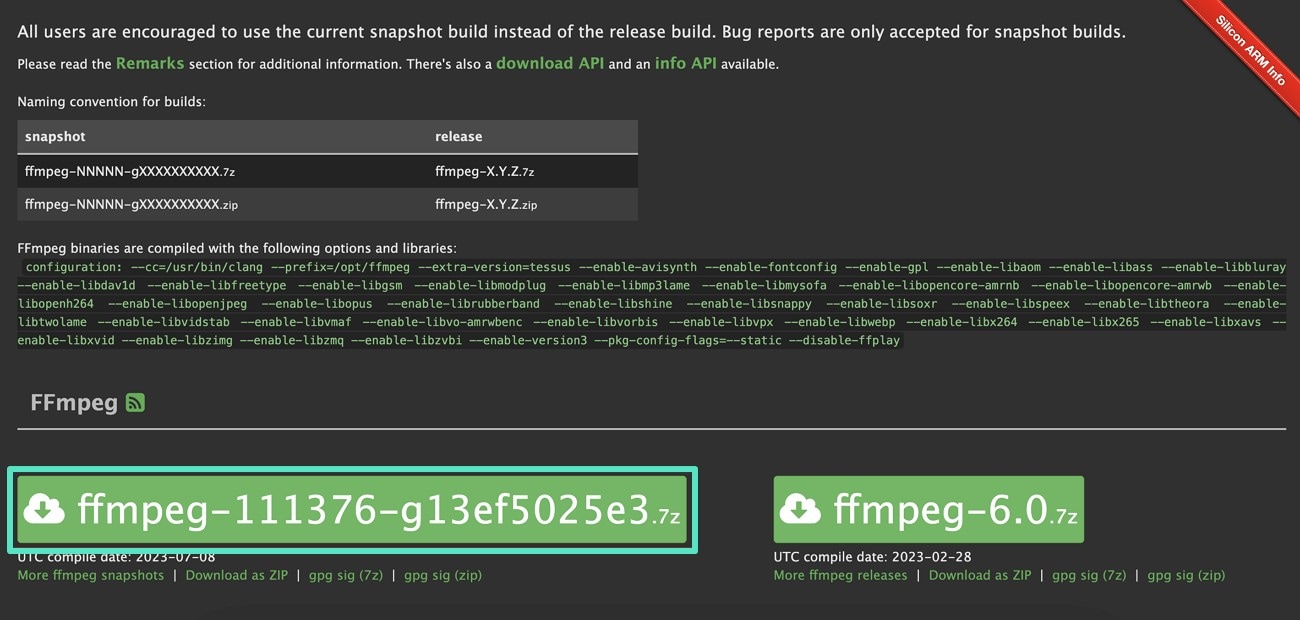
- Step 1. Begin by visiting the FFmpeg website's Download page and locating the section titled "Static builds for macOS 64-bit" to click on it.
- Step 2. In the following interface, click the FFmpeg version to start the download process.
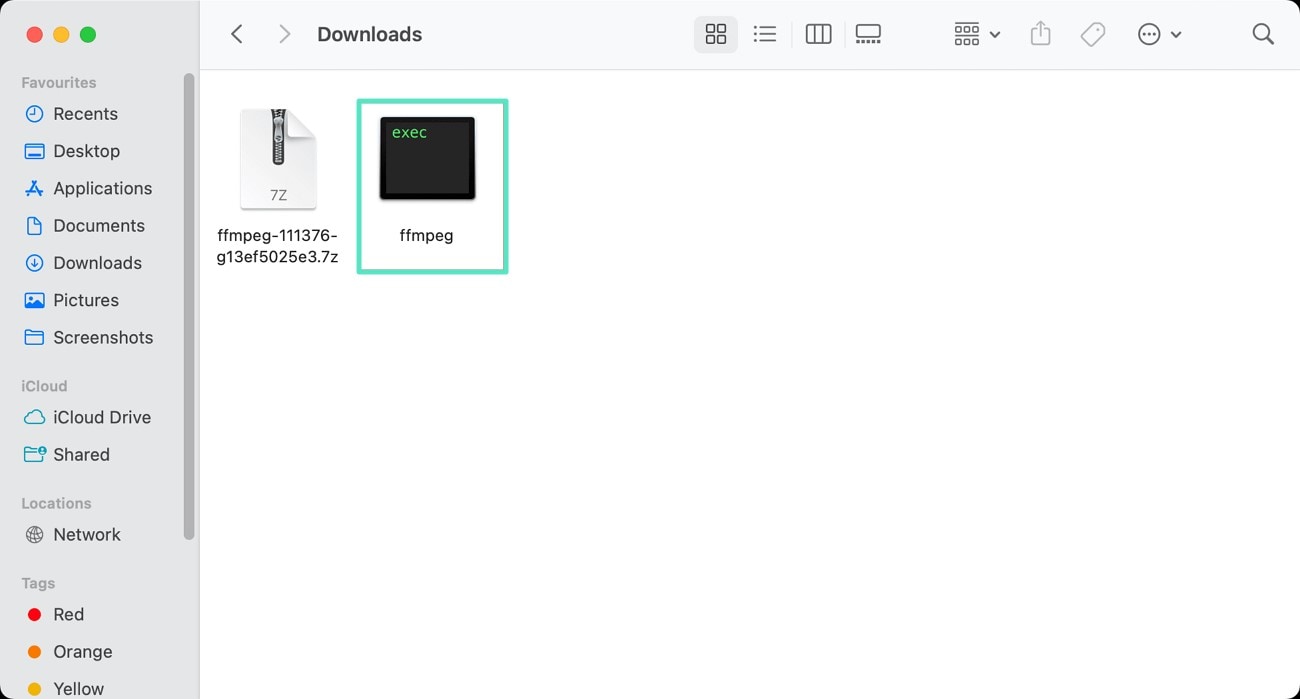
- Step 3. After the download finishes, open the .7z archive and extract the FFmpeg executable. You can then move this executable to a directory of your preference.
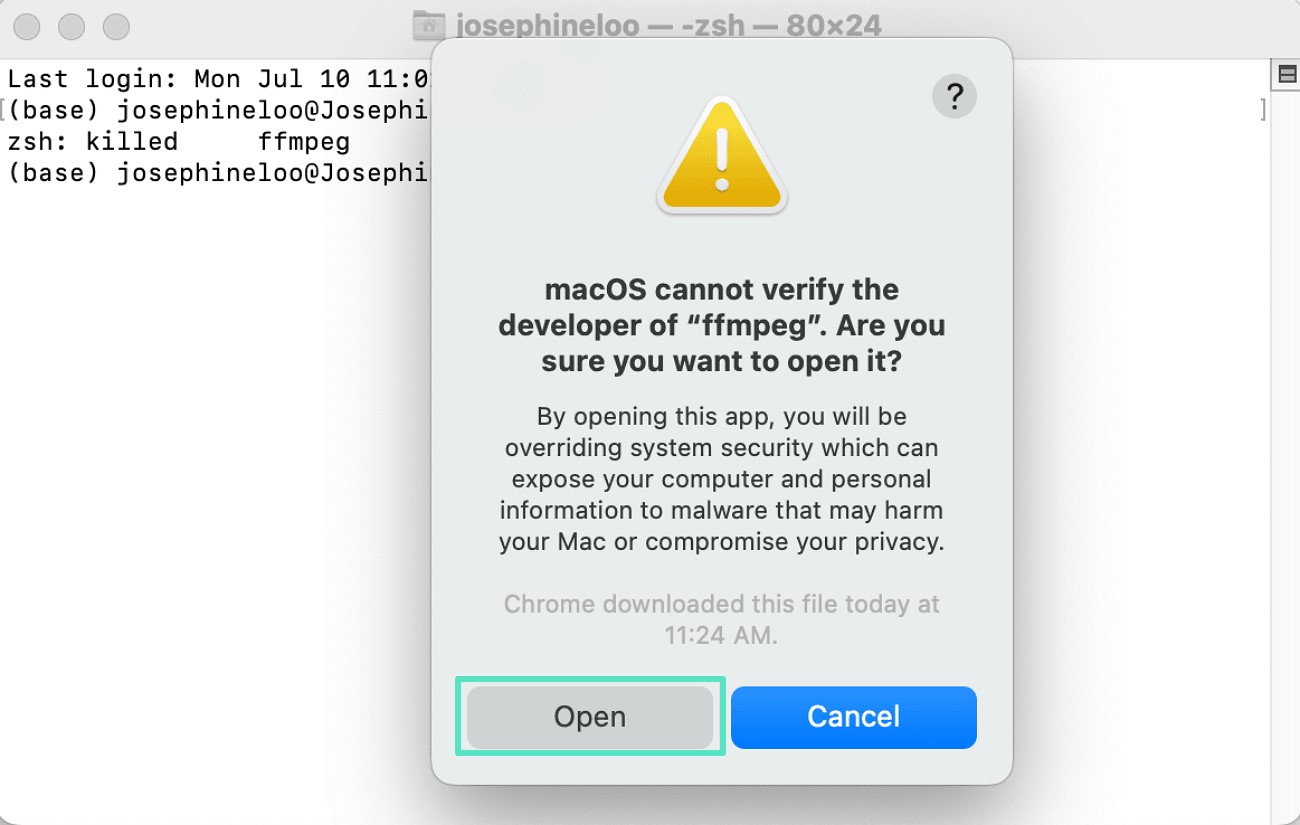
- Step 4. In the following pop-up window, press the "Open" button to complete the installation process.
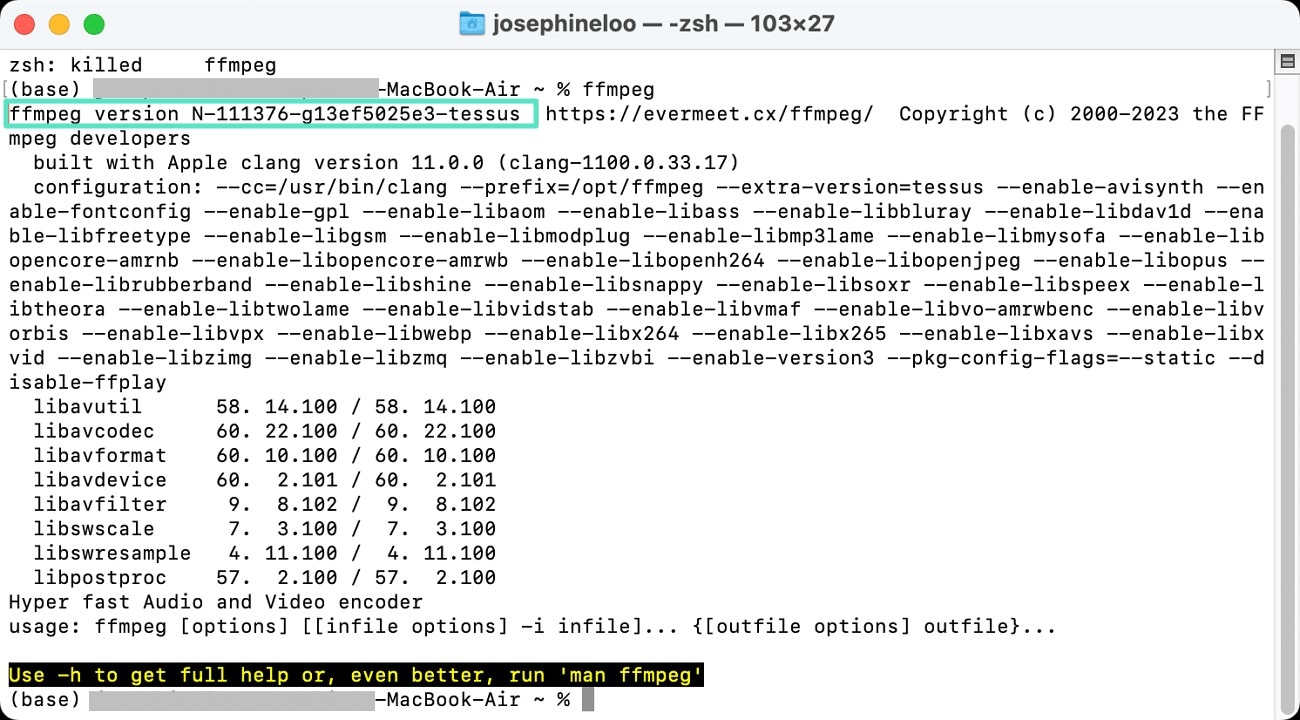
Step 5. Once the installation is completed, you can verify it by running the "ffmpeg" prompt in the Terminal.
Installing FFmpeg on Linux
For Linux users, installing FFmpeg on their operating system is pretty simple and straightforward. Follow the steps mentioned next to know how you can perform the installation process before knowing how to use FFmpeg:
- Step 1. Start by updating the package manager by inputting the "sudo apt update" prompt in the terminal.

- Step 2. Once the update is completed, run the "sudo apt install ffmpeg" command in the same terminal.

- Step 3. To verify the successful installation, enter "FFmpeg" in the terminal and check the installation status.

Part 2. Editing and Converting Videos in FFmpeg
FFmpeg is a versatile tool that provides various video editing and modification functionalities. A few of the most prominent and essential video processing techniques and how to FFmpeg are discussed in the section below:
Process 1: Batch Converting MP4 to MP3 with FFmpeg
Batch converting videos and media files can be easily automated with FFmpeg, as it lets you extract audio tracks to create MP3s. Unlike online APIs, FFmpeg allows full local control through its command-line interface, enabling customized batch conversion workflows. Provided below are the steps on how to convert multiple video files into audio simultaneously using this command-line tool:
Step 1. Start by creating a Batch folder on your PC and then create two subfolders within it. Name these folders Input and Output and add all your videos that you want to convert to the Input folder. Before running any commands, go to the main batch folder in your terminal or command prompt. To convert videos into batches, use the loops that process each video individually.
Step 2. Run the following command in the Command Prompt to execute the how to use FFmpeg Windows process successfully:
On Windows:
ffmpeg -i input.mp4 -ss start_time -t duration -c copy output.mp4
On Mac:
for file in input/*.mp4; do ffmpeg -i "$file" -acodec mp3 "output/$(basename "$file" .mp4).mp3"; done
Process 2: Trimming a Video Using FFmpeg
This command-line tool can remove the unwanted part of the video by shortening it. The trimming feature of FFmpeg works by processing the start time of the video and its duration. You can use different time formats, such as HH: MM: SS, depending on your needs and requirements. Let us have a look at the prompt you can use to trim the video:
On Windows:
ffmpeg -i input.mp4 -ss start_time -t duration -c copy output.mp4
On Mac:
ffmpeg -ss 00:01:00 -to 00:01:30 -i input.mp4 -c:v copy -c:a copy output_trimmed.mp4
To learn how to use FFmpeg, you can replace the start_time with the time you want to start the video in HH:MM: SS format. For example, if you wish to start trimming at 1 minute and 30 seconds, you can specify the start time as either -ss 00:01:30 or simply -ss 01:30, omitting the hour portion.
Next, specify the duration, for example, if you want to trim 20 seconds, you can use -t 20.
The -c copy option copies the video and audio streams directly, skipping re-encoding, which speeds up the process and keeps the original quality intact.
Process 3: Cropping Video Through FFmpeg
Cropping videos with FFmpeg involves cutting out unwanted portions of the video frame by specifying a rectangular area to keep. You can crop the video effortlessly by defining the width, height, and the position of the crop area relative to the original video. Learn how to give the crop command to this video modification tool in the following section:
On Windows and Mac:
ffmpeg -i input.mp4 -filter:v "crop=w:h:x:y" output.mp4
Replace the input with the file name, and specify the cropping parameters w (width), h (height), x (cropping x coordinate), and y (cropping y coordinate) according to your requirements. Now, change the output.mp4 to the folder in which you want to save the cropped video.
Process 4: Extract Audio From Video Using FFmpeg
FFmpeg offers two approaches to detach the audio from a video using its platform. The first one is to copy the existing audio codec or re-encode a new codec. Let us explore both approaches how to FFmpeg in the section below:
Method 1. Copying Existing Audio Codec
Use the following command prompt if the audio of the video is already in a suitable format and does not need encoding:
ffmpeg -i input-video.mp4 -vn -acodec copy output-audio.m4a
Replace the input-video with the video name and output-audio with the desired output audio file name. The acodec function copies the original audio stream without converting.
Method 2. Re-encoding To A New Format
This method lets you change the original audio codec format of the video to your desired format. For instance, if the audio codec in the video was in M4A, you can change it into MP3. Use the command mentioned below to change the audio codec and extract the audio from the video:
ffmpeg -i input.mp4 -vn output.mp3
In place of input, add your video name and the desired audio name in place of the output.
Process 5: Resize the Video With FFmpeg
If you are wondering how do I use FFmpeg, it uses the scale video filter to resize videos. You can specify exact dimensions or scale proportionally by preserving the aspect ratio to avoid distortion. Mentioned below are some of the prompts you can use to resize the video using the command line:
Resizing with Height and Width
To resize the video with the height and width, run the following prompt in the command line after FFmpeg:
ffmpeg -i input.mp4 -vf "scale=1280:720" output_resized.mp4
Resizing with Width Calculated
The following prompt will help you change the size of the video with respect to the width:
ffmpeg -i input.mp4 -vf "scale=1200:-1" output_resized.mp4
Resizing with Height Calculated
Specify the height with the following prompt to change only the height of the video:
ffmpeg -i input.mp4 -vf "scale=-1:720" output_resized.mp4
Resizing By Percentage
You can specify how much you want to increase the size of the video using the following prompt:
ffmpeg -i input.mp4 -vf "scale=iw*0.5:ih*0.5" output_resized.mp4
Process 6: Speed Up and Slow Down Videos
Adjusting the playback speed of the video is quite convenient with FFmpeg, as you can change the framerate without any manual editing. FFmpeg can speed up or slow down videos by using the setpts filter for video and the "atempo" filter for audio. To learn FFmpeg how to, to adjust the speed of your video according to your preferences, consider the following prompt:
Speed Up Video By 2x
ffmpeg -i input.mp4 -filter_complex "[0:v]setpts=0.5*PTS[v];[0:a]atempo=2.0[a]" -map "[v]" -map "[a]" output_fast.mp4
Slow Down Video to Half Speed
ffmpeg -i input.mp4 -filter_complex "[0:v]setpts=2.0*PTS[v];[0:a]atempo=0.5[a]" -map "[v]" -map "[a]" output_slow.mp4
Process 7: Convert Video to GIF
Besides basic video modification, you can also convert your video into a short sequential GIF using this command-line tool. Provided below is a simple prompt that you can use within the FFmpeg interface to create a GIF from your lengthy video:
ffmpeg -i input.mp4 -vf "fps=10,scale=320:-1:flags=lanczos" -c:v gif animation.gif
Process 8: Compress a Video
Video compression reduces file size by optimizing encoding settings such as bitrate, codec, resolution, and frame rate. FFmpeg allows controlling bitrate, using efficient codecs, and resizing to compress videos while maintaining the original quality. Run the following command in the command line to compress the video to a specific size for learning how to use FFmpeg on Windows:
ffmpeg -i input.mp4 -c:v libx264 -crf 25 -c:a aac -b:a 128k compressed.mp4
Part 3. The Ultimate Tool To Edit Videos Efficiently
If you want to make your video editing experience a more comprehensive solution in which you can preview all the changes made in real time, opt for Wondershare Filmora. The tool offers a complete set of features to edit video and audio files effortlessly. You can adjust the aspect ratio, trim, and crop the files according to your preferences.
Besides manual editing, the tool also provides many AI-powered features that help you automate the editing process. You can import videos in multiple formats and import them to the magnetic timeline, which helps you efficiently organize multiple clips. Moreover, people who wonder how to use FFmpeg Mac can preview the applied modifications within the preview window offered by the platform.
 secure download

Step-by-Step Guide on How to Edit Videos with Filmora
As discussed, the tool offers various editing functionalities to generate high-quality content without any manual effort. Provided below is a step-by-step guide on how to edit videos using this exceptional tool:
- Step 1. Start by Creating a New Project In Filmora: To begin the process, launch Filmora on your device and press the "New Project" tab located on the homepage. Next, import the video that you want to edit from your device and drag it to the editing timeline。

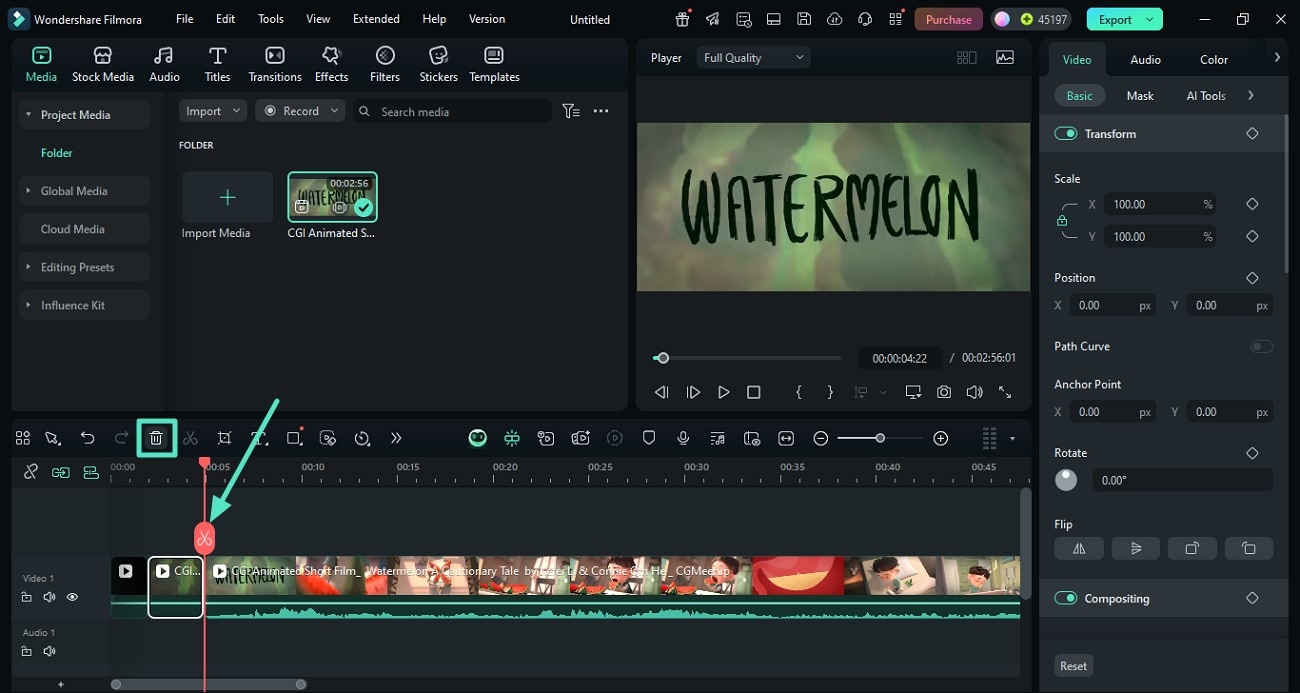
- Step 2. Trim Unwanted Segments: Once the video is successfully imported, drag the ends of the video track to the point you want to keep. To remove any segment from the center, place the Playhead to the point and press the "Scissor" icon on it. Next, repeat the same process by moving the playhead to isolate the video part. Head to the top of the timeline and press the "Bin" icon。
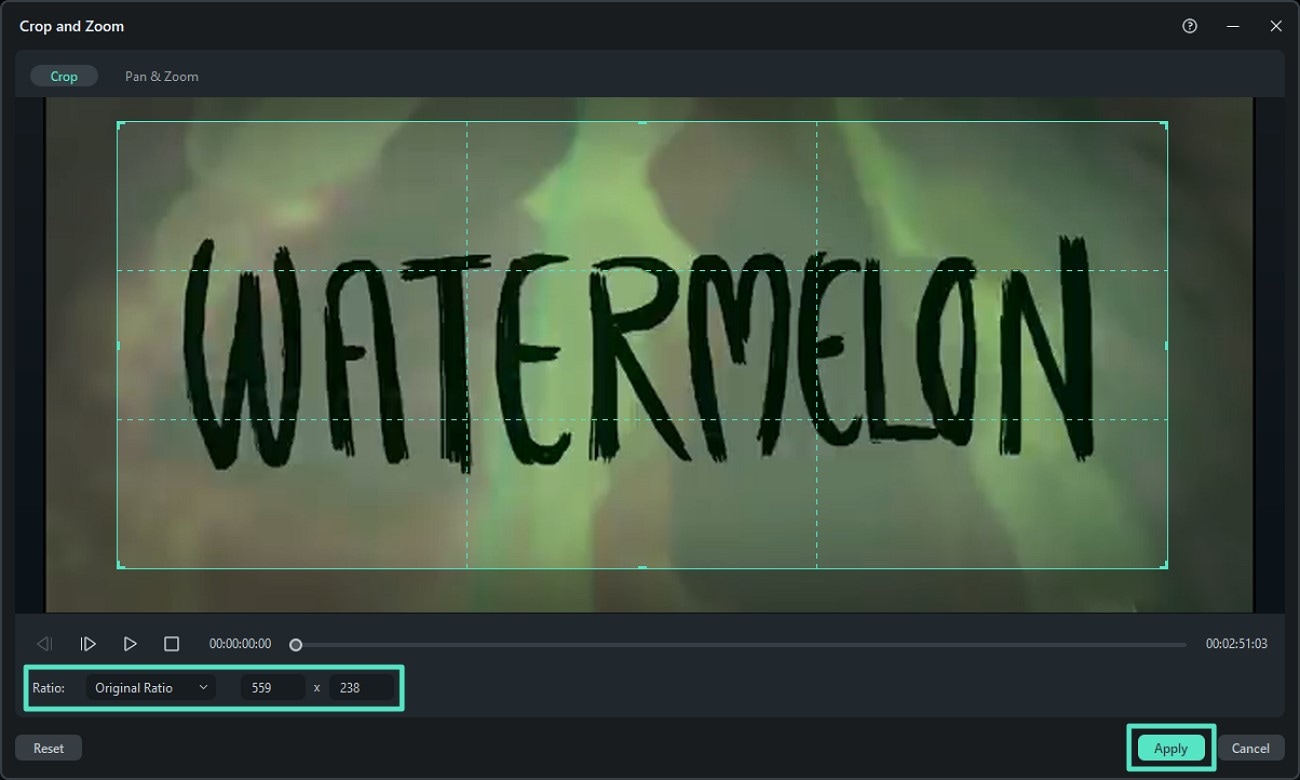
- Step 3. Crop The Video Imported. Right-click the video track and opt for the "Crop and Zoom" option from the expanded list. Select the area by dragging the corners of the video preview or choose the aspect ratio from the options provided. Press the "Apply" button once you are done with the cropping and learning how to use FFmpeg。
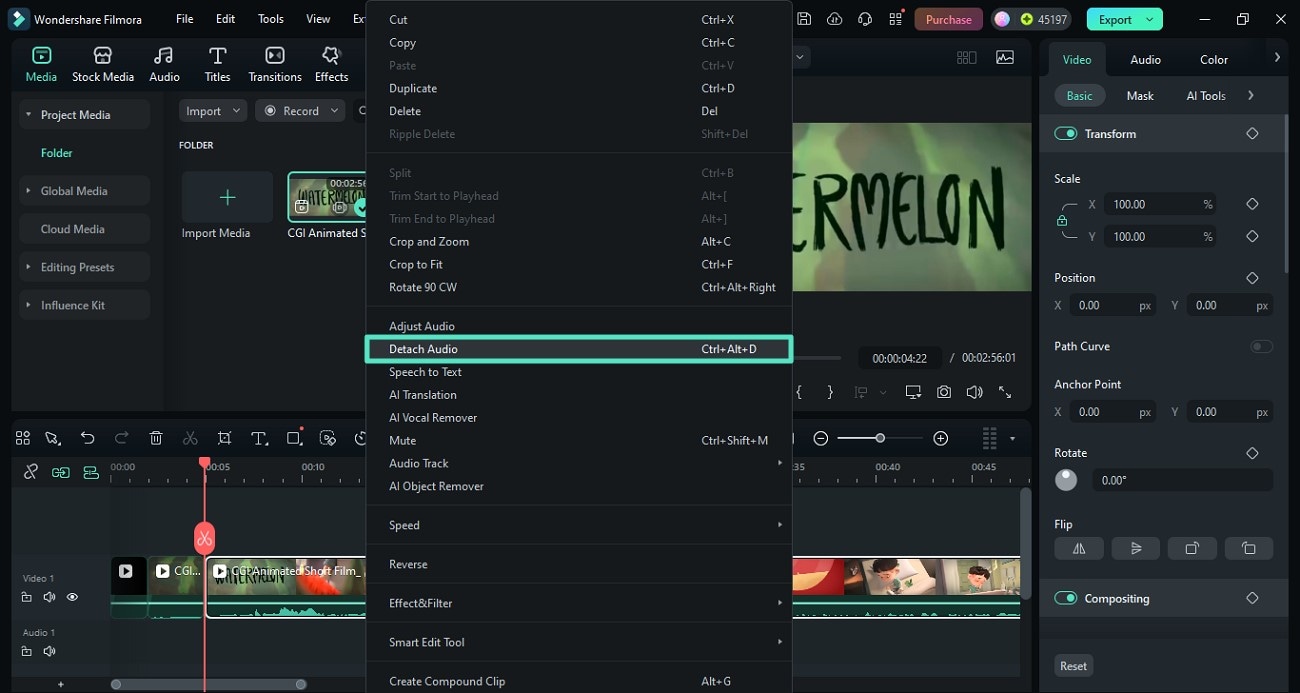
- Step 4. Detach The Audio from the Video: To extract the video's audio, right-click the track and press the "Detach Audio" option to remove the audio from the video. Once it is done, you can apply other background scores using different functionalities of Filmora, like the music library and AI music。
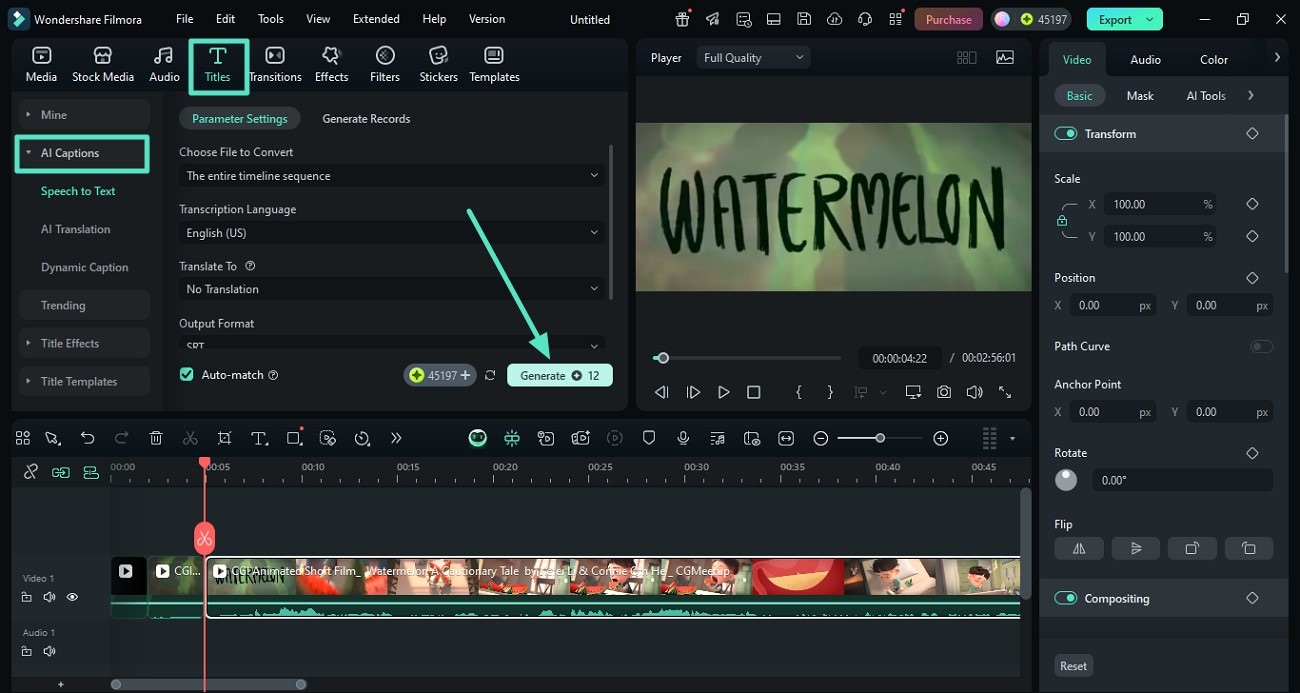
- Step 5. Insert Automated Subtitles: If your video has dialogues, you can generate captions across them efficiently using the AI captions facility. Simply head to the "Titles" option from the toolbar at the top and enable the "AI Captions" section. Input the language of the video and press the "Generate" button to execute the process。
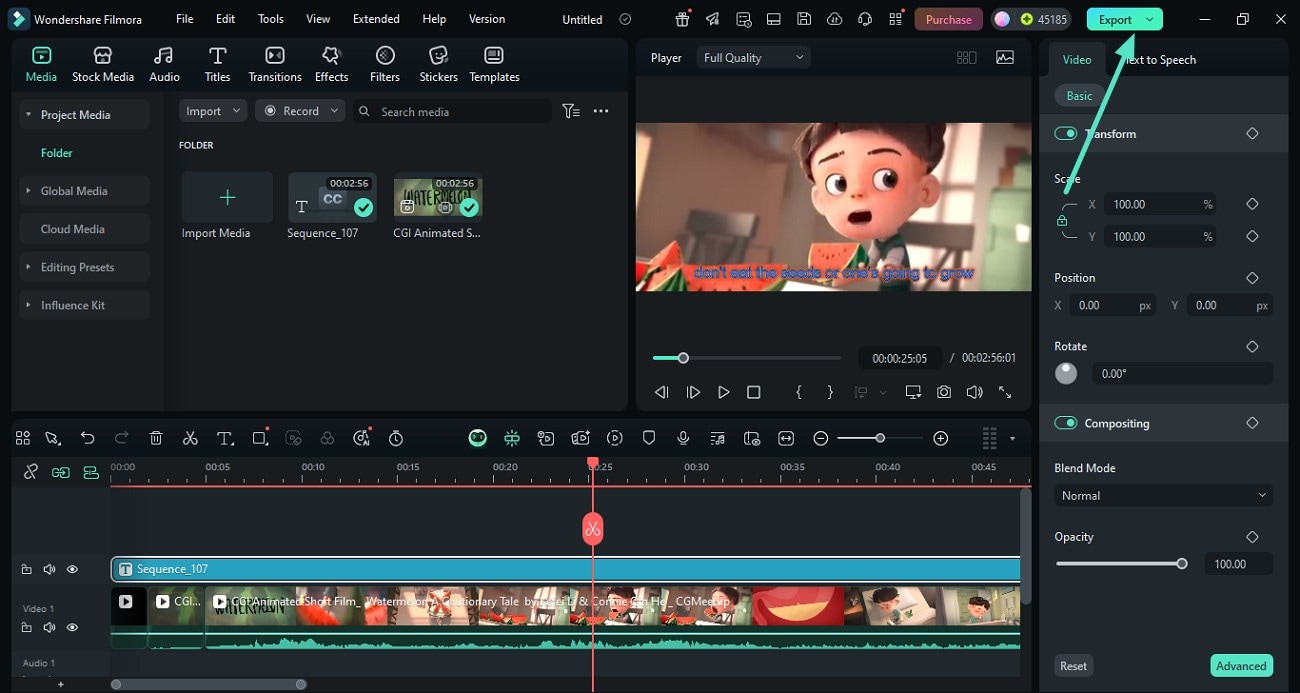
- Step 6. Review the Results and Export. Once the captions are generated, head to the top-right corner of the interface and press the "Export" button。
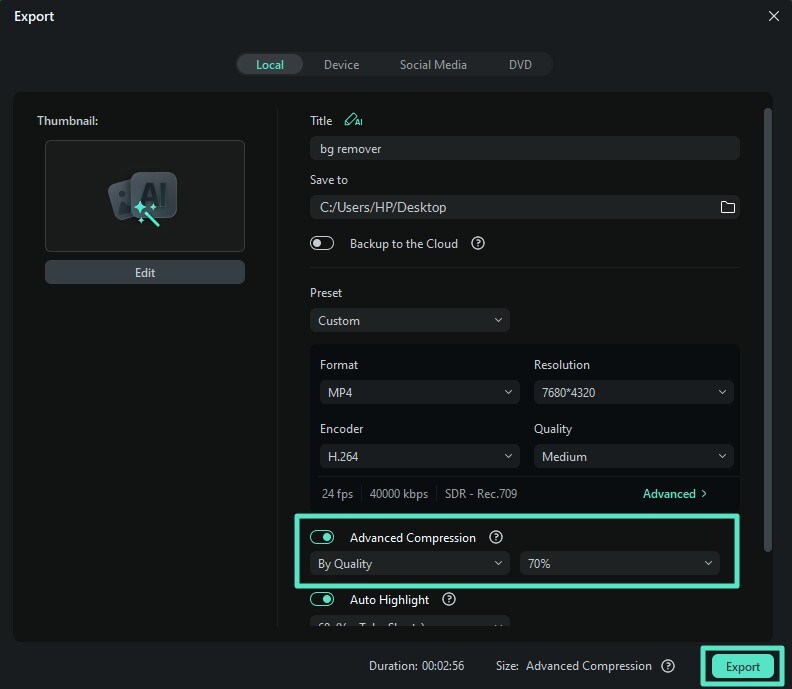
- Step 7. Compress Video and Save. In the following export window, enable the "Advanced Compression" toggle and select the compression level by expanding the drop-down menu. Next, click the "Export" button to save the results successfully to your device。
Here is the edited video.
secure download
Conclusion
To wrap it up, this article discussed how to install FFmpeg on different operating systems effortlessly. The article also provided a detailed guide on how to perform different editing tasks using this command-line tool. However, if you are looking for a more comprehensive tool that offers functionalities beyond the command line, Filmora is the right choice.
