The green screen filter has taken over TikTok and Instagram. From trending reaction videos to eye-catching skits, the green screen effect TikTok creators love is here to stay. But while mobile apps can offer basic overlays, they don't give you full control.
With Wondershare Filmora, creators can break free from the limitations of mobile apps. Its powerful yet interface allows you to create seamless, high-quality green screen effects worthy of pro-level content. Are you ready to make YouTube, TikTok, or IG green screen filter content? Explore the article to learn more.

Part 1. A Closer Look at the Green Screen Filter
A green screen filter is a video editing technique that replaces a solid green background with any other image or video. This process is known as chroma keying. It works by isolating the green color range and removing it from the footage, allowing another layer to show through.
Why green?
Green is used because it's the farthest color from human skin tones and most clothing. This makes it easier to separate the subject from the background. It's also easier to light evenly, reducing shadows that interfere with chroma key accuracy.
Common Uses of the Green Screen Filter
Here are some common uses of the green screen filter:
- YouTube tutorials and reaction videos: Add overlays while maintaining engagement.
- Virtual product demos: Place yourself in different scenes to highlight features.
- Gaming streams: Remove your background while streaming to let gameplay take focus.
Limitations of Basic Editors
Mobile apps offer a simplified version of chroma keying. However, they often lack precision tools. Edge bleeding, poor lighting, and color mismatches are common issues that can ruin the illusion. That's where Wondershare Filmora comes in.
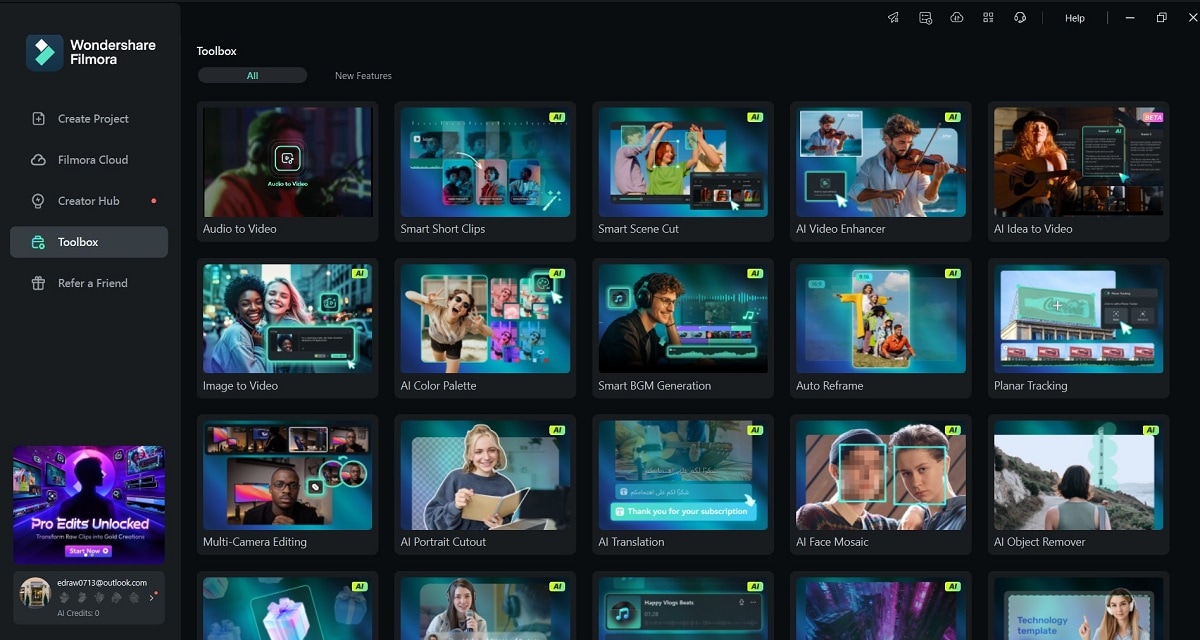
The next section will walk you through how to create green-screen videos using Filmora.
Part 2. How To Use Green Screen in Filmora
Creating green-screen videos with Filmora is both powerful and intuitive. Here's how to use the green screen filter effect with precision and flair.
Import Footage and Backgrounds
Download and install Filmora on your computer. Next, launch the tool and log in or register for a Wondershare account. Follow the steps below.
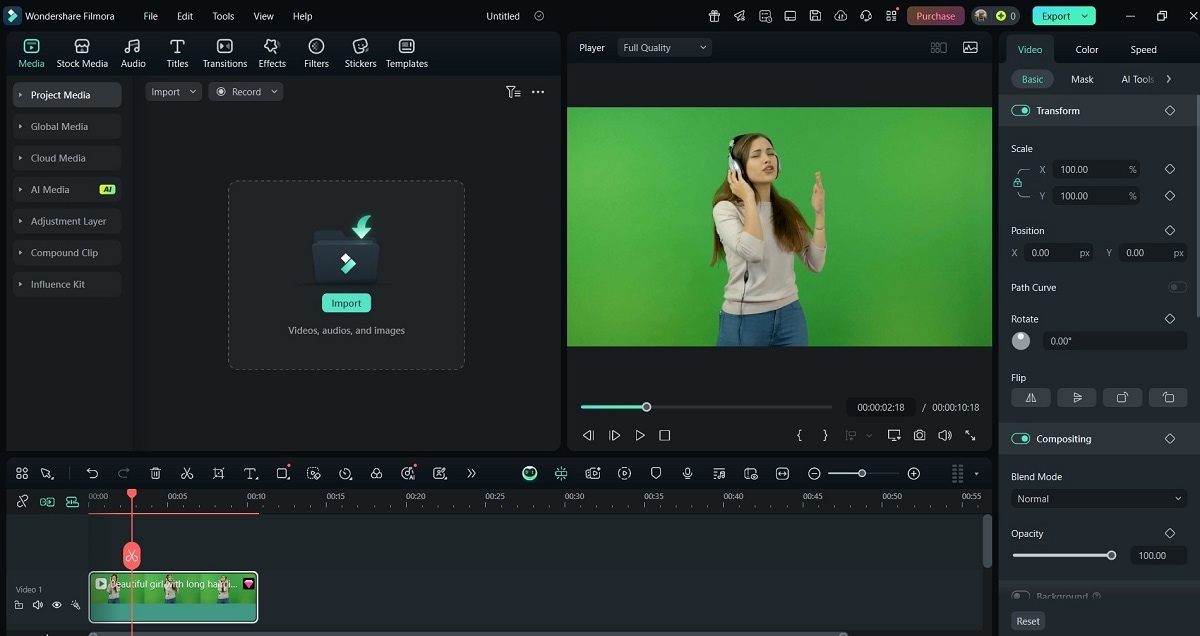
01of 04Drag and drop your green screen video into the media library
Drag and drop your green screen video into the media library. Alternatively, click the Import button and upload your file. Drag it to the timeline.
02of 04Add your desired background image or video
Add your desired background image or video. This will replace the green area.
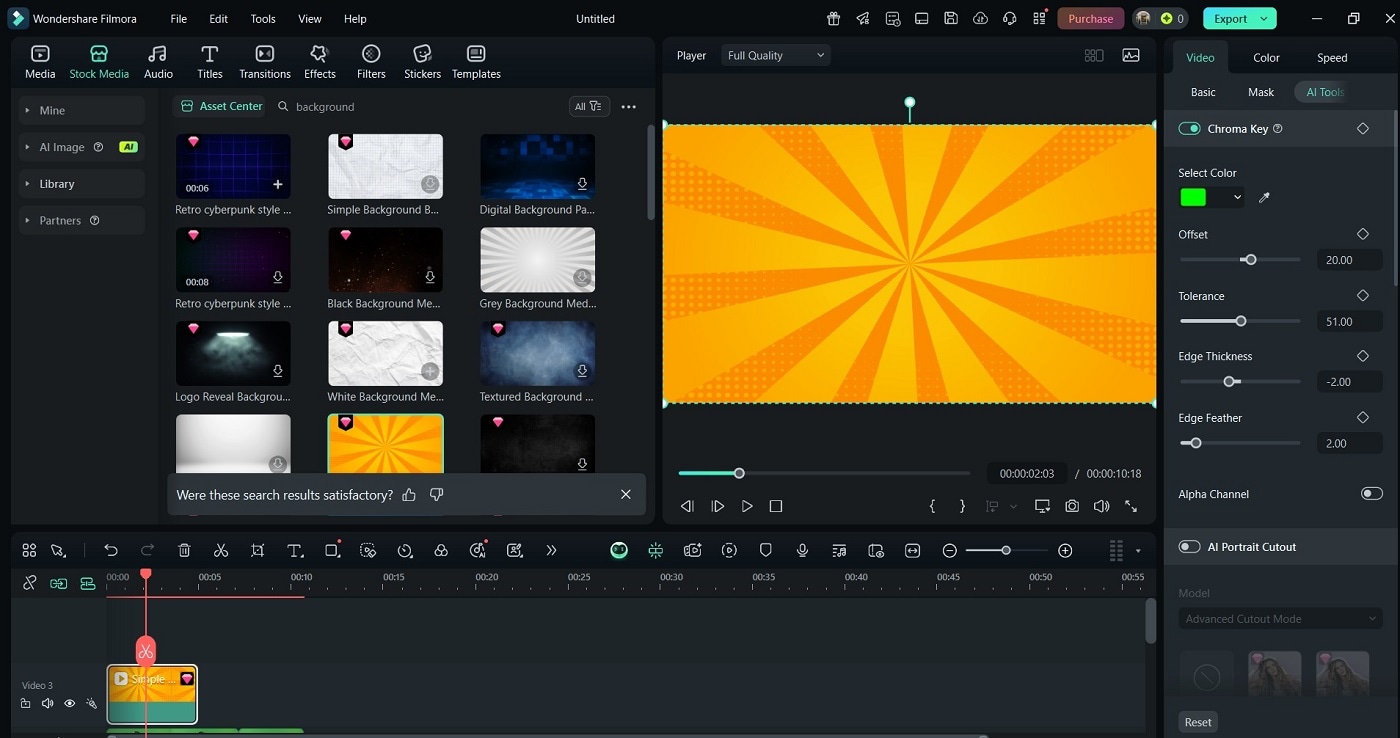
Use high-resolution backgrounds that match the lighting and angle of your main footage.
Apply the Chroma Key Effect
Now for the fun part: removing the green!
03of 04Place the green screen clip on Track 2
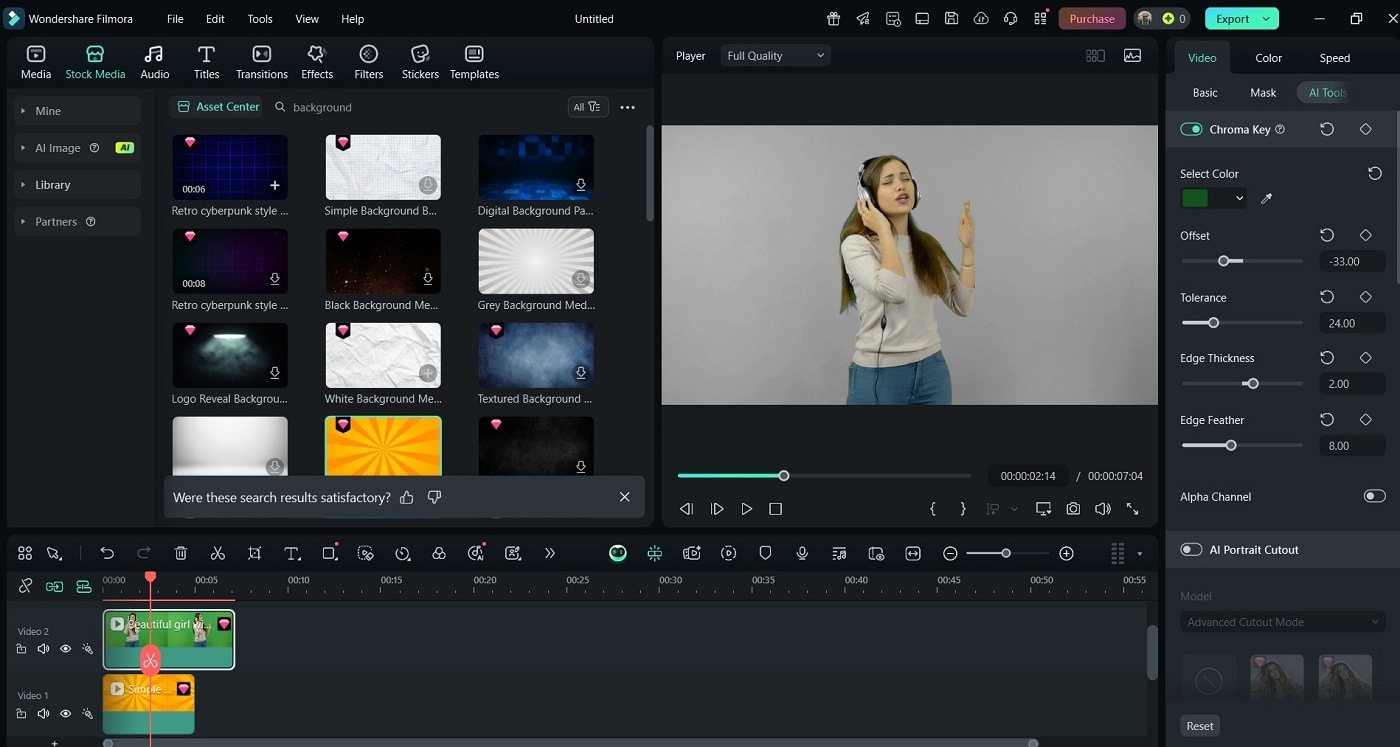
Place the green screen clip on Track 2 (above the background layer). Double-click the clip to open the editing panel.
04of 04Check the Chroma Key box in the right panel
Check the Chroma Key box in the right panel. Filmora automatically removes the green background.
You can now fine-tune the effect:
- Offset and Tolerance: Adjust the amount of green that gets keyed out.
- Edge Feathering: Softens the transition between subject and background.
Enhancing the Result
To make your final video stand out, go to the Color panel and make further adjustments.
- Lighting Correction: Match lighting levels between subject and background.
- Color Matching: Sync tones for a more natural look.
- Blur and Shadow Tools: Add soft shadows to anchor your subject visually.
- Motion Effects: Add zooms or camera motion to the background for dynamic shots.
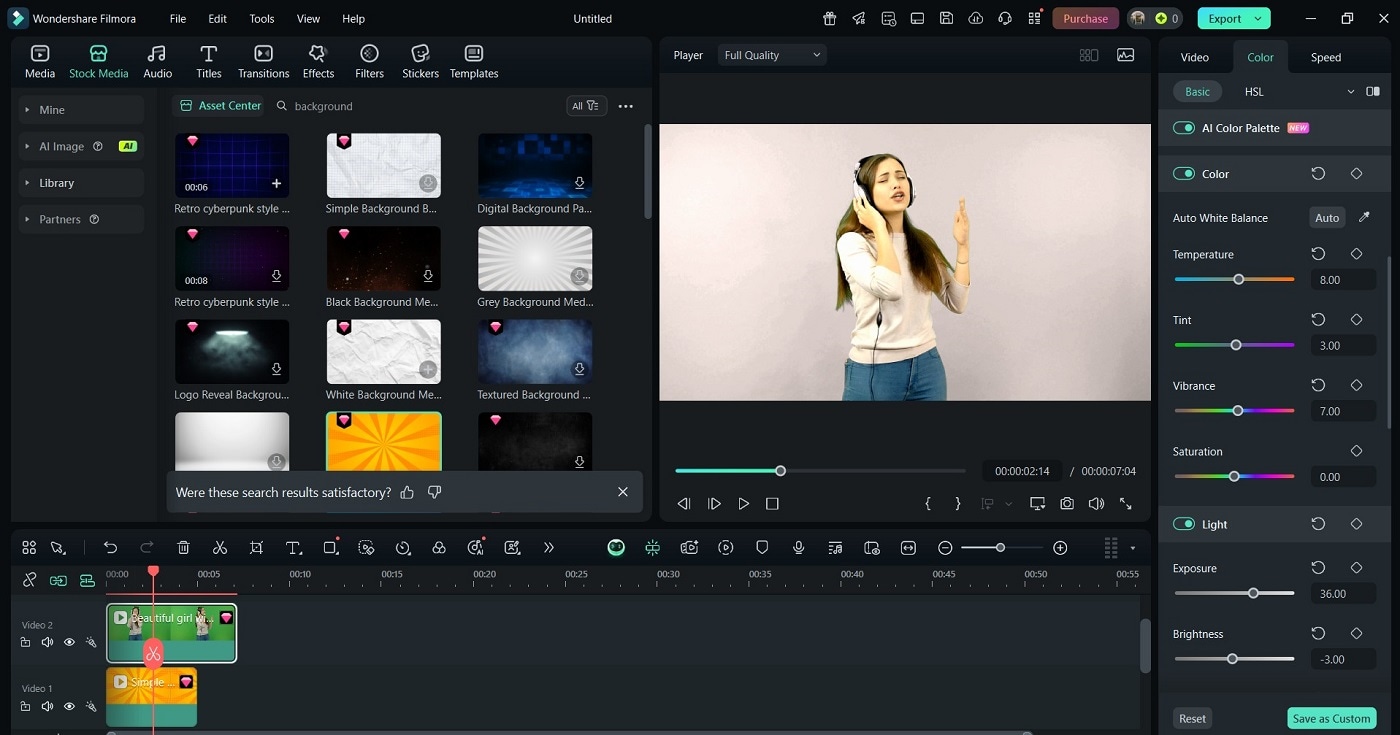
With Filmora, you can even add motion tracking, voiceovers, and sound effects to polish the edit. Filmora combines smart tools with easy-to-use features, making green screen editing accessible and professional.
Part 3. Best Scenarios To Use the Green Screen Filter
The green screen filter is a powerful creative feature that adapts to a wide range of content styles. From casual creators to professionals, it helps add depth, polish, and engagement to any type of video. Here are some of the best scenarios for different professions to use effectively.
YouTube Content Creators
Green screen editing is popular among YouTubers who want to enhance their on-screen presence:
- Reaction videos become more immersive when you place yourself over the content you're discussing.
- How-to guides and tutorials benefit from background visuals that support your explanation.
- Product reviews and unboxings look cleaner when combined with branded visuals or close-up footage.
This approach helps grab attention and keep viewers engaged throughout the video.
Online Educators and Presenters
For educators, trainers, and public speakers, the green screen filter provides a practical way to enrich lessons:
- Replace plain backgrounds with slide decks, diagrams, or illustrative animations.
- Simulate professional environments such as classrooms, labs, or workspaces.
- Create dynamic presentations that hold your audience's attention.
It is especially useful when producing content for e-learning platforms or virtual classrooms.
Gamers and Streamers
Streamers can use green screens to refine their live broadcasts:
- Remove distracting backgrounds so the gameplay remains the focus.
- Incorporate overlays like notifications, chats, and scoreboards.
- Match the visual theme of the game to improve the overall viewing experience.
This results in a cleaner and more visually appealing stream setup.
Small Businesses and Marketers
Business owners and marketers can produce high-quality content with minimal resources:
- Add virtual sets, brand elements, or promotional footage to enhance storytelling.
- Maintain consistent visual branding across video campaigns.
- Save on studio rental or travel costs by recording anywhere.
With the right approach, the green screen filter becomes a creative asset across many industries. Next, explore why Filmora is the ideal tool for making it happen.
Part 4. Why Filmora is the Best Tool for Green Screen Editing
Filmora is one of the best green screen filter editors available today. It combines simplicity with power, giving both beginners and seasoned creators all the tools they need in one platform. Here are its main features

Intuitive and Beginner-Friendly
Filmora's drag-and-drop interface is designed for all skill levels. Its real-time preview window lets you see chroma key results as you tweak them. There's no complicated setup needed. You also get built-in templates, overlays, and social media presets that make it easy to stylize your edits.
Advanced Chroma Key Features
Filmora offers more than background removal. Below are its Chroma Key features to help you edit the right way:
- AI background detection automatically removes green without manual masking.
- Adjustable settings like tolerance, feathering, and edge correction help you clean up rough edges.
- Wrinkle and shadow correction tools fix lighting flaws on your green screen fabric.
- Spill suppression ensures green tint doesn't reflect on your subject.
These features are normally found in premium editing suites, yet Filmora makes them accessible and easy to use.
Complete Editing Suite in One App
Beyond the green screen, Filmora gives you:
- Motion tracking and keyframing to animate layers or simulate camera movement.
- Built-in stock media and sound libraries for custom backgrounds and sound effects.
- Audio syncing, titles, and effects that integrate smoothly with your footage.
- Export presets for TikTok, IG Reels, and YouTube with optimized resolution and aspect ratios.
Fast, Affordable, and Cross-Platform
Filmora runs on Windows, macOS, and even mobile. It supports GPU acceleration for faster previews and rendering. With flexible pricing plans and a free trial, it's perfect for creators on any budget.
For green screen editing that's both powerful and practical, Filmora is the tool that delivers.
Conclusion
The green screen filter is no longer for professionals. Thanks to tools like Filmora, anyone can create studio-quality content for TikTok, Instagram, YouTube, and beyond. The tool makes the process smooth and accessible whether you're replacing your background for tutorials, product demos, or creative skits.
With its advanced chroma key tools, drag-and-drop interface, and export options tailored for social platforms, Filmora gives creators an edge in standing out online. If you're ready to level up your content and master the green screen effect for TikTok or Instagram, Filmora is the all-in-one solution you've been looking for.


 100% Security Verified | No Subscription Required | No Malware


