
 100% Security Verified | No Subscription Required | No Malware


 ChatGPT
 Perplexity
 Gemini
 Claude
 Grok
Grok
While we usually aim for clean, smooth footage, there are situations where handheld footage makes more sense.
Can you imagine if an action-chasing scene had a perfectly locked-off shot? The intensity wouldn’t come through as strongly. At the same time, professional cameras often include stabilizers. It can make shots look rather overly smooth, which sometimes feels unnatural.
For this problem, you can process and add back the natural movement using the handheld effect in Premiere Pro. There are a few ways you can try to apply this effect. But if you prefer a faster method, we’ll also show you a simpler way to achieve the same result.
In this article
Part 1. How to Create a Handheld Effect in Premiere Pro
If you want to add natural handheld camera movement in Premiere Pro to a static shot, the first method you can use is by “borrowing” motion from existing handheld footage. The idea is simple: stabilize one clip, then transfer that movement data to another.
For this, you’ll need:
- Clip to add handheld movements to
- Clip that already has handheld movements
This method relies on the Warp Stabilizer effect, but instead of removing motion, you’ll use it to copy and reapply the handheld feel.
How to Create the Handheld Camera Effect in Premiere Pro
Step 1: Import your footage. Bring both the handheld clip and the target clip into Premiere Pro.
Step 2: Place the handheld clip on the timeline. Drag it down, and delete its audio track if it has one.
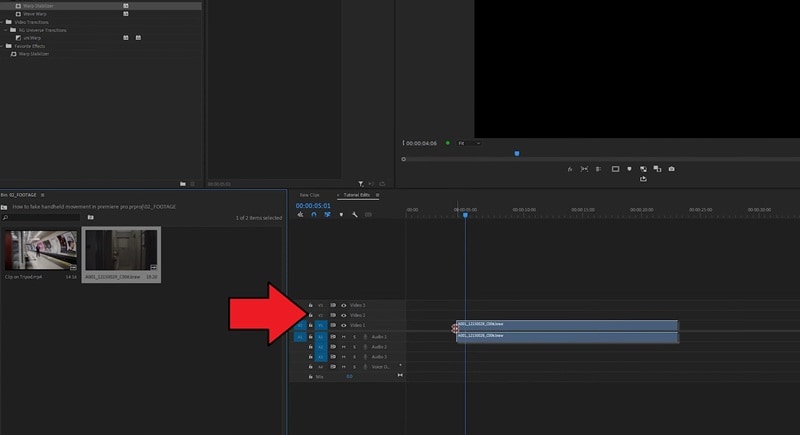
Step 3: Nest the handheld clip by right-clicking the video on the timeline and choosing Nest.
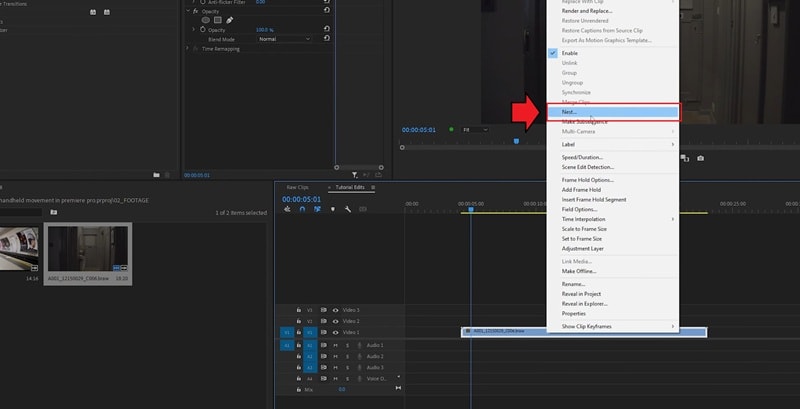
Step 4: Next, apply Warp Stabilizer. In the Effects panel, search for Warp Stabilizer, then drag it onto the nested sequence. Make sure the nest is selected when applying. Premiere will analyze and stabilize it.
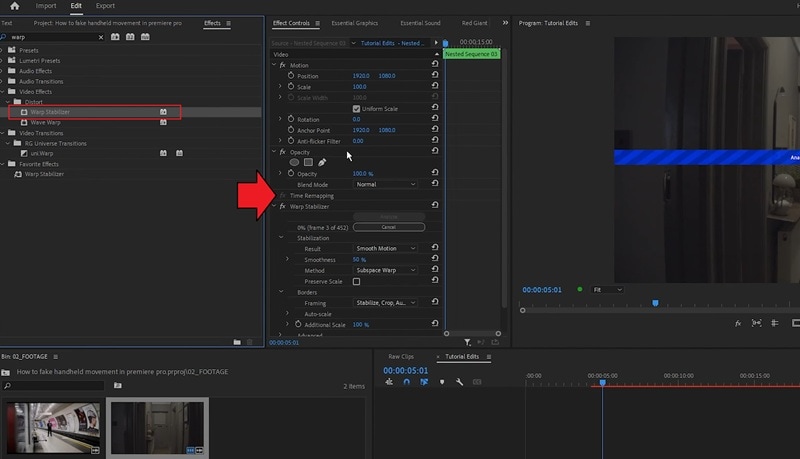
Step 5: Once stabilization is complete, double-click the nest to open its sequence. Inside, swap the handheld clip with the video you want to give the handheld movement.
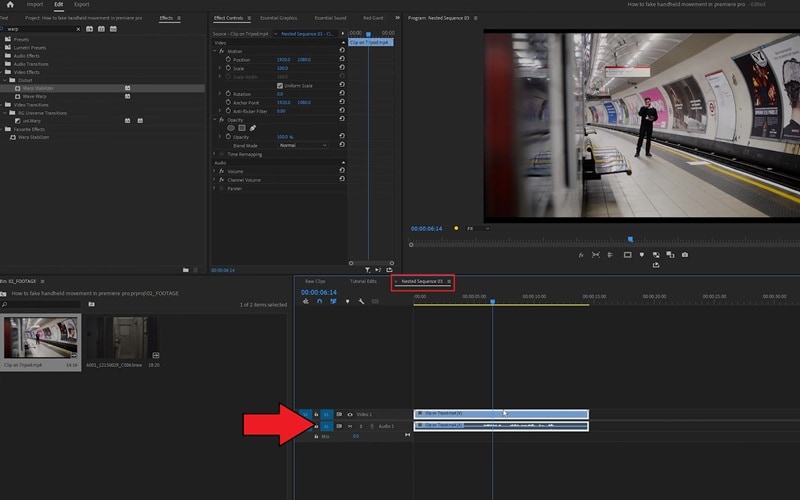
Go back to the original timeline. If needed, trim the nest’s length to match your footage. You’ll now see your static shot take on the same handheld shake. You can also watch the full video below for more details:
Part 2. Use Handheld Effect Presets for Premiere Pro
Other than manually setting up Premiere Pro to mimic handheld movement, you can also download and apply handheld effect presets. These presets are ready-made motion settings designed to imitate natural camera shake, so you don’t have to prepare a handheld reference clip.
Listed below are our selections of Premiere Pro handheld effect presets you can try.
1. Handheld Camera Movement Presets by Cinecom

The Handheld Camera Movement Presets by Cinecom give you 8 different options to add natural shake to your footage in Premiere Pro. They’re divided across four focal lengths, with each lens offering both a normal and a heavy motion version.
How to use: Once installed, simply drag the desired preset onto your clip, and the movement will be applied automatically. You can still tweak the Transform settings if you want to adjust the intensity or blur.
Pricing:
- Personal License: Free
- Premium License: $9 (for commercial use)
2. Handheld Presets by Tyler on Motion Array
This Premiere Pro preset pack includes 5 Premiere Pro handheld effects: 3 subtle presets for gentle camera shake and 2 impact presets that add a stronger, more dramatic jolt. It works best for Premiere Pro 2017, but also runs smoothly on newer versions.
How to use: After downloading, import the preset file into Premiere Pro through the Effects panel. Then, drag and drop the chosen preset onto your clip. You can fine-tune the intensity in the Effect Controls panel.
Pricing: Free for Motion Array users.
Part 3. Create a Handheld Look Instantly with Built-in Effects in Filmora
It’s possible to create a handheld effect without a second clip with handheld movement, nor do you need to download an online Premiere Pro handheld effect resource. Wondershare Filmora gives you a simpler solution to do it directly to your footage with Video Effectbuilt-in effects.
Filmora comes with multiple handheld styles at different intensity levels. Each effect can also be customized further to your preference. Since it’s included in Filmora’s library, you don’t need to purchase extra packs. And, you can try Filmora for free first and then decide later if you’d like to upgrade to a subscription.
 secure download

How to Apply Handheld Effect Easily with Filmora
Step 1: Create a New Project and Import Your Footage
Open Filmora, start a new project, and drag your video into the media library. Place it on the timeline so you can begin editing.
 secure download
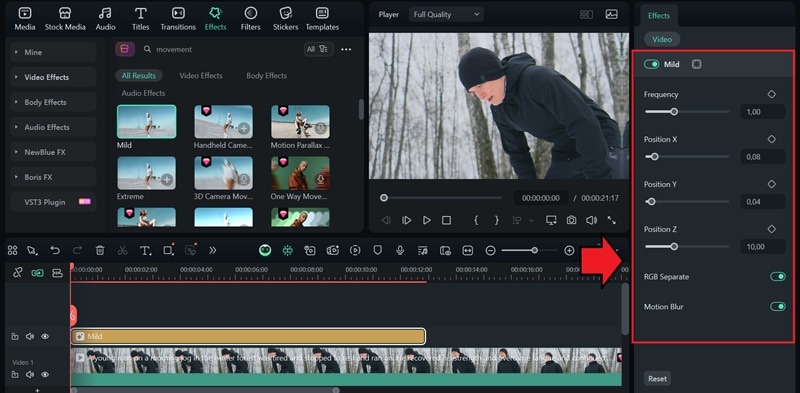
Step 2: Browse and Apply the Handheld Movement Effect
Go to the Effects tab and search for “Movement.” You will see several handheld effects, which you can preview before applying. Once you find the one you like, drag it onto the timeline above your video track.
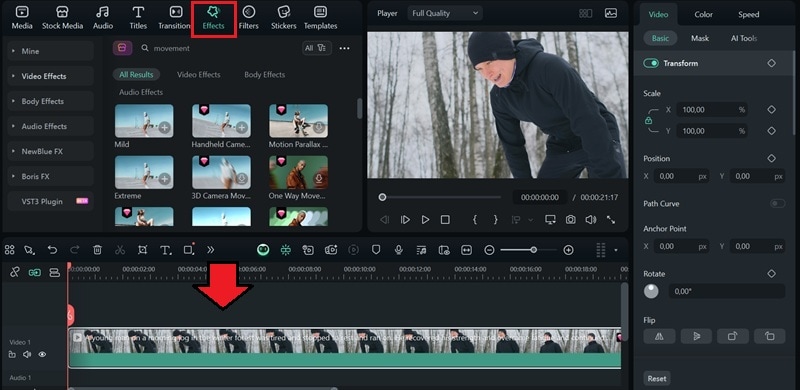
Step 3: Customize the Effect Settings
Select your clip and adjust settings such as frequency, position, and motion blur until the movement matches your style. The exact controls available will depend on the effect you’ve chosen.
Bonus: What If I Want to Stabilize Handheld Footage?
If you want the opposite effect, what you need is a stabilization tool. You can do it on both Premiere Pro and Filmora, so you can choose whichever tool you are most comfortable with:
- Premiere Pro gives you more detailed controls through the Warp Stabilizer effect, which is ideal if you need professional-level adjustments. You can control the smoothness, crop settings, and other parameters.
- In Filmora, stabilization is much quicker. You just enable the Stabilize option on your clip, and Filmora automatically smooths out the shake.
How to Stabilize Handheld Footage in Premiere Pro
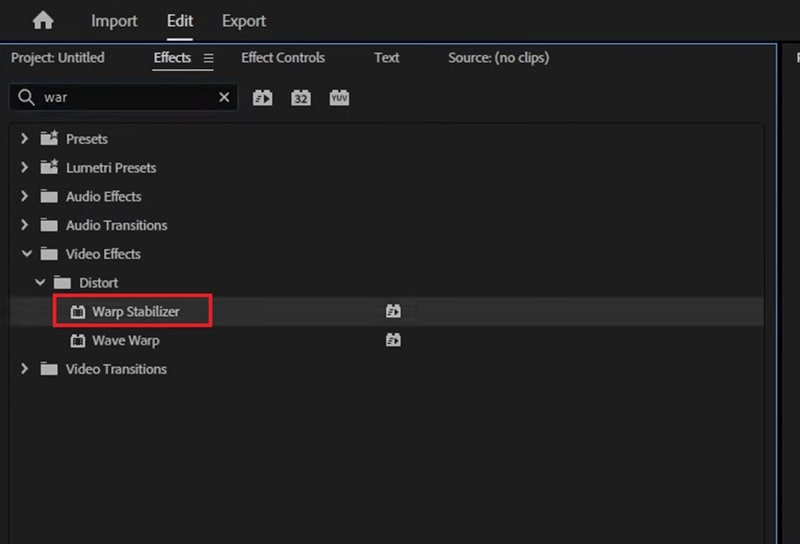
Step 1: Apply Warp Stabilizer to Your Clip
With your footage on the timeline, select it and open the Effects panel. Go to Distort > Warp Stabilizer. Drag the effect onto the clip in the timeline or double-click it to apply the effect.
Premiere Pro will immediately start analyzing the clip in the background, which may take a while depending on the clip length and your computer’s performance.
Step 2: Adjust Warp Stabilizer Settings
Once it’s finished, play back your video to preview the default stabilization. You can then fine-tune the settings in the Effect Controls panel.
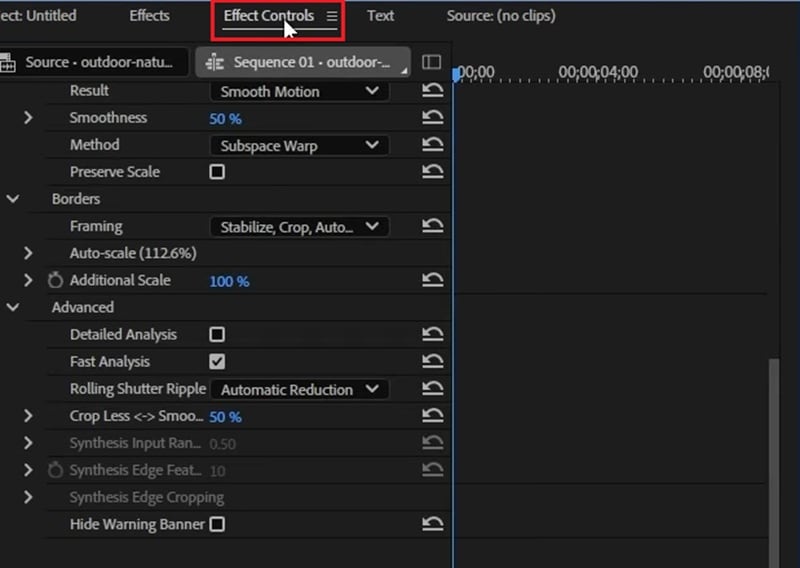
Here, you’ll find several key adjustments:
- Result: Choose Smooth Motion to keep some of the camera’s original movement, or No Motion to remove all shake.
- Method: Options like Subspace Warp, Position, or Perspective determine how Premiere stabilizes the clip.
- Framing: Pick Stabilize Only to see the raw effect without cropping, or use other modes for automatic scaling and framing.
Other than that, you can also adjust smoothness levels, rolling shutter settings, and cropping reduction. Experiment with different combinations until your footage looks stable but still natural.
How to Stabilize Handheld Footage in Filmora
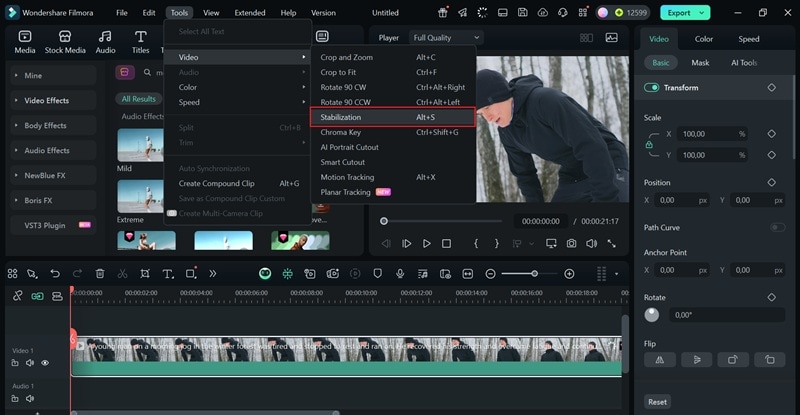
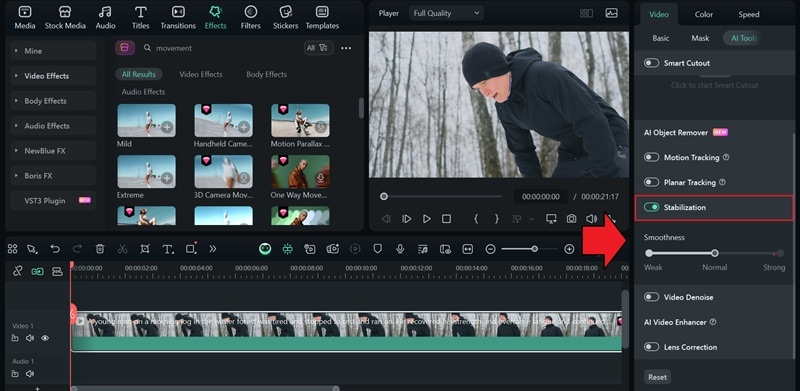
Step 1: Access the Stabilization Tool
After importing your clip to the timeline, select Tools > Video > Stabilization. Or, you can also access the option by selecting the clip and heading to Video > AI Tools > Stabilization on the property panel.
Step 2: Enable and Adjust Stabilization
Make sure the stabilization is turned on. Filmora will automatically analyze your clip and smooth out the motion. Use the slider to increase or decrease the strength depending on how smooth you want the footage to look.
Tip: Advanced Option with Mocha FX in Filmora
If you need more control, Filmora also supports Mocha FX, which can stabilize your footage by tracking objects or backgrounds with inverse planar tracking.
- Shake Removal with Planar Tracking: Define custom tracking layers to reduce unwanted jitter with precision.
- Selective Stabilization: You can choose to stabilize the entire frame or focus only on specific objects or areas.
- Motion Restoration Options: Restore some of the original motion for a more natural feel, or crop and scale the footage for cleaner edits.
Conclusion
Handheld movement doesn’t always mean bad footage, but it can also add realism and energy to your video. In Premiere Pro, you can achieve this by borrowing natural shake from handheld clips using Warp Stabilizer. Or, you can download and apply Premiere Pro handheld effect presets from the internet.
But if speed and simplicity are what you’re after, Filmora can also be an option. It gives you built-in handheld effects and simple stabilization tools that don’t require extra setup.
secure download
