
 100% Security Verified | No Subscription Required | No Malware


 ChatGPT
 Perplexity
 Gemini
 Claude
 Grok
Grok
iMovie is Apple's free video editing app on iPhone, iPad, and Mac. It's designed for beginners and casual editors, offering a clean interface and essential tools for trimming, cutting, and enhancing videos. One of its most valuable features is its built-in filter library, which lets users quickly change the mood and look of their videos with just a few taps or clicks.
Filters play a significant role in visual storytelling. They help set the tone, improve colors, and add consistency across scenes. In this guide, you'll learn how to use imovie filters step by step. You'll also see how Filmora can improve and complement your workflow or be a more flexible alternative. It's a great option if you need more control.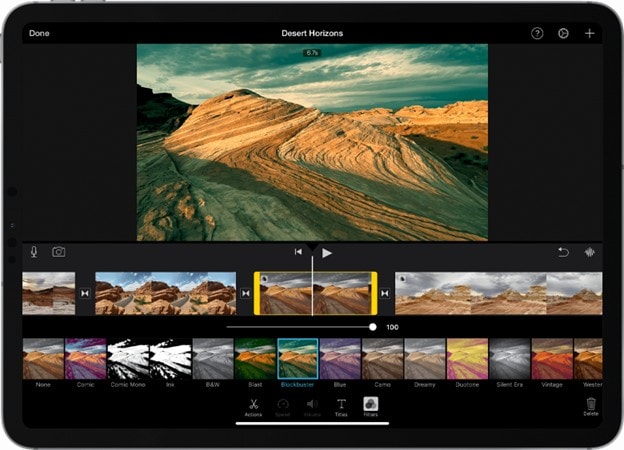
Filters in iMovie: Strengths and Limitations
One of the biggest strengths of iMovie is its accessibility. It comes pre-installed on most Apple devices and is ready to use straight out of the box. The app offers a clean and intuitive interface that makes it easy to learn, even if you're new to video editing. The best part is that all projects sync with your iCloud, so you can edit on your iPhone, iPad, or Mac.
Regarding filters, iMovie provides a quick and reliable way to give your videos a polished look without advanced tools. In this section, you'll walk through what makes iMovie's filters valuable and what the limitations are to keep in mind.
Built-In Filter Library
iMovie includes over 30 preset video filters designed to adjust your video's color tone, contrast, and overall mood. You'll find simple yet effective options like Silent Era, Dramatic, Blast, and Vivid Cool. Each filter is tap-to-apply, and you can preview the effect in real-time before committing.
These filters are handy for:
- Matching the mood across different scenes
- Adding a cinematic or retro feel
- Improving plain-looking footage for social media or school projects
Since they're baked into the app, there's no need to download anything extra or set up complex workflows.
Filter Customization in iMovie
While iMovie's filters are not highly customizable, you can still refine the look of your video using basic adjustment tools. After applying a filter, you can tweak exposure, contrast, saturation, and brightness to fine-tune the results.
You also have control over where the filter is applied. You can use it for an entire clip, break your video into segments, and apply different filters to each scene. This gives you some flexibility when working with multi-part edits.
However, this is where the customization ends. iMovie doesn't allow for deeper control like color isolation, tone mapping, or layered filter effects.
Where iMovie Falls Short
iMovie works well for quick edits but has apparent limitations for users who want more advanced filter features.
- No Masking or Area Control: You can't apply a filter to only part of the frame. For example, you can't selectively brighten the background or apply blur to a subject's face.
- No Downloadable Filters or LUT Support: iMovie doesn't support external filters, LUTs, or third-party presets, which limits your ability to expand your visual style.
- No Filter Stacking or Animation: You can't layer multiple filters or animate their appearance over time. Once you choose a filter, it applies to the clip as a static effect.
For beginners or casual editors, iMovie's filter tools are more than enough. However, it may feel too limited for creators who want more creative freedom or precision.
Quick Guide to Using Filters in iMovie
Using filters in iMovie is a simple way to enhance your video's look without advanced editing skills. The great thing about iMovie is that the experience is similar across all devices. So, all you have to do is familiarize yourself with the General UI as provided below, and you're good to go. The following example uses the iPhone version.
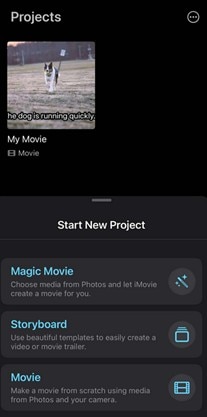
01of 03Step 1: From the homepage, select Movie to start a project from scratch.
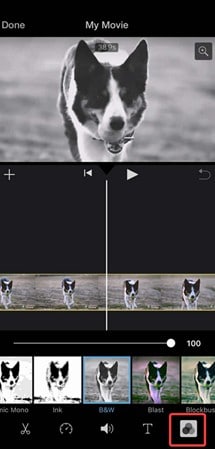
02of 03Step 2: Upload the videos you want to add filters to.
03of 03Step 3: From the bottom toolbar, select the Filters icon. Then, choose from any of the filter presets available in the appearing selection.
Repeat for each clip if you want different looks across scenes. That's it. Your filtered video is ready to export or for further fine-tuning.
Pro-Level Filtering With Filmora: The iMovie Upgrade Path
Filters on iMovie are an excellent option for basic video editing and quick filter applications. But when you're ready to move beyond preset styles and want more creative freedom, Wondershare Filmora becomes a noticeable upgrade. It offers advanced features in a beginner-friendly interface, perfect for creators ready to level up their editing game.
 secure download

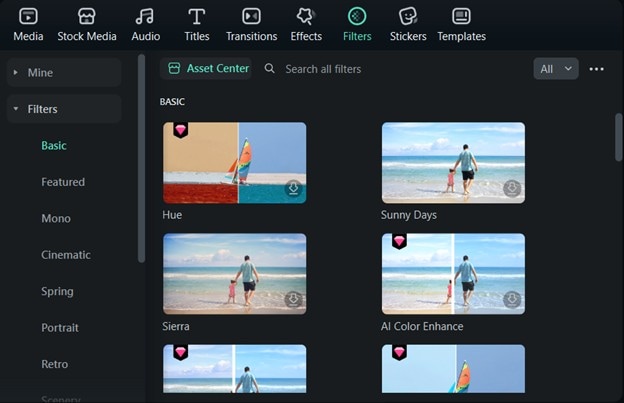
Expanded Filter Library
Filmora has an ever-growing collection of 100+ filters that span cinematic tones, lifestyle moods, and artistic looks. You'll find dynamic filters that shift and change over time, making them perfect for storytelling and mood transitions within your videos.
Filmora regularly releases new filter packs, giving you access to fresh styles without hunting down plug-ins or third-party add-ons. This keeps your content current and helps you experiment with trending visual styles.
Custom Color Grading Tools
Filmora supports complete color grading. This is something iMovie can't do. This opens up creative possibilities:
- Import or export LUTs to maintain consistent color across multiple projects or match the look of professional films and shows.
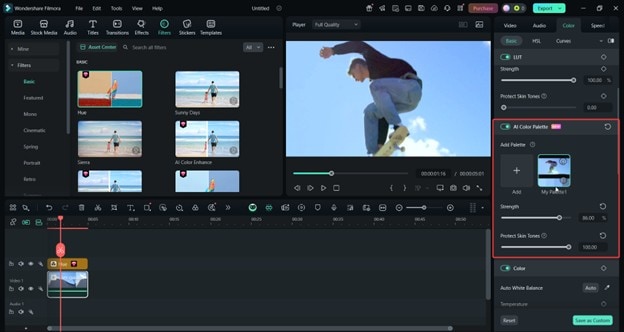
- Use the AI-powered Color Palette to automatically match tones between different clips, saving time when working with footage in varying lighting conditions.
- Manually fine-tune exposure, contrast, saturation, and white balance using professional-grade controls that give you precise control over your video's final look.

These tools let you create a signature visual style for your content, whether editing interviews, social media reels, music videos, or cinematic short films.
Additional Editing Features
Filmora includes tools that work seamlessly with its filter system to boost overall video quality:
- Speed controls create buttery-smooth slow-motion effects or dramatic time-lapse sequences that maintain filter quality throughout.
- Keyframing lets you animate filters and transitions over time, creating dynamic visual effects that evolve as your video plays.
- Auto-sync automatically aligns video with music tracks or voiceovers. This keeps your audio perfectly matched even when applying complex visual effects.
- Motion tracking allows filters and effects to follow moving subjects, creating professional-looking results that would be impossible in iMovie.
Filmora gives you the creative flexibility iMovie lacks without making you feel you need to be a pro video editor. It makes it easy to create complicated edits. This means that it's the perfect choice for creators who've outgrown iMovie's limitations.
Integrated Workflow: iMovie Filters + Filmora
Filmora offers more advanced tools, but you don't need to abandon iMovie completely. Many creators use both apps together to build a smoother workflow. iMovie is convenient for iOS-only users or beginners just getting started. Filmora steps in when you're ready to refine your content with deeper customization.
Pre-Filter Enhancements in iMovie
Start with iMovie for quick video assembly. Its lightweight design makes it perfect for:
- Selecting clips directly from your camera roll without extra steps
- Trimming and sequencing footage quickly to get your story structure right
- Applying basic iMovie filters like Vivid, Dramatic, or Noir to set the initial tone and mood
Once your base edit is complete, export the video from iMovie and import it into Filmora for advanced enhancement. This approach saves time on the basics while setting you up for more creative work.
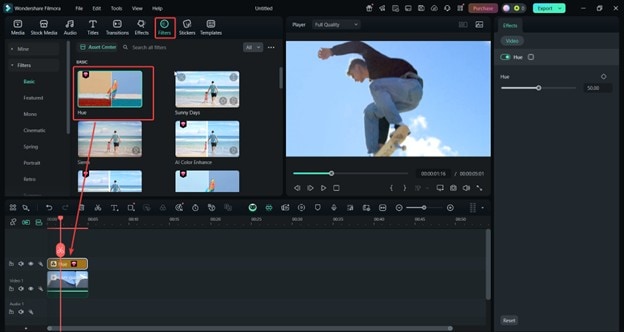
Advanced Filter Application in Filmora
With your rough cut assembled, Filmora makes it easy to layer on professional visual polish. You can:
Browse and apply professional filter packs or themed templates that match your content style.
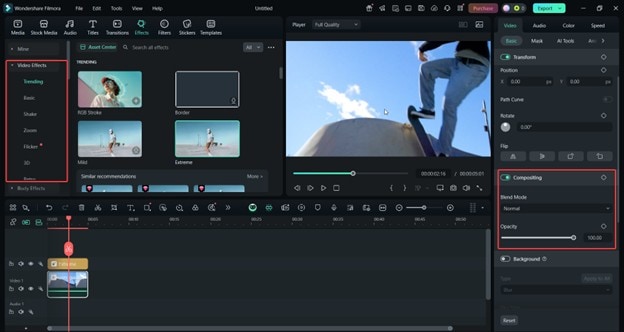
Use the Effects tab or the Compositing/Blend Mode features to make your filters look more natural.
Also, make sure to take advantage of the auto Color Palette tool to automatically match tones between scenes, especially when working with footage shot in different lighting conditions.
Filmora also lets you refine your work using motion tools, speed adjustments, and precise color grading. It handles the advanced stuff when you want to go beyond iMovie's limits without starting your entire project from scratch.
Why This Workflow Works
While changing apps might seem troubling, combining iMovie's quick-edit strengths with Filmora's powerful features, you create content that appears consistent. This is especially the case where you work exclusively on your Apple devices. You get the speed and simplicity of iMovie for foundation work, then the creative freedom of Filmora for the finishing touches that make your videos stand out.
However, using Filmora from start to finish is always an option if you don't like the hassle of switching apps and want more control over your video. After all, it's built for professional video editing, and you'll do best when you master its features.
Conclusion
As you've reached the end of this article, you should now be familiar with the easy steps to use iMovie filters. You should also now understand why filters play such a big part in improving the overall aura of a video. Just adjust it accordingly so the video doesn't look or feel flooded.
When working with filters, using Wondershare Filmora for your complete editing workflow is best. Remember, relying on a program with more tools is always better, especially if you're a full-time content creator or love video editing.
secure download 