
 100% Security Verified | No Subscription Required | No Malware

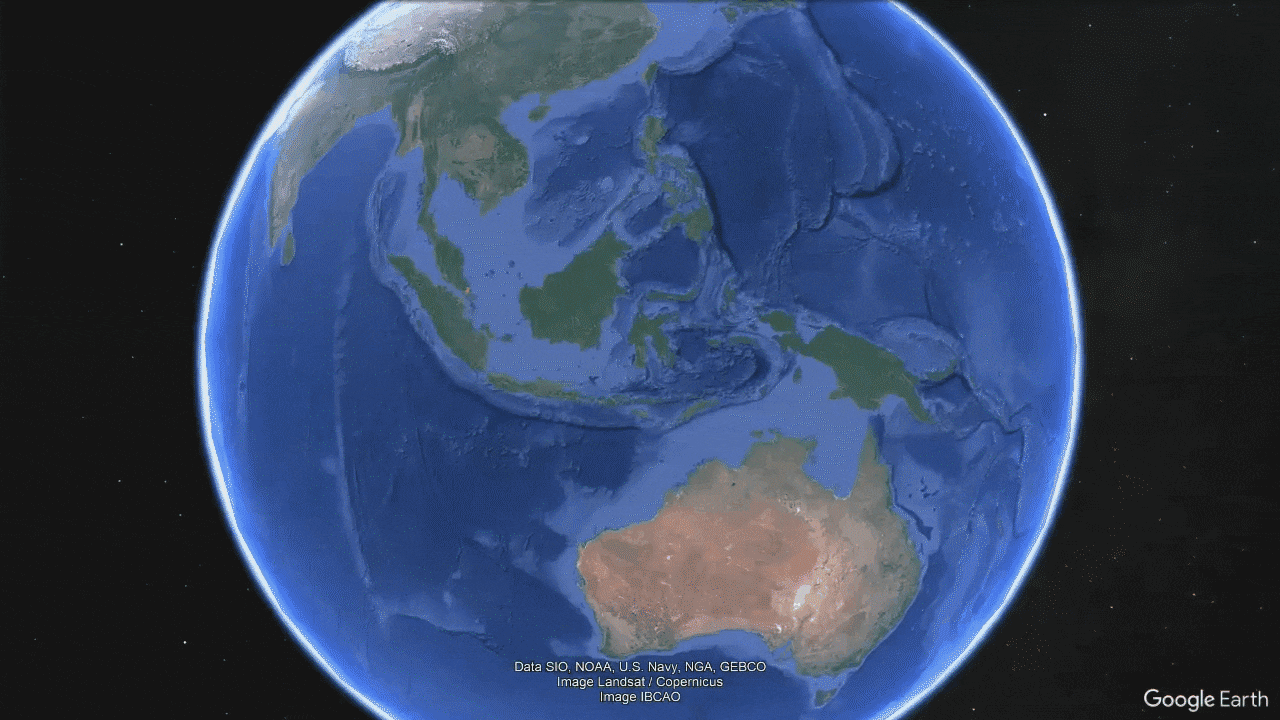
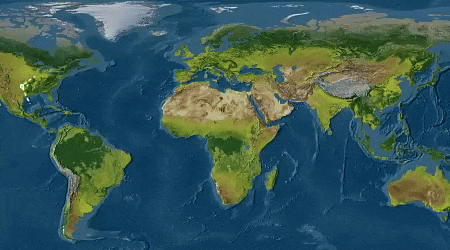
At its core, a Google Earth video is simply a recording of your map movement — a perfect fit for travel intros, school projects, geography explainers, or fun social-media edits. But many beginners searching "how to make a Google Earth video" hit a wall: the tools feel unfamiliar, and quality easily degrades.
In this guide, we'll walk you through the most reliable ways to capture a Google Earth video — from built-in options and screen recorders to pro-grade capture tools — and show you how to polish the result with basic editing so it looks smooth, crisp, and ready to share.
In this article
Part 1. How to Record Google Earth Video via Google Earth Pro (Built-in Recording)
For anyone wondering how to make Google Earth videos without getting overwhelmed, Google Earth Pro is one of the easiest places to start because it offers simple tools designed for beginners.
Why choose Google Earth Pro
- Built-in tour recording for capturing smooth camera movements
- Custom path controls to design your own route or flyover
- Automatic transitions and flyovers for clean, cinematic results
- Ideal for beginners who want professional-looking output without complex editing
Where you can use it
- Desktop: Windows / Mac / Linux
- Mobile app: Android and iOS
- Browser version: Quick and simple option with no installation required
So without dragging it out, here are the simple steps you can follow to learn how to record video from Google Earth directly inside Google Earth Pro.
Step 1. Install Google Earth Pro
- Visit the official Google Earth Pro website and download the software for your desktop (it's completely free).
- Open the application after installation.
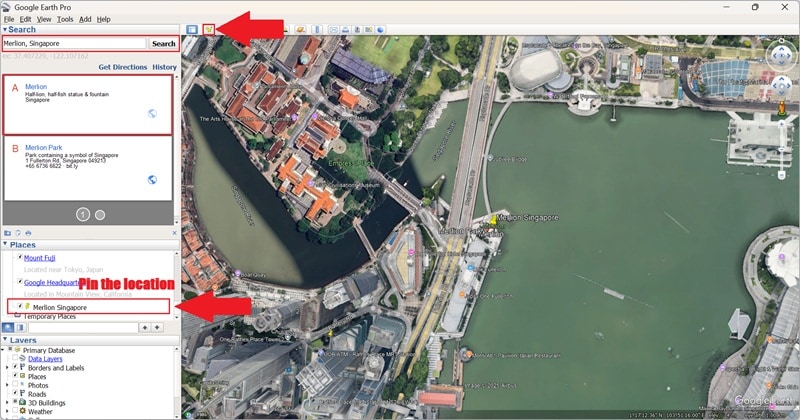
Step 2. Search for the Place You Want to Show
- Use the search bar on the left to type the name of the location you want to feature.
- Click "Search" and let Google Earth Pro fly you there automatically.
- To save the location for later use, click the yellow pin icon and it will appear under My Places.
Step 3. Start Recording the Tour
- Click the camera icon in the toolbar to open the recording panel.
- Hit the red record button to begin capturing the movement.
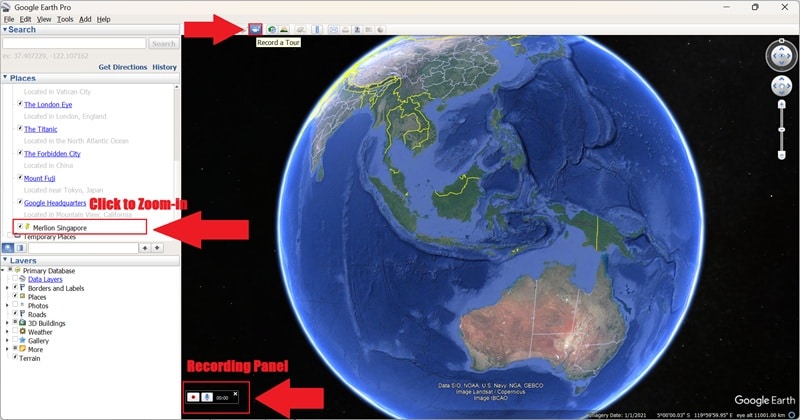
- With recording active, click the saved location to trigger the zoom animation.
- When you're done, click the record button again to stop.
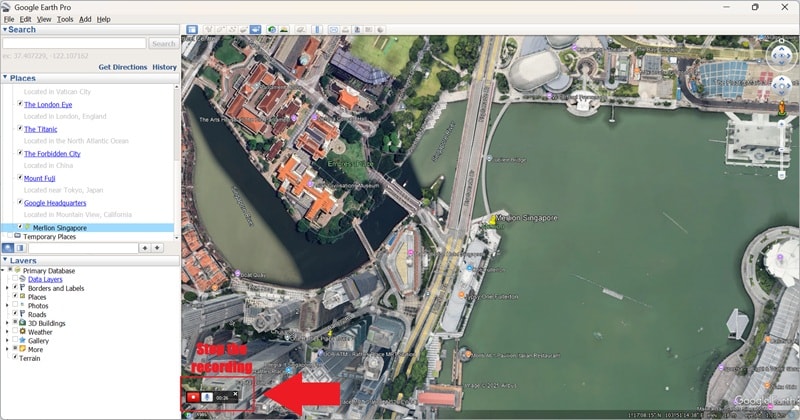
Step 4. Save the Tour File
- Click the disk icon next to the playback controls to save your tour file.
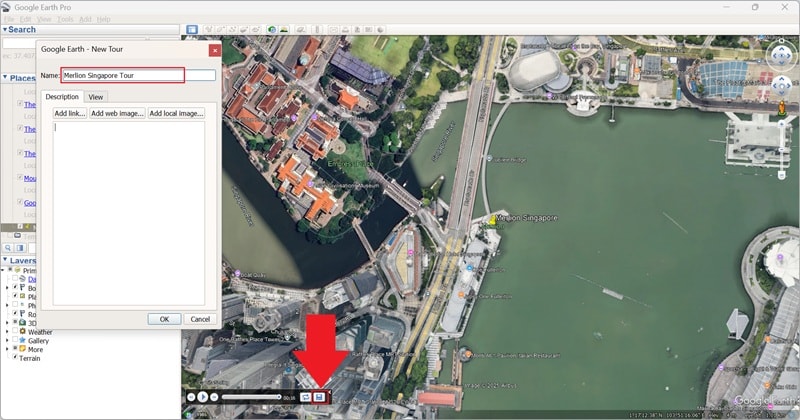
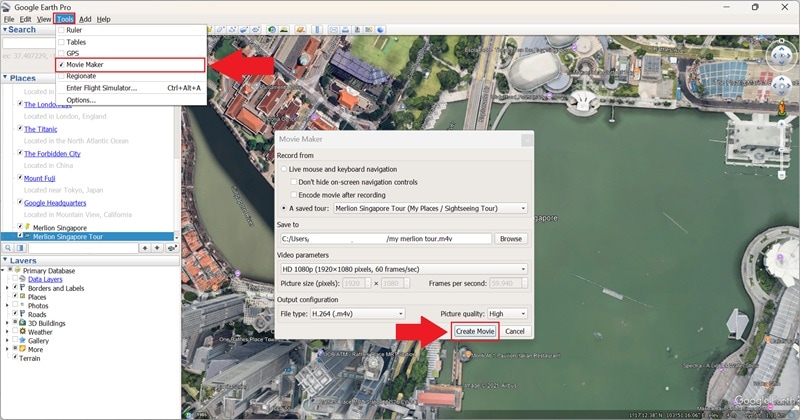
- Close the playback window, then go to Tools → Movie Maker.
- Choose your video resolution and format (MP4, M4V, or WebM).
- Select a save location, then click Create Movie to export.
And just like that, you now know how to record Google Earth zoom-in clips easily! The steps are simple, and they work really well when you just need a clean, basic animation. Go ahead and check out your result now and see how smooth it turned out.
Part 2. How to Record Google Earth Video Using Professional Screen Recording Software
Now that you've tried learning how to make a video with Google Earth using the built-in recorder in Google Earth Pro, you might reach a point where you want a little more freedom. After all, the tool offers very few editing options beyond recording.
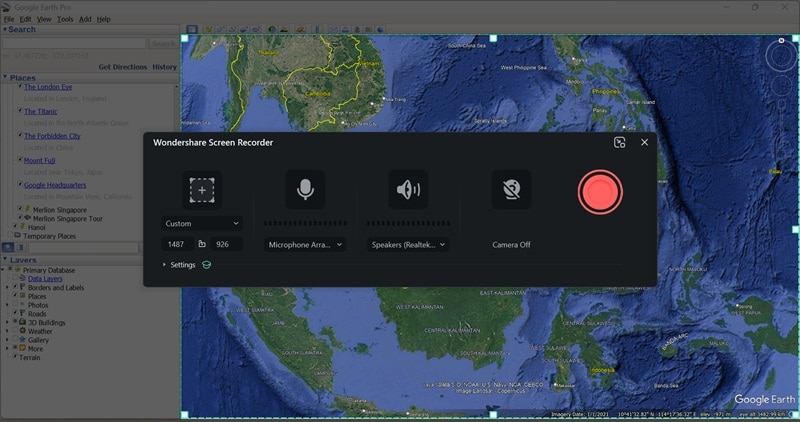
In moments like this, using a dedicated screen recorder makes it a lot easier to capture Google Earth zoom-in shots or record Google Earth video without limitations. These are two solid options you can try depending on what feels comfortable for you.
Option A: Filmora Screen Recorder (Beginner-Friendly + Fast Workflow)
One option that should be at the top of your list is clearly Wondershare Filmora. This all-in-one video editor is ideal if you want something simple yet powerful. It helps you record video from Google Earth with clean quality and gives you editing tools right after.
 secure download

Why Filmora Works Great
- 🎥 Easy, professional Screen Recorder: Filmora gives you a smooth, stable way to record Google Earth video with full control over resolution and frame rate. You can capture the entire screen or just the Google Earth window for sharp, clean footage.
- ⚡ Instant editing workflow: Your recording drops right into the Filmora timeline, so you can trim, refine motion, and polish immediately—no extra exporting steps.
- ✨ Creative enhancement tools: Add text, transitions, motion graphics, and cinematic filters to turn a basic map capture into a polished travel-style video.
- 🧭 Animated route lines: Use the Pen Tool to draw and animate custom travel paths, perfect for highlighting journeys or storytelling visually.
How to Record Google Earth Video with Filmora
If you want to learn how to record a Google Earth video using Filmora, the process is super simple. Just follow these steps, and you'll have a clean recording in no time.
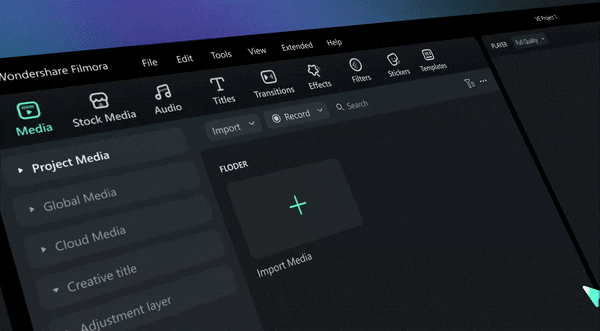
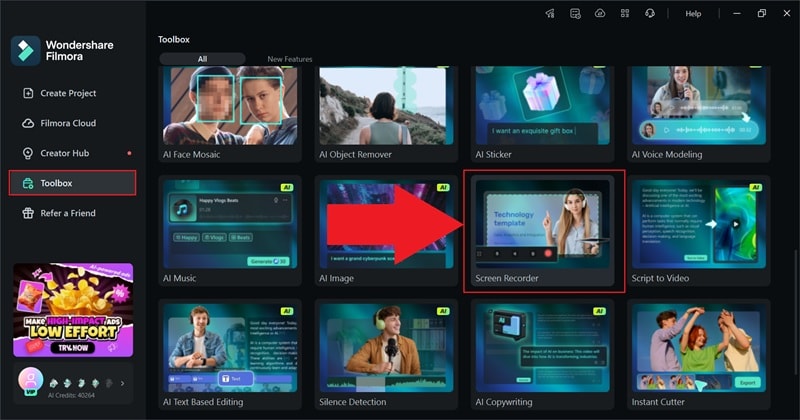
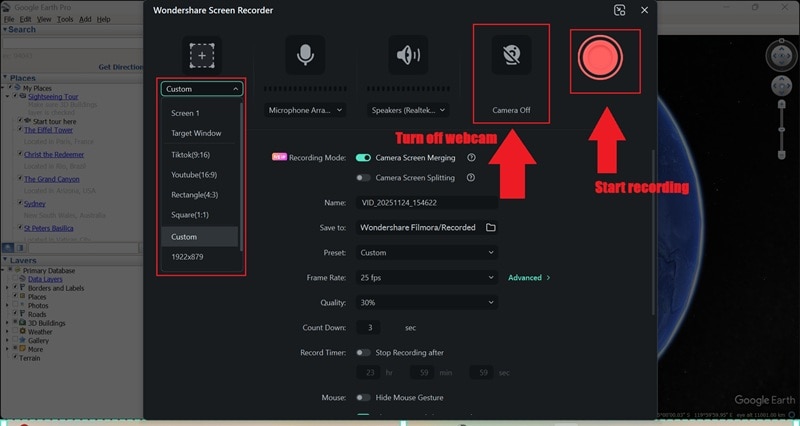
Step 1Open Filmora and Open the Screen Recorder Feature
- Download and install the latest version of Filmora on your device.
- Open the app, go to the "Toolbox" section, and select "Screen Recorder".
Step 2Select the Area You Want to Capture
- Choose whether to record your full screen or only the Google Earth window.
- Turn off the webcam if you only need the map view.
- Click the big red button to start recording.
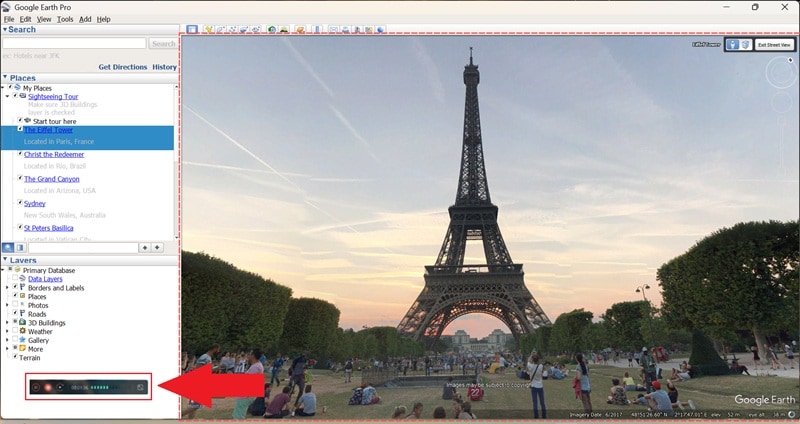
Step 3Start Recording
- Switch to Google Earth Pro and play your movement or zoom in animation.
- Let it run until you get the shot you want.
- Click the red button again to stop the recording.
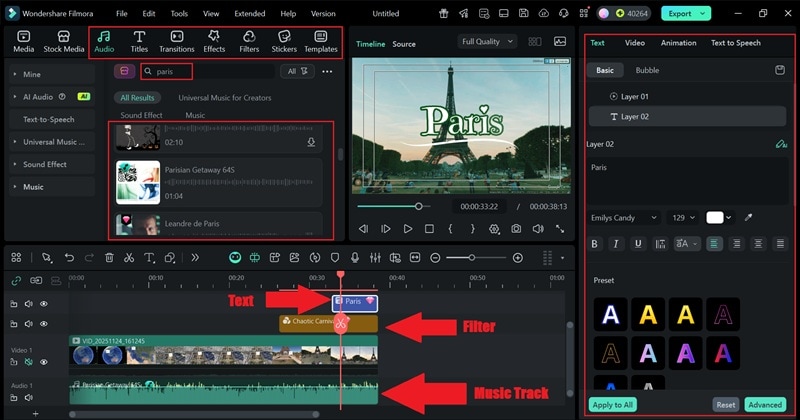
Step 4Edit Your Recording
- The clip will drop straight into the Filmora timeline, where you can trim, enhance, or add effects.
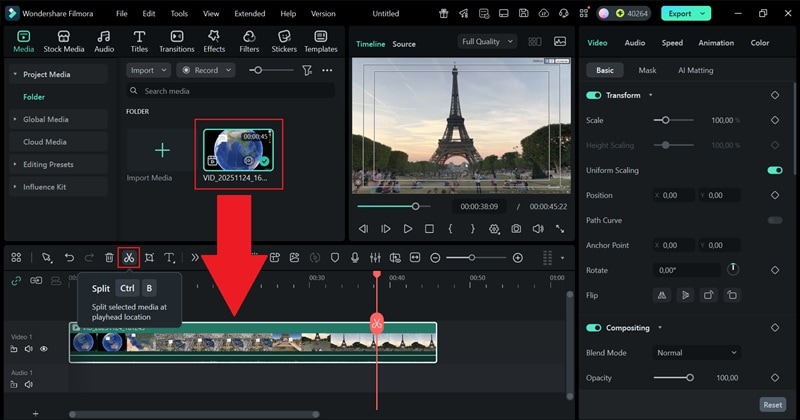
- Also add music, effects, filters, or text to enhance the video.
- Drag items from the top tabs into the timeline and adjust them using the property panel on the right.
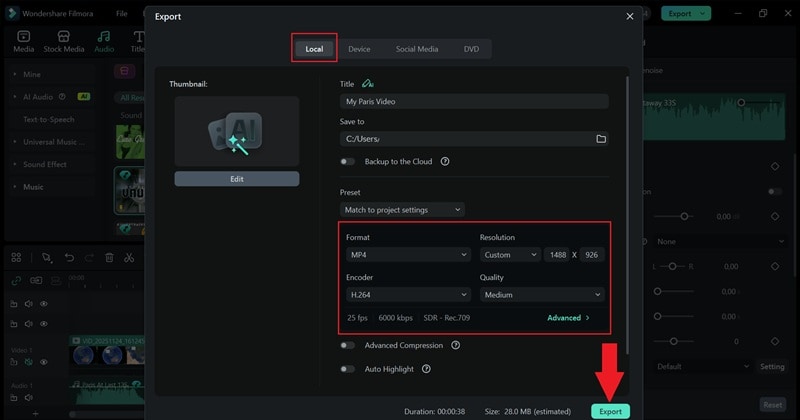
Step 5Export and Save Your Video
When everything looks good, hit "Export" to wrap up your edit. You can either:
- Save the file to your computer through "Local" or
- Send it directly to your social platforms like YouTube from Filmora.
Add a title, choose the format and resolution you want, pick the save location, and press "Export" again to finalize your video.
That's it! Learning how to record video from Google Earth with Filmora gives you way more freedom to experiment and polish your clip the way you want. The screen recording alone is solid, but the editing tools inside Filmora take everything to a higher level while keeping the workflow simple.
Go ahead and check the video you just made and see how clean it turned out.
Option B: OBS Studio (Free & Advanced)
Other than Filmora, OBS Studio is also a strong option. It gives you a lot of control when figuring out how to record Google Earth video, especially if you like tweaking settings and customizing your setup.
Why OBS Is Worth Using
- Open-Source:OBS is completely open-source, so you can use it without paying and your clip stays clean with no watermark.
- Advanced Control: You can tweak the bitrate, resolution, and output settings to get the exact look you want when you record Google Earth video.
- Scene-Based Setup: OBS uses scenes, which let you mix different sources on one screen. It is helpful if you want a more custom setup.
- High-Quality Capture: Google Earth animations can be demanding, but OBS handles them really well and keeps the recording fluid.
- Community Guides: And if you ever get stuck, there are loads of YouTube guides that walk you through everything step by step.
How to Record Google Earth Video Using OBS
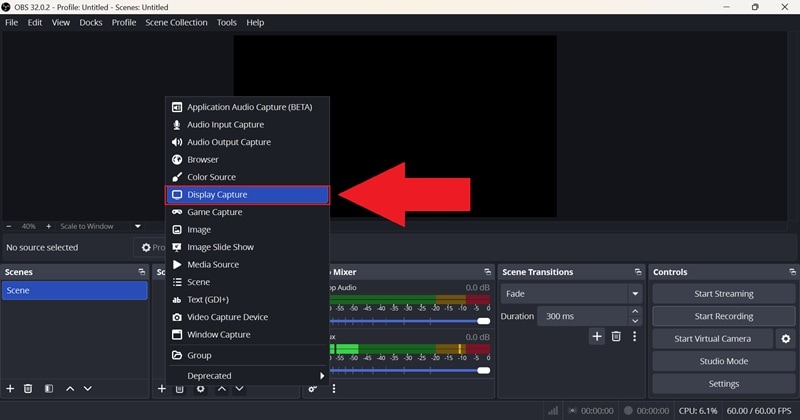
Step 1Open OBS Studio and Add a Display Capture
- Launch OBS Studio on your computer.
- Go to the "Sources" box and click the plus icon.
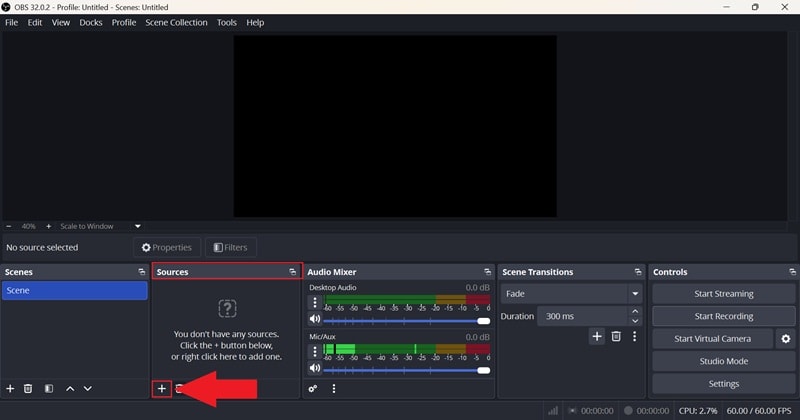
- From the menu that pops up, choose "Display Capture".
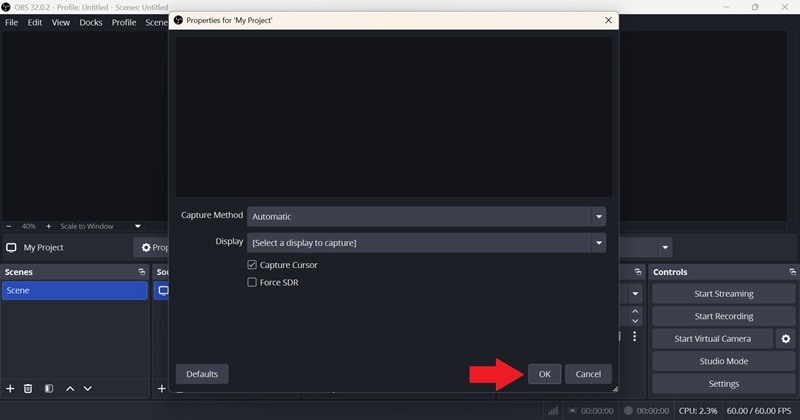
Step 2Name Your Source and Confirm The Display Settings
- Enter any name you want for the source and click "OK."
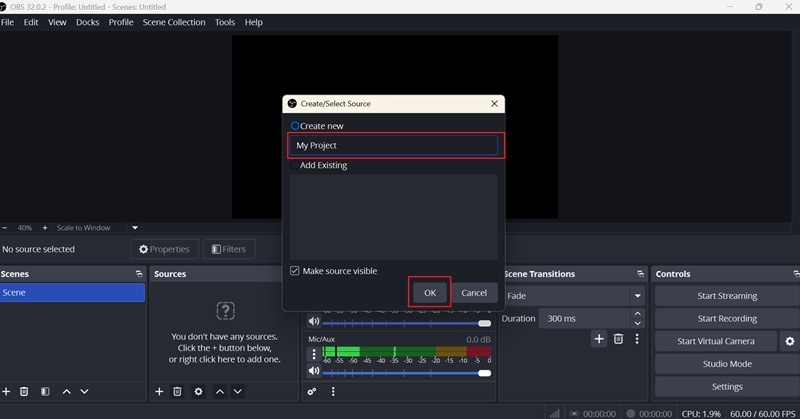
- A preview window will appear. In most cases, the default settings are already fine, so just click "OK" again.
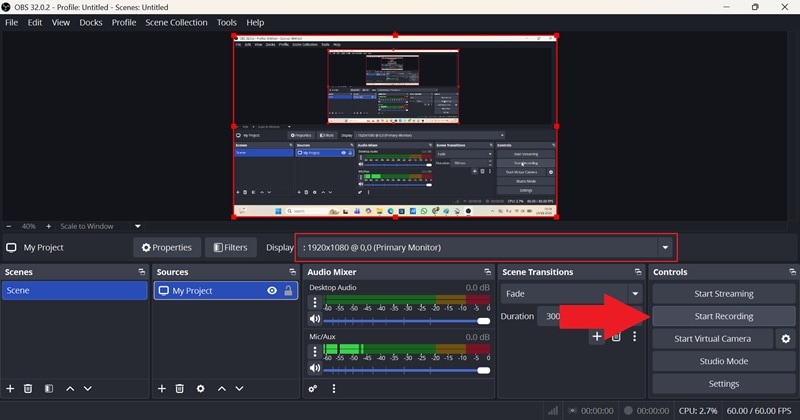
Step 3Start Recording Your Screen
- Go to the controls panel on the right and click "Start Recording".
- Switch to Google Earth Pro and run your zoom or movement as usual.
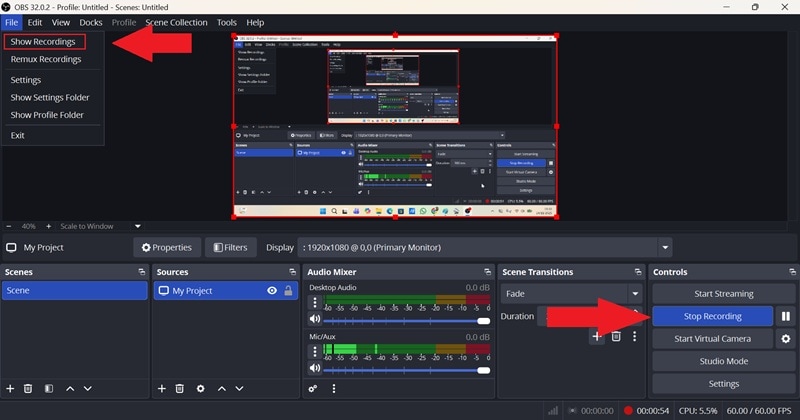
Step 4Stop Recording When You Are Done
- Return to the controls panel and click "Stop Recording".
- OBS will save the video automatically in your recordings folder, which you can open by selecting "File" and "Show Recordings".
Part 3. Turn Your Google Earth Recording into a Cinematic Video
By now, you already know how to make a video with Google Earth in a few different ways, and this is the part where you can really start having fun. After all, recording the map is just the beginning. The next step is making it look clean, smooth, and a lot more cinematic.
Sure, Google Earth Pro and OBS Studio get the job done for recording, but they don't give you much to work with when it comes to creative editing. On the other hand, Filmora makes the whole process easier because everything you need is already built in.
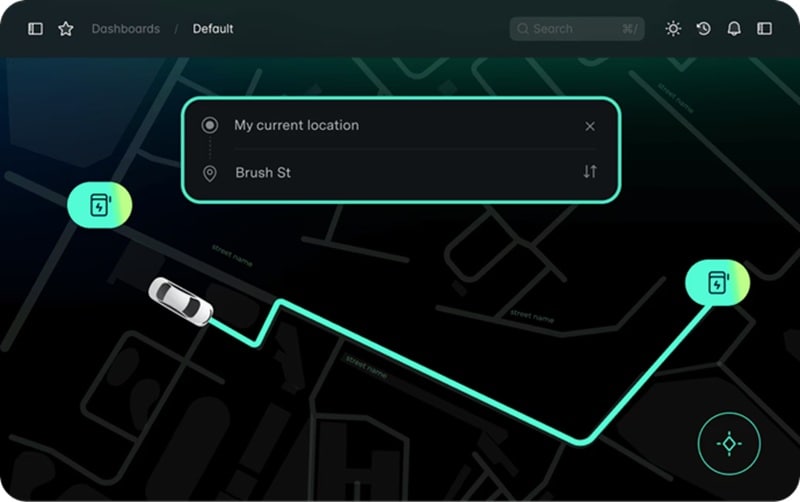
One of its standout tools is the Pen Tool, which lets you draw and animate custom paths. It fits perfectly with Google Earth clips because you can highlight travel routes, show flight paths, or add smooth line animations that follow the exact direction of your zoom or flyover. See the guides below to learn how:
Step 1Screen Record Google Earth Using Filmora
- Use Filmora's screen recorder to capture your Google Earth route.
- Record the exact movement you want to include in your video.
Step 2Bring Your Recording to the Timeline and Trim it
- After you finish recording, the clip will appear in Filmora's main workspace.
- Drag it down to the timeline, then trim out any parts you don't need.
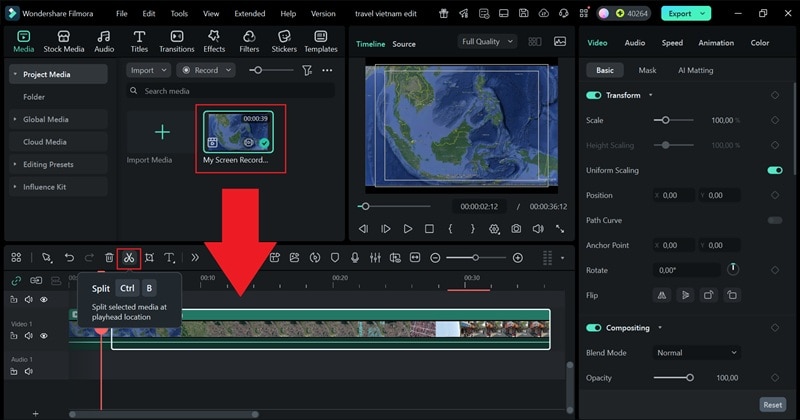
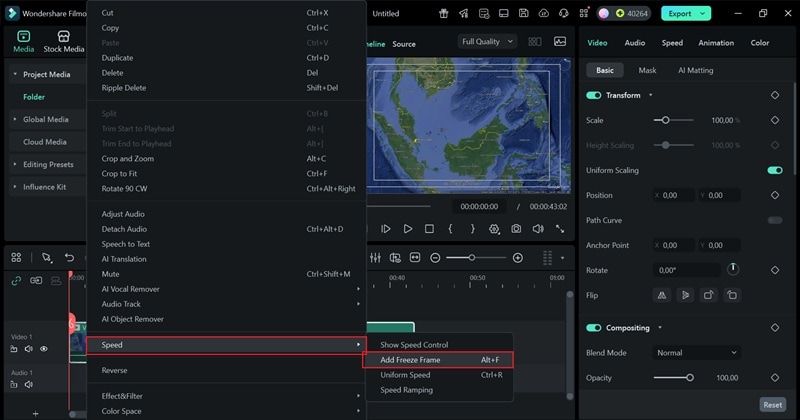
Step 3Freeze Frame Your Video
- Move the playhead to the precise moment where you want to use the Pen Tool.
- Right-click the clip, open "Speed", and choose "Add Freeze Frame".
This step locks the scene on a single frame so you can work on your line animation without the video moving underneath.
Step 4Open the Pen Tool
- Click the small icon beside the text button above the timeline to reveal more Filmora tools.
- From there, pick "Drawing Tools" and then select "Pen Tool" to start creating your path.
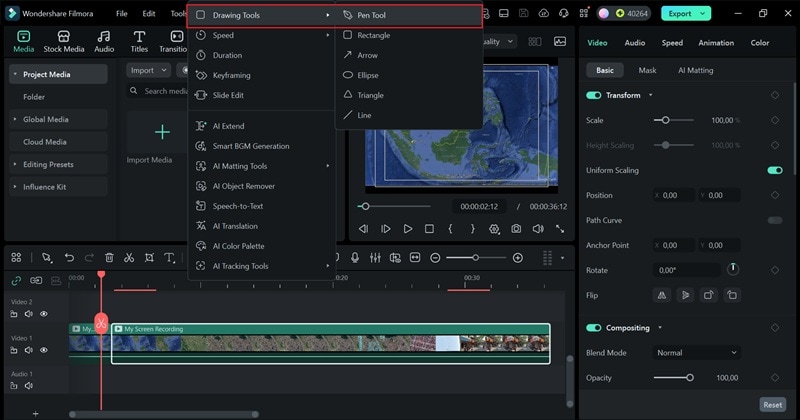
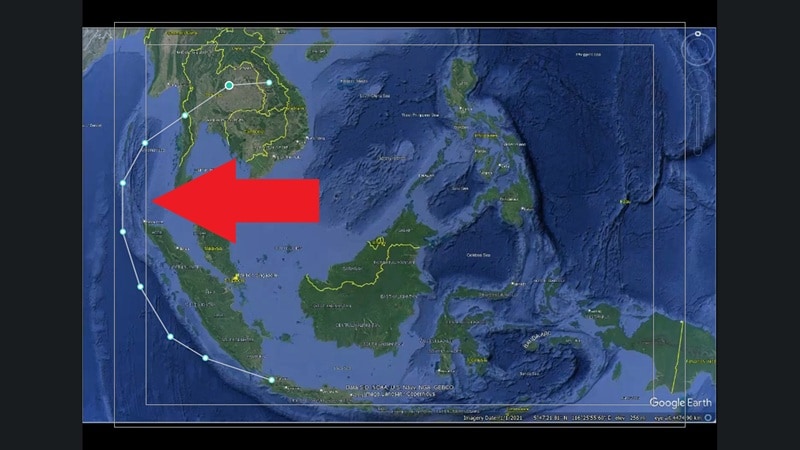
Step 5Use The Pen Tool To Create Your Travel Path Animation
The Pen Tool in Filmora is great for drawing outlines or creating animated paths, and here you can use it to map out your travel route.
- Use your mouse to trace that journey directly on the freeze frame.
- Take your time and follow the curves of the map so the line looks clean and smooth.
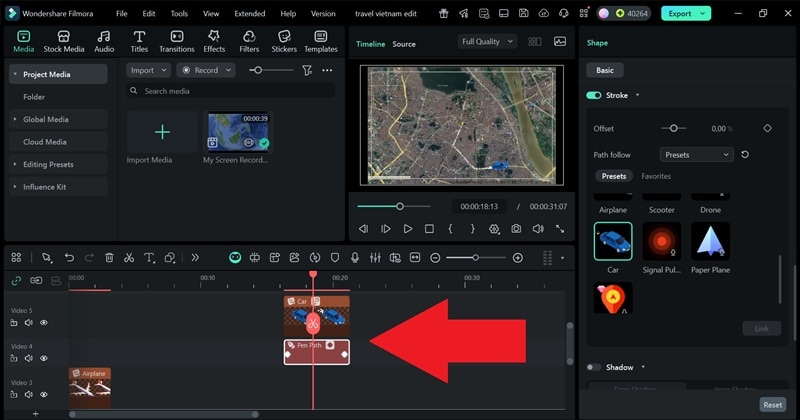
Step 6Add Effects, Movement, and Airplane Object
- Click the path you drew with the Pen Tool in the timeline so it's selected and ready to edit.
- On the right side, find the "Effects" section.
- Play around with the styles and adjust the glow, color, or animation until the line matches the vibe you want.
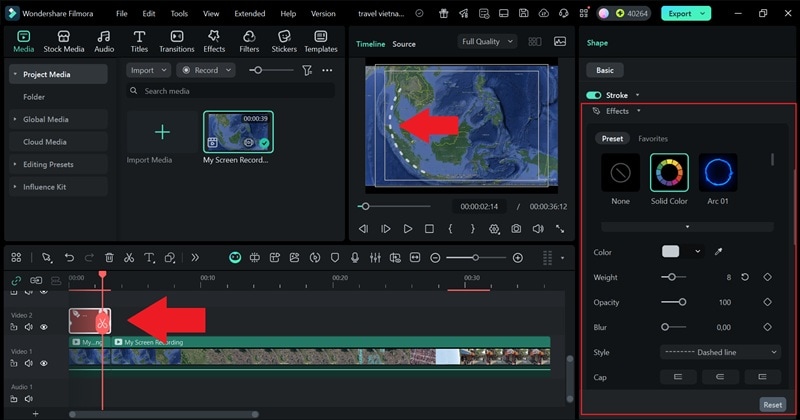
- To make the line appear as if it's being drawn live, scroll down to the "Trim Path" controls.
- Set the playhead at the very beginning and click "Add Keyframe" on the "End" slider.
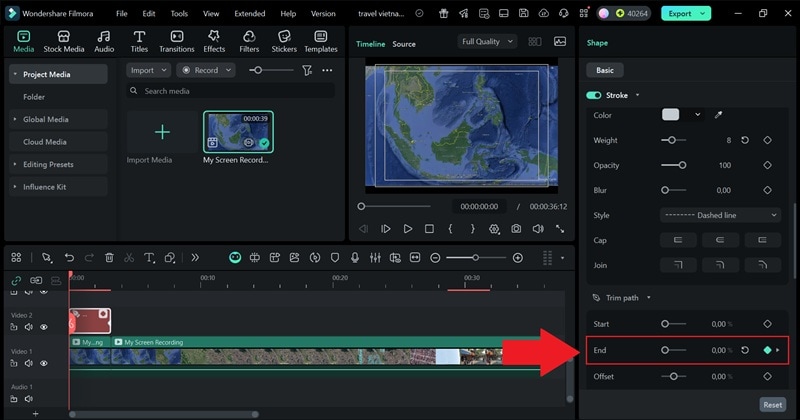
- Move the playhead to the end of your clip, then raise the End value from 0 percent to 100 percent and add another keyframe.
- Open the "Path Follow" menu and look for "Preset".
- Pick the Airplane option and click "Link" so the animation follows your travel route with a matching icon.

Step 7Create Another Travel Path Animation
- Repeat the same steps to draw the next part of your route.
- This time, create a new path from Hanoi to the Old Quarter.
- Use the Car preset as the moving icon since it fits this section of the trip better.
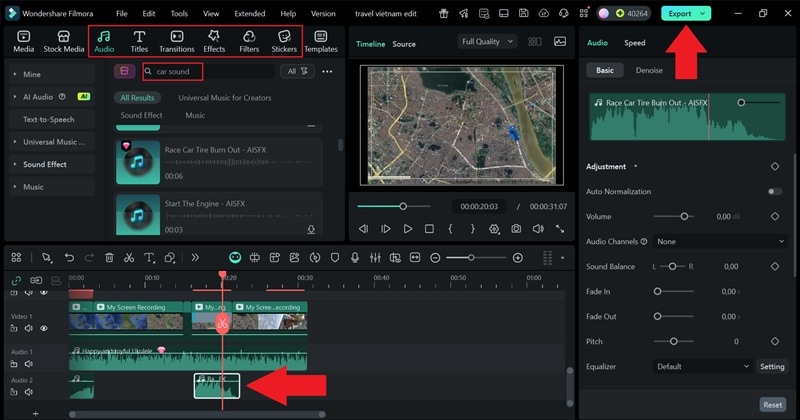
Step 8Enhance and Export Your Video
- Browse Filmora's media library and features to make your travel clip look more polished.
- Add music, sound effects, or filters with the style you prefer.
- When you're satisfied, click "Export" and save the final video to your device.
Even though the tools look advanced, the process is surprisingly easy to follow, and the final result is definitely worth it. Go ahead and check out how your video turned out.
Conclusion
Making a Google Earth video is a simple way to upgrade your travel clips and give your stories a clearer sense of place. So, we helped you learn different ways of how to record Google Earth video, from the built-in tools in Google Earth Pro to using OBS Studio for more control. Each method helps you figure out how to record Google Earth zoom-in moments and capture the exact paths you want to show.
But if you want the simplest and most complete option, Filmora is the best pick. It lets you record your Google Earth movement and then enhance everything right inside the editor. The Pen Tool is a great bonus since it allows you to add clean animated travel lines that follow your route perfectly.
secure download 