

Those who are new to Sony Vegas platform may find lots of difficulties at their learning stage. Recently so many queries were received regarding inability of software to combine video clips that are separated by using split tool. As there are few tools in software that works only on a single clip, so users so often need to combine their different parts of videos. If you are also suffering with such an issue then you can find a useful solution below. The given steps can help you to join, merge or combine different sets of video files using Sony (Magix) Vegas platform.
Wondershare Filmora is a powerful and budget-friendly video editing solution, especially ideal for users seeking an alternative to high-cost professional software like VEGAS Pro. While VEGAS Pro can be priced at several hundred dollars depending on the version, Filmora offers flexible subscription plans and a perpetual license at a much more affordable rate. It supports both Windows and macOS platforms and comes equipped with advanced features like AI tools, multi-track editing, built-in effects, and templates. You can also try Filmora risk-free by downloading its free trial version directly from the official Wondershare website.
How to Merge Clips into One Using VEGAS Pro
It's important to understand that video clips you want to merge in VEGAS Pro don't need to share the same specifications. Files with different formats, resolutions, frame rates, or bitrates can still be combined, but they will require re-encoding during rendering to ensure smooth playback and compatibility. This means merging is more than a simple drag-and-drop task—it's a structured process similar to working on a new composite project.
To manage your media efficiently, start by using the Project Media panel in VEGAS Pro. Here, folders are called bins, and you can create as many as needed to organize your clips. Simply right-click in the Project Media window, select "Create New Bin," and name it appropriately. This helps streamline your workflow, especially when working with multiple scenes or video segments. After editing, you can consolidate everything into a Smart Bin for easier navigation and final assembly.
Steps to be followed:
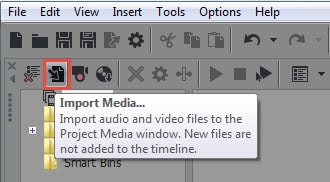
- Select File > Import > Media from the menu.
- Click the Import icon directly on the interface.
- Drag and drop media files directly into VEGAS Pro.
Three different methods for merging are as below:
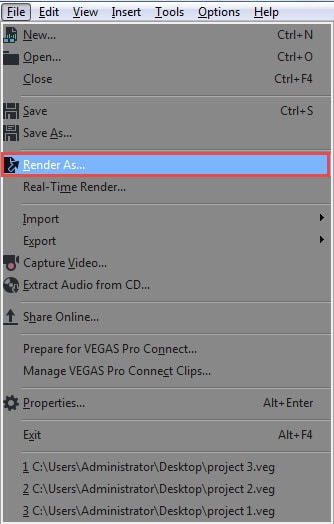
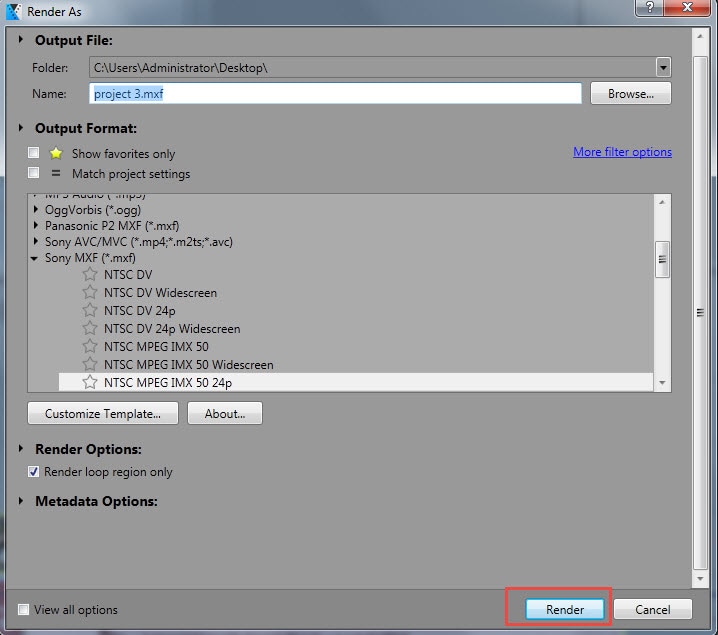
Method 1: Use Ctrl + A option from clips then hit file option: a pop up render window will appear on your system where you can set name of the project.
Change output format as well as resolution. Finally hit the render option for creation of new project.
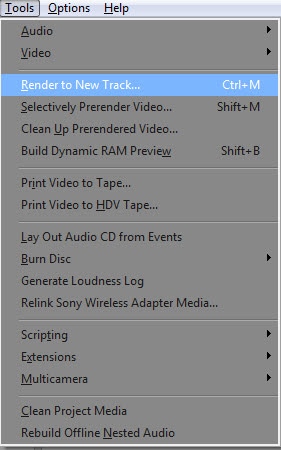
Method 2: Use Ctrl+M shortcut key or hit Tools and then go to Render.
Method 3: Go to File and the save your file.
It is also possible to add effects to merged video file at once.
An Easier Alternative: Wondershare Filmora
With Wondershare Filmora Video Editor, you can quickly and efficiently merge multiple video clips into one seamless file. Whether you're combining footage from your camera, recorded TV shows, downloaded YouTube clips, or conference videos, Filmora makes the process smooth and interruption-free. After merging, your video plays continuously as a single cohesive project. Ready to get started? Follow the full step-by-step tutorial below.


Part 3. Tips for Smooth Merging in VEGAS Pro
Successfully merging clips in VEGAS Pro isn't just about stacking footage on the timeline—it's also about keeping your editing workflow clean, efficient, and professional. Below are expert tips to ensure your merged video looks polished and plays seamlessly:
- Use Ripple Editing to Avoid Gaps: Enable "Ripple Edit" to automatically shift clips and avoid empty spaces between them when you trim or move a segment. This ensures continuity and saves time during timeline adjustments.
- Snap Clips Together Precisely: Turn on "Snapping" (press F8) so clips automatically align edge-to-edge. This eliminates micro-gaps that can disrupt playback or leave black frames.
- Preview Before Exporting: Always preview the full sequence to catch any audio desyncs, abrupt transitions, or visual glitches. Use the Loop Playback function to test specific sections repeatedly.
- Use Crossfades for Smooth Transitions: Slightly overlap adjacent clips to apply automatic crossfades. This softens the cut between clips and creates a more professional flow, especially for vlogs, interviews, or cinematic edits.
- Group Related Clips: If your project includes multiple synced video and audio tracks (e.g., from multi-cam shoots), use Group > Create New to keep elements locked together as you move or edit.
Conclusion
Merging clips in VEGAS Pro is straightforward once you understand the basics—import, arrange, trim, and export. It's a powerful solution for professional-level video editing and merging. For those seeking a faster, more user-friendly experience, Wondershare Filmora offers an intuitive alternative with drag-and-drop merging, built-in effects, and direct YouTube export. Whichever tool you use, applying the right techniques—like ripple editing, snapping, and clean transitions—ensures a seamless final result. Choose the software that fits your workflow and start creating smoother, more cohesive videos today.
