- Vegas Pro
How to Speed Up Rendering in VEGAS Pro: Expert Tips and a Faster Alternative

Jul 14, 2025• Proven solutions
 TL;DR:
To significantly speed up slow video rendering times in VEGAS Pro, you must enable hardware GPU acceleration, optimize your export bit rates, and dedicate your system's resources exclusively to the editing software.
● Lower your custom template bit rate to an optimal range of 3m to 8m and export using fast-processing video codecs like Sony AVC.mp4 or Main Concept.mp4 to reduce file size and processing time.
● Prevent system lags during the editing phase by setting the video preview quality to half, utilizing lower-resolution proxy files, and switching the VEGAS Pro process priority to high within the Windows Task Manager.
● If hardware limitations persist, Wondershare Filmora serves as a lighter alternative for 64-bit Windows 7 or macOS 10.14 and newer, offering an automatic background rendering feature for timeline previews to accelerate the final export.
Ask AI for a summary
 ChatGPT
 Perplexity
 Gemini
 Claude
 Grok
Grok
Vegas Pro is a well known video editing package that allows users to perform non linear editing. This software tool is developed by Sony and acquired by Magix, and the recent update was launched on 24th May 2016. With this advanced software tool, you can give reality to any video imagination with ease as the easy to use interface with advanced tools provides unlimited capabilities. The new Vegas Pro Users might be searching for some useful tricks to make interesting videos on this software platform, if so then information provided below in this article will be highly beneficial for you all.
Part 1. Why Is VEGAS Pro Rendering So Slowly?
Rendering speed in VEGAS Pro can be affected by a combination of software settings, hardware limitations, and project complexity. If you're experiencing unusually long export times, consider the following common causes:
Insufficient Hardware Resources
VEGAS Pro is a powerful editor that relies heavily on your system's CPU, GPU, and RAM. If your hardware is outdated or underpowered, rendering times will lag. For example:
- Low RAM (8GB) slows down data processing.
- Older CPUs without enough cores struggle with multi-threaded rendering.
- Unsupported or weak GPUs mean no acceleration, forcing the CPU to do all the work.
Improper Project and Render Settings
Mismatched or unoptimized settings can increase rendering time. For example:
- Using a higher resolution or frame rate than your source media.
- Selecting a codec or bit rate that requires more compression.
- Not using hardware-accelerated encoding (like NVENC or Intel QSV).
Heavy Effects and Transitions
Using multiple video effects, color grading, or animated transitions can dramatically slow rendering. VEGAS Pro needs to process each effect frame-by-frame, especially with 4K or multi-layered projects.
Part 2. Best Tips to Speed Up VEGAS Pro Rendering
The most common need of all Vegas Pro users is to speed up the rendering time of various video projects. Many professionals are searching for the tricks to make their preview window on Sony Vegas less laggy so that every editing task can be performed with ease. Below are few useful tips to achieve best speeds over Sony Vegas Pro video editing program:
1. Lower Down Bit Rate
It is possible to lower down your bit rate in Vegas Pro; for this you simply need to select any of your favourite templates and then click on customization option. It will open up a pop up window where all template customization settings can be done. Just go to Bit rate tab and lower down its value so that ultimately rendered video file can have less file size as well as it takes less time for complete rendering. The best possible value of bit rate is 3m to 8m.
2. Delete Unwanted Effects/ Tracks
In case if you are going through some video effects that appear of no use for your project type or that hardly make any difference on your project then you can easily get rid of them. Note that more number of effects on a video means you need to spare more time for rendering hence it is good to stay away from unwanted video tracks as well as effects. It is also possible to merge different tracks in order to create a single project that can be managed easily and quickly.
3. Close Applications
If you wish to run your Vegas Pro very smoothly on your device then prefer to use it without any interference of other undesired programs. When you are working on any project using Vegas pro then try to close your Skype, iTunes, Internet browser and all other applications that are of no use for current work. It will help your system to increase focus on Vegas Pro project and hence fast results can be used. You can check status of all running objects from task manager by pressing Control+Shift+Esc command.
4. Leave Computer Alone
Once you have created your video file and you need to begin with the rendering process then it is good to leave your computer and manage other tasks around. Follow step 3 first that is close all unwanted programs and then initiate rendering process, one started then go for a walk or enjoy with people around you. It will help you to enhance processing speed as your escape out will ensure that you will not be using any other program besides rendering process.
5. Set Priority Option to High
It is one of the most important things that you need to do in order to achieve fast rendering. While leaving your computer for rendering task, go to task manager and right click on Vegas pro. Now from drop down menu select Set priority option and switch it to high. This setting will let your computer know that Sony Vegas tasks must be taken as first priority and must be executed fast.
6. Enable GPU Acceleration
The overall performance of Vegas Pro can be easily enhanced by using GPU acceleration feature. For this you need to go to Options and then select preferences; visit the video tab and for video processing type GPU acceleration make selection for graphic card. Some PCs do not have such settings and they will display Off for GPU acceleration selection settings.
7. Reduce Video Quality in Preview
In order to avoid lags in video previews, you can simply reduce the quality of video clip. Just go to preview and select Half; it will directly reduce video quality by 1/2th level and will reduce efforts of Vegas pro while helping your program to run smoothly.
8. Choose Proper Video Codec Type
The type of video codec you are using for Vegas pro processing will also affect its overall performance. Always prefer to use Sony AVC.mp4 for better results. Other useful option for video codec is Main Concept.mp4; its ability to render projects rapidly is well known by all professionals.
9. Set Power Settings
Make some efforts to do power settings on your device if you are working on Windows Vista or Window 7. It can be done from control panel and this trick can help your program to achieve 100% rendering speed. Laptops usually come with pre-configured type power settings that help to manage CPU load very precisely.
10. Select Proper Transitions
Manage your rendering time properly by selection proper transitions, layers and effects so that videos can run smoothly on your software program. Other than this then quality of video file must be selected carefully as rendering time completely depends upon it. Never create a bourdon on your video file.
If you want to learn more editing tips about Sony Vegas, you should not miss Sony Vegas Editing Tips
Part 3. How to Optimize VEGAS Pro Settings for Faster Video Rendering
Step 1: Enable GPU Acceleration
Utilize your GPU for rendering by enabling hardware acceleration in VEGAS Pro's settings.
Step 2: Adjust Render Settings
Select appropriate render templates and settings that match your project's requirements to avoid unnecessary processing.
Step 3: Manage Effects and Transitions
Limit the use of heavy effects and transitions, as they can significantly increase rendering time.
Step 4: Use Proxy Files
Create lower-resolution proxy files for editing, which can be replaced with full-resolution files during final rendering.
Step 5: Optimize System Resources
Close unnecessary applications and processes to allocate more resources to VEGAS Pro during rendering.
Part 4. Faster Alternative to VEGAS Pro: Speed Up Rendering with Wondershare Filmora
If you’re tired of the slow rendering of your videos, Filmora Video Editor is going to cheer you up. Despite including all the useful features, this software is pretty easy to use. So stress-free that even kids could edit videos after spending a few hours on it.
No wonder why most YouTubers, professional video editors, and even filmmakers trust Filmora, whether it’s about editing small video clips or a complete movie.
Key Features
- User-Friendly Interface: Intuitive design suitable for beginners.
- Efficient Rendering: Optimized performance for faster rendering times.
- Built-in Effects and Transitions: A wide range of ready-to-use effects to enhance your videos.
- Cross-Platform Compatibility: Available on Windows and macOS.


Furthermore, you can speed up rendering time in Filmora to finish your projects quickly by following the below step-by-step tutorial.
Step 1: Open Filmora
After installing Wondershare Filmora on your Windows or Mac, open the software and start a new project. Wait for the main editing interface to fully load.
Ensure that no media files (audio, video, or images) have been imported or added to the timeline at this point.
Step 2: Preview Render Files
Method 1: Auto-Render
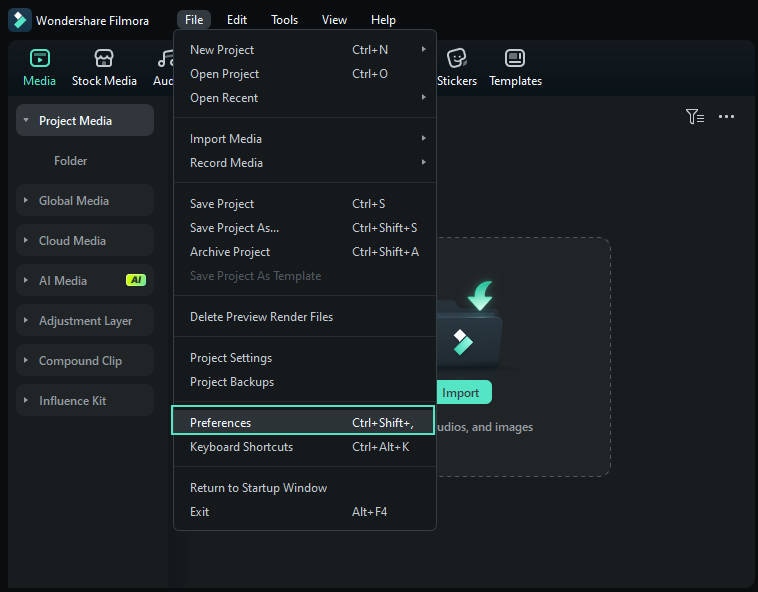
Click on the “File” menu in the top-left corner, select “Preferences” from the dropdown.
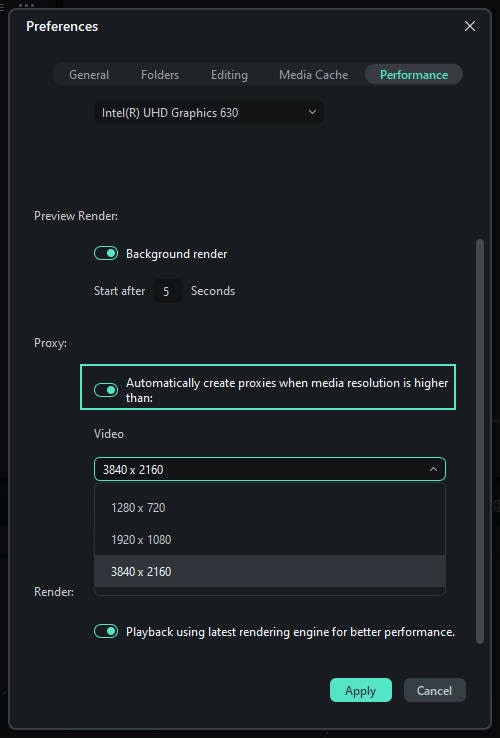
In the settings window, go to the “Performance” tab. Under the “Preview Render” section, set a starting time, and enable it.
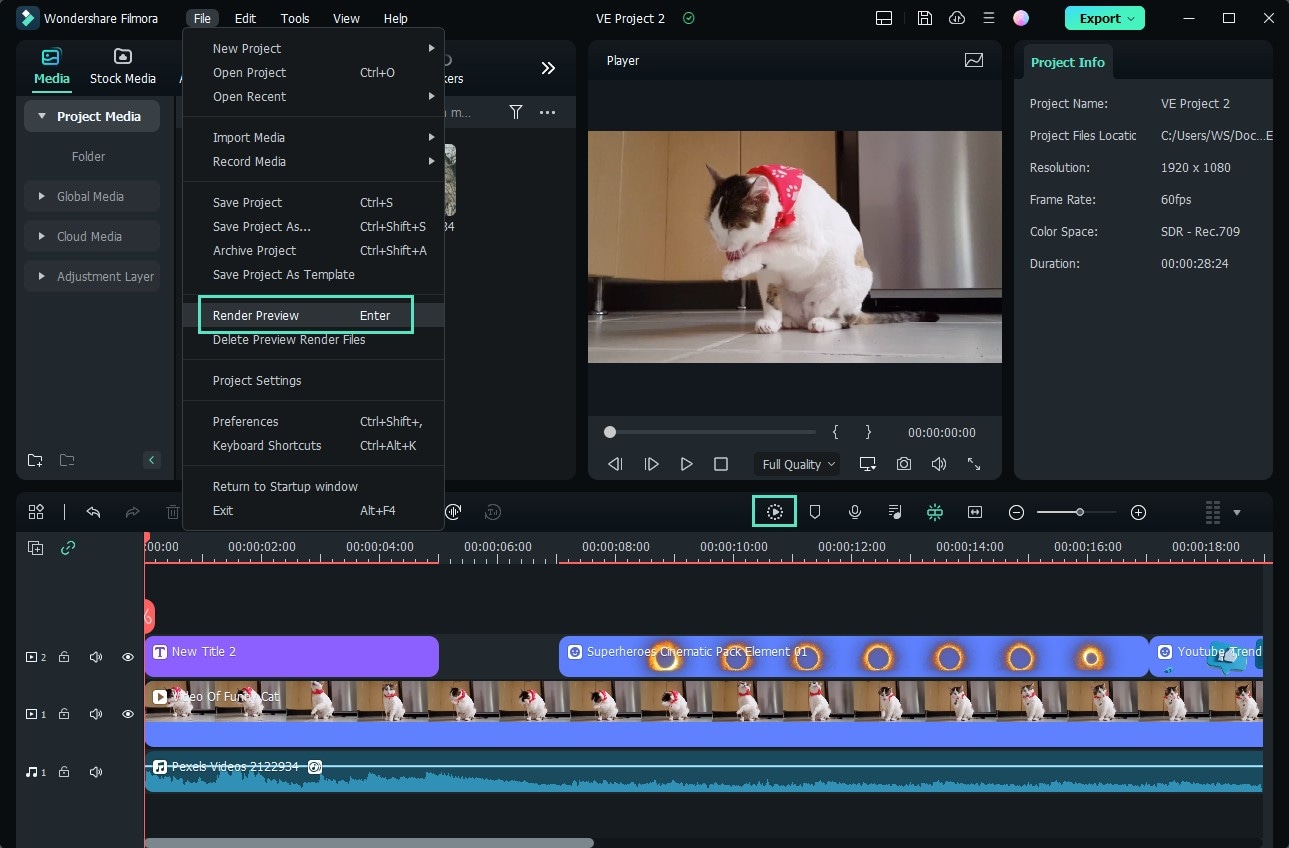
Method 2: Manual Render (Render Preview)
Click the Render Button to begin rendering your timeline whenever this red line appears (as when you add media or make other changes to your timeline).
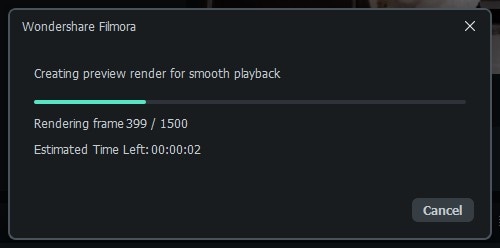
The render preview window will pop up, showing the render progress and the estimated remaining time.
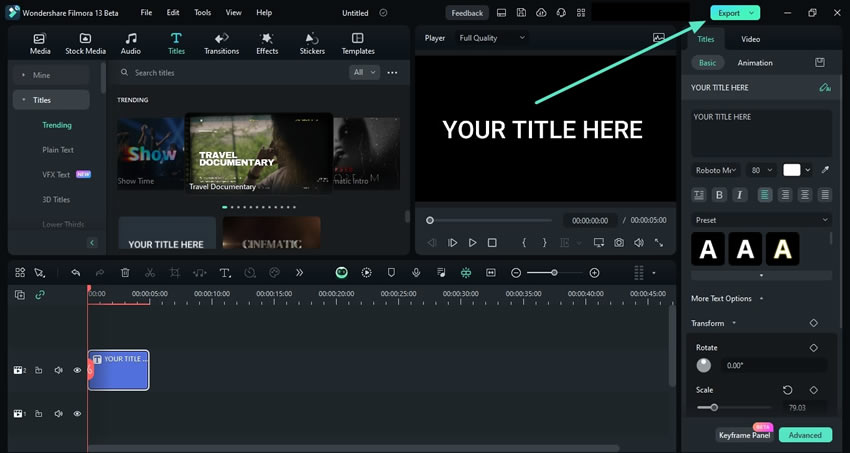
Step 3: Export Settings
Hover your cursor towards the top right corner of Filmora's editing window and click the "Export" button. Choose the one way you want to export and click the “Export” button. You will see your video in the specified position.
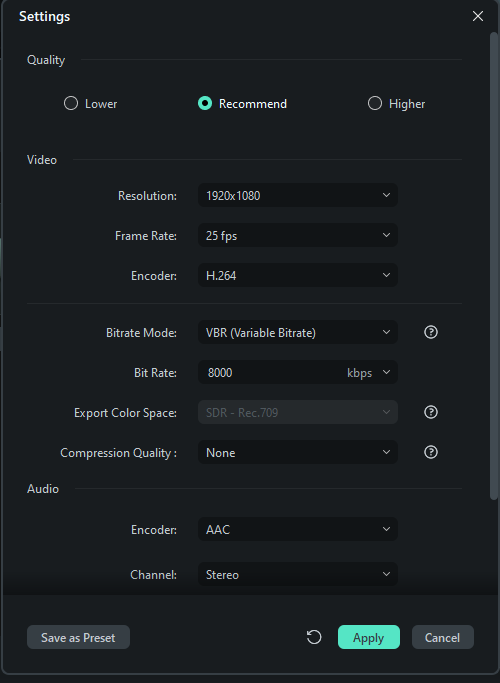
After selecting the export button, a new window will appear. From there, choose “Settings.”
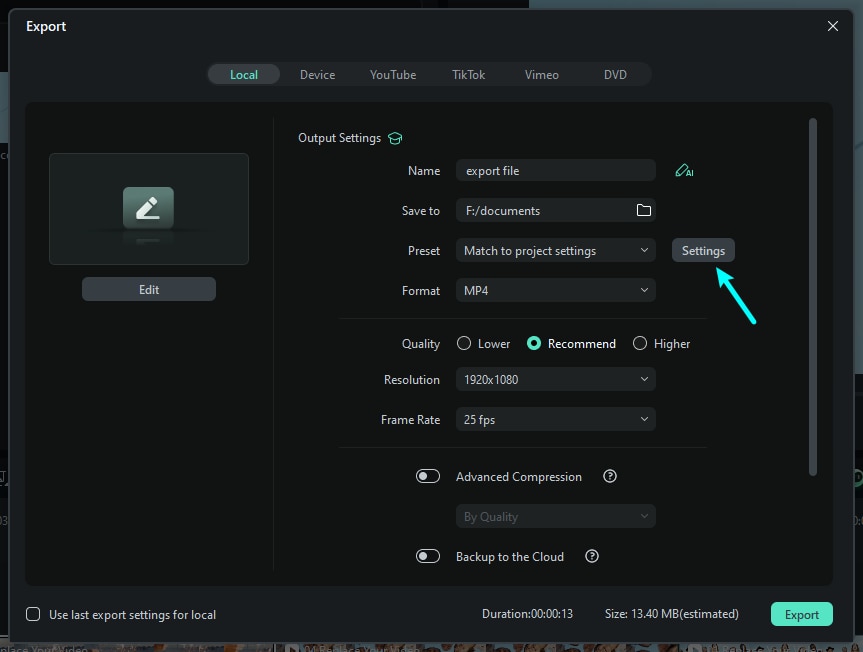
The settings window has three quality levels: Lower, Recommend, and Higher. The only difference between them is the Bit Rate. You can adjust this or other parameters, such as Resolution and Frame Rate, in this window.
When you're finished adjusting your video, press the Export button in the Export window. You can find the video in the specified location you selected.

You can increase the rendering speed in Filmora by following the simple steps mentioned above. Working on them will solve your slow rendering problem within a few minutes. And you can export high-quality videos to your system without any trouble.
Conclusion
If you're frustrated by slow rendering in VEGAS Pro, you're not alone. Performance issues often stem from heavy effects, outdated settings, or limited hardware. By adjusting preferences, enabling GPU acceleration, and using proxy files, you can speed up rendering significantly. For an even faster and easier experience, Wondershare Filmora is a great alternative. With optimized performance, automatic proxy creation, and hardware-accelerated exporting, Filmora helps creators render videos quickly—without the steep learning curve. Choose the tool that best fits your workflow and start editing smarter, not slower.
You might be thinking that giving a motion blur effect to video with Sony Vegas Pro is a very difficult task but you can achieve it with great ease.
by Benjamin Arango Jun 06, 2026 18:38 PM
This detail guide will provide you complete information about using Vegas Pro for creating classic picture in picture effect step by step with pictures. Besides, we will also offer another solution to
by Benjamin Arango Jan 06, 2026 11:35 AM
The article below contains complete guidelines about how to split videos and then use track motion tool or Event Crop/Pan tool to check their performance.
by Benjamin Arango Jan 06, 2026 11:35 AM
Benjamin Arango
staff Editor
