Ever wondered how to slow-mo in CapCut and make your videos look amazing? Think about iconic scenes like the "bullet time" effect in The Matrix, where the action slows down dramatically while the camera moves at normal speed. This stunning slow-motion effect adds a cinematic touch to any video.
The great news? You don’t need expensive equipment or complicated software to achieve it. CapCut makes creating slow-motion effects quick and easy, perfect for turning everyday clips into professional-looking content.
In this guide, we’ll show you exactly how to make slow-motion videos on CapCut and share tips to get the best results for your videos.

In this article
Part 1. Bnefits of Adding Slow-Motion Effects to Your Videos?
You might think CapCut slow-motion is just about making videos look cool, but there's so much more to it than that. Sure, those buttery-smooth, slowed-down clips are super satisfying and can give you all the artsy vibes, but the real magic of slow-motion lies in its practical uses.
Let's dive into why adding slow-mo effects to your videos with CapCut can be a game-changer:
- Educational Purpose
Some concepts are just too complex to grasp in real time. That's why educators and trainers often slow down their videos. By doing this, they give their audience the time to fully understand tricky subjects without feeling rushed.
- Sports Analysis & Highlights
If you ever watched a sports game, you must’ve seen the instant replay highlights that show key moments in slow motion. This technique is important for analyzing critical plays. By slowing down the action, sports analysts can make precise decisions. Moreover, it can also let viewers take in every detail of the action.
- Cinematography
Want to add some drama or highlight a particular moment in your video? Slow motion is your answer. It’s not just about aesthetics; it can synchronize mismatched audio, build suspense, or amplify emotions that might not hit as hard at regular speed. It’s a powerful tool to make your videos more impactful and memorable.
So, next time you're editing, don’t underestimate the power of slow motion. It's not just about making things look pretty, it's a technique with serious benefits across various fields. Next up, we'll show you how to create slow-mo effects using CapCut.
Part 2. How to Add Slow-Motion in Capcut
CapCut offers two main ways to create slow-motion effects in your videos, whether you're using the mobile app or the desktop version on your PC. Both are packed with features, but the process is slightly different depending on the platform you’re using. Let’s break it down how to get slow mo on CapCut in different devices.
How to do slow-mo on CapCut for Mobile
Step 1. Open CapCut
Start by opening the CapCut mobile app and selecting the video clip you want to edit.

Step 2. Access the Speed Options
Tap on the clip, then click on Speed. Here, you’ll find options to apply slow-motion effects.
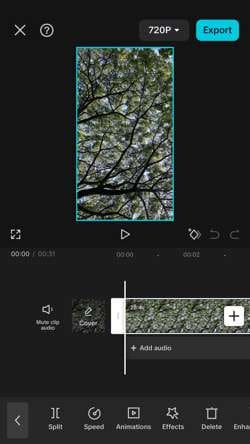
Step 3. Choose Your Speed
- Normal Option: Adjust the speed uniformly across the entire clip. You can slow it down to as low as 0.1x speed. The app also shows the new duration of your clip after the slow-mo effect.
- Smooth Slow-Mo: If you want a smoother look, enable the "Smooth slow-mo" option, which helps avoid any choppy visuals by interpolating frames.
- Curve Options: For more creative control, use the curve feature. You can choose from presets like Montage, Hero, Bullet, Jump Cut, Flash In, and Flash Out, or customize your own speed curve by dragging points on the timeline.

Step 4. Apply and Save
Once you’re happy with your edits, hit the check mark to apply the changes.
How to do slow-mo on CapCut on PC
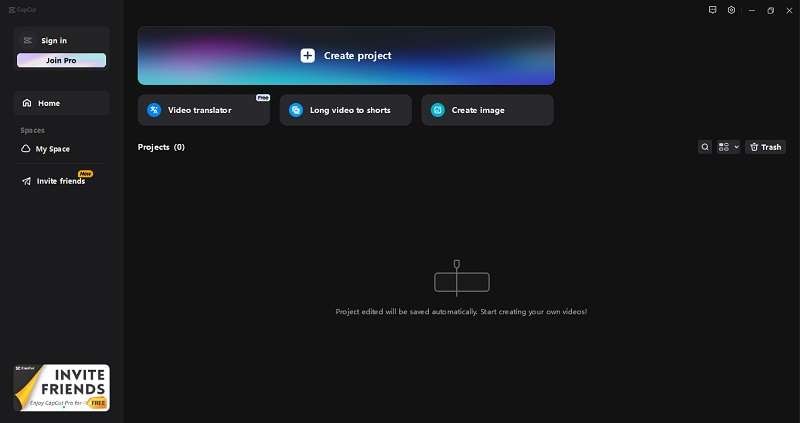
Step 1. Launch CapCut Desktop
After installing CapCut on your computer, open the program and start a new project.
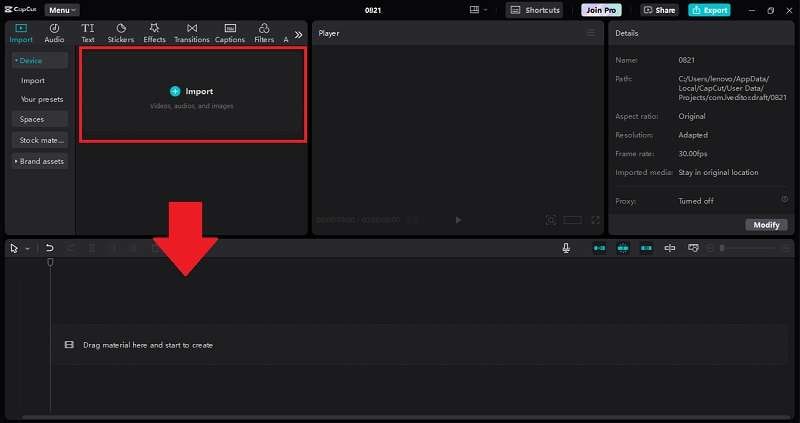
Step 2. Import Your Video
Click Import to upload your video, or drag and drop it directly onto the timeline.
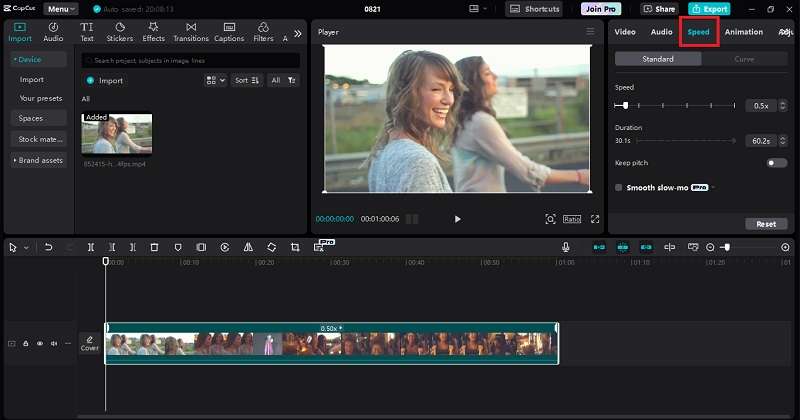
Step 3. Edit the Speed
Select the video clip you want to edit and click on the Speed option in the upper-right panel.
- Normal Option: Like on mobile, you can adjust the speed uniformly by dragging the speed bar left to slow down the video. Enable "Smooth slow-mo" for a more polished look.
- Curve Options: The desktop version also allows you to use preset slow-motion effects or create custom curves by adjusting beats on the timeline.
Step 4. Finalize Your Video
Once your slow-motion effect is applied, add any other edits, then click Export in the top right corner to save your video. You can also adjust the resolution, quality, and other settings before exporting.
Part 3. CapCut Alternative: How to Slow Down Videos Like a Pro Using Filmora
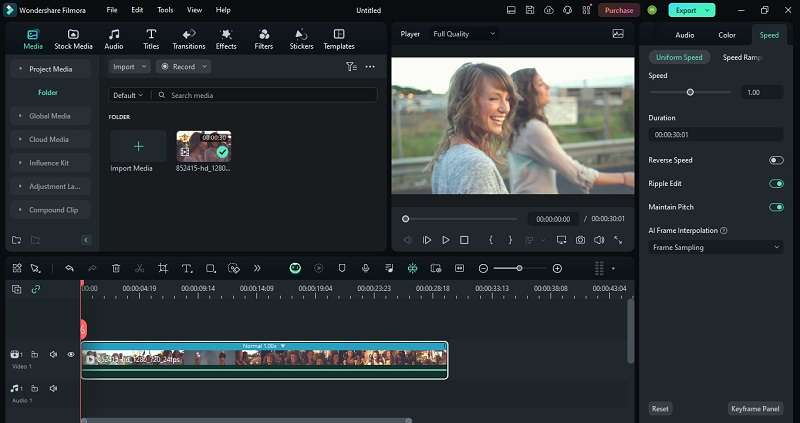
While CapCut is a fantastic tool for doing slow-motion videos, you might want to explore other options with more advanced features and greater ease of use. Wondershare Filmora is a powerful alternative that offers a wider range of capabilities, making it a go-to choice for many video editors.
Filmora is compatible with Windows, Mac, Android, and iOS, giving you flexibility no matter what device you’re using.
Filmora Key Features
- AI Optical Flow: This feature automatically increases the frame rate of your video, ensuring smooth and high-quality slow-motion effects without expert intervention.
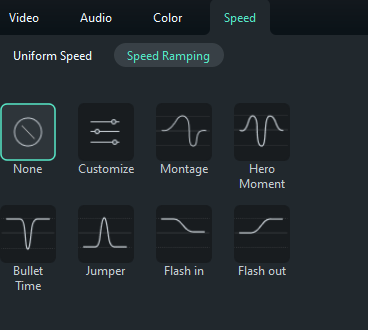
- Speed Ramping: Filmora offers six templates for easily applying professional speed effects, allowing you to customize the flow of your video precisely.
- Freeze Frame & Reverse Speed: Use these effects to stop a moment in time or play your video backward, adding creative touches to your edits.
- Maintain Original Audio Pitch: Unlike CapCut, Filmora maintains the original pitch of your audio even when you slow down your video, ensuring that the sound remains natural.
CapCut vs. Filmora: A Quick Comparison
- Ease of Use: Both CapCut and Filmora are user-friendly, but Filmora stands out with its intuitive interface and faster workflow, especially for more complex edits.
- Speed Control Features: While CapCut offers basic slow-motion effects and speed curves, Filmora provides more advanced options like AI Optical Flow for super slow-motion and Speed Ramping with customizable templates.
- Audio Handling: Filmora shines with its ability to maintain the original audio pitch when altering speed, ensuring your audio remains natural, even when the video is slowed down or sped up.
- Compatibility: CapCut is versatile, but Filmora supports a broader range of video formats and offers more customization options, making it a better choice for professional editing.
There are two methods to apply slow-motion effects in Filmora. Here, we breakdown those methods.
Method 1: How to Make A Slow Mo Video Uniformly
Step 1: Access Speed Controls
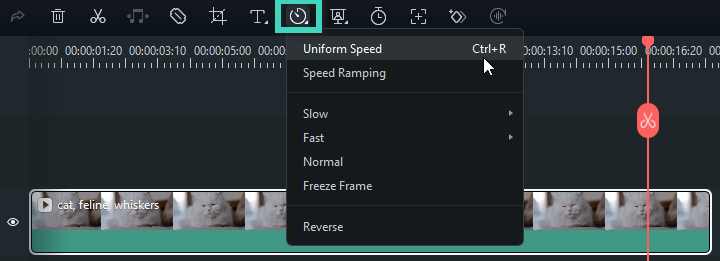
Begin by selecting your video clip on the timeline. Then, click on the Speed icon located in the toolbar above. Choose "Uniform Speed" to start modifying the playback speed of your video.
Step 2: Modify Playback Speed
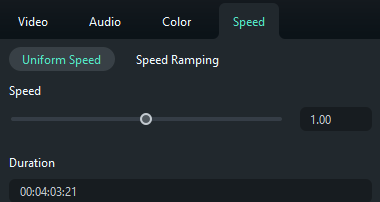
To reduce the video speed, drag the Speed slider to the left. For more precise adjustments, enter your desired speed value in the Duration field. Make sure it is less than 1 for slower playback.
Method 2: How to Make A Slow Mo Video with Different Speeds
Step 1: Access Speed Ramping
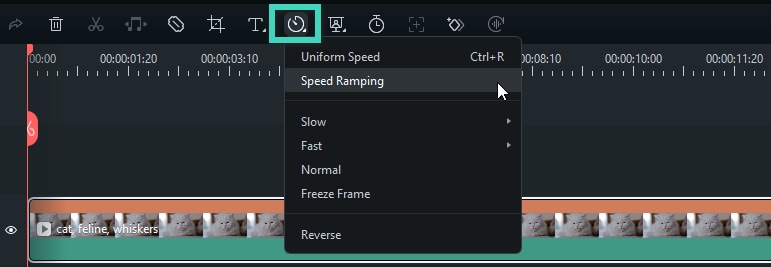
For more complex speed effects, you need to use Filmora’s Speed Ramping feature. Click the Speed icon again and select Speed Ramping. It will help customize different speed across the video clip.
Step 2: Select the Speed Ramping preset
Then, click on your video clip in the timeline and navigate to Speed > Speed Ramping. You’ll find various presets available, including Customize, Montage, Hero moment, Bullet time, Jumper, Flash in, and Flash out. Select the one you need.
Step 4: Fine-Tune Speed Points
After applying a preset, you can adjust the speed points for further refinement. Move the speed points up or down to change the speed, and drag them left or right to alter the section of the video affected by the speed changes.
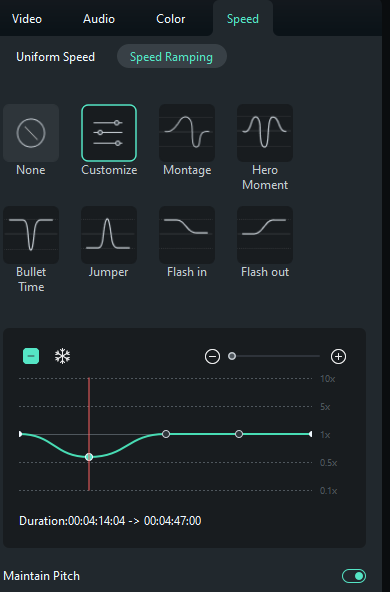
To add or remove speed points, use the Plus (+) or Minus (-) icons as needed. To freeze a segment of your video, place the playhead at the desired location, click the snowflake icon to insert a freeze frame, set its duration, and apply the changes.
Enhance Your Slow Mo Videos Using Filmora AI Interpolation
In Filmora’s AI feature, there’s AI Frame Interpolation tool that can help you can help you create ultra-smooth slow-motion videos by generating intermediate frames in your video. This tool uses advanced algorithms to ensure that even when slowing down footage significantly, the motion remains smooth and natural.
To use it, click on the video in the timeline, go to the right settings panel, and select the "Speed" tab. Choose "Uniform Speed" and expand the "AI Frame Interpolation" section. Select ""Optical Flow"" to enhance your slow-motion effect with AI-driven frame interpolation.
Conclusion
To wrap things up, adding slow-motion effects in CapCut is simple and can really take your videos to the next level. CapCut's tools make it easy whether you're capturing dramatic moments or breaking down action shots.
However, if you're looking for something a bit more advanced, Filmora is a standout option. With features like AI Optical Flow for smoother slow-mo and Speed Ramping for creative control, Filmora offers a more professional-grade editing experience.
So while CapCut is great for quick edits, Filmora is definitely worth considering if you want to step up your slow-motion game.
FAQ
-
1. Is it possible to adjust the speed of only certain sections of my video?
Yes, in CapCut, you can adjust the speed of specific sections of your video. To do this, use the split tool to divide your video into segments. Then, apply the desired speed adjustments to each section individually. This allows you to have slow-motion effects in some parts while keeping others at normal speed. -
2. Is it possible to add music to my slow-motion video in CapCut?
Absolutely. CapCut allows you to easily add music or sound effects to your slow-motion videos. Simply import your audio file, drag it to the timeline, and sync it with your video. You can also trim or adjust the audio to match the slower pace of your footage. -
3. Is CapCut a good choice for editing professional slow-motion videos?
CapCut is a solid choice for basic slow-motion edits, especially for casual or social media content. However, for more advanced features like AI-driven frame interpolation, speed ramping, or maintaining audio pitch, a tool like Wondershare Filmora might be better suited for professional-level editing.


 100% Security Verified | No Subscription Required | No Malware

