Modern camera devices now allow you to make certain adjustments right before you use them. Let’s say you want to configure the frame rate and choose your preferred option. Well, you can easily do that with just the snap of a finger. Changing the video frame rate can be done directly from your camera settings. All it takes is just a click or two. However, it’s quite a different story if you wish to change the frame rate of an existing video. In this case, you may need video editing software to make such changes on your end. Fret not. There are lots of them that can surely help very well in this regard.
In this article, we will talk about changing FPS in Premiere Pro. We will provide a short guide on how to do it quickly and easily. Lastly, we will also suggest an alternative you can explore as well. Continue reading below to learn more.
In this article
Wondershare Filmora: Best Alternative to Premiere Pro’s FPS Reconfiguration
As mentioned earlier, changing the video frame rate of existing content is a walk in the park. You just need a video editing app that allows you to make such reconfigurations. Adobe Premiere Pro is one of the options you may consider in this respect. It has a Video Preset section that gives you access to reconfigure the frame rate and other similar settings. But that’s not the only software you may consider in this regard. If you wish to explore other alternatives, Wondershare Filmora can surely assist you as well. It is a powerful content-creation tool equipped with highly advanced features and wide configuration settings. Do you want to try Wondershare Filmora on your end? If that is so, check out the details provided below to learn more.

Key Features
Wondershare Filmora has tons of amazing features to offer to users. To get to know some of them, read the items listed below.
- Frame rate reconfiguration: It allows you to reconfigure the frame rate of your video content in just a snap. Among the available options in this respect are 24 FPS, 30 FPS, 60 FPS, 25 FPS, and many others.
- Simple and advanced video editing: It is packed with various tools that can help you perform a variety of video editing techniques.
- Numerous creative resources: It has a large library of creative assets that you can easily insert into your video project. Among them are stock images, video clips, audio bits, filters, effects, and many others.
- Ready-made video templates: It offers a large collection of high-quality video templates that you can easily customize based on your preferences.
- Artificial intelligence: It provides access to a variety of AI-powered tools that you can integrate into your creation process. To name a few, these are AI Smart Cut Out, AI Text-Based Editing, AI Text-To-Video, AI Copywriting, and many others.
- Flexible export options: It allows you to render and export your videos in different formats. Among the supported file types are MP4, WMV, AVI, MOV, F4V, MKV, 3GP, MPEG-2, WEBM, GIF, and MP3.
Step-By-Step Guide
Wondershare Filmora is very easy to use and navigate. If you need assistance when changing the video frame rate, this app can surely help you a lot. Do you want to try it on your end? If that is so, check out the guide below. Read the instructions very well and follow the indicated steps accordingly.
Step 1: Download the Wondershare Filmora application from its official website. Right after, install it on your computer.
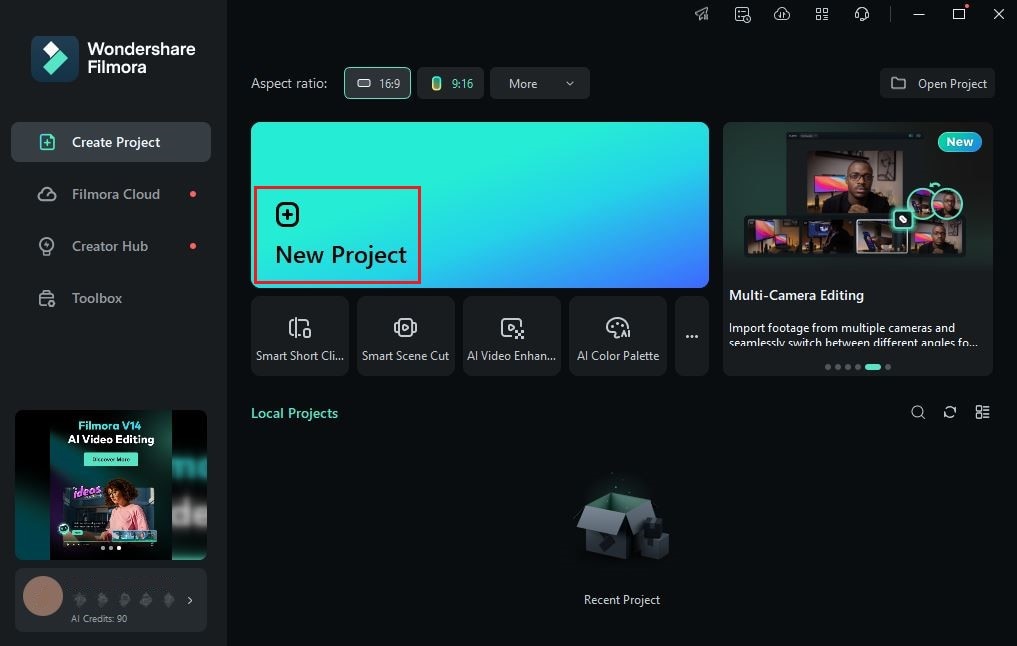
Step 2: Run the newly installed video editing software on your desktop afterward. Once it fully loads up, go to the main dashboard and click New Project to start editing. Alternatively, scroll down a little to the Local Projects section and open an existing session if there is any available.
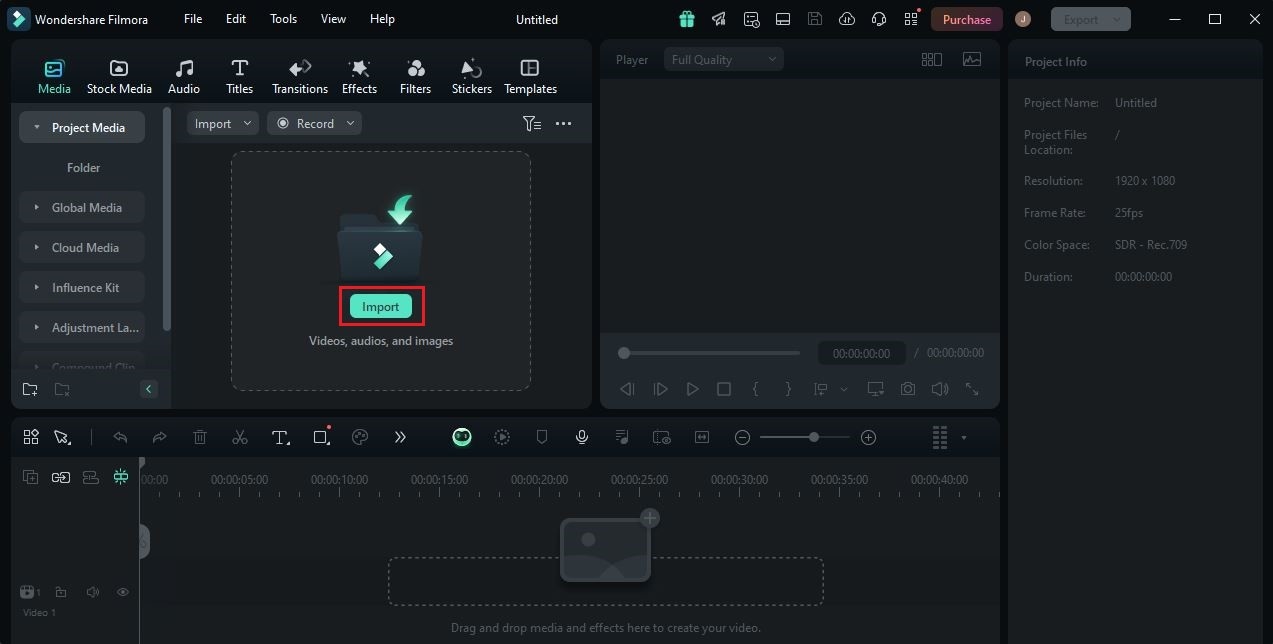
Step 3: After that, head over to the Elements Panel and click Import under the Media tab. Choose all the files you are going to use and upload them to the platform. Once completed, grab the files one by one and drag them from the Elements Panel to the Editor Timeline.
Step 4: At this juncture, you may now commence the actual video editing. Start by finalizing the arrangement of the assets based on your preferences and making all the necessary adjustments. For instance, you may fix the color settings, adjust the audio volume, or apply visual effects.

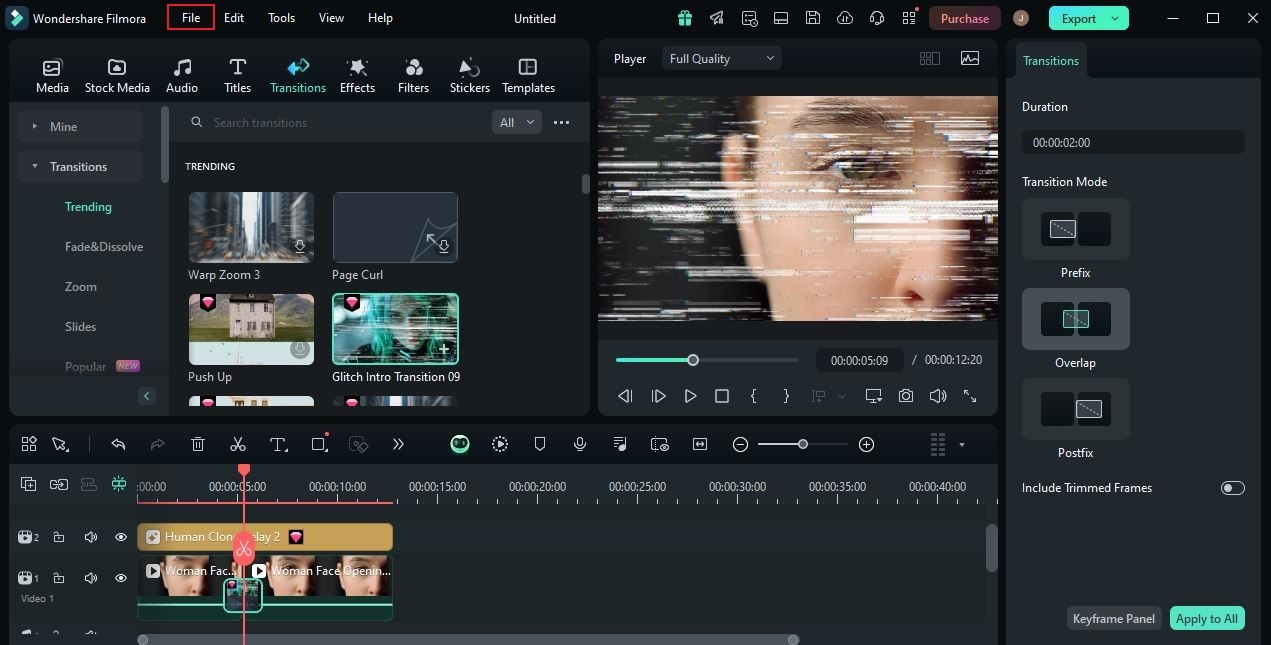
Step 5: Once done, it’s about time to proceed with the frame rate reconfiguration. Don’t worry. It’s indeed a piece of cake. Changing the video frame rate can be done with just the snap of a finger. To get started, head over to the top navigation bar and click File.
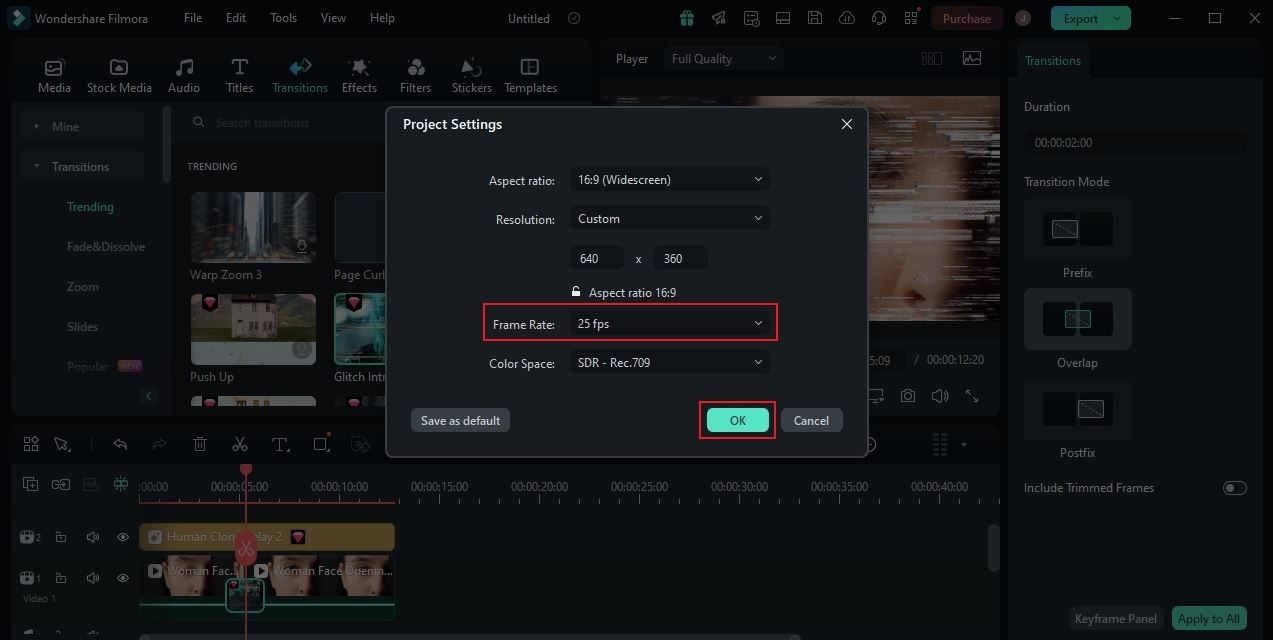
Step 6: Select Project Settings from the list of options. Immediately, a new window will be displayed on your computer screen. From there, find Frame Rate and click the drop-down menu next to it. Choose the frame rate you want to set and then click OK afterward to proceed.
Step 7: Finally, play and review the output. Check if the new frame rate suits your preferences and needs very well. If you are satisfied with the result, click the Export button right above the Preview Panel to render the video and save a copy to your computer. Otherwise, continue making some adjustments until a desirable outcome is achieved on your end.
Guide to Changing FPS in Premiere Pro
What if you use Adobe Premiere Pro to edit your video project? Can you reconfigure its frame rate from there? The short answer to this question is absolutely yes. Changing the frame rate in Premiere Pro is a walk in the park. For the most part, all it takes is just a click or two. Do you want to give it a shot? If that is so, here are the two tutorials to help you get started. Perform the steps in the proper order to gain the best result.
Changing the Frame Rate of a Video Clip in Premiere Pro
Below is a step-by-step guide to changing the FPS of a video clip in Premiere Pro.
Step 1: Go to the Timeline and select the video clips you want to edit.
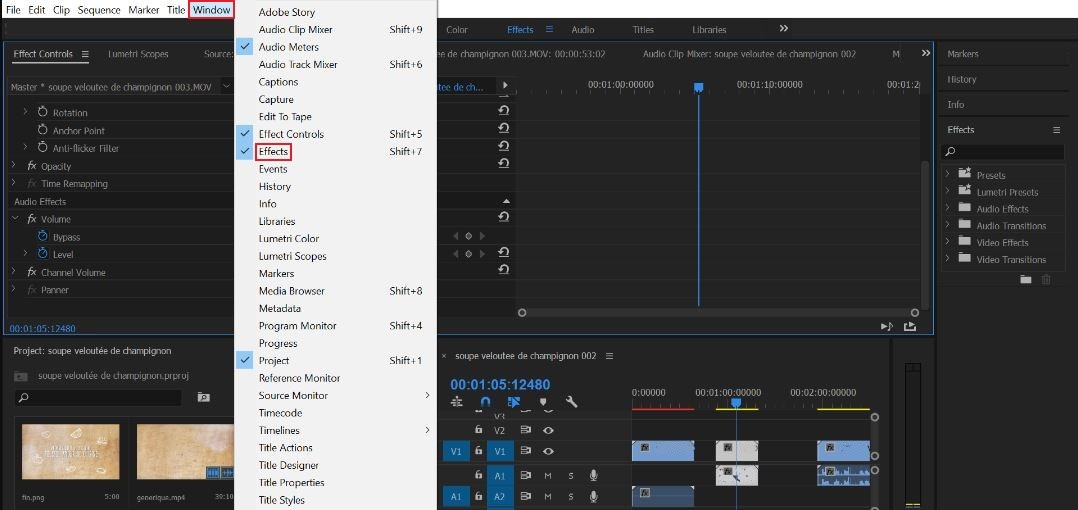
Step 2: After that, head over to the top menu bar and click Window. Select Effects from the list of options. Immediately, the Effects panel will be displayed on the right-side corner of your computer screen. From there, click the Video Effects folder.
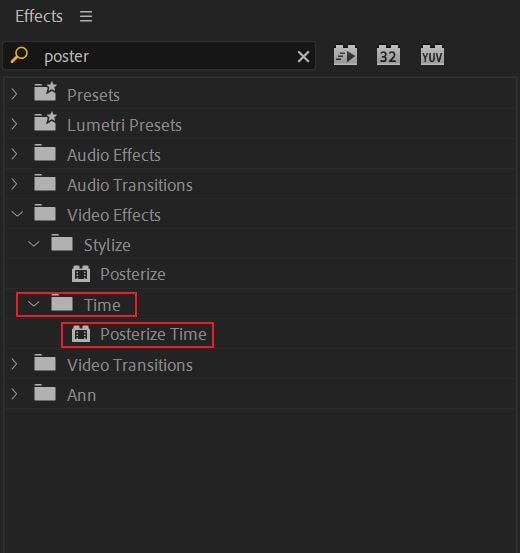
Step 3: Click the Time option afterward and then choose Posterize Time. Drag the effect asset to the Timeline and drop it to the selected video clip.
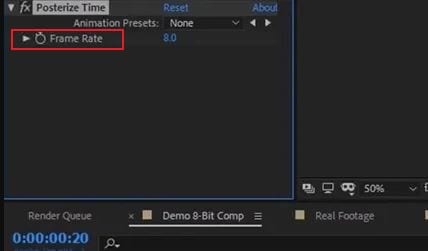
Step 4: At this juncture, the Effects Control panel will be displayed on the left-side corner of your workspace. Explore the given options and find the Frame Rate. To change its default input, simply click the text field next to it and type the new frame rate you prefer to set.
Changing the Frame Rate of a Project Sequence in Premiere Pro
Below is a step-by-step guide to changing the FPS of a project sequence in Premiere Pro.
Step 1: Once again, head over to the top menu bar and click Window. Select Project from the list of options.
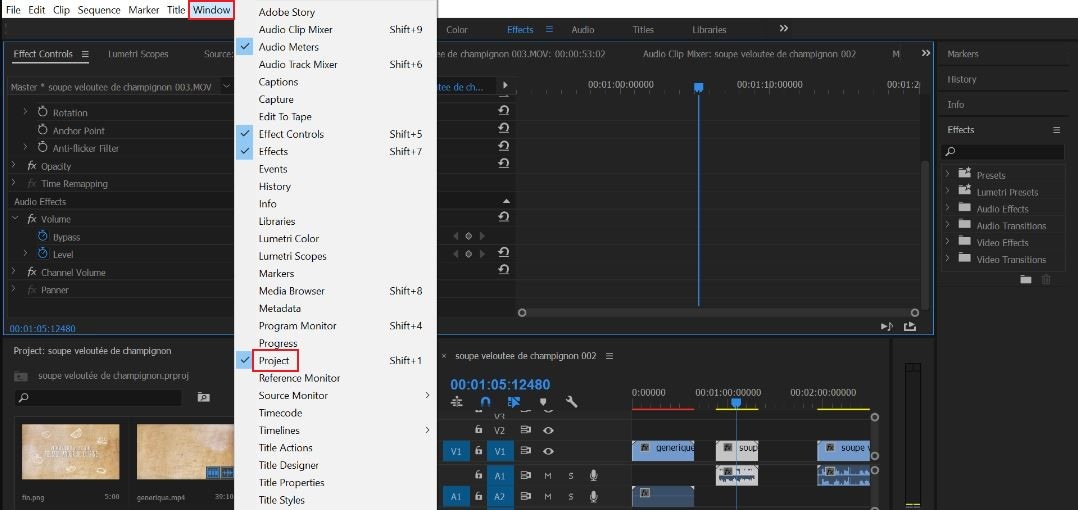
Step 2: After that, the Project Panel will immediately open on the right-side corner of your workspace. Find the specific sequence you want to edit and then right-click on it. Choose Sequence Settings from the given options.
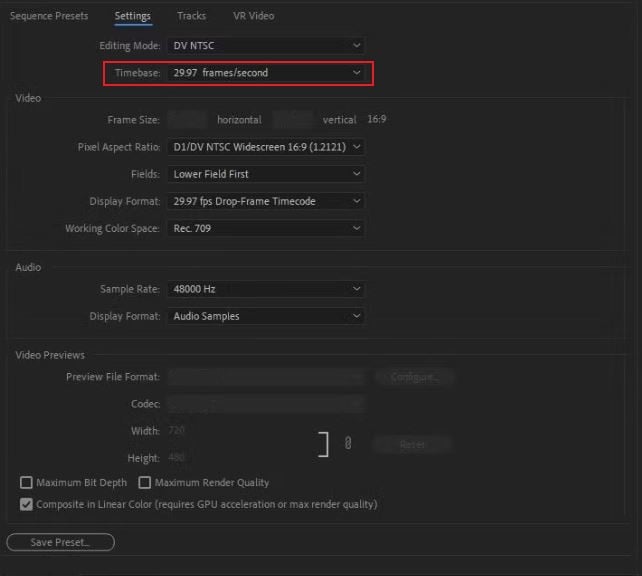
Step 3: A new pop-up window will be displayed on your computer screen. From there, find the Timebase option and click the drop-down menu next to it. Explore the given options and choose the frame rate you want to set. Once done, tap OK to proceed and apply the changes.
Things to Consider When Changing the Video Frame Rate
It is true to say that changing the frame rate is a very simple task. You can instantly complete it with just the snap of a finger. However, don’t forget that this kind of modification can extremely affect the overall quality of your video content. That’s why you should make a great choice before changing the frame rate. Don’t worry. There are some tips that can help you arrive at a wise and sound decision. Do you want to know what those are? If that is so, check out the list provided below.
Delivery of the Video
Where do you plan to broadcast your video content? Yes. You should first ask this question to yourself and make a decision. Afterward, choose the best frame rate that suits well with your preferred platform. For example, 24 FPS is an ideal choice for television or cinema content. It is the standard choice for most filmmakers out there. You may take it into consideration as well if you have the same plan in mind.

Online Compatibility
The majority of online platforms that stream video content are capable of supporting various frame rates. But for a more optimized viewing experience, you can try to set your videos to 30 FPS. That is by far the standard frame rate being used by most apps out there.
Clear Trace of Motion
Setting the frame rate properly can certainly give you a sharp, clear, and high-quality video output. It can indeed improve the traces of motions on your footage. Don’t worry. If something on your video clip doesn’t seem right, you can easily change the frame rate in a snap. Just choose another available frame rate and set it on your end.

Conclusion
When it comes to video editing, everything now seems possible. Why so? Let’s just simply say that modern video editing apps at present can offer a lot to users. For instance, changing the video frame rate is now a very simple task. All it takes is just a few taps to make your desired changes. Refer to the discussions above if you’re changing the FPS in Premiere Pro. The two tutorials can surely provide you with the best assistance in this regard. On the one hand, download Wondershare Filmora on your computer if you wish to explore a great alternative app. It is a powerful video editing software that provides advanced features and allows such configurations. Try this app on your end and discover the best it can give.


 100% Security Verified | No Subscription Required | No Malware

