Many content producers use slow-moving video clips for a variety of reasons. Most of them include such type of footage because it is necessary. Others add them to the project simply for aesthetic value. But hold on. Too many slow-paced videos might ruin the quality of your content. That’s why you should handle it with extra care and creativity. How so? Well, one thing you can to convert the clip into a timelapse video. Don’t worry. The majority of modern video editing apps offer this kind of video effect. You just have to set your preferred timelapse frame rate and choose a specific speed. Yes. For the most part, it’s just as simple as that. Therefore, you should explore this technique if you’re someone who uses slow-moving video footage a lot.
In this article, we will talk about the best frame rate for timelapse video. We will also provide a short guide on how to reconfigure the default frame rate for timelapse. Lastly, we will suggest a few helpful tools that you can use in this regard. Continue reading below to learn more.
In this article
How to Calibrate the Timelapse Frame Rate Using Wondershare Filmora?
Before adding the timelapse effect to your video content, the first thing you should do is recalibrate the frame rate. Yes. That is indeed important because the visual effect you’re about to implement is directly related to motion and animation. If not calibrated properly, the result will not be as good as you expect it to be. Don’t worry. It’s now very easy to edit the frame rate for timelapse videos. In this respect, you can use Wondershare Filmora. It is a potent content-creation software that offers not only highly advanced tools but also access to such project settings. Do you wish to give it a shot? If that is so, read the details written below to learn more.

Key Features
Wondershare Filmora offers tons of amazing features that can help you configure the timelapse frame rate and produce stunning videos. See the list provided below to check out some of them.
- Frame rate calibration for timelapse: It allows you to reconfigure the frame rate settings based on your preferences. You’re given several options in this regard. Among them are 24 FPS, 30 FPS, 60 FPS, 25 FPS, and more.
- Simple and advanced video editing: Its platform is capable of facilitating a variety of video editing techniques in a snap. You will not find it hard to implement your original creative plan.
- High-quality creative assets: It is fitted with a huge library of creative resources that you can access and use within the platform. Among the assets you can try in this regard are stock images, video clips, audio bits, effects, and filters.
- Fantastic video templates: It offers tons of ready-made video templates that you can easily customize based on your preferences.
- Artificial intelligence: For convenience, it has lots of AI-powered tools that you can integrate into your video creation process. To name a few, these are AI Smart Cutout, AI Text-To-Video, AI Voice Enhancer, AI Copywriting, AI Text-Based Editing, and more.
- Flexible export options: It allows you to render and export your video in different formats. Among the supported file types are MP4, WMV, AVI, MOV, F4V, MKV, 3GP, MPEG-2, WEBM, GIF, and MP3.
Step-By-Step Guide
Wondershare Filmora is very easy to use and navigate. If you need to change your timelapse frame rate settings, you can instantly make the adjustment on your end. Do you want to try it now? If that is so, check out the tutorial provided below. Read the instructions very well and follow the indicated steps accordingly.
Step 1: Download Wondershare Filmora from its official website. Right after, install it on your computer.
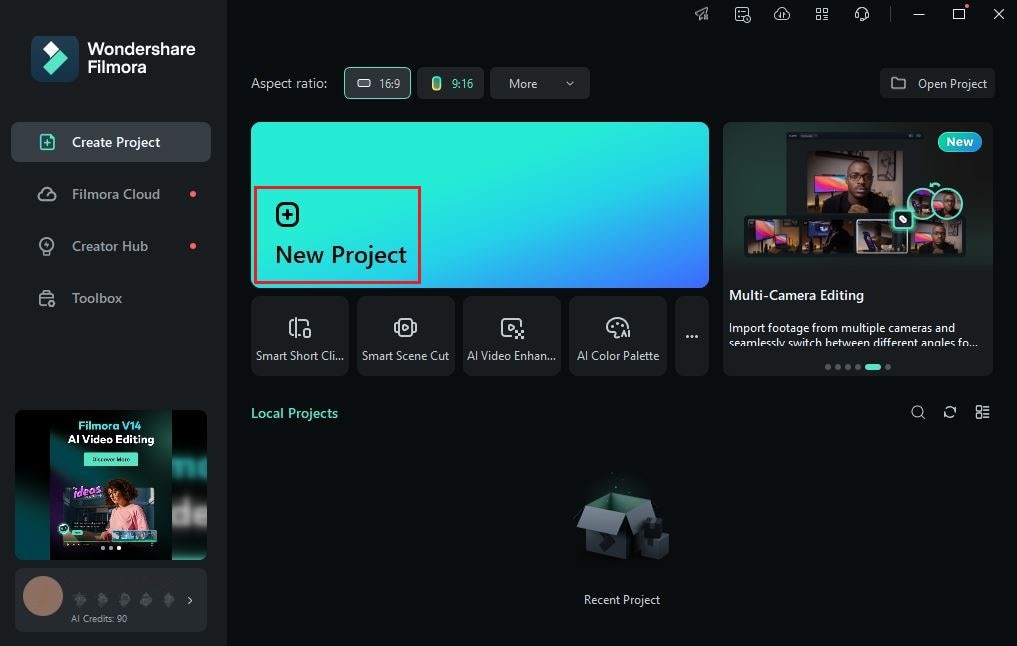
Step 2: Launch the newly installed video editing application on your desktop afterward. Once it fully loads up, head over to the main dashboard and tap New Project to start editing. Alternatively, scroll down a little to the Local Projects section and open an existing session if there is any.

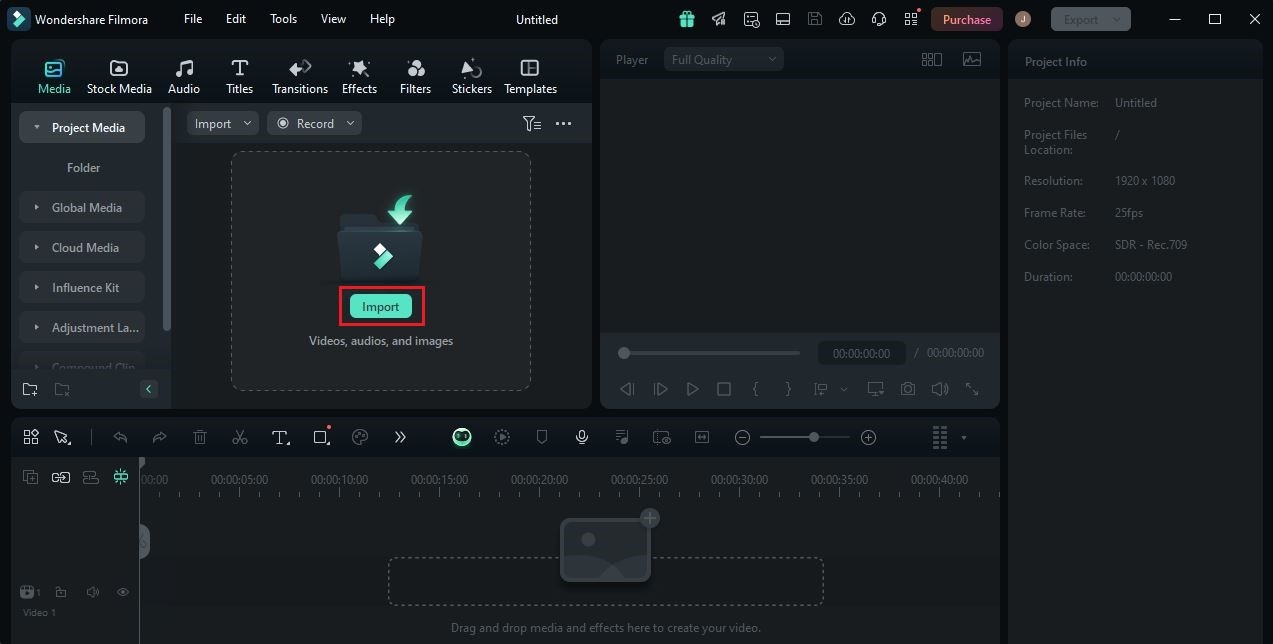
Step 3: After that, navigate to the Elements Panel and click Import under the Media tab. Select all the files you are going to use and upload them to the platform. Once completed, grab the files one by one and drag them from the Elements Panel to the Editor Timeline.

Step 4: At this juncture, commence the actual video editing. Start by finalizing the timeline arrangement of your assets. Subsequently, make all the necessary adjustments on your end. For instance, you may initiate color correction and color grading, add visual effects, and fix certain issues.

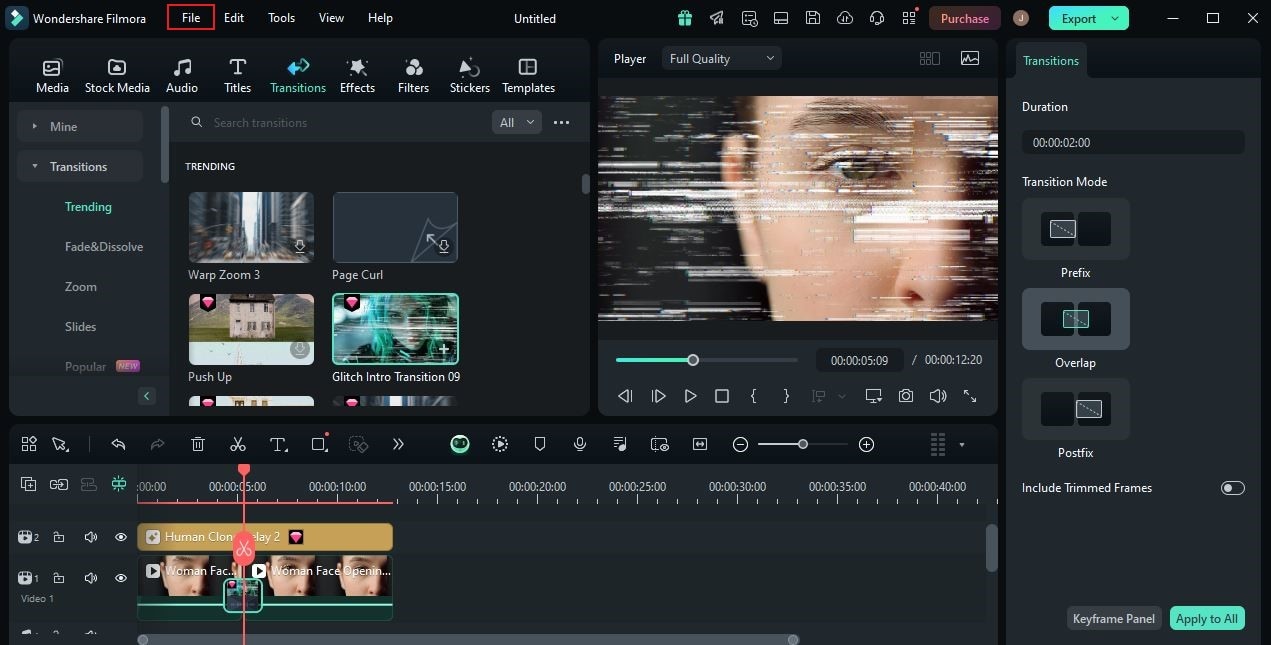
Step 5: Once done, you may now reconfigure the timelapse frame rate settings. Fret not. This procedure is indeed a walk in the park. To get started, simply head over to the top menu bar and click File.

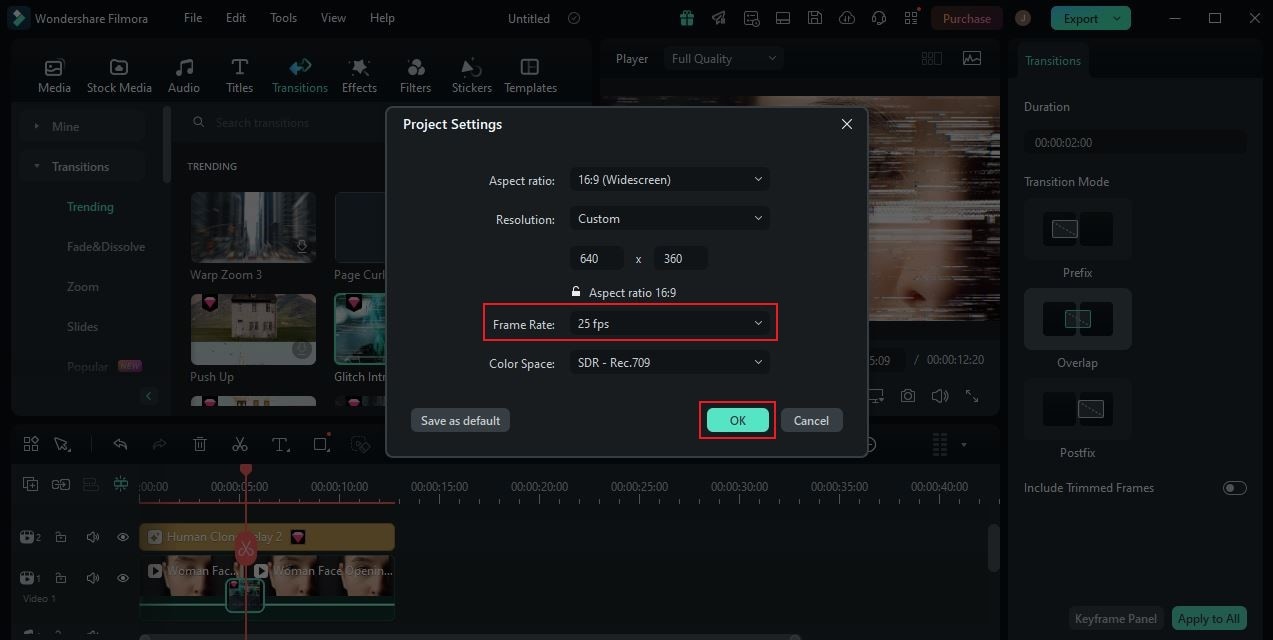
Step 6: Pick Project Settings from the list of options. Immediately, a new window will be displayed on your computer screen. From there, find Frame Rate and click the drop-down menu next to it. Select the best frame rate for your timelapse video content.

Step 7: Finally, play and review the output. Check if the selected frame is working great on your timelapse video. If you are satisfied with the current version of your video project, click the Export button above the preview to render the video and save a copy to your computer. Otherwise, continue making changes until a desirable outcome is achieved.
Discovering the Best Frame Rate For Timelapse Video Content
The timelapse effect on videos is not new to many of us. It has been a default feature present in most camera devices nowadays. While it is very convenient to use and activate, don’t forget that the timelapse frame rate must be configured properly. You have to choose the best frame rate for your timelapse video, depending on its settings and content. Don’t worry. In this respect, there are lots of choices provided. You just have to go over the options and find the best one that suits your preferences. Do you want to know more about this matter? If that is so, read on for more details.

Frame rate is the main component of timelapse videos. Why so? Simply because the frame rate is extended to a certain degree and played back at a faster speed. That’s why you should calibrate the timelapse frame rate very well. For timelapse, how many frames per second should you use? On most occasions, 30 FPS is the standard frame rate that editors use for timelapse videos. It can already give your video the clarity and high-quality resolution you need for your fast-paced content. Can you go lower than that? In this case, 25 FPS might be a great option if your timelapse video is not that long. Yes. When configuring the frame rate for timelapse videos, the duration is among the essential elements you should not brush off. You should capture longer videos if you’re planning to convert them into timelapse. As you know, the playback speed will be elevated. Therefore, the duration will be shortened as it increases.
Tips For Configuring the Frame Rate For Timelapse Videos
Calibrating the frame rate for timelapse videos is indeed a walk in the park. You can indeed do such modifications with just the snap of a finger. But hold on. If you want to get better results, there are some important things you need to keep in mind. Check out the list provided below to learn more.

- If available, don’t hesitate to use the timelapse mode on your camera device. Just make sure that the corresponding settings are well-configured before you shoot the video.
- Familiarize yourself with your camera device. You should know its functions in order to configure the necessary settings properly.
- Study the subject you’re about to shoot. If possible, try to create a specific shooting plan tailored to the unique characteristics of your subject.
- At some point, you might encounter some hardships. Let’s say the video is a bit shorter than expected, or the resolution is not that clear. In instances like this, the best thing you should do is retake and revise. Who knows? On the second or third try, a stunning output might come your way.
4 Online Tools That Can Help You Create a Timelapse Video
True enough, not all camera devices are equipped with a timelapse mode feature. Some of them only offer a regular video shooting feature. But don’t worry. It’s not a big deal. At present, you can now easily convert a regular video into a timelapse using an online converter tool. Do you want to try it on your end? If that is so, check out the list below. Read the description of each tool and find the best fit for you.
Kapwing

First on the list is Kapwing. It’s a popular web-based video editor that provides numerous tools you can use in content creation. To name a few, you can add text to videos, insert musical scoring, formulate visual effects, and many others. What if you need to create a timelapse video? Fortunately, it has a default feature that allows you to convert a regular video into a timelapse. All you have to do is upload the video file and change the video speed according to your liking. Yes. It’s just as simple as that. For better results, don’t forget to set the timelapse framerate beforehand.
Typito

Typito is the next online tool on the list. In a way, it’s almost similar to other video editing options out there. Typito is fitted with tools and settings that can help you craft a stunning video output. Of course, included in its wide array of features is the video speed configuration. You can use it to transform your regular videos into a timelapse. If you want to be more particular with the output details, you may recalibrate the timelapse frame rate afterward.
Clideo

Let’s say you want to directly convert a video into a timelapse without further calibration. In this case, the best tool for you is Clideo. It has a designated platform that allows you to increase or decrease the video playback speed based on your preference. Basically, you just have to upload the video and choose your preferred speed. After that, you may now export the output to your local storage. Don’t worry. You may still submit the video for post-production and recalibrate the timelapse frame rate for better results.
Flixier

Last but not least is Flixier. It is an all-around video editing tool hosted on the internet. You can conveniently facilitate various video editing procedures using its highly advanced features. Just access the tools on the platform and use them based on your specific needs. Don’t worry. Flixier allows you to change the default video speed of your content. That being the case, you can easily convert your regular video into a timelapse in just a snap.
Conclusion
It’s fair to say that the timelapse effect is not a go-to option for most video editors out there. But somehow, we cannot deny that it comes in very handy in certain instances. That’s why you should not brush off the possibility of using this effect in the future. Refer to the list of tools above and find the best option that suits your needs. For further assistance, download Wondershare Filmora. You can use this powerful content-creation software to configure the timelapse frame rate and enhance the quality of your output. Explore this platform on your end and make the most of its amazing features.


 100% Security Verified | No Subscription Required | No Malware

