
 100% Security Verified | No Subscription Required | No Malware


 ChatGPT
 Perplexity
 Gemini
 Claude
 Grok
Grok
Cutting or splitting videos are basic skills that every editor must master. When cutting or splitting a clip, you can delete unnecessary scenes adjust pacing, and seamlessly piece together different footage segments based on your needs. But don't worry, we've got your back. In this article, we will help you find the tools for splitting, trimming and cutting videos without losing an ounce of quality.
In this article
What's The Difference Between Cutting, Splitting, and Trimming A Video?
So, you've got your video ready, but now you're wondering—what's the difference between cutting, splitting, and trimming? Aren't they all the same? Well, not quite. Each technique serves a different purpose and can lead to some pretty cool results. Let's break it down.
Cutting
Cutting is like taking a pair of scissors to your video. You can chop out whole sections you don't want—the beginning, middle, or end. Once you've cut out the unwanted parts, you can either leave the remaining clips as they are or start getting creative.
You could rearrange the clips to tell a different story, add transitions between them, or even combine them with other footage. It's all about turning your raw footage into something more polished.
Splitting
Splitting is pretty similar to cutting, but instead of removing parts, you're dividing the video into separate clips. Think of it as hitting the "pause" button and breaking the video into different sections. After splitting, you can treat each clip as its own mini-movie. You could apply different effects to each part, rearrange them, or even save them as separate files if you need to. You can also split video into parts online.
Trimming
Trimming is like giving your video a quick cleanup. It's perfect for getting rid of those awkward moments at the start or end—like when you're adjusting the camera or waiting for something to happen.
Trimming doesn't change the order of your video, but it does make it shorter and more to the point. Once you've trimmed the excess, you can still go back and add effects, transitions, or even mix it with other clips.
Best Tool to Cut Video Files Without Losing Quality
 secure download

Now, after understanding the difference, you know when you should cut your MP4 video. When it comes to cutting video files, especially without losing quality, Wondershare Filmora is one of the best tools you can use. This software can be used both on a Mac or Windows. It's packed with features that make video editing not only easy but also highly effective, ensuring that your videos maintain their original quality throughout the editing process.
Why choose Filmora?
Filmora stands out as a top choice for several reasons:
- Cross-Platform Compatibility: Filmora is available for both Mac and Windows, allowing you to start a project on one OS and finish it on another without any hassle.
- Lossless Editing Features: Filmora has several features that will help you to easily cut, merge, and split videos without losing quality while adding creative touches.
- Broad Format Support: Filmora supports a wide range of video formats, including MP4, AVI, MOV, WMV, and more. This ensures you can work with virtually any video file without worrying about compatibility issues.
- Easy Sharing: Once you've finished editing, Filmora makes it simple to save your video in various formats, burn it to a DVD, or upload it directly to YouTube or Vimeo.
Supported files
| Formats | |
| Input |
● MPEG-1/2 Video file: (.mpg, .mpeg, .m1v, .m2v) ● MPEG-4 Video: (.mp4, .m4v, .3gp, .3g2, .3gp2) ● AOMedia Video 1 (.av1) ● QuickTime Movie File: (.mov encoded with MPEG 4 or MJPEG codec only) ● Camcorder File: (.dv, .mod, .tod, .mts, .m2ts, .m2t) ● Flash Video: (.flv, .f4v) ● Windows Media: (.wmv, .asf) ● Audio Visual Interleave (.avi) ● Matroska Video: (.mkv encoded with MPEG 4 or MJPEG codec only) ● HTML5 Video File: (.mp4, .webm, .ogv) ● Non-encrypted DVD Titles: (.vob, .vro) |
| Output |
● Common video/audio: .mp4, .wmv, .av1 mp4, .avi, .mov, .gopro cineform, .f4v, .mkv, .ts, .3gp, .webm, .gif, .mp3, .wav ● 4K: .mp4, .mov, .mkv |
How to Cut Video Files: 4 Easy Methods
- Superb video stabilization with low distortion.
- Vast video/audio effects and creative assets.
- Powerful AI for effortless content creation.
- Intuitive, professional yet beginner-friendly.
- Works on Mac, Windows, iOS, and Android.

Cutting video files in Filmora is incredibly easy, thanks to its variety of tools that cater to different needs. Here are four methods to cut your video files, each with its own benefits and best use cases.
Method 1: Using the Split button on the playhead
This method is perfect for precise manual control over your edits.
How It Works: Click on the video in the timeline, then drag the playhead to the exact spot where you want to create a split. Click the Split button on the playhead to divide your video at that point. If you don't select a specific track, this will split all clips under the playhead. To split a single track, make sure to select it first. Then, after the video split, you can delete the part you want to cut.

Best For: Detailed, hands-on editing where you want to control exactly where the video is split. Ideal for when you need to make precise cuts at specific points in your video.
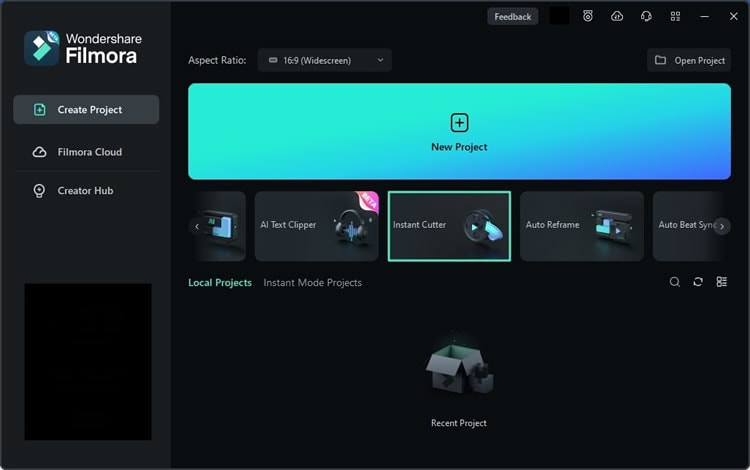
Method 2: Using the Instant Cutter Tool
The Instant Cutter Tool is your go-to for quick, lossless cutting, especially for large files.
How It Works: Launch Filmora and access the Instant Cutter tab by navigating through the tabs at the top of the main display.
Import your video clip, then use the sliders in the Trim tab to set the start and end points of your cut. Once you're happy with your selection, click the Export button to save your edited clip.
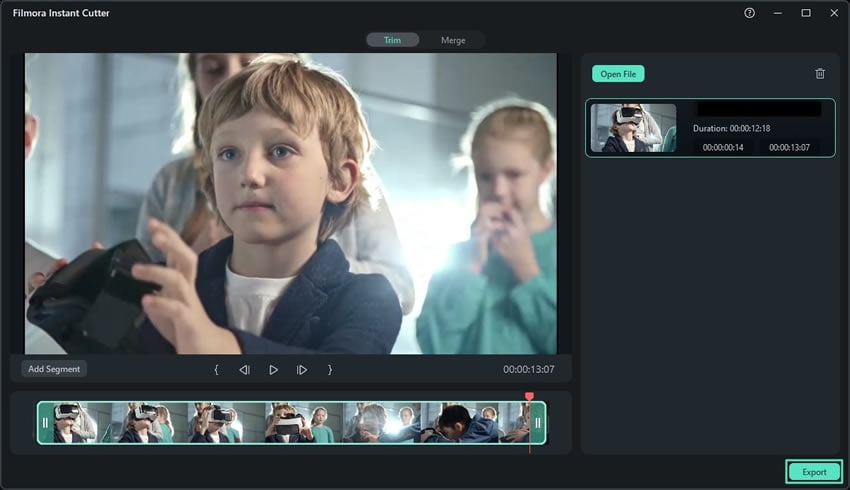
Best For: Fast, straightforward cuts without any re-encoding, which means no quality loss. Perfect for large video files or when you need to cut multiple clips quickly.
Method 3: Using Quick Split Mode
Quick Split Mode is designed for speed, making it a great choice when you need to split a long video into multiple parts quickly.
How It Works: Import your video into the timeline, then click on the Quick Split Mode icon.

Simply click on the timeline where you want to split the video, and Filmora will create the split instantly.

Best For: Rapid splitting of long videos into shorter clips. Ideal for breaking down lengthy footage into manageable sections.
Bonus: how to cut 3GP files easily?
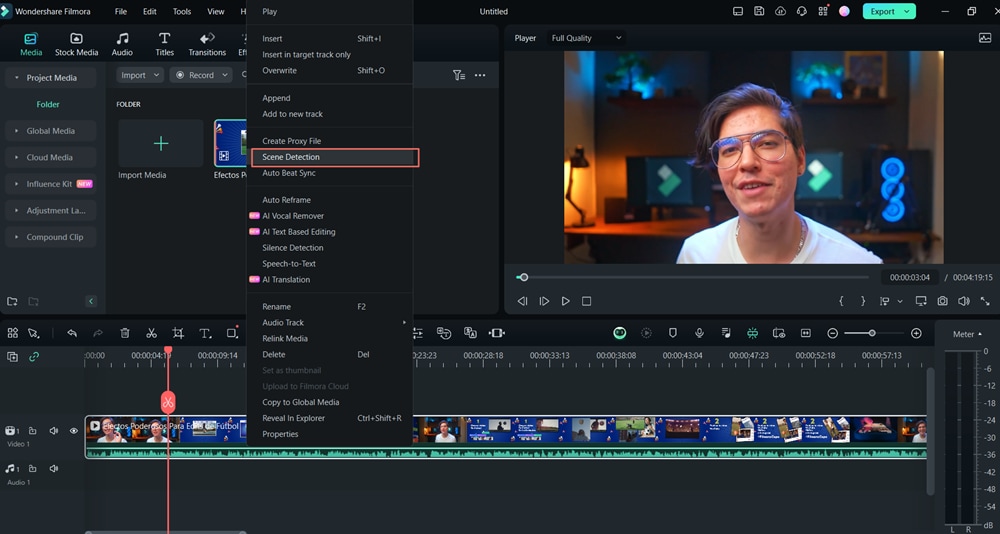
Method 4: Using Scene Detection feature
Scene Detection is a smart feature that automatically detects and splits your video into segments based on scene changes.
How It Works: Import your video into Filmora, then right-click on the clip and select Scene Detection. Alternatively, go to Tools > Scene Detection after selecting the video.
In the pop-up window, click Detect and Filmora will automatically separate the video into smaller segments based on the scenes. You can preview the segments and add them to the timeline if satisfied.
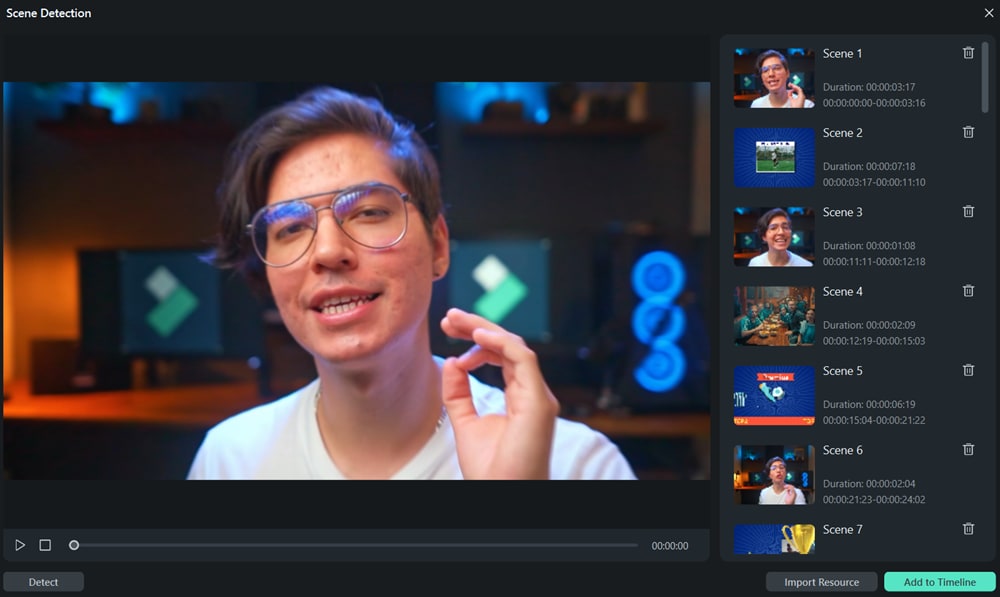
Best For: Automatically splitting videos with multiple scenes. This is especially useful for editing movies, TV shows, or any video with distinct scene changes.
🤩 Post You Might Be Interested In:
Conclusion
Editing your videos can be simple and effective when using the right tools, and Filmora stands out as a versatile option for both Mac and Windows users. With its range of features—from precise cuts with the Split button to quick edits with the Instant Cutter Tool and automated scene splitting—Filmora allows you to cut, split, and trim your videos without losing quality. Its user-friendly interface, broad format support, and lossless editing capabilities make it ideal for any video project, ensuring that your final product looks polished and professional.
secure download
