
 100% Security Verified | No Subscription Required | No Malware


 ChatGPT
 Perplexity
 Gemini
 Claude
 Grok
Grok
Making a movie is like magic—mixing creativity, technology, and teamwork to turn a small idea into something real that can make people feel, think, or just have fun.
It starts with a simple story thought and ends with the final scene you see on screen. Every step needs different people doing their part to make it work. Whether it's a small, cheap movie or a big blockbuster, they all follow the same basic steps to go from a messy idea to a finished film.
This guide will explain how to make a movie, breaking down each step from the first idea to the final movie. Also, we will introduce a new method to make a movie with AI. Let's dive in.
In this article
5 Stages of Making a Movie
The filmmaking process can be concluded in five different stages. Let's see each stage in detail.
Stage 1: Development
- Start with a Story Idea: The story is the foundation of any great film. You can draw from personal experiences, base it on a location or prop you already have access to, or adapt a public domain story.
- Write a Low-Budget Script: Developing the script through multiple drafts, including outlining plot structure, characters, dialogue, and themes. While you are writing, always consider how you will film each scene and whether it is feasible with a relatively small budget.
- Define Your Exact Budget and Consider Fundraising Opportunities: Before filming begins, it is wise to sit down and calculate the budget you have access to immediately. A good tip here is to explore fundraising opportunities. Pitching the project to producers, studios, or investors to secure funding. This often involves creating a "treatment" (a detailed summary) or a mood board to convey the vision.
Stage 2: Pre-Production
Pre-production is crucial if you want to save time and money. This is the stage where your vision becomes a workable plan.
- Storyboarding: A storyboard is like a comic book showing how scenes will work. You can sketch it by hand (if you can) or use digital tools to visualize each scene. This helps you plan your shots efficiently and avoid wasting time while shooting.
- Casting: If you have friends who are actors, these will be your go-to people. If not, you can try a local theater group and ask them to participate. These people won't ask for a lot of money, and they will appreciate film footage for their portfolios.
- Hire a basic crew: You don't need a team with hundreds of people for your first film. Even a crew of two, where one person is in charge of the camera and the other is in charge of sound, can work if these people know what they're doing.
- Location scouting: Consider different free or low-cost venues, such as public parks and various public buildings. You might consider your own house as one of the locations, and you can ask friends if they can lend their home for a day of shooting.
- Shooting schedule: When preparing your filming schedule, try to focus on maximum efficiency. For example, you should group scenes by location to minimize the need for moving equipment. Coordinate with the team and stick to the plan.
- Weather Check: Always monitor the weather forecast. Depending on the weather conditions, you might need to rearrange the schedule. This is important for outdoor shoots. If the weather is bad, you will waste a day, so do something else that day.
Stage 3: Production
This stage is all about creativity, strategic choices, and using the right techniques. We have prepared a checklist of all the gear you will need to achieve professional-looking results.
Cameras
Modern smartphones can shoot in 4K and offer stabilization modes. Some even support manual settings when paired with the right apps. However, if you have access to a DSLR or mirrorless camera, even if it's an older model, you can gain more control over depth of field and lens choices.
Audio
Sound quality is what separates amateur films from professional ones. Built-in camera mics tend to pick up too much background noise, so you need to invest in a budget-friendly lavalier (clip-on) or shotgun microphone. Brands like Boya and Rode offer excellent low-cost options that can improve sound clarity, which is especially important for dialogue scenes.
Lighting
Lighting can actually be free if you manage to use natural sunlight that's streaming through the windows to get soft, even illumination. If shooting indoors, position household lamps strategically to fill in shadows, or purchase a basic LED panel kit. Diffusing light through white bedsheets or baking parchment can create a flattering, cinematic look. For outdoor shooting, organize to catch the golden hour sun rays (at sunrise or sunset).
Helpful Mini Gear
Many small tools can aid the filmmaking process. Check out this short table that outlines most of the gear you will need to adhere to the schedule and maintain your flow.
| Gear Item | Budget-Friendly Option | Why It Helps |
| Tripod | $20 budget tripod or borrowed model | Keeps shots stable |
| DIY Stabilizer | Monopod, PVC rig, or handheld gimbal clone | Smooth motion shots |
| Lens Attachments | Clip-on smartphone lenses | Adds variety to framing |
| Reflector | White foam board or car sunshade | Bounces light for better exposure |
| Wind Protection | DIY "dead cat" mic cover from faux fur | Reduces outdoor wind noise |
| Diffuser | White bedsheet or baking parchment | Softens harsh light |
| External Storage | Cheap SD cards or portable SSD | Prevents running out of space mid-shoot |
Video and Sound Recording
Keep the camera steady and compose your shots carefully. Use the rule of thirds for framing, and capture a mix of wide, medium, and close-up shots to give yourself more flexibility in editing. Always shoot more takes than you think you need. In terms of audio, try to record dialogue in quiet locations. Position your mic close to the source, monitor audio levels with headphones, and avoid noisy environments unless they're essential to the scene's realism.
Script supervision
A script supervisor can be anyone who knows the story front and back. This person will ensure continuity, tracking costumes, props, and actor movements between takes so the final product looks good. Taking a quick smartphone photo after each setup can be a lifesaver for future reference.
Tips for Filmmaking
Here are some pro tips that will help you avoid some of the most common mistakes in filmmaking that can set you back days.
- Use stable shots to avoid amateur-looking footage: Handheld shooting without stabilization is very distracting. If this is your only option, keep your elbows close to your body and use slow, deliberate movements. Resting against a wall adds stability.
- Record the room tone for smoother audio edits: After recording dialogue in a location, capture 30 seconds of silence (room tone). This ambient sound can be layered into edits to mask audio cuts and keep scene transitions natural.
- Film extra b-roll to cover cuts and continuity issues: B-roll is footage of objects, scenery, or actions that you can use to hide jump cuts and add smooth scene transitions. They increase the production value of your project. Take extra shots of hands on a coffee mug, leaves blowing in the wind, or someone walking past a shop.
Stage 4: Post-Production
Now that you have hours upon hours of footage, it's time to sit down in front of your PC or laptop and edit it into a cohesive story. The best tool for this job is Wondershare Filmora, which is famous for being a powerful movie creation tool that offers easy editing features that are perfectly suitable for beginners and professionals alike. Here's what you need to do:
 secure download

- Editing: Use Filmora's non-linear magnetic timeline to cut and trim clips and stitch them together into one cohesive whole. You can instantly preview the footage and see how it works. Arrange the clips to follow the previously created storyboard. This part determines the pacing of the narrative you are telling. Use easy keyframing tools, motion and planar tracking, as well as chroma key and smart cutout features.
- Sound & Music: Filmora also offers all the sound editing features you will need to create a smooth listening experience. Use Filmora to crossfade sounds between clips, and take advantage of smart AI tools like the Smart BGM generation tool to add smooth background music. You can also use AI to create missing sound effects from text. Enhance the voice and remove hums and hisses with an AI voice enhancer and audio denoiser.
- Color grading: Colors should be consistent throughout the movie's runtime. If you want to mimic the colors from a source, like another movie you admire, you can use the AI Color Palette. Otherwise, you can customize color wheels and HSL slider setups, or add some of the thousands of pre-created filters to make everything look professional. Pick a color scheme based on the mood of your movie.
- VFX: Filmora comes with thousands of visual and transition effects. You can search for a pick from several different presets for popular types of transitions, like cross-fade, swipe, fade, wrap, glitch, and more.

secure download After you are done with this stage, you should have a movie that is ready for distribution.
Stage 5: Distribution
Once your film is complete, the next challenge is getting it in front of an audience. Distribution isn't just about uploading your movie somewhere online. You need to spark interest, reach the right viewers, and create opportunities for your work to be seen.
- Create a Trailer That Hooks Viewers: A well-crafted trailer is often your first and best marketing tool. Keep it under two minutes, focus on your strongest visuals, and give just enough of the story to spark curiosity without spoiling key moments.
- Build Marketing Momentum Early: Don't wait until your film is finished to start promoting. During production, share behind-the-scenes photos, short teaser clips, and cast interviews on social media. This type of marketing builds anticipation.
- Explore Online Release Platforms: YouTube offers a massive potential audience and easy monetization options. Another platform to consider is Vimeo, which offers higher-quality streaming and holds a professional reputation among filmmakers.
You can also try short-film platforms like Short of the Week or FilmFreeway's online showcase. As a pro tip, when uploading, use an eye-catching thumbnail, a keyword-rich title, and a clear description that makes people want to click.
How to Make a Short Movie on a Budget with AI?
We have already discussed the most important steps to make a movie, from preparation to distribution. It does take a long time to make a perfect movie. If you are not a professional filmmaker, it may be difficult to finish all of them.
However, with the development of AI technology, you can make a movie more easily than before. You only need to briefly type in your idea, and then the AI will generate scripts, storyboards, characters, and more automatically. Filmora's AI idea to video generator is such a great tool.
With it, you can convert a simple idea into a short film with AI. Here's how:
- Download and install Filmora on your Windows or Mac device.
secure download
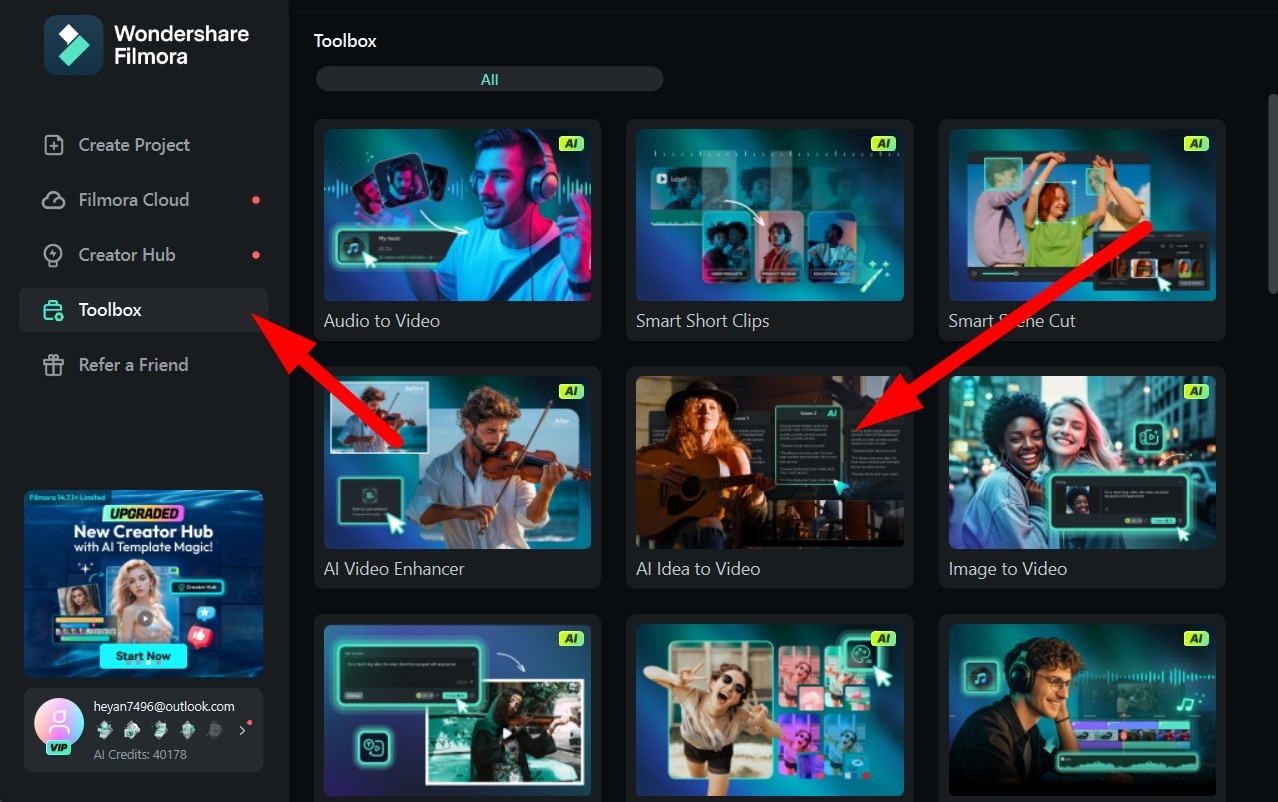
- Go to Toolbox > Idea to Video.
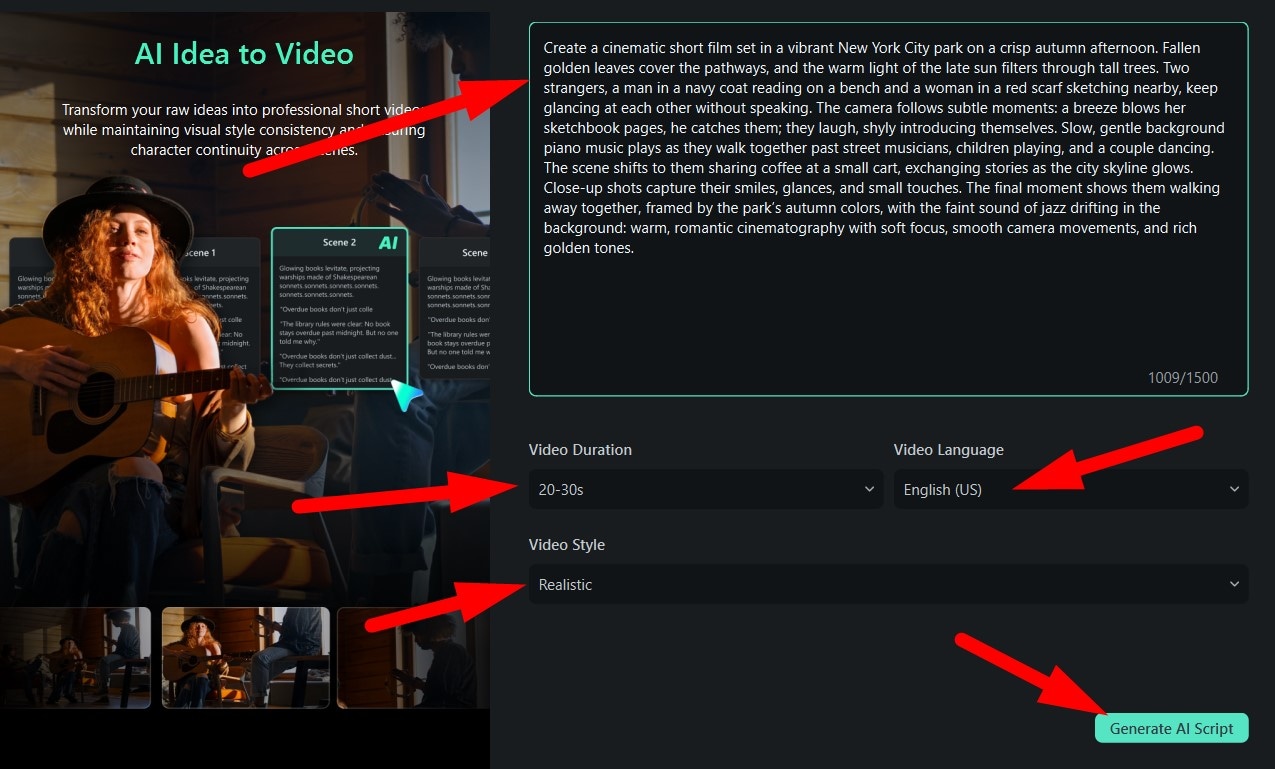
- Add your prompt, set the Video Duration, Video Language, and Video Style, and then click on Generate AI Script. The AI will immediately start working on it.
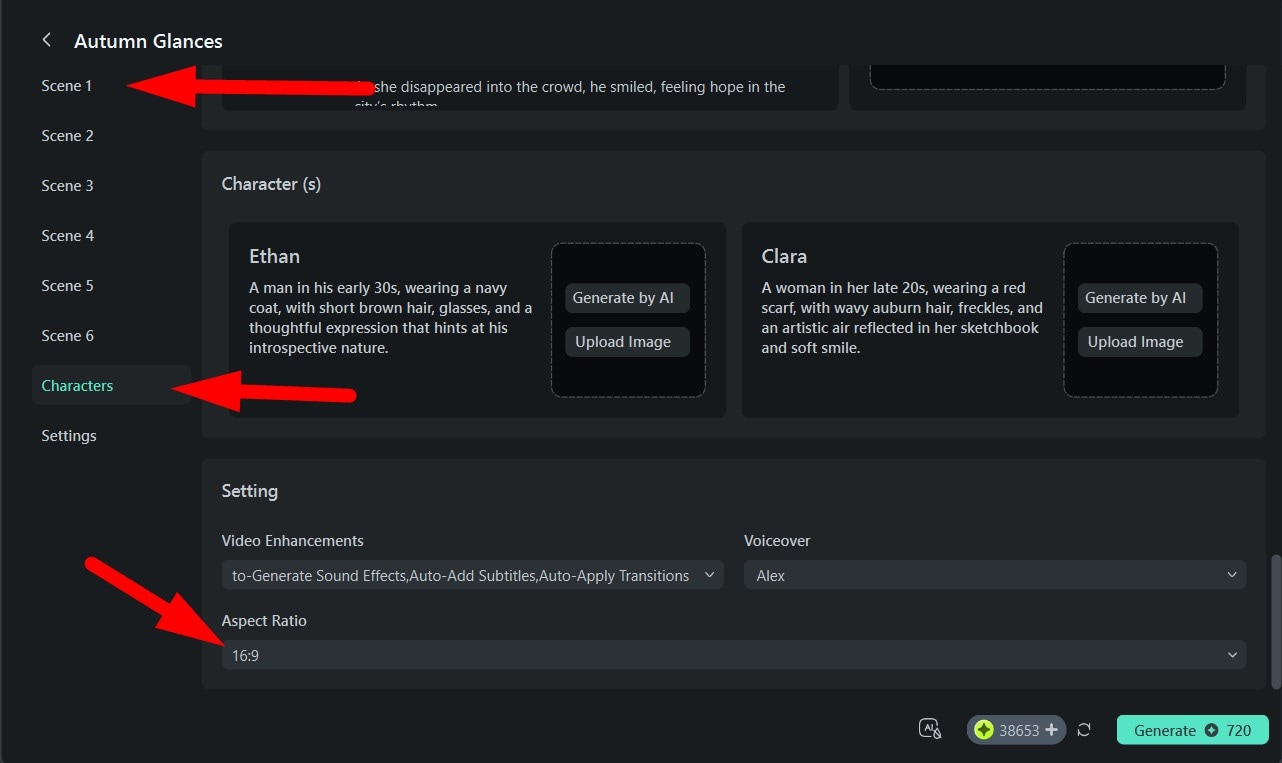
- The AI will create several Scenes based on your initial prompt. In our case, we have six scenes. Review each one, review the Characters created, and under Settings, make sure to pick a suitable aspect ratio for the final result. When all this is done, you can click on the green Generate button in the bottom-right corner.
- This will open up a new project for you, where you can tweak and edit the video.
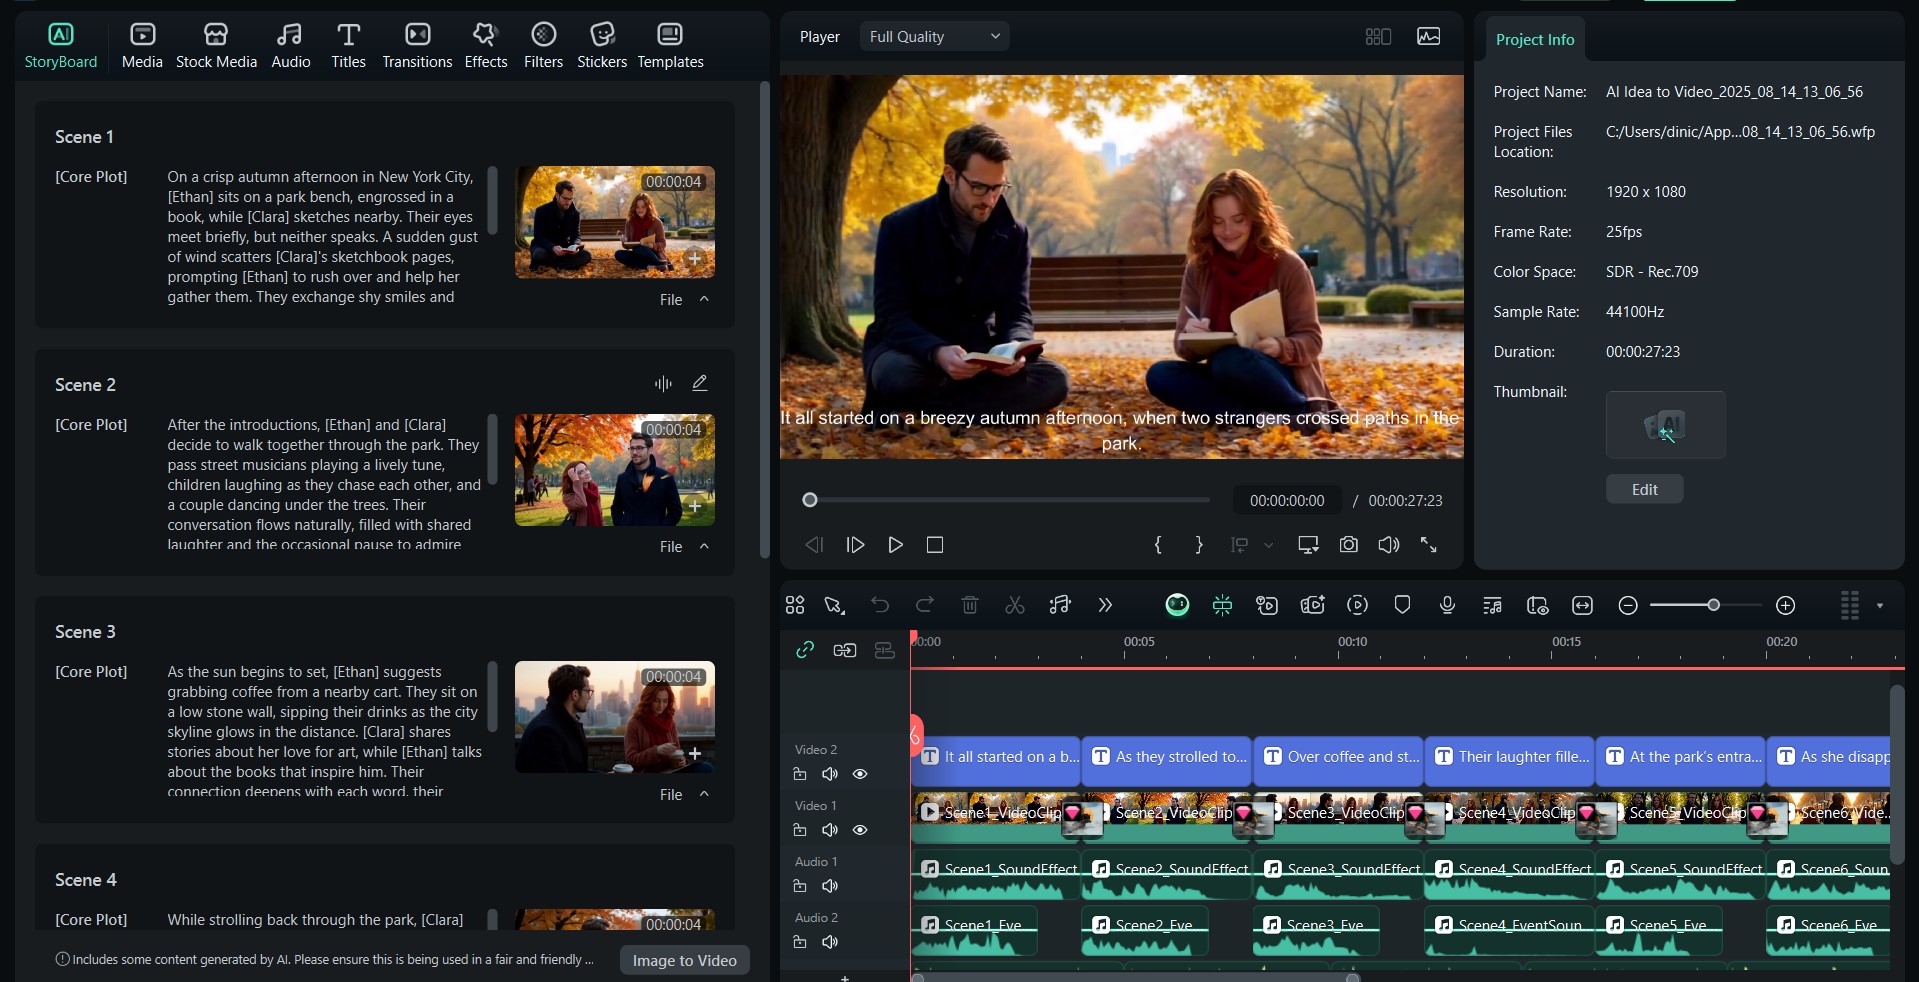
- And then, check out the result we got.
Conclusion
Learning how to make a movie is less about budget and more about resourcefulness. By focusing on strong storytelling, smart planning, and creative problem-solving, you can produce something engaging without deep pockets. And, with modern tools like Filmora and the willingness to think outside the box, your film idea can move from a simple concept in your head to a real movie on screen faster than you even thought possible.
secure download 