


 100% Security Verified | No Subscription Required | No Malware

Do you remember any video that you probably saw years ago but still recall vividly? This is because that video had a blend of imaginative color grading and well-informed video editing. Color grading while editing videos ensures cohesiveness and creativity, aiding storytelling through visual content. Through intentional color grading and video editing, you can imbue sentiments in your videos and put a lasting impression on your audiences.
In this article, you will acknowledge the significance of video color grading and effectual video editing in ensuring a fruitful outcome of the design process. Aside from that, you will gain clarity and insight into the difference between video color correction and grading. Furthermore, you learn how to edit videos with color correction. Let’s get started!
In this article
What is Color Grading?
Color grading is a technical and creative adjustment that alters raw video footage and creates cohesive color tones to give the video the right feel. When video editors use distinctive color palettes for artistic impressions and unifying appeal, video images often fail to match the palettes. This is when video color grading is handy and ensures the footage closely follows the color palette.
Color Grading vs Color Correction
Often used interchangeably, however, color correction and grading are two distinct processes in color settings. Here’s a tabular view to understand the distinctiveness between color grading and correction:
| Video Color Grading | Video Color Correction |
| Grading ensures creativity. | Color correcting ensures consistency. |
| It is the second step in coloring the footage. | It is the first step in coloring the footage. |
| Color grading is more creative and less technical. | Color correction is a highly technical process. |
| It adds an edge and sets the tone to create drama and draw attention. | It balances and fixes color to match the hues and tones of the world. |
What are the Benefits of Video Color Correction?
Video color correction benefits by ensuring harmony in colors and professionalism in your creative expression, improving the video's narration. By color-correcting footage, you polish the footage and restore the nuances when the video is rendered on different devices. Thereby, color correction validates fruitful outcomes in the video editing process.
With a steady hand and a sharp eye, you can balance exposure, white balance, and contrast to preserve natural tones and match color between shots. By working with color correction, you can also streamline the editing workflow, saving time in your video production process.
How to Edit a Video With Filmora Color Correction?
Filmora is one of the best video editing software. Its advanced built-in color tools can spontaneously and systematically eliminate flaws in your raw footage and enhance its visual impact. It allows you to adjust brightness, saturation, contrast, tint, temperature, and white balance and apply 3D LUT, components, and filters to help you make your video more appealing.
- Histogram: The histogram mirrors the distribution of colors by highlighting the various colors and their pixel.
- White Balance: White balance adjusts the tint and temperature of your video.
- 3D LUT: With 3D LUT, you can imitate different visual styles of shows and movies.
- Color: The color setting allows you to adjust vibrance, saturation, contrast, brightness, and exposure.
- Light: With the light panel, you can alter blacks, whites, shadows, and highlights.
- HSL: HSL is short for hue, saturation, and luminance and adjusts individual color ranges in a video.
- Vignette: This tab allows you to apply a custom vintage movie-like effect on the video.
![]()
Here's a step-by-step guide on how you can edit video with Filmora:
Step 1: Import the Video File for Color Correction
Import your target video clip into the Filmora media library. Now, drag and drop the video clip into Filmora's timeline and double-click it to start color correction.
Step 2: Adjust the Color Correction
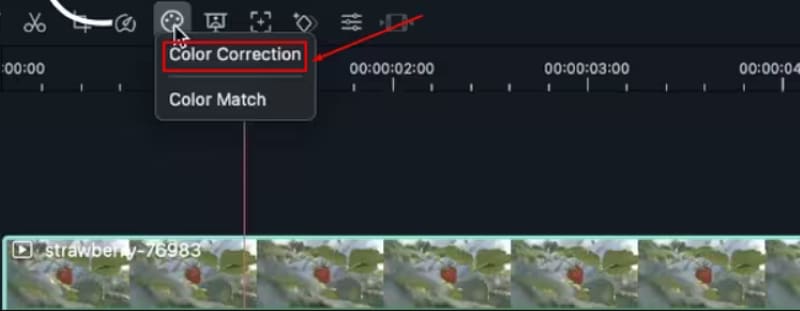
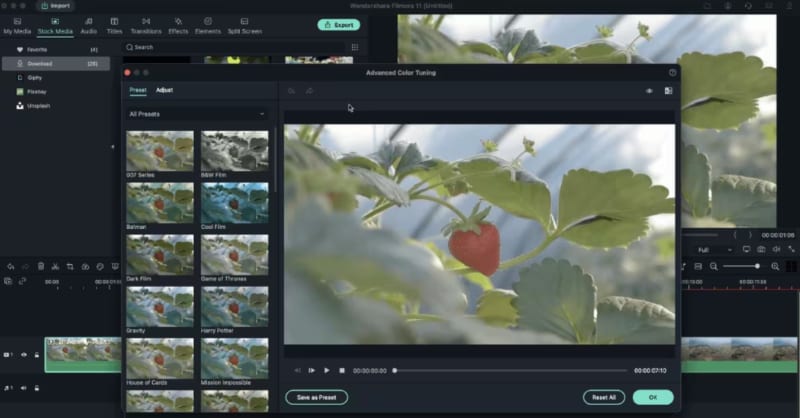
Locate the “Advanced Color Tuning” option, represented by the color tuning icon. On clicking it, a drop-down menu will appear on your screen, from which you have to opt for “Color Correction.” You will get access to the “Advanced Color Correction” window, where two options will appear on your screen: Adjust and Preset. Proceed with the preset option you wish to use or customize.

Step 3: Compare Before & After
Take your cursor to the top right corner and click the “A/B icon” to see a side-by-side comparison of the before-and-after video clip. You can also consider split viewing from top to bottom or left and right.
Alternatively, for before-and-after views, you can avoid comparing and proceed directly with the “Eyeball” icon. From the top left corner of the preview panel, you can utilize the “Undo” buttons or click on the “Reset All” button to undo the changes.
Conclusion
Color grading and correction are distinct yet interconnected and integral processes when editing a video. Crafting a perfect balance between them will ensure professionalism in the outcome and amplify the meaning of the creative expression, leaving a lasting impression on viewers.
Additionally, a meticulous video editing process with Filmora fine-tunes your raw footage such that each frame feeds into a powerful narrative. Undoubtedly, video editing is an extensive process and may wear you out, but with Filmora’s advanced tools, you can easily elevate the creative process and the outcome.
