A common understanding in cinematography circles is that editing makes the seventy percent of the total job. It is editing that makes a significant difference, and Filmora, a professional video editor, comes in handy when you want to edit your photos.
Filmora has multiple features that allow you to shine your videos in countless ways. This article will clarify everything you need to improve your music video. Also, it is just the tip of the iceberg. The more you try to be creative, the more options Filmora will provide you. The following points highlight how you can polish your music video editing skills.
Part 1. Duplicate your project before editing
Before you begin unleashing your inner creativity, you must make a duplicate copy of your project file. Of course, it would help if you did so to keep a backup file.
It will help you get back to the pre-edit file if you want to start from the beginning or if you want to save the file for use in the future. You can make a duplicate file of your project by following the subsequent steps.
Step1Download and install Filmora
You can download Filmora from its official website.
Step2Create or import your project
- Create a project if you are using Filmora for the first time.
- Import the project from your computer directory. Then, go to file in the menu bar, and click on the open project.
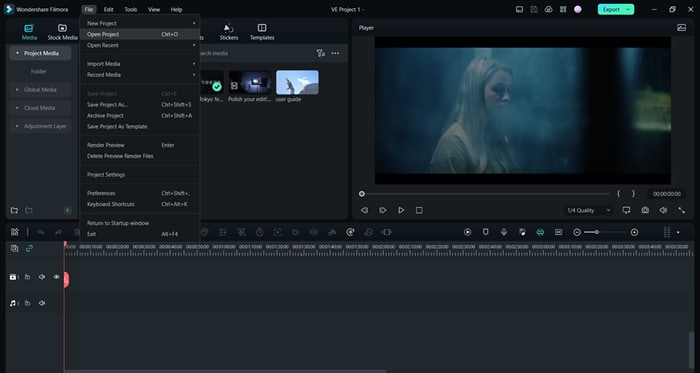
- Select the project you want to open.
Step3Duplicate the project file and rename it
- When you open Filmora, a start-up window will appear.
- Right-click on the project you want to duplicate.

Step4Rename the duplicate file
- Rename the file to keep a record of new editions.
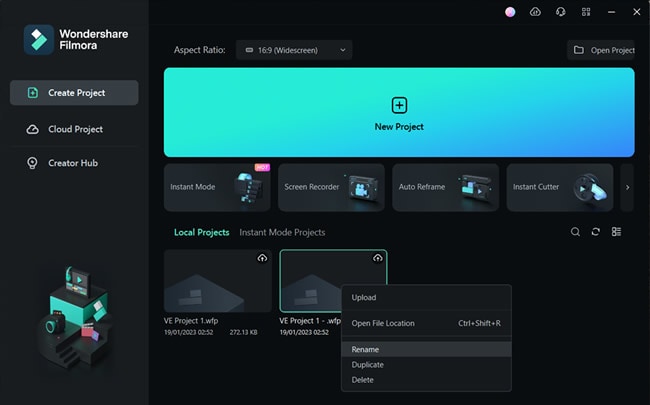
The file is renamed. It will help you remember which file is original. If your files become corrupted, you can easily access the original ones. Once you are done duplicating your project file, it is time to do our primary job: Polishing our video edits with Filmora.
Part 2. Polishing Your Music Video
Just like ladies apply polish to their nails to make them more attractive, you can use editing to your music video to get the same result. Ladies can go to the beautician if they want. You can go to a professional editor if you like it.
However, these options are pretty expensive. The best way is to do it yourself. It is fun. Also, you can let loose your hidden artist for a while. Stick to the following points to understand how to begin polishing your music video.
How to put cuts on beats?
Adding beat cuts to a music video is imperative. Randomly placing beats yield an inferior-quality video. It also gives the impression that video editing is not done by a professional. The beats must be adjusted to synchronize with the storyline of the video.
Moreover, the video will lose its charm if you put cuts on every beat. People will not be able to enjoy, let alone understand, what is happening in the film.
What are the beats?
Beats are pieces of music that recur in a pattern. They are essential for music videos. It adds attraction for the viewers. Also, without beats, no music video can go viral. In the digital age, beats boost your music video.
Let's learn how you can put cuts on your beats.
Step1Import the music video
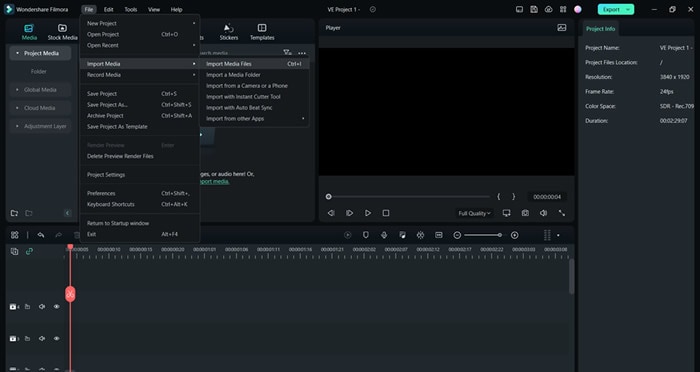
- Import the Music video to which you would like to add any beat.
- You can also use the one given in Filmora.
- Drag and Drop the music video in the timeline panel.
Step2Detach its audio
- Right-click on the video.
- Select the option "Detach Audio." It will separate the attached audio from the music. You will be able to add cuts where you deem necessary.
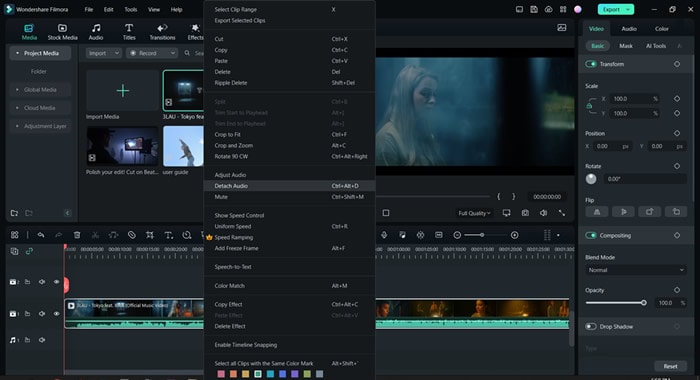
You can also import audio from your drive. After that, drag and drop the imported file into the timeline panel.
- Right, Click on the audio file in the audio panel.
- Select the option "Beat Detection." It will show beats (with red markers) on the audio timeline, making adding cuts to the beat easy.
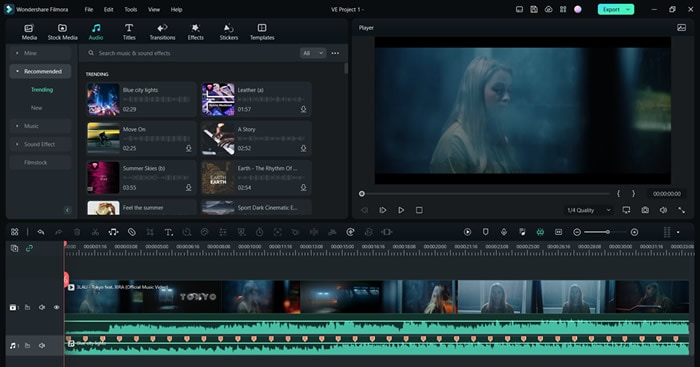
Step3Cut the beats where you find necessary
- Listen carefully to the audio file and plan where you want to add a cut to your beat.
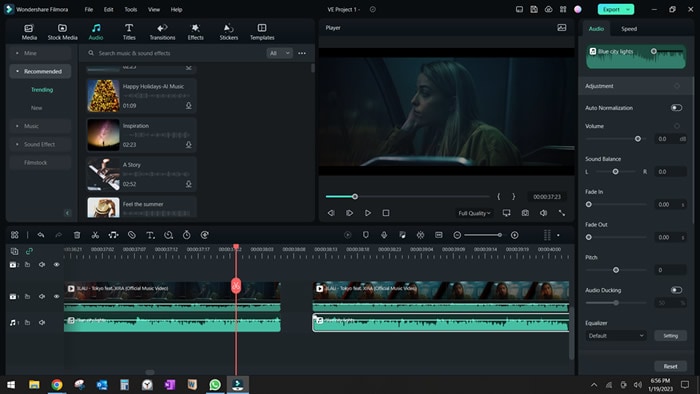
- Adjust the beat according to your music video.
- Join the trimmed video segments to maintain continuity. The final product should look like the one given below.
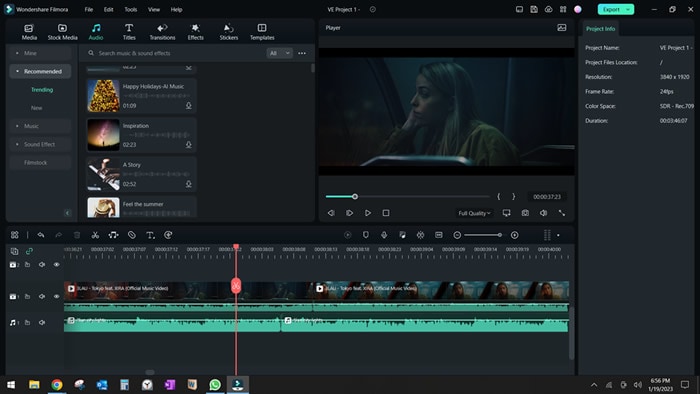
Resultantly, it will readjust the beat to a different spot on the video. You can make multiple cuts in the beats. However, it is not recommended. It makes the whole experience of listening quite jarring.
Once you've added cuts to the beats, it is time to make them smooth. For that, keep reading the instructions given below.
How to smooth out cuts
Adding cuts in the beats is one part of the job, not the whole job. After adding these cuts, you have to smoothen them. With it, the point of interest for the audience becomes clear.
To maintain the audience's attention on our video, we have to smoothen the cuts so that our audience quickly understands the ongoing story in our video. If sudden changes occur on the screen, watching it gets disconcerting.
Indeed, you would not want your audience to have this experience. Head to the following techniques to understand how to smooth out video cuts
Technique 1: Showing multiple perspectives
The focal person in the video must occupy the same spot in the previous shot as it maintains in the current shot.
Let us understand from the example given below.
- Shot 1: The actress in the music video is occupying the left seat on the bus while looking outside.
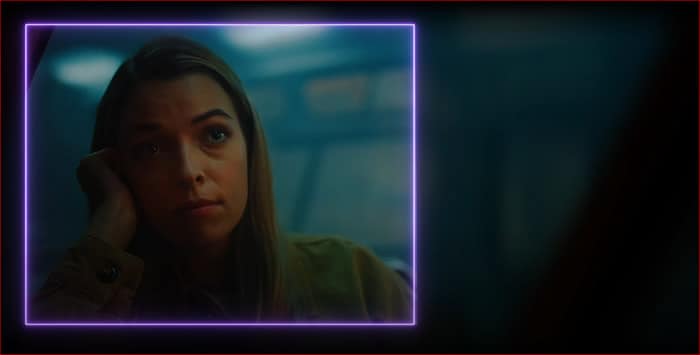
- Shot 2: The actress occupies the same spot in the subsequent shot.

- Third Shot: The shot shows the wide angle of the bus from the inside. The actress is still sitting in the same position and the same place.

This technique keeps the audience focused on the point of interest while giving them a different perspective of the scene.
Technique 2: Using light leaks
The technique is quite helpful for the transition between two cuts. It uses different levels of colors to shine between cuts, adding smoothness and providing coherence.
What are light leaks?
Light leaks are great effects in Filmora. These effects fill the screen with light. It seems that light is leaking in a disorderly fashion. For the time being, the whole screen is filled with that effect. Thus, it explains the name of this effect as a light leak.
Filmora provides a plethora of features for adding Light Leak for transitioning cuts. With the use of Filmora, one can quickly bring a level of flow to the music video. Keep reading to understand how to use this remarkable feature of Filmora.
Step1Access the light leak effects on Filmora
- Go to Effects on the Interface.
- Go to Overlay and choose the light Leak feature.
- You can also use any other light Leak stock in your capacity.
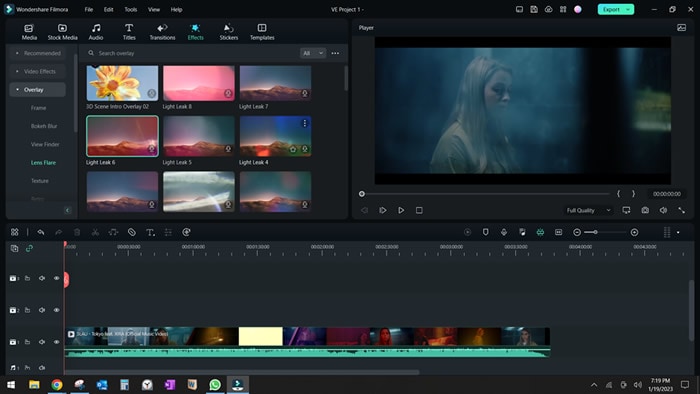
Step2Drag and drop the effects in the video editing
- Drag and drop the effect between any two cuts where you want to add this feature for a smooth transition.
- The effects should be placed above the video, in the timeline over the clip.
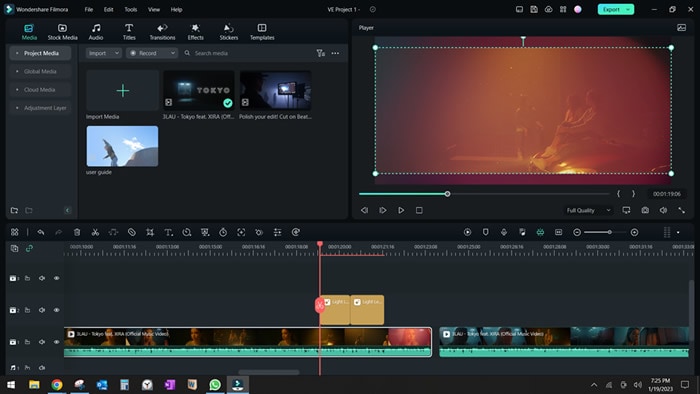
Step3Setting the color and blend of the light leak effect
- Right-click on the clip, and go to "Edit Properties."
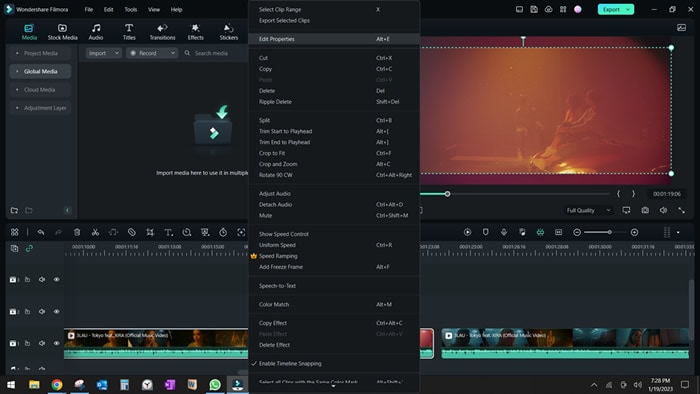
- Go to the Composing menu. Then, go to "Blend Mode" and choose "Screen."
- It will adjust the light Leak feature to your entire screen.
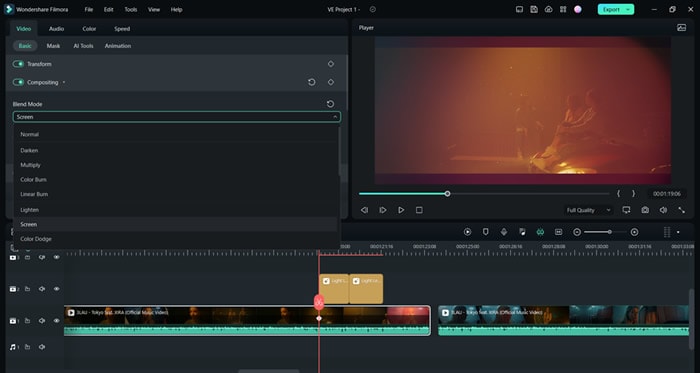
Step4Fit the effect to the width of the screen
- Go to the Transform option in the clip properties.
- Click on both circles in front of the Scale option. It will adjust the effect to the entire frame width, giving it a pleasing outlook.
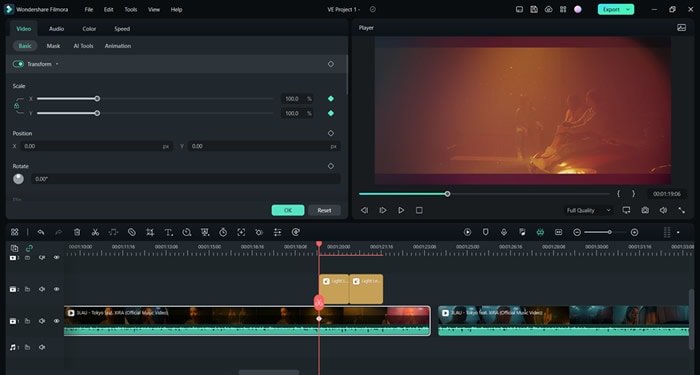
There you go! Your light Leak filter is ready. Give attention to how the light floods the screen and the scene transitions from one part to the next.

Now, you are done with adding some additional color and light to your cuts. Your cuts are now smooth and trouble-free. Moving onto our next tip that will further polish your music video. It is called Reframing and Zooming.
Reframe and zoom to polish your video
Another significant feature of Filmora is that it allows you to readjust the frame and zoom of the video. Any zooming option left undone in the shooting phase can be addressed in the editing phase.
For example, a director did an excellent job shooting a video. He considered every angle and yielded the best video shoot he could achieve. However, he missed a few zooming-out techniques while shooting. Now, what should one do? Use Filmora.
It is where the reframing and zooming feature of Filmora comes into play and saves the day.
What are the reframing and zooming features?
This feature allows you to adjust the zoom on the point of interest in the music video. If you want to add extra focus on a certain point, the feature in Filmora can do that for you. You can run zoom in or zoom out on any particular object or actor. Follow the given steps to understand how you can do that.
Step1Plan your video
- Where you want to reframe and zoom. Trim that part of the video.
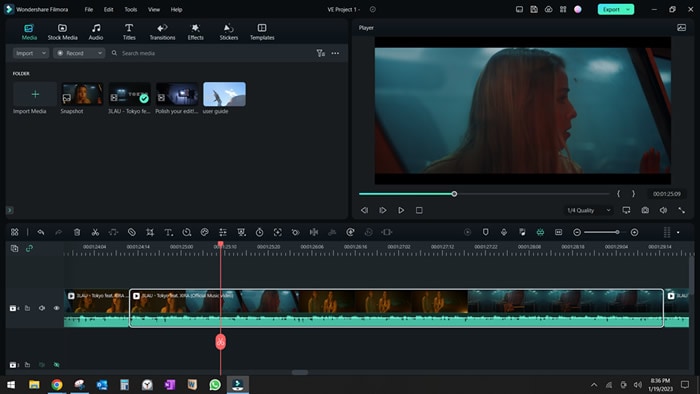
Step2Choose any two points on the clip for reframing
- Choose any two points on the clip. These points are reference points. When the clip moves from one point to the next point, the reframing takes place.
Step3Adjust the scale and position of the clip
- Go to the Transform option in Clip properties.
- Go to the clip's end (2nd point), and turn on the Scale and Position circles.
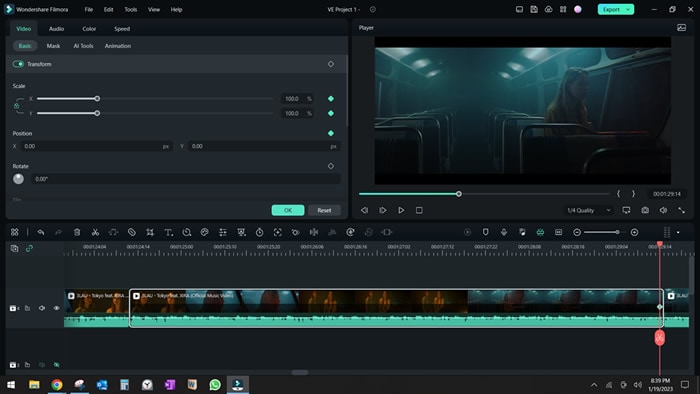
- Go to the start of the clip
- And adjust the value of scale and position.
Atl Text: Setting new value to Scale and Position.
Step4Replay the clip
- Once the scale readings and position in the initial point are set, replay the clip to observe the reframing.

You can use it on the static shots if you want. The procedure is the same. You have to adjust the scale and position of the screen to adjust reframing. Thus, Filmora fills gaps in your music video without the need to reshoot.
Final words
Video editing requires patience, creativity, and efficient tools. Filmora provides the most effective means to run various effects on your video. You can add cuts to your, smoothen your cuts, and readjust the frame of your video. These are merely a few features to mention.
In a nutshell, Filmora assists you in polishing your music video. You will not need a professional editor. You will become one in no time.

