


 100% Security Verified | No Subscription Required | No Malware

Screens come in all shapes and sizes these days, including the videos we watch on them. So, the way a video fills the screen, called its aspect ratio, is more important than ever. Consider how a music video might look on YouTube compared to a smartphone or a TV – the ideal aspect ratio can change depending on where you plan to show it.
A music video aspect ratio is an important decision. Where you want people to watch your video (YouTube, TV, social media) can affect how it looks. This article will help you understand the aspect ratios and how to choose the best one for editing.
In this article
Part 1: What Are Common Aspect Ratios for Videos?
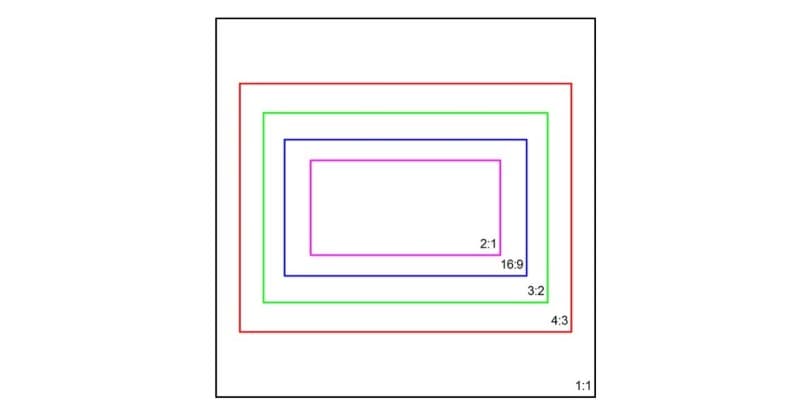
The aspect ratio for a video is the ratio of its width to its height. It’s written like X:Y, where X is the width, and Y is the height. You can see it as two numbers separated by a colon, like 16:9 or 4:3.
The aspect ratio plays a big role in how viewers experience the video. Wider aspect ratios, like 16:9, give us a panoramic view, like looking out a window. On the other hand, square aspect ratios (1:1) create a more focused experience, drawing our attention to the center of the frame.
It’s important to remember that the aspect ratio is independent of the size of the video itself. A small phone video and a giant movie screen can both have the same aspect ratio, like 16:9. Now, let’s explore some of the most common aspect ratios used in videos and where you’re likely to see them:
16:9 (Widescreen)
Most modern TVs, computer monitors, and even smartphones are designed in 16:9. It’s also the standard for online video platforms like Facebook, YouTube, and Netflix. If you’re filming a general video without a specific platform in mind, 16:9 is a safe and versatile choice. Most HD resolutions, like 1080p and 4K, use 16:9. When editing a music video, this aspect ratio is a popular choice.
9:16 (Vertical)
The 9:16 aspect ratio best fits mobile devices because it matches how you hold your phones in portrait orientation. This is why many popular mobile platforms, like TikTok, Instagram Stories, and Facebook Stories, have adopted this ratio. If you’re creating a music video for mobile viewers, using a 9:16 aspect ratio is ideal. This format grabs attention quickly because it fills the entire screen without any wasted space.
1:1 (Square)
Square videos? That’s a 1:1 aspect ratio. It’s uncommon for movies or TV shows anymore, but it’s making a comeback on social media like Instagram and Facebook video carousel.
4:3 (Full-Screen)
The 4:3 ratio was the standard for old TVs and computer monitors. This aspect ratio gives a classic look. If you want to give your music video on YouTube a retro feel, this might be the right choice. It can add a unique touch when you edit a music video.
21:9 (Cinematic Widescreen)
Filmmakers often use a 21:9 ultra-widescreen ratio to create a more immersive viewing experience. You might see it in some high-end monitors or TVs designed for a movie-like atmosphere at home. This aspect ratio of a video provides a cinematic feel with a wide view.
4:5 (Tall)
This ratio is less frequent, but you can use it for portrait-oriented videos with a more artistic touch. You might see it used by some videographers or for specific social media posts. Facebook recommends using a 4:5 aspect ratio for feed placement. But not all platforms prioritize 4:5 videos. It’s always a good idea to check the recommended aspect ratio for the specific platform for which you’re creating content.
While choosing the right aspect ratio upfront is ideal, things don’t always go according to plan. Maybe you filmed in one format but now need to upload to a platform with a different aspect ratio, like going from YouTube (16:9) to TikTok (9:16). Video aspect ratio changers like Wondershare Filmora can help. Keep reading if you’re curious about how to resize your video for different platforms without sacrificing quality.
Part 2: How To Edit Video Aspect Ratio With Filmora
Keeping up with different platform requirements can be challenging as a video editor or content creator. You often need to change the aspect ratio of the same video without altering its quality. Filmora offers an easy solution with its Auto Reframe feature.
It detects the focus of your video and automatically crops it to keep it in the frame. You can also manually adjust the focal point or choose a specific aspect ratio like 1:1 (square) for Instagram, 16:9 (widescreen) for YouTube, or 9:16 portrait. Plus, you can adjust the video resolution to match the music video’s aspect ratio creative direction.
There are several ways to resize the video with Filmora. You can use the auto-reframe feature, adjust it in project settings, or use the crop and zoom tool before you export the video.
How To Resize Aspect Ratios of Your Videos for Any Platform
Easily change the music video or any other video’s aspect ratio with Filmora. Follow these steps to use the Auto-reframe feature:
Step 1: Download and launch the Filmora desktop app once installed. Register a new account or access your existing one.
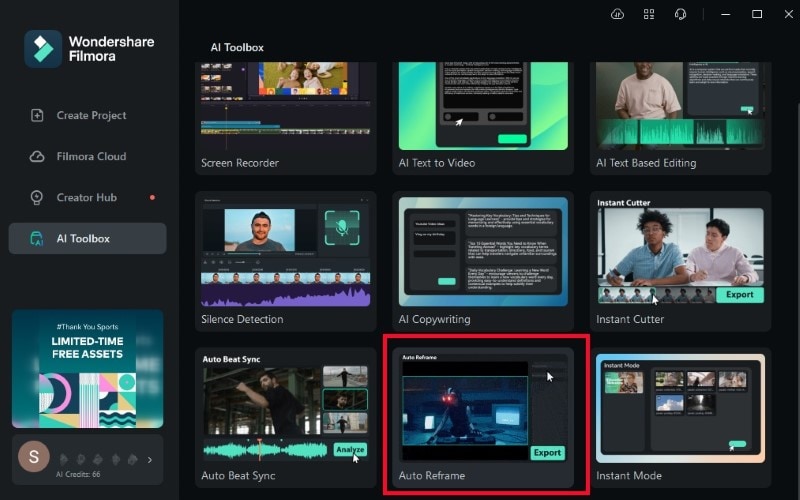
Step 2: Go to AI Toolbox from the left side navigation pane. Then, scroll down and select Auto Reframe.
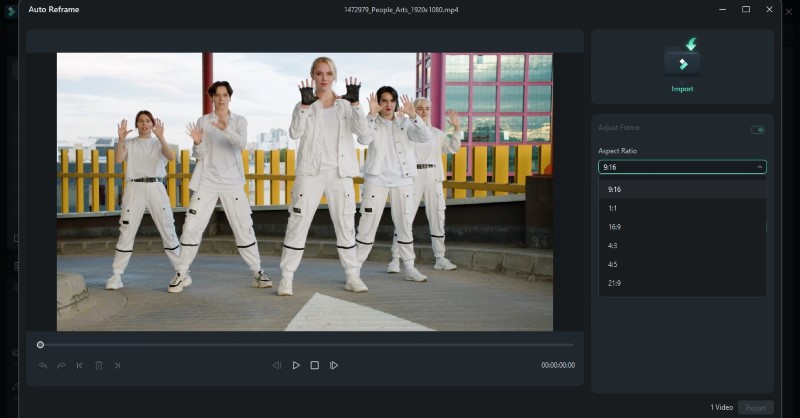
Step 3: Click Import and choose the music video from the local storage.
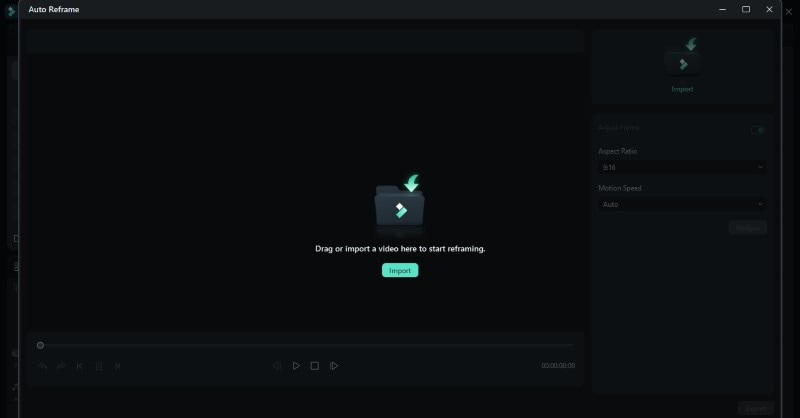
Step 4: Select an option from the Aspect Ratio dropdown list on the right side of the pop-up window. Click Analyze to start changing the video size.
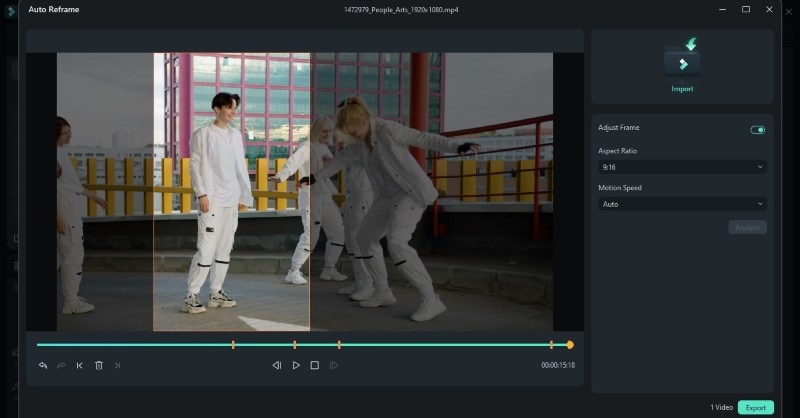
Step 5: Preview the adjusted video aspect ratio. Play and pause to adjust the frame based on the parts you want, then click Export to save the music video in the chosen aspect ratio.
Now, you’ve explored the different aspect ratios of videos and even learned how to adjust them in Filmora. But there’s one more thing to consider: video resolution. Read on to learn the difference between these two in the next section.
Part 3: Music Video Aspect Ratio and Video Resolution: What’s the Difference?
Creating a music video involves many choices, including the way the final product will be framed. Two terms you’ll encounter are music video aspect ratio and video resolution. While they might sound similar, they define different aspects of your video.
Aspect Ratio: Framing Your Music Video
The aspect ratio doesn’t change the number of pixels, but it determines how those pixels are arranged. Choosing an aspect ratio depends on the following:
- Target platform: YouTube recommends 16:9, while some films use 2.35:1.
- Creative vision: Wider ratios can give a more expansive feel, while 4:3 might suit a vintage aesthetic.
Video Resolution: Sharper or Softer Image
Video resolution refers to the number of pixels that make up the video frame. The higher the video resolution, the clearer the details of the videos. Common resolutions include:
- 720p (1280 pixels x 720 pixels ): Standard HD quality, good for web streaming.
- 1080p (1920 pixels x 1080 pixels): Full HD quality, most common for Blu-rays and high-quality streaming.
- 1440p (2560 pixels x 1440 pixels ): Quad HD resolution, becoming more common for high-end displays.
Resolution impacts the level of detail in your video:
- Online Streaming: 1080p is a good balance of quality and file size.
- Professional Productions: Use 4K for high detail and clarity.
- Social Media: 720p may suffice to save on bandwidth and upload time.
Higher resolutions, like 4K, offer sharper images and allow for zooming in without losing quality. Like standard definition (SD), lower video resolutions might appear softer and less detailed.

How They Work Together
A music video aspect ratio can be achieved in different resolutions. For instance, you can have a 16:9 video in various resolutions like 720p or 1080p. Here’s how to consider them when editing your music video:
- Think about the Platform: Where will your music video be shown? Most online platforms and TVs today use a 16:9 aspect ratio. Editing in 16:9 ensures your video fills the screen without black bars.
- Consider the Style: The aspect ratio can influence the mood of your video. Choose a format that complements the song’s genre and visual style.
- Target the Right Resolution: Aim for the highest resolution your editing software and target platform can handle. It ensures the best possible quality for viewers.
The beauty of digital editing is that you can adjust the aspect ratio and resolution in post-production. For instance, you can film in a wider format and adjust it later to achieve a specific aspect ratio while editing your music video.
Part 4: What Aspect Ratio Should a Music Video Be?
16:9 is the best aspect ratio for a music video. This is because it is the international standard and matches most devices’ screens. Major video platforms like YouTube and Facebook also recommend 16:9 for their content. It allows you to use the entire screen and offers a good balance between showing the performer and the setting.
Still, the ideal aspect ratio depends on the video’s content and purpose. For mobile viewers, the 9:16 aspect ratio is ideal. Platforms like TikTok and Instagram Stories use this vertical format. It matches the vertical orientation of smartphones and grabs attention quickly. If your audience is mainly mobile users, consider this ratio when you edit music videos.
How about other video aspects, like 1:1?
YouTube will adjust your square video to fit the 16:9 player. This might mean black bars appear on either side of your video on desktop screens. However, it could work well if your concept focuses on close-up shots or a social media-style feel.
Conclusion
The right music video’s aspect ratio can improve your content from good to great. It shapes how viewers see your work, so wisely choosing makes a big difference. But it’s important to remember that aspect ratio is just one thing you should consider. High-quality video resolution is equally important for a video that looks great across devices.
Try Filmora to edit music videos with various aspect ratios easily. No matter the platform you choose, your music video will be ready to shine.
