


 100% Security Verified | No Subscription Required | No Malware


 ChatGPT
 Perplexity
 Gemini
 Claude
 Grok
Grok
Video compression is an essential process for creatives who upload content to various digital media platforms. By reducing the file size of videos, it’s easier to share content with a wider audience. The trade-off is that video compression can introduce artifacts. They are visual distortions that degrade the quality of the video.
Learning about video compression artifacts and noise is crucial for producing high-quality videos. The article explores its different types, causes, and strategies to reduce them. Maintain the integrity of your video content. Read on to learn more.

In this article
Part 1.Comprehensive View of 7 Video Compression Artifact Types
Video compression artifacts are unwanted visual distortions that occur when compressing digital video files. These artifacts can affect the viewer’s experience and the perceived quality of the video. Here are seven common types of video compression artifacts:
- Blocking Artifacts
These appear as blocky distortions, especially in low-bitrate videos, due to the loss of detail in each frame.
- Blurring
Loss of sharpness and detail in the video, often resulting from aggressive compression settings.
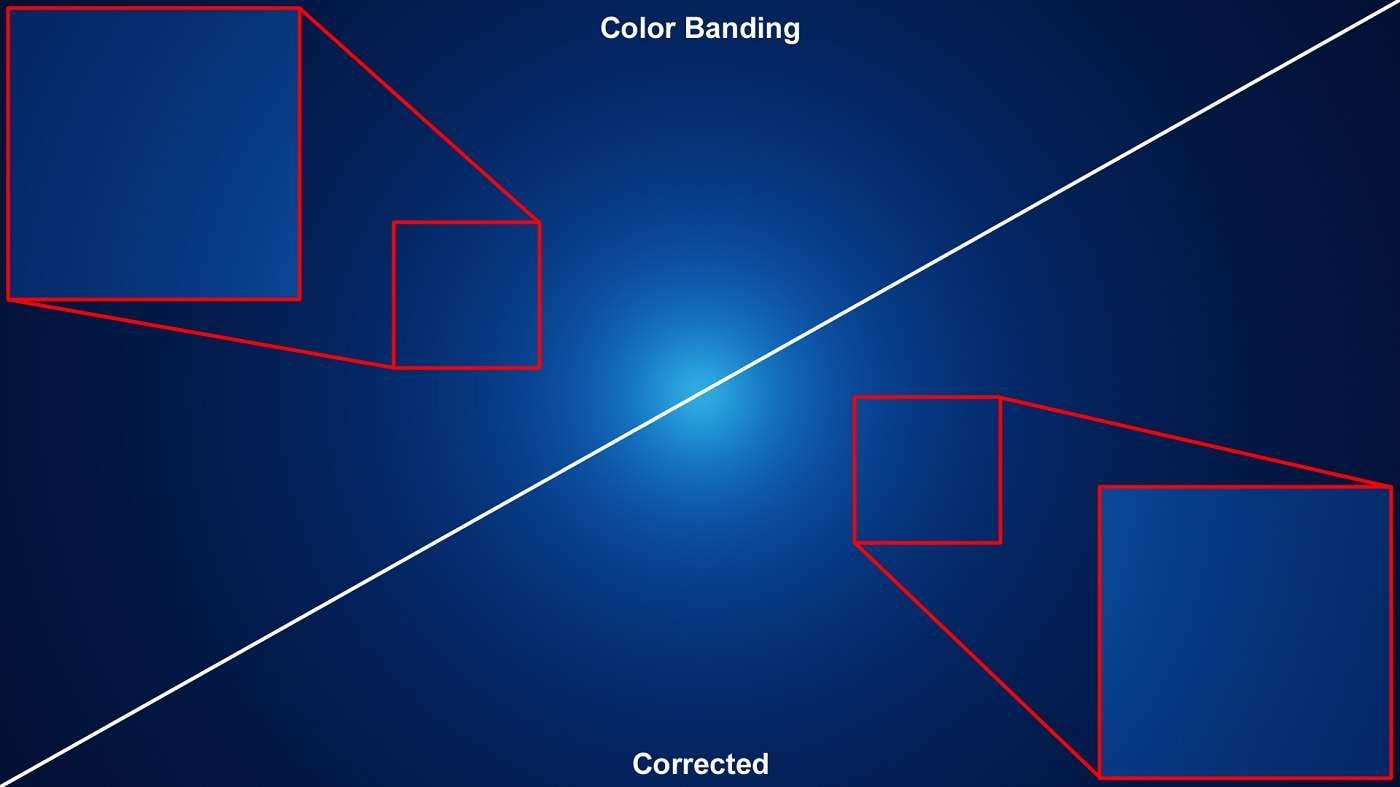
- Color Banding
Noticeable bands of color where smooth gradients should be, usually due to insufficient color depth.
- Mosquito Noise
Flickering or buzzing artifacts around sharp edges are typically seen in low-bitrate videos.
- Flickering
Variations in brightness or color between frames, create a distracting flicker effect.
- Floating
Displacement of objects within the frame, causing a floating appearance due to poor motion estimation.
- Jerkiness
Irregular or stuttered motion, often resulting from low frame rates or poor frame interpolation.
The impact of these artifacts on video quality is significant. They can distract viewers, reduce engagement, and give a professional video an unpolished appearance. Reducing these artifacts is essential for content creators to maintain high-quality video production. The next part discusses how to prevent video compression artifacts.
Part 2. How To Prevent Video Compression Artifacts
Preventing video compression artifacts needs a comprehensive approach. It includes pre-compression techniques, optimal compression settings, and post-compression enhancements. Let’s explore these strategies in detail to help you maintain high-quality video content.
Reducing Video Compression Artifacts When Exporting Videos
Here are some pre-compression techniques to remember:
- Use high-quality source material
Start with the best possible footage to ensure minimal degradation during compression. High-quality source material provides more data for the compression algorithm, resulting in fewer artifacts.
- Use appropriate video formats and codecs
Choose formats and codecs that are optimized for your content’s intended platform. Formats like H.264 and H.265 (HEVC) are widely used for their efficient compression capabilities without significant quality loss.
- Optimal resolution and frame rates
Match the resolution and frame rates to the final output requirements. Avoid unnecessary upscaling or downscaling, as these processes can introduce artifacts. For example, export your video to those settings if your target platform supports 1080p at 30fps.
Compression Settings
Higher bitrates retain more data, reducing artifacts. Balance bitrate with file size needs. You can use Variable bitrate as it adapts to content complexity. It often provides better quality at lower file sizes. Plus, use software with advanced compression settings. Wondershare Filmora, for example, offers automatic compression features to simplify the process.
Post-Compression Techniques
Here are some post-compression techniques to consider:
- Noise reduction filters. Use filters to reduce unwanted noise and artifacts.
- Sharpening tools. Apply sharpening tools to enhance detail without introducing new artifacts.
- Color correction and grading. Adjust colors to improve visual quality and reduce banding effects.
Now that you’re prepared from start to finish, having a reliable tool is the last step for perfect video compression. The next section discusses a powerful software that can do just that:
Wondershare Filmora: The Best Tool for Handling Video Compression
Filmora simplifies video compression for beginners and professionals. Its intuitive interface and advanced features can handle all kinds of editing needs. Its auto-compression tool optimizes settings for quality and platform requirements. The new feature makes it easy for creatives to achieve high-quality results without extensive technical knowledge. Here are the key features of Filmora:

- Auto compression by quality. Filmora can automatically adjust compression settings based on your desired quality.
- Auto compression by YouTube upload. The tool can also optimize videos specifically for YouTube uploads.
- Cross-platform compatibility: Filmora is available on many platforms, ensuring accessibility.
- Simple drag-and-drop interface. Its user-friendly interface is suitable for beginners and professionals alike.
- Free version available. The platform offers a free version with basic features to get you started right away.
How To Use Filmora for Video Compression
Here are the steps to compress your videos using the automatic compression feature of Filmora:
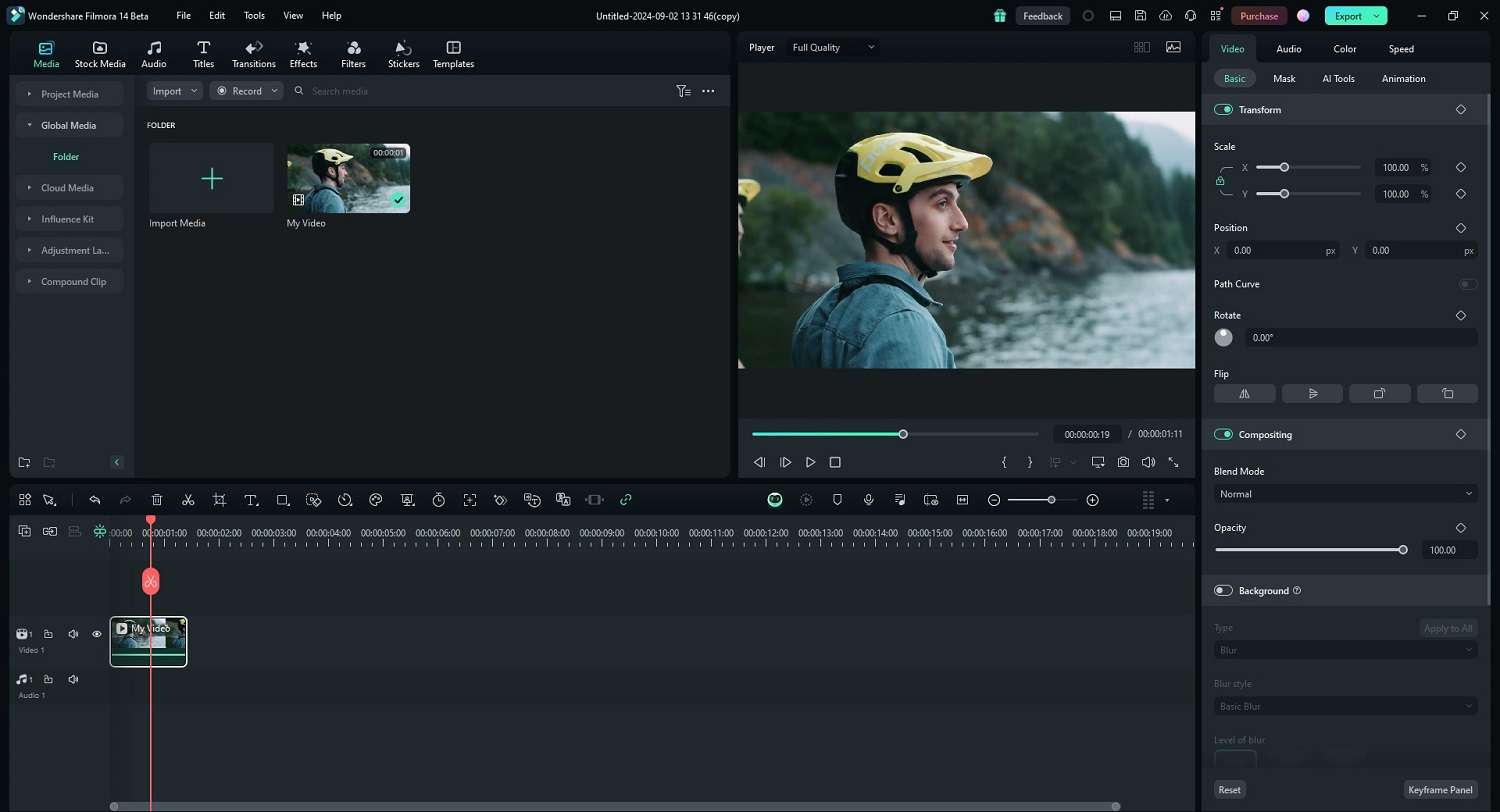
Step 1: Download and install Filmora to your computer. Launch the tool and log in or register with a Wondershare account. Import your video to the Media tab and drag it to the timeline.
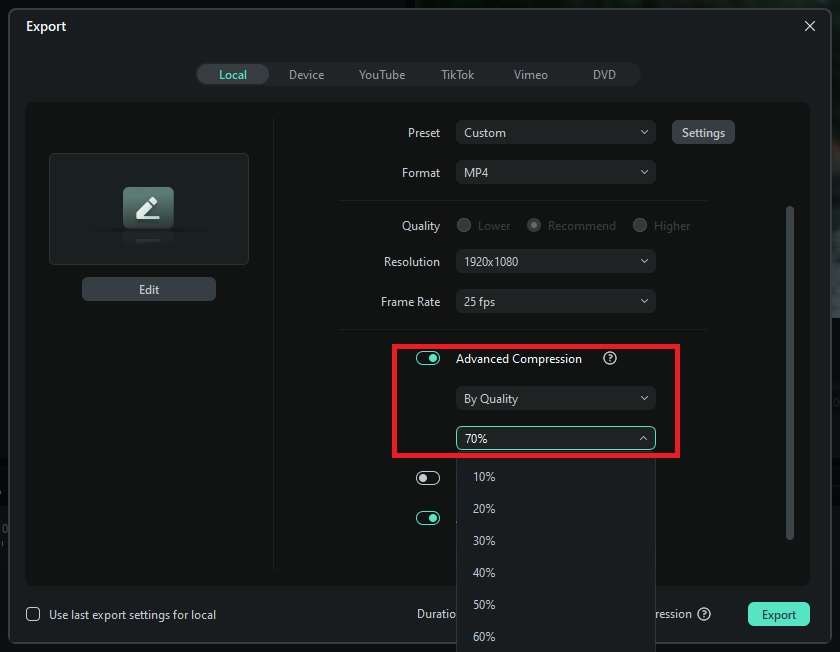
Step 2: Click the Export button. Turn on Advanced Compression to enable the auto compression feature. Click By Quality and compress your video by percentage.
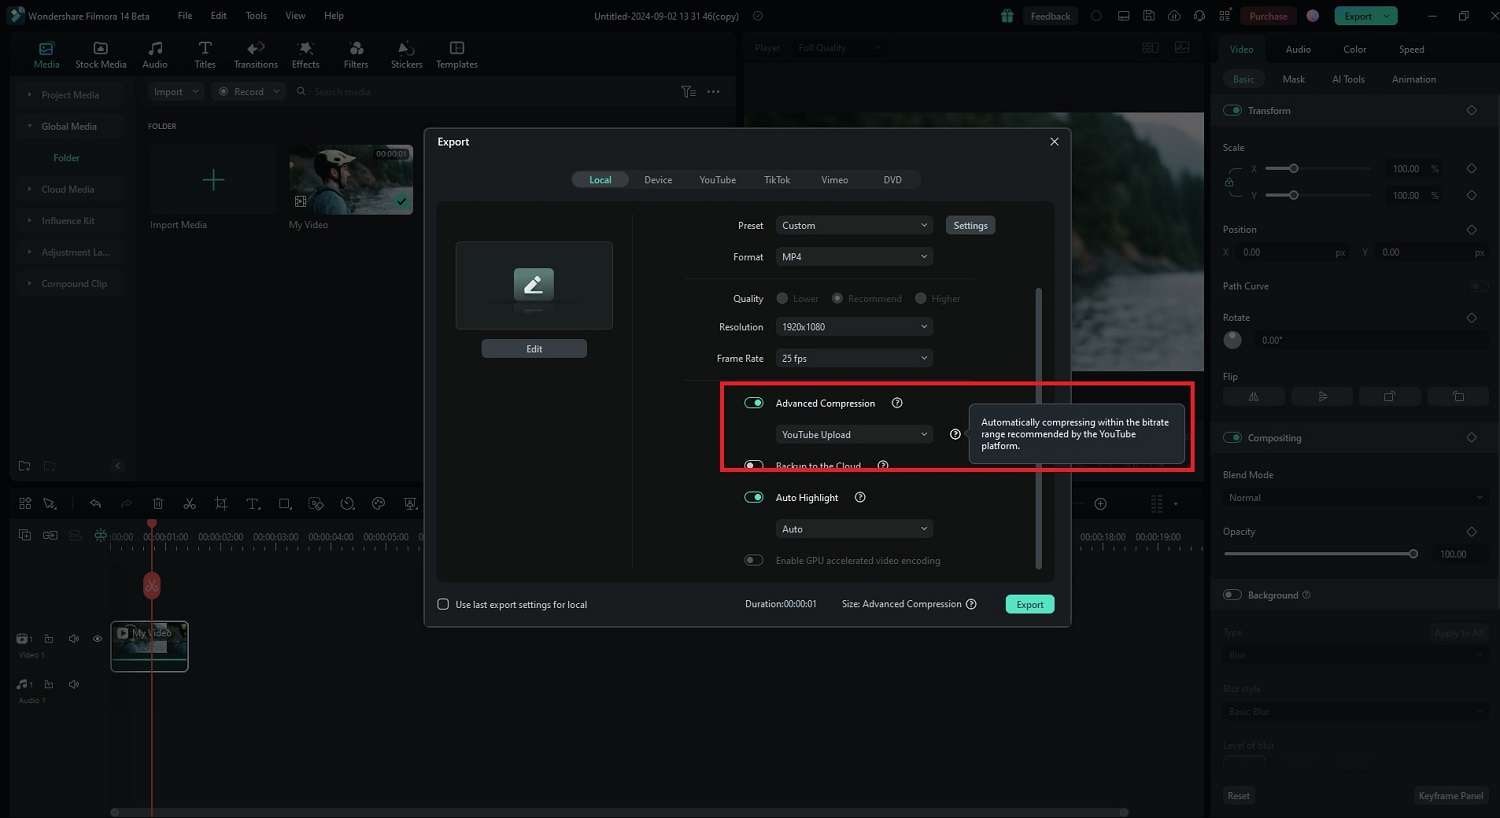
Step 3: If you want to automatically compress within the bitrate range recommended by YouTube, choose the YouTube Upload option instead. When you’re done, click the Export button once again.
Price Plans
For those interested in giving Filmora a try, here are its price plans:
- Free Version. Basic features are available.
- Cross-Platform Monthly Plan. $9.99 per month.
- Cross-Platform Annual Plan. $29.99 per year.
- Perpetual Plan. $49.99 one-time payment.
Bonus: How To Spot Video Compression Artifacts
Identifying video compression artifacts is crucial for ensuring high-quality video content. Here’s how you can spot these artifacts effectively:
Visual Examples
Here are the most common types of visual examples you should look out for:
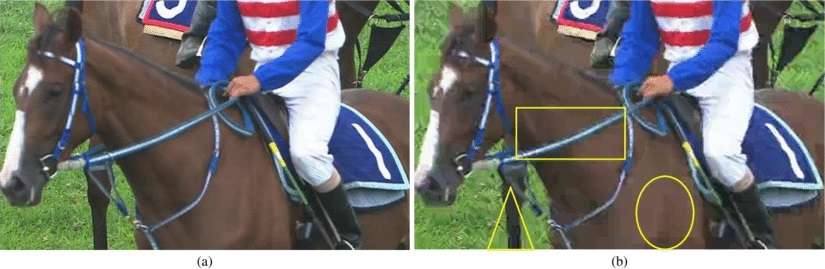
- Blocking
Blocking artifacts appear as square or rectangular patterns. This occurs when the video compression process groups pixels into blocks and reduces detail to save space.

- Blurring
Blurring manifests as a loss of sharpness and detail, particularly in scenes with fast motion or complex textures. It results from aggressive compression that smooths out details to reduce file size.

- Color banding
Color banding shows up as visible bands of color instead of smooth gradients. This is common in scenes with gradual color changes, such as skies or shadowed areas.
Technical Signs
Here are technical signs to remember when compressing videos:
- Bitrate drops
Sudden drops in bitrate can lead to quality loss. Lower bitrates mean less data is allocated to each frame, increasing the likelihood of artifacts.
- Resolution changes
Changes in resolution, especially downscaling, can introduce pixelation and loss of detail. Look for jagged edges and reduced sharpness as indicators of excessive compression.
Diagnostic Tools
If you need help managing compressed videos, here are a few tools to keep in mind:
- Software tools
Use tools like VLC Media Player, HandBrake, or Adobe Premiere Pro to analyze your video files. These tools can help identify areas with high compression and visual distortions.
- Bitrate and quality analysis
Tools like Bitrate Viewer can show the distribution of bitrate throughout your video. It can help you spot areas where quality may drop.
Real World Examples
If you’re still unsure how to spot video compression artifacts, here are some real-world scenarios:
- Streaming
Artifacts are often more visible in streaming scenarios due to adaptive bitrate streaming. Videos adjust quality based on network conditions. Fast-moving scenes are more prone to artifacts.
- Social media uploads
Platforms like Instagram and Facebook apply their own compression, often leading to artifacts. Uploading videos with high bitrate and resolution can help lower this effect. But some quality loss is inevitable.
Conclusion
Preventing video compression artifacts can maintain the quality of your video content. Using tools like Filmora can simplify this process. Its features can help you get the best possible video quality with low effort.
Stay updated with the latest tools and techniques. Experiment with Filmora’s video compression tools and deliver a better experience to your audience. Remember, learning and applying these methods will pay off in the long run. Ensure your videos are free of video compression artifacts and noises. Follow the simple techniques outlined above to always get high-quality videos for your audience.
FAQ
-
Are there specific scenes or content types more prone to video compression artifacts?
Yes, high-motion scenes are more susceptible to video compression artifacts. Detailed textures and areas with gradual color gradients (such as skies or shadows) are also prone to artifacts. The increased complexity of maintaining visual quality can sometimes cause artifacts during compression. -
What role do bitrate and resolution play in the appearance of video compression artifacts?
A higher bitrate allows for more data to be retained, reducing artifacts. Maintaining a high resolution can also prevent excessive downscaling. Experiment with the ideal bitrate and resolution, as it can introduce visual distortions. -
How do video compression artifacts impact streaming quality on platforms like YouTube?
YouTube applies its own compression algorithms, which can introduce more artifacts. High-quality uploads with optimal bitrate and resolution settings can lower these effects. However, some degradation may still occur due to platform-specific processing.
