

Picture yourself photographing a beautiful, blooming flower or a dramatic sunset over several hours. You would like to present how nature evolves over time, but you do not know how to transform it into an interesting video. This is ideal with time-lapse videos, and iMovie provides a very simple method of converting your long image sequences or slow-moving clips into dynamic clips.
However, many people do not know how to use this utility offered by Apple devices. In this article, we will discuss how to create a time-lapse on iMovie effortlessly using your Mac and iPhone.
Part 1. How to Create a Time-Lapse in iMovie: A Simple Guide
As we all know, iMovie is a multimedia editor for Apple devices that offers accessible tools for creating a time-lapse video. You can simply speed up the video or photo sequence to give your media a time-lapse effect. Moreover, you get the ability to customize the speed rate according to your preferences.
Method 1. Creating a Time-lapse on Mac with iMovie
Below is a stepwise guide on how to time-lapse on an iMovie video on a Mac device:
- Step 1: Add Video and Adjust Speed Level
- Step 2: Split Unnecessary Clips
- Step 3: Include Transitions
- Step 4: Add Filters
- Step 5: Add More Visuals and Export
- Import your clip or image sequence into the tool's interface, then drag it onto the timeline.
- Select the middle video segment, right-click and choose the Split Clip option simultaneously.
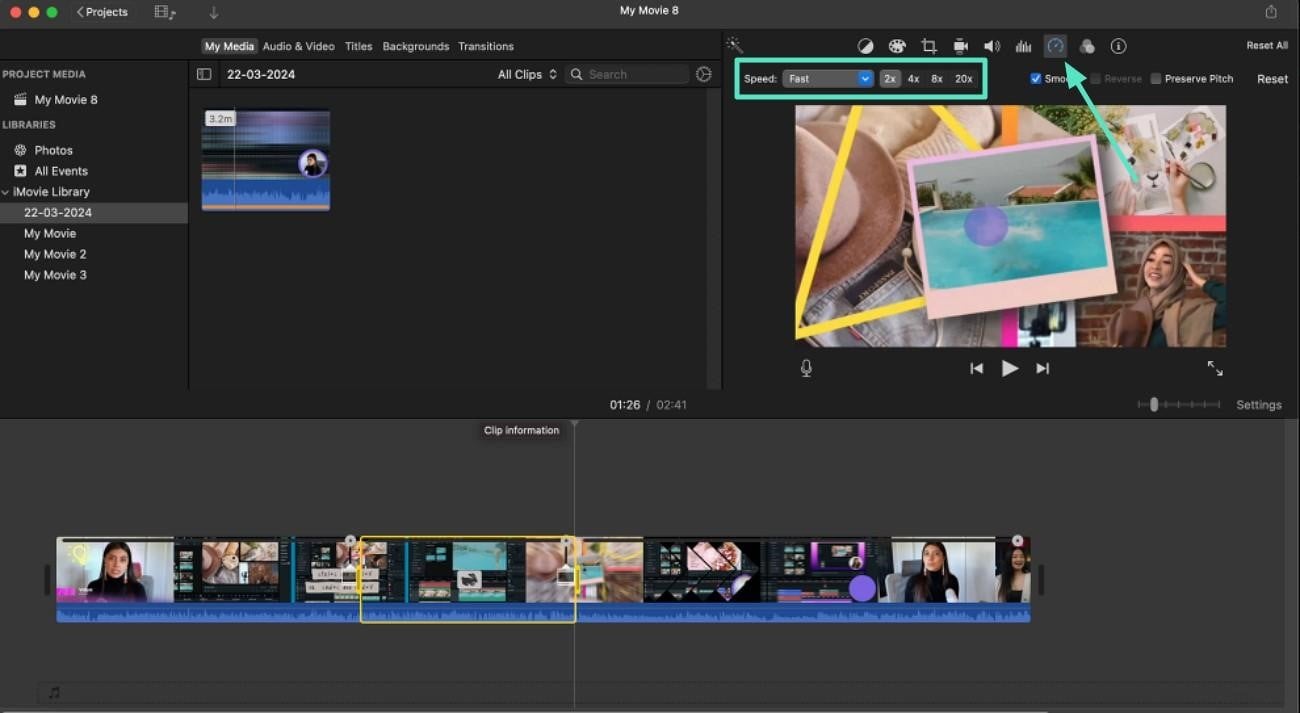
- Use the "Speed Adjustment" icon above the video preview.
- Pick the "Fast" option after expanding the "Speed" drop-down.
- Adjust "Speed Level" from the given options.
- After speeding up, remove the unwanted part by trimming the video.
- To remove a section from the middle, navigate to the part and click on it.
- Hold the "Options" key and click the "Split Clip" option from the drop-down menu.
- Place the playhead to the end of the section and again press "Split Clip."
- Hit the Delete key to instantly remove the split part from the iMovie timelapse video.

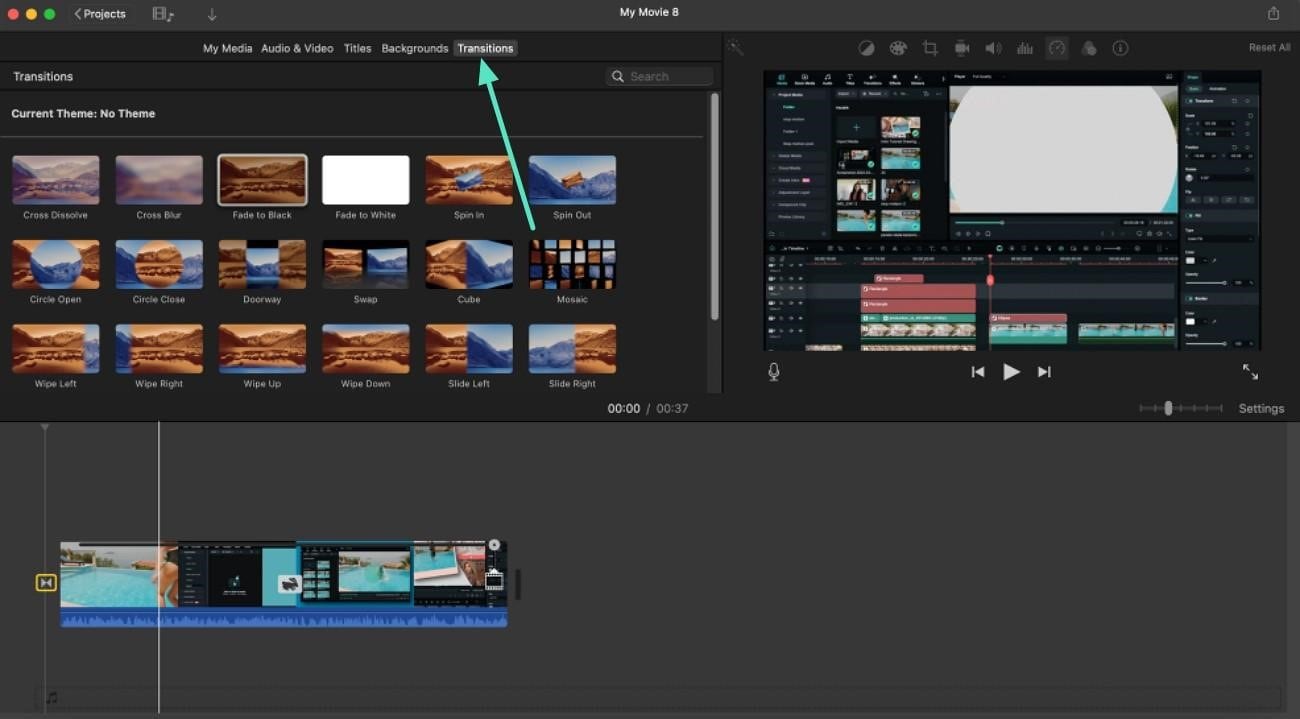
- Add transitions between the segments by accessing the "Transitions" option on the left toolbar.
- Choose the transition of your choice from the library.
- Drag the selected transition between the clips on the timeline to successfully apply it.
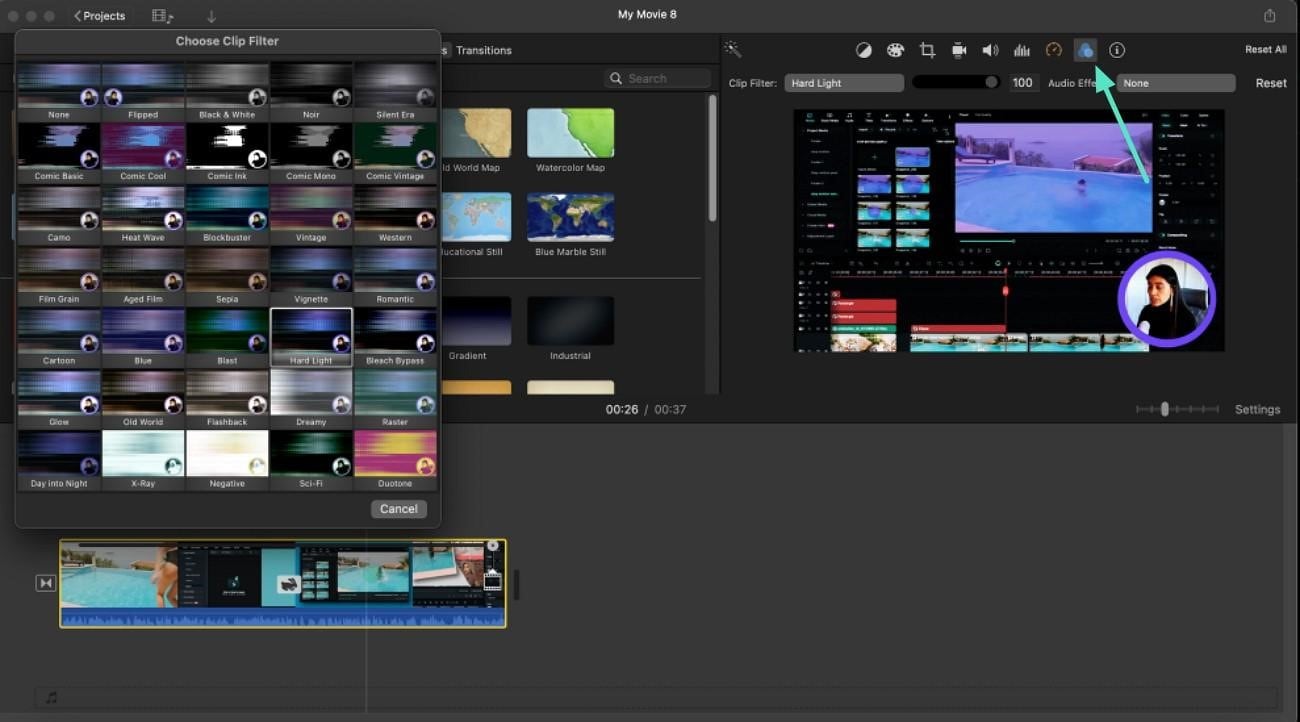
- Enable the "Filters" section from the toolbar above the preview window.
- Select and apply the filter from the library to the video by dragging it to the timeline.
- Preview the applied filter within the preview window on the right.
- Head to the toolbar on the left and enable the "Audio & Video" section.
- Now, select the music of your choice from the library.
- Drag it to the timeline to apply it to the video effortlessly.
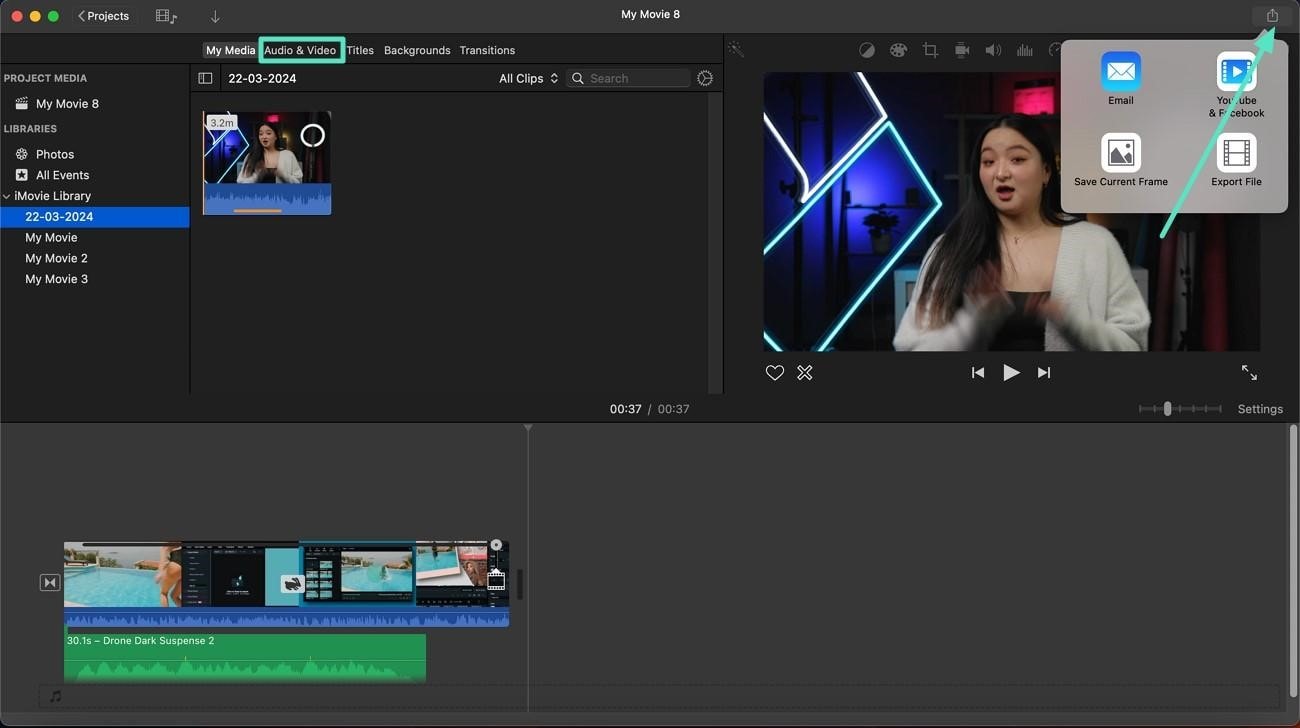
- Now, head to the top-right corner of the video and save the results.
Method 2. Creating a Time-lapse on iPhone with iMovie
Having discussed the time-lapse creation process on Mac with iMovie, let us now have a look at the steps using iPhone on how to time-lapse iMovie:
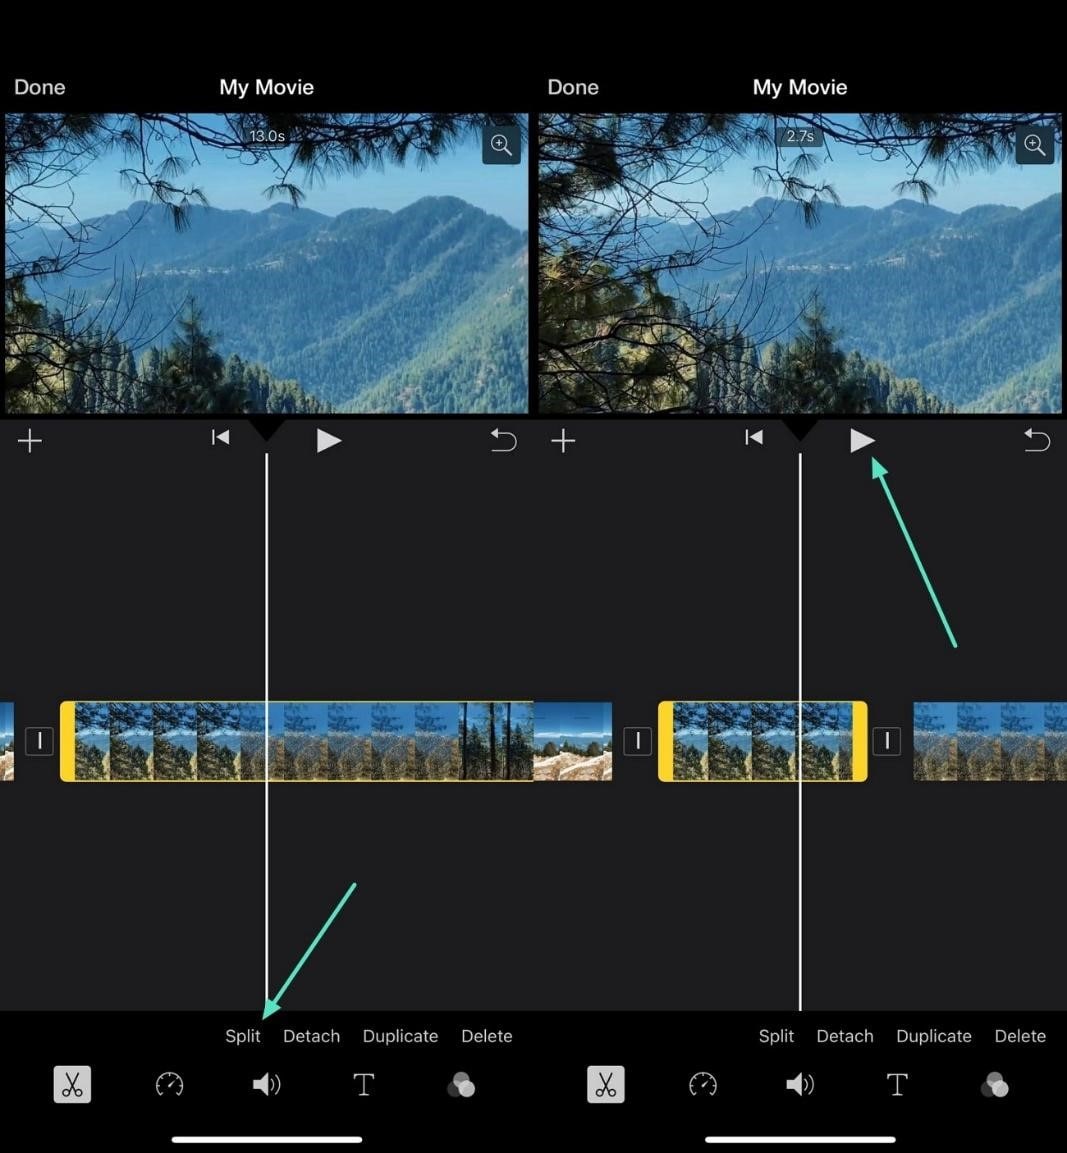
- After importing the video into the app, place the playhead where you want to speed up the video.
- Head to the bottom and tap the "Scissor" icon on the toolbar.
- Now place the playhead till the segment you want to speed up and split again before pressing "Play."
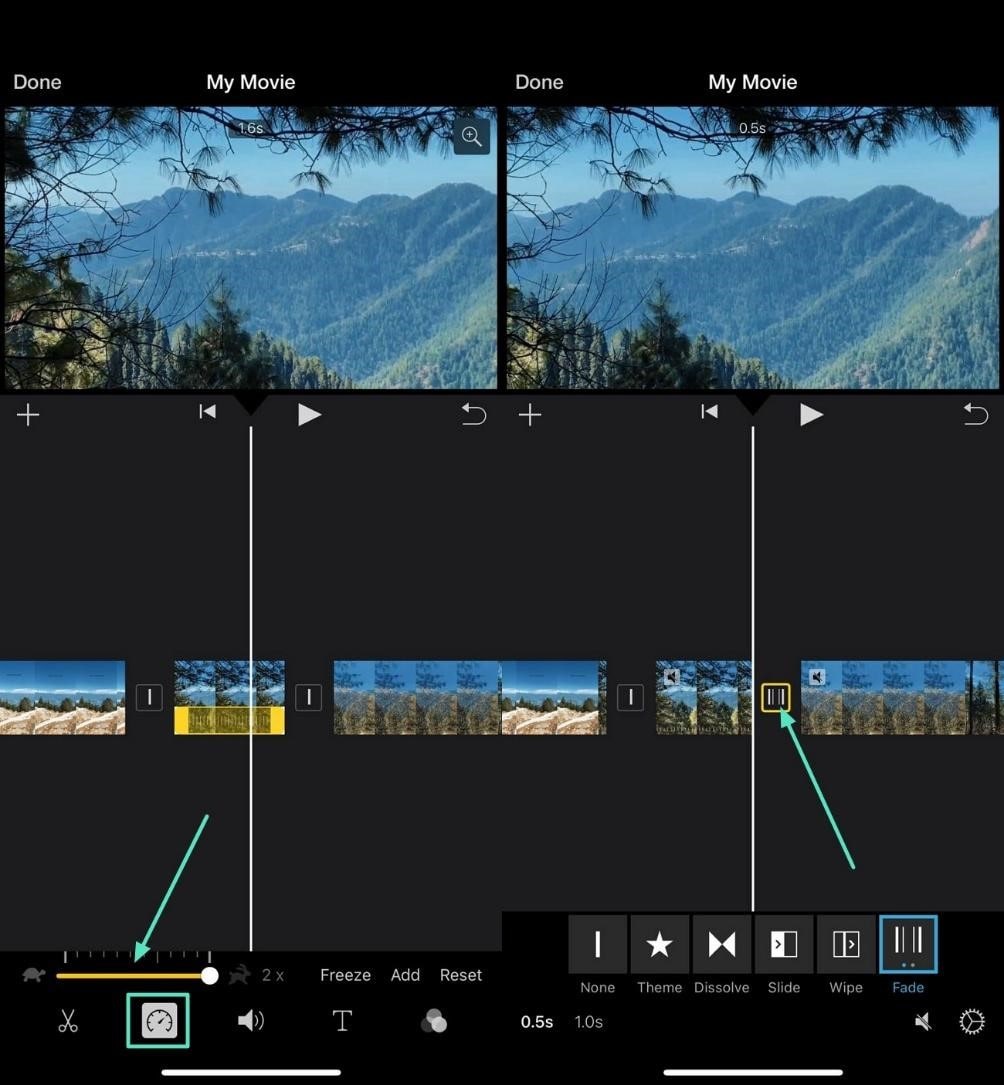
- Select the center segment and head to the bottom toolbar to tap on the "Speed Adjustment" icon.
- Drag the speed slider located at the bottom to its maximum.
- Apply transition between the segments by tapping the "Transition" icon in between.
- Choose the transition from the options provided and adjust its speed from the bottom left.
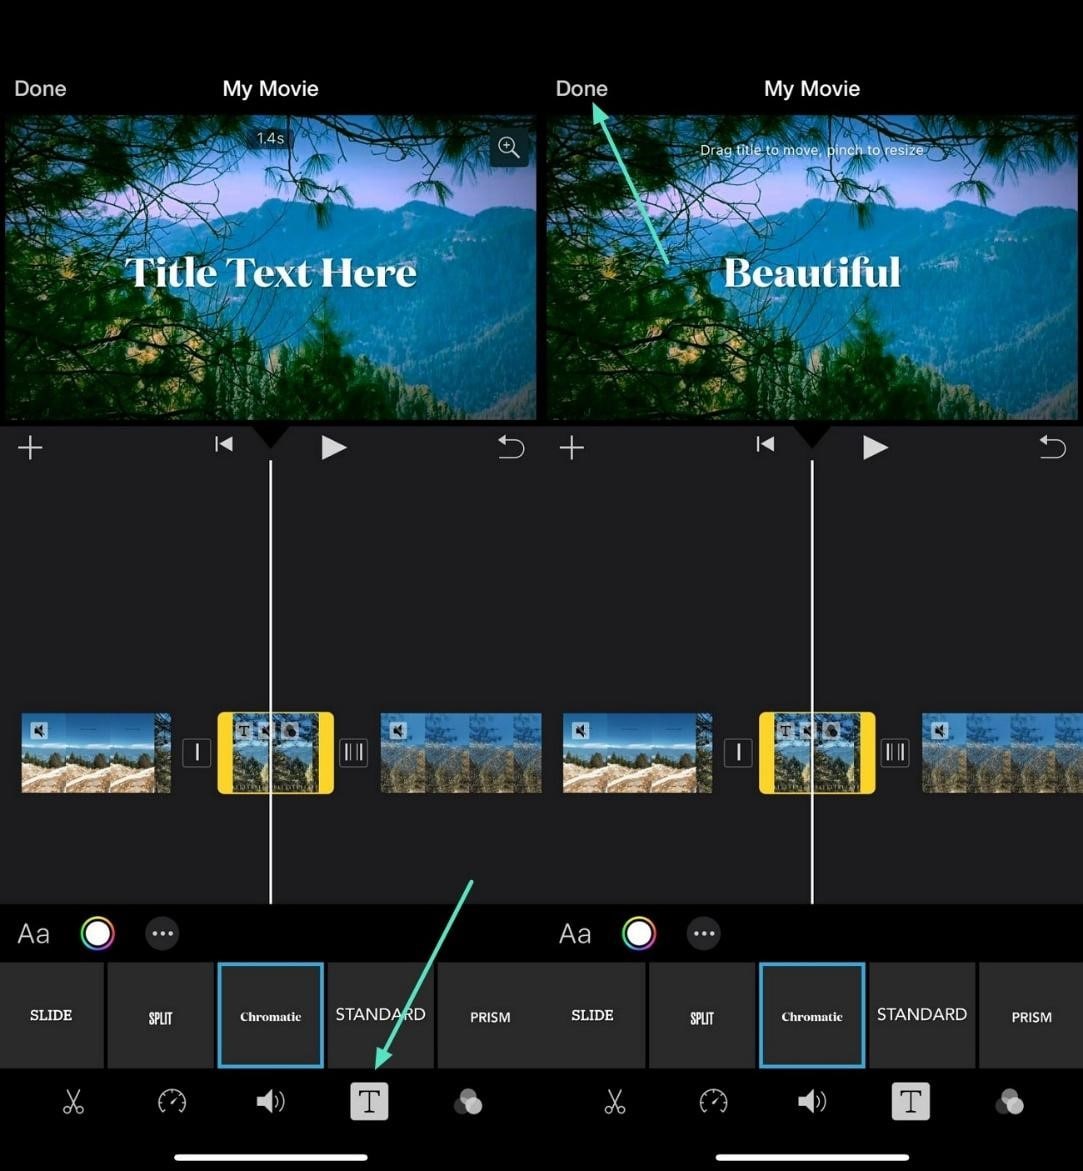
- Add customized text by tapping the "T" icon in the toolbar.
- Choose the text templates from the options provided.
- Input your text using your phone's keyboard.
- Once all the editing is done, press "Done" from the left-most corner.
Part 2. Common Issues With Timelapse on iMovie
While iMovie offers a convenient way to speed up footage or create a time-lapse video, it comes with certain challenges. Mentioned below are some of the common issues users might face while creating a time-lapse video using this video editor:
- Choppy Playback: When working with long clips or suboptimal speed settings, time-lapse videos may appear jittery or uneven during playback.
- Large Export File Size: iMovie typically exports time-lapse videos in high resolution, which can result in much larger file sizes compared to other tools.
- Color Inconsistencies: When creating a time-lapse from photos, users may notice dull or inaccurate colors. This is due to the limitations of iMovie's automatic color processing.
- Limited Speed Adjustment: iMovie only supports a restricted range of playback speeds. To achieve very fast time-lapses, users often need to export the clip multiple times and re-import it, which is inefficient.
- Variable Frame Rate Issues: Footage recorded with variable frame rate can lead to inconsistent playback or export in iMovie. This may cause jerky motion or audio-video sync problems in the final time-lapse.
Part 3. Fueling Quality in Time-lapse Videos With the Best Alternative
If you want a more powerful and flexible way to create time-lapse videos with full control over speed and quality, Filmora Mobile App (iOS/Android) is an excellent choice. This AI-powered tool not only lets you adjust video speed precisely for time-lapse effects but also provides a rich library of templates through its image-to-video feature, making quick creations effortless.
You can even import an existing time-lapse and enhance it further with advanced editing options. In the next section, we'll walk you through how to create time-lapse videos using both Filmora Mobile and Filmora Desktop.
Comprehensive Guide to Creating Time-Lapse Video on Filmora App
The application offers two unique methods to create and enhance the iMovie time-lapse from video. Let us explore the steps for both methods in the section below:
- Sunrise Timelapse

- Day to Night

- Painting Timelapse

Method 1. Create a Time-lapse Video From Ordinary
With the Filmora App, you can efficiently convert any ordinary video into a time-lapse video. Mentioned below is a stepwise guide to convert a normal video into a time-lapse video using this app:
- Step 1: Start By Importing and Splitting the Video
- Step 2: Apply Speed Adjustment
- Step 3: Insert Transitions
- Step 4: Add Filters
- Step 5: Insert Background Music
- Step 6: Export in 4K Quality
- To begin, launch Filmora App and create a "New Project" from the homepage.
- Import the video and access the "Split" icon located at the bottom.
- Place the playhead to the area from where you want to begin the timelapse and tap "Split."
- Now split at the end of the segment to isolate the video part successfully.
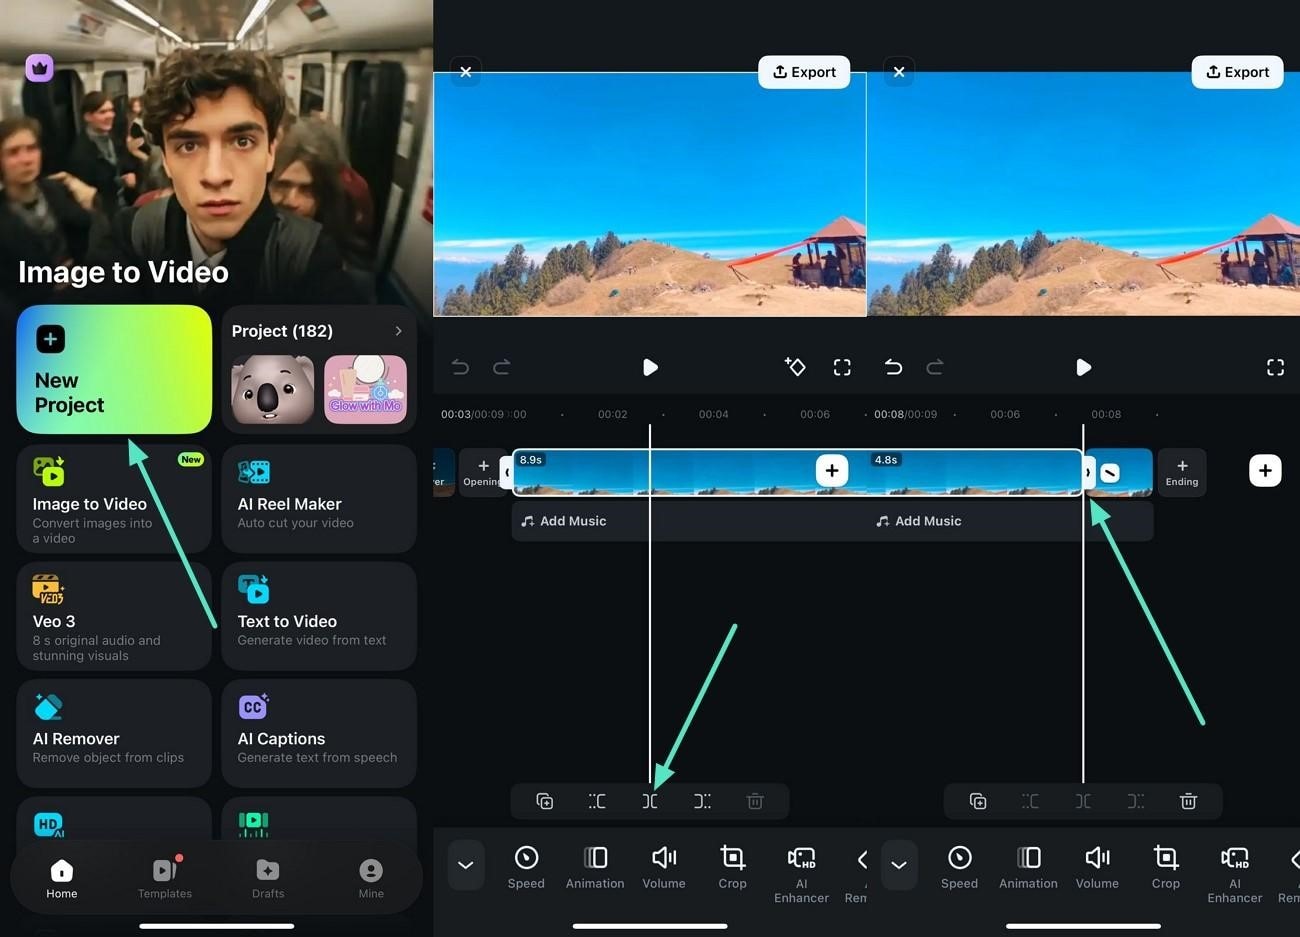
- Once the section is separated, tap on it to enable the toolbar below.
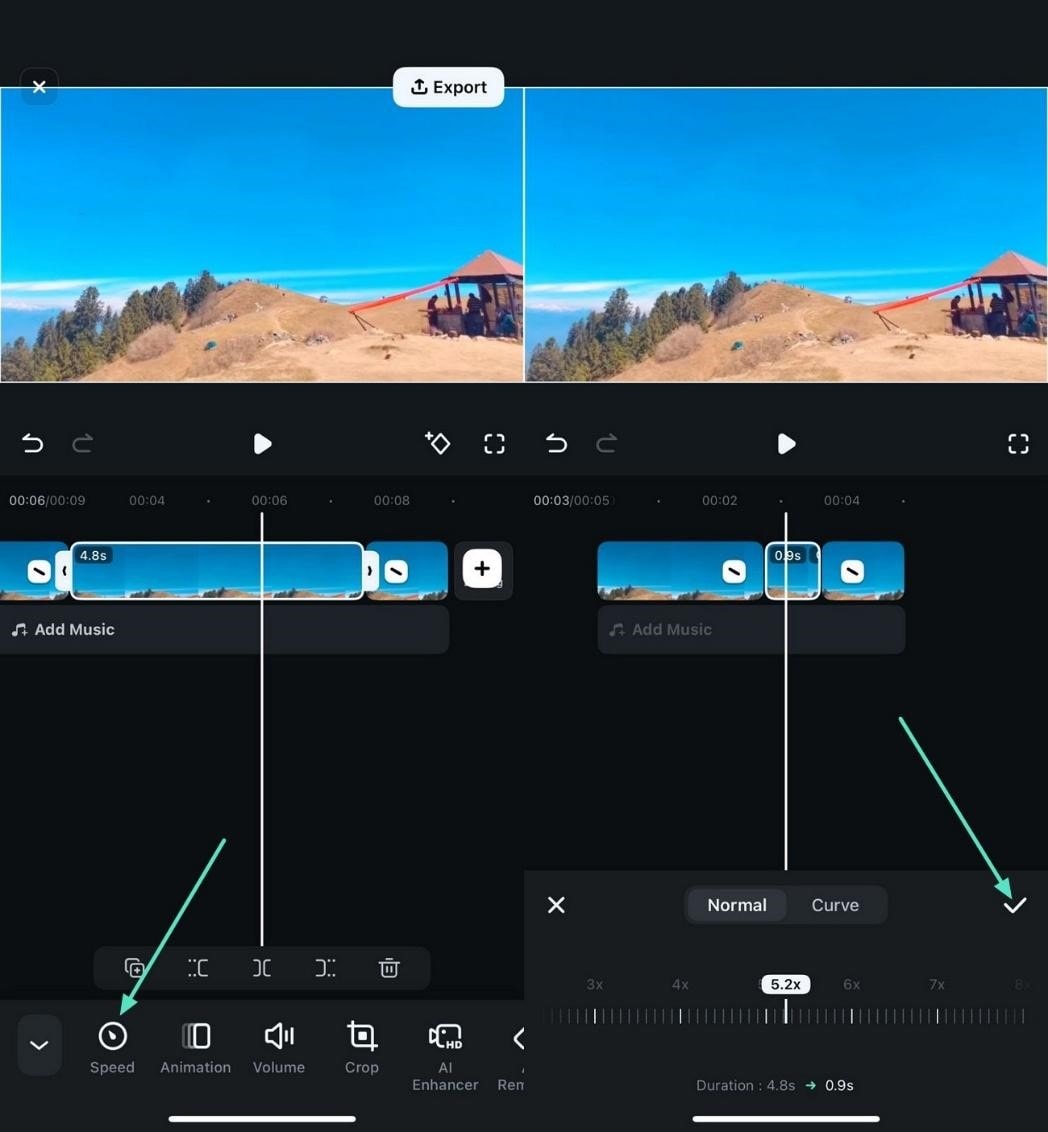
- Next, press the "Speed" icon located on it and drag it according to your preferences.
- When the speed is accelerated, tap the "Tick" icon located on the right.
- Locate the "Transition" icon between the clips and tap on it.
- Select the transition of your choice from the options provided.
- Apply the selected one by tapping on the small "Tick" on the right.

- Moving forward, tap the "Filters" icon located at the bottom.
- Next, select the relevant filter from the enabled library.
- Use the "Tick" icon to apply the filter to the timelapse on iMovie video.

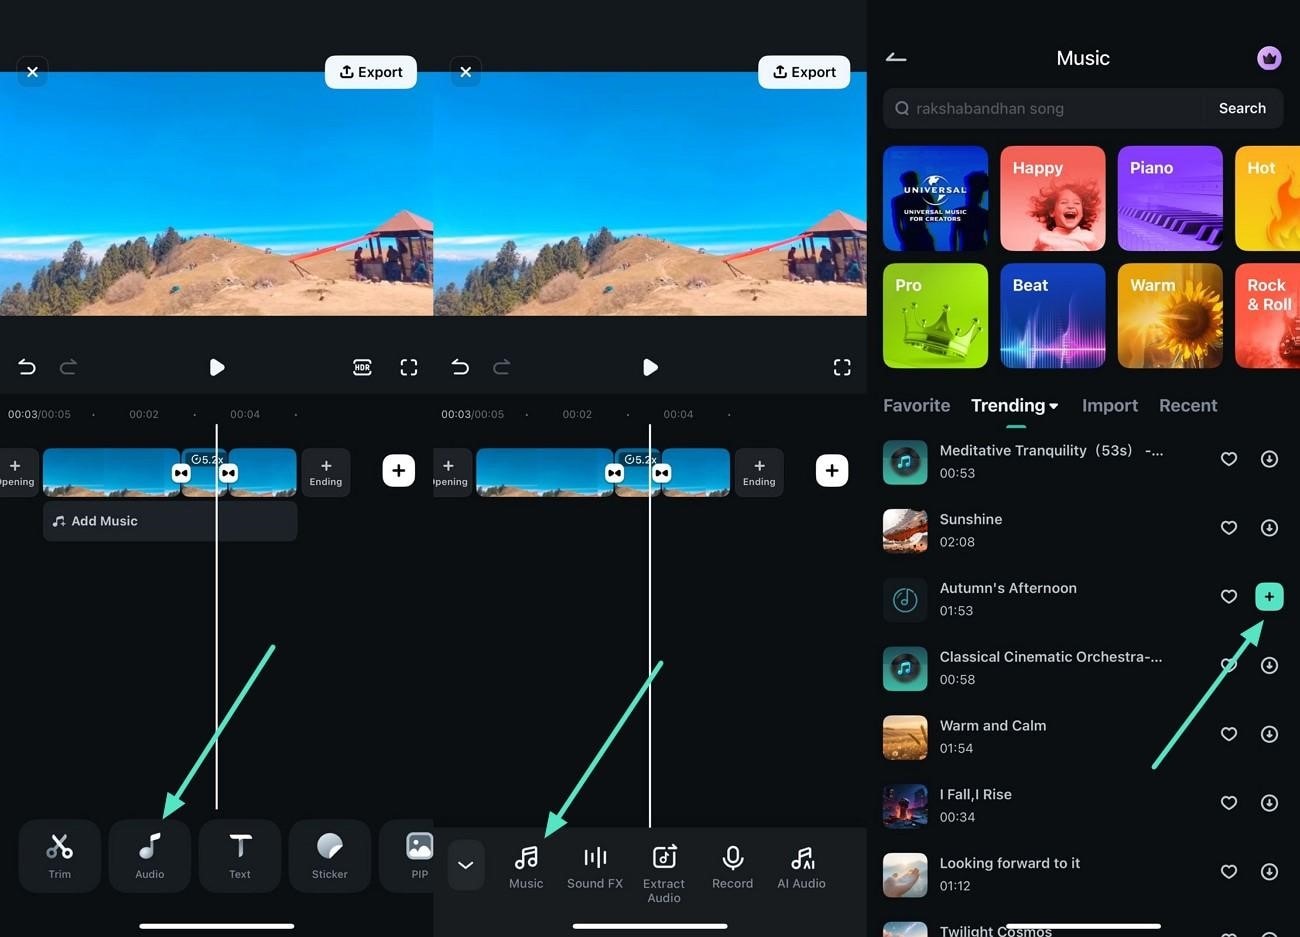
- To give your time-lapse video flair, access the "Audio" icon located at the bottom.
- Select the "Music" icon from the following toolbar.
- Now select the audio and apply it to the video by pressing the "+" icon on the right.
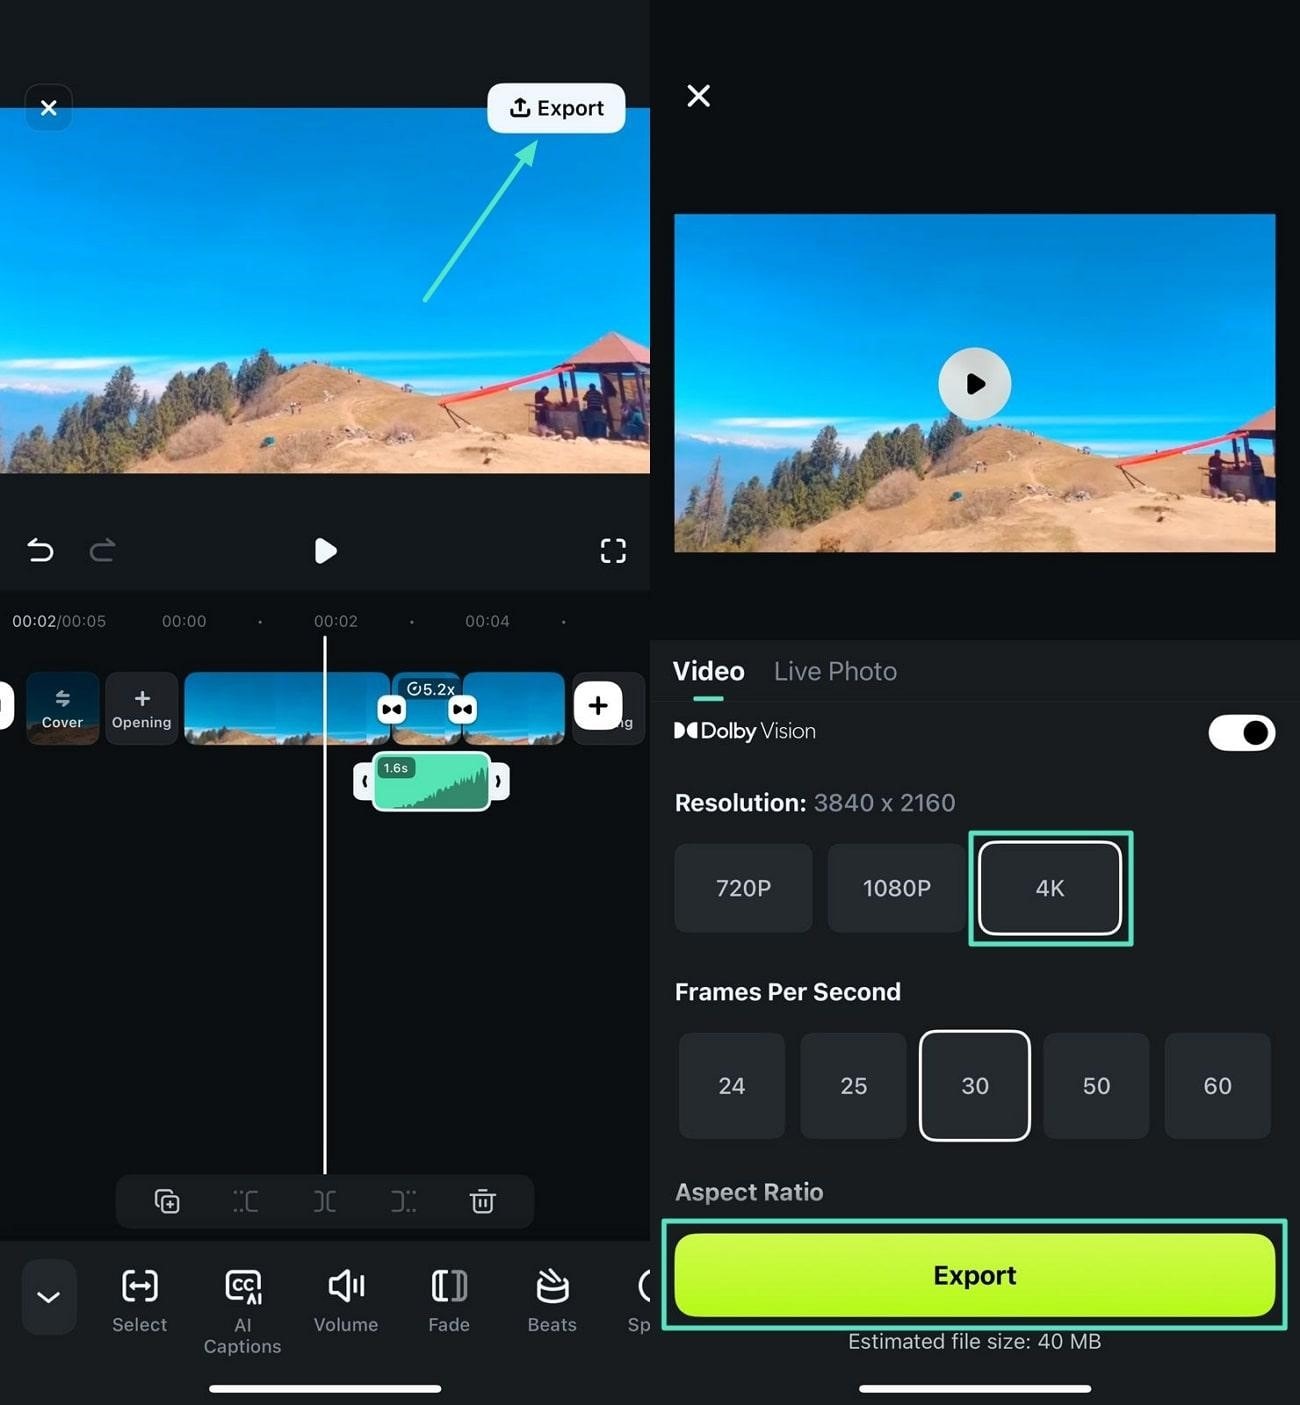
- Once the timelapse is created successfully, head to the top-right corner and press "Export."
- Select "4K" as export quality and hit the "Export" button to save the video.
Method 2: Choosing the Image to Video template
The image-to-video feature of the application transforms your videos into compelling videos. You can select different templates from the options provided to generate a video according to your requirements.

Learn the steps mentioned below to learn how to time-lapse iMovie using the Filmora App:
- After launching the application on your smartphone, head to the homepage and tap "Image-to-Video."
- Next, press the "More Templates" option to explore the templates library.
- Choose the template of your choice by tapping on it.
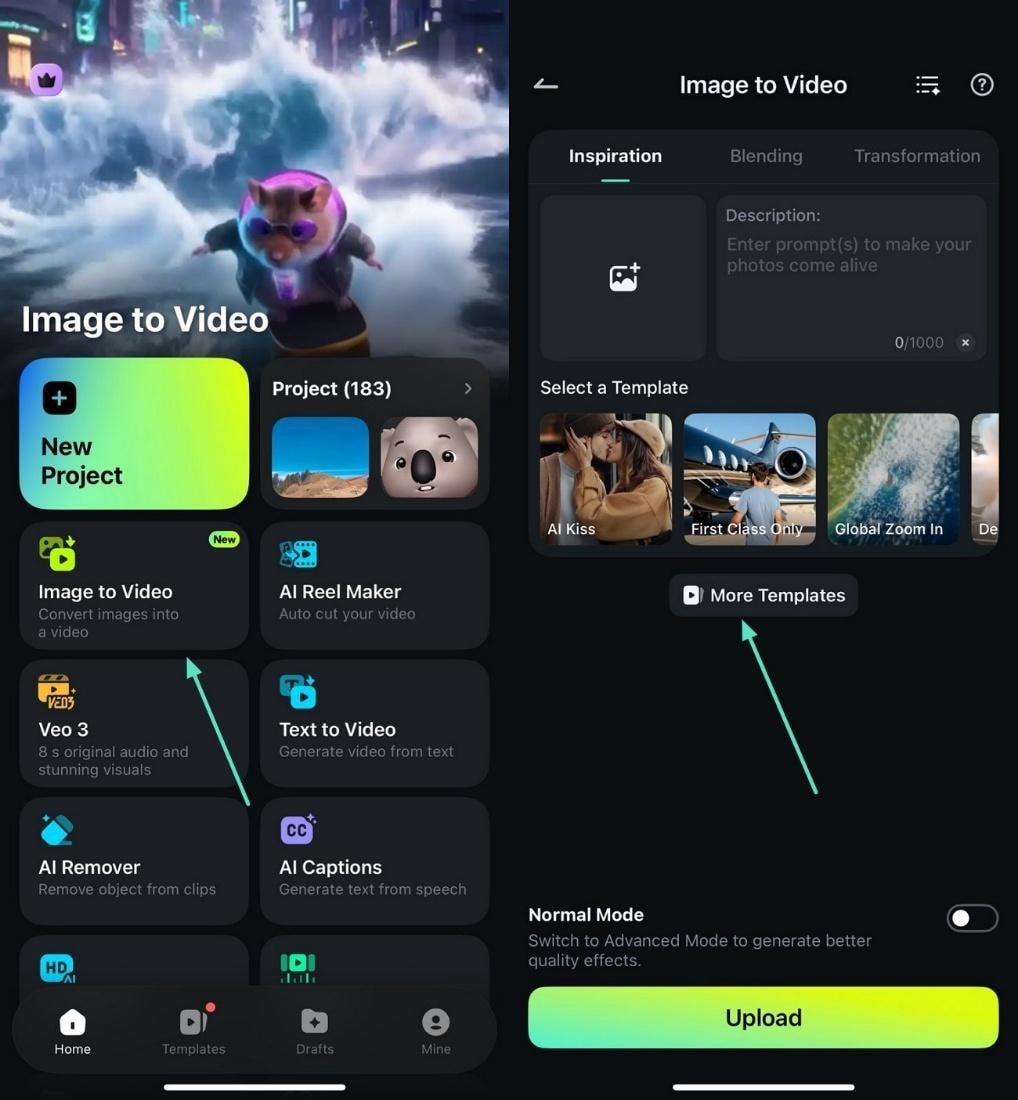
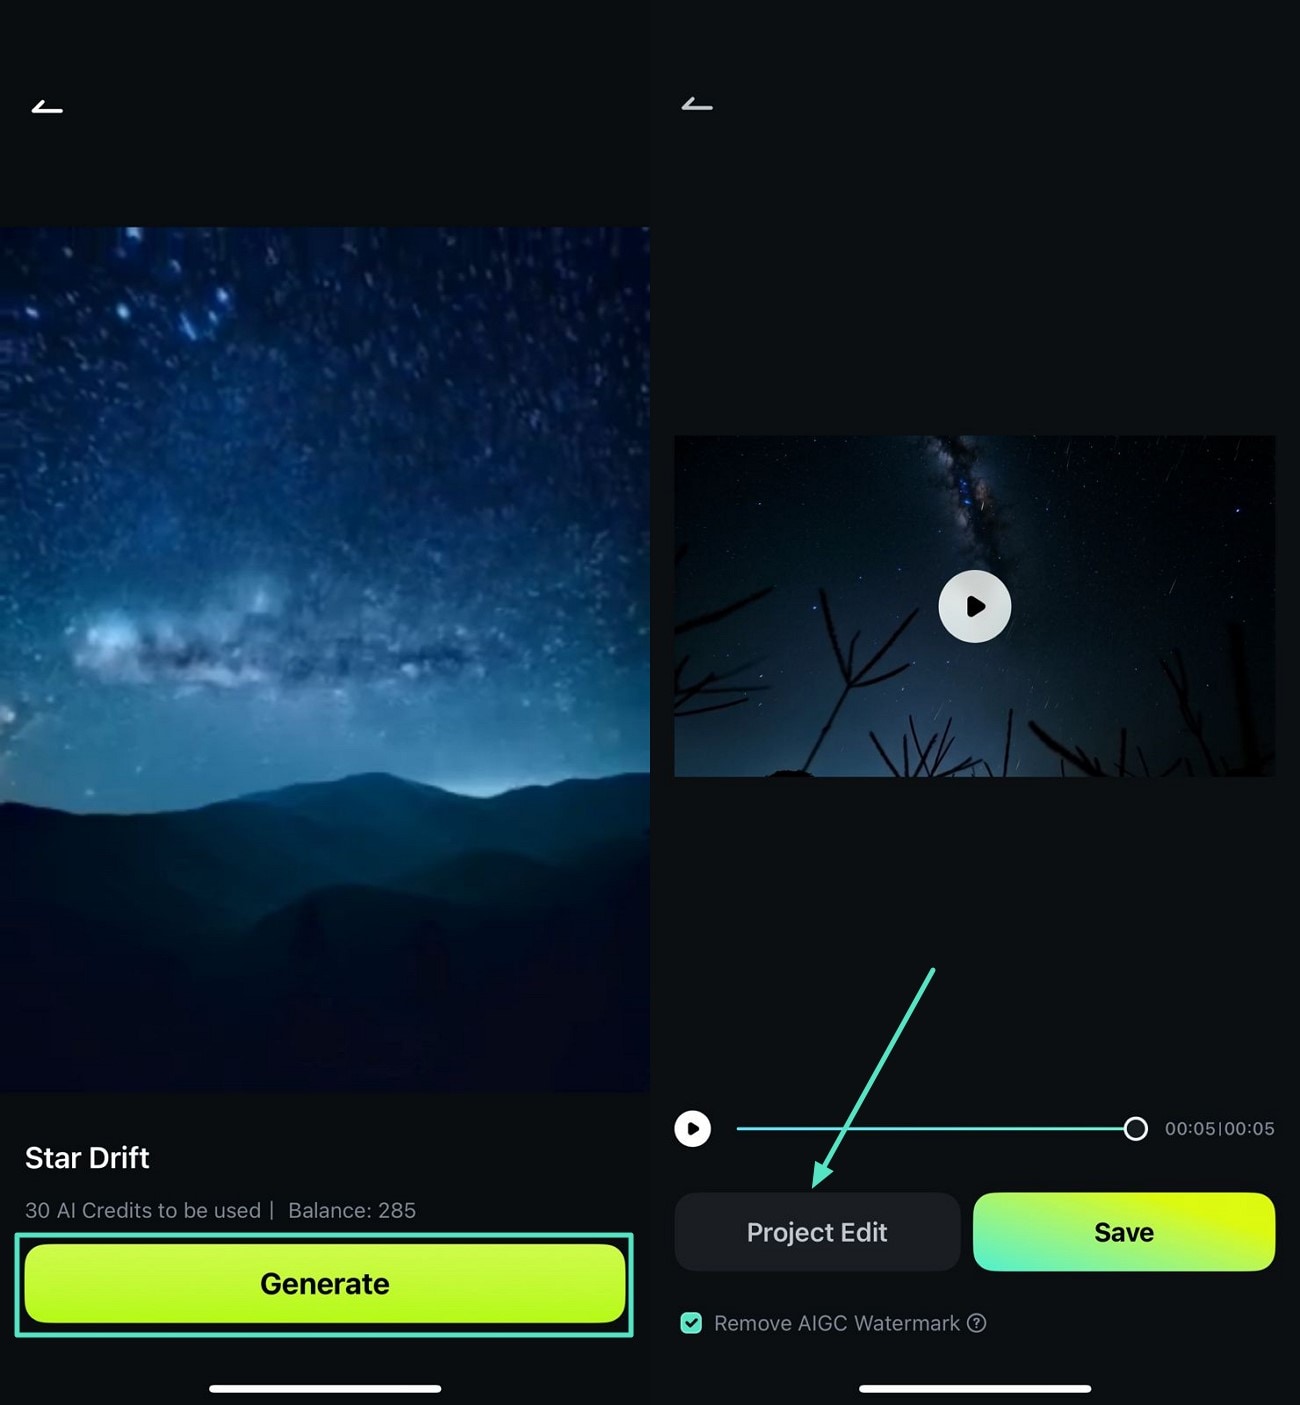
- Next, preview the template in the next interface and press the "Generate" button located at the bottom.
- Import the image that you want to convert into a time-lapse video to execute the process.
- Once the video is generated, hit the "Project Edit" option on the left.
- Apply different functions such as "Filters" by enabling the library and tapping on the "Tick" icon.
- Finally, press "Export" to save the video successfully to your device.

Part 4. Craft and Enhance Time-Lapse Video With Wondershare Filmora
If you are looking for professional-grade time-lapse video generation from your PC, you can use the desktop version of Wondershare Filmora. The tool offers more precise control and higher-quality time-lapse video production effortlessly. Filmora's desktop version stands out as a versatile editing platform, particularly for handling photo sequences, something iMovie doesn't fully support.
Instead of limiting users to video-centric editing, Filmora enables direct importing of multiple photos into the timeline. The user can batch-adjust durations and select playback speed for a smoother time-lapse video. Moreover, you get the ability to create compelling time-lapse videos using the templates library offered by the tool.
How Filmora Enhances the Time-lapse Video Creation?
Mentioned below are some of the prominent features offered by this incredible application to create and enhance a time-lapse video:
- Speed Control: Filmora allows precise and uniform speed adjustment of your entire video clip, enabling smooth acceleration or deceleration to create time-lapse effects effortlessly. This control lets the user increase the speed up to 10.0x with precise customization.
- Speed Curve: With the Speed Curve feature, you can add dynamic speed changes within a single clip by adding customizable speed points and curves. This feature enhances timelapse on iMovie by allowing smooth transitions between fast and slow motions.
- Multiple Export Support: Filmora supports exporting time-lapse videos in various formats and resolutions, including 4K, providing flexibility to deliver videos optimized for different platforms or storage needs.
- Transition Between Clips: You get a vast library of seamless transitions that can be applied between time-lapse clips to improve flow and visual interest. Using these transitions helps create a continuous narrative feeling.
- Time-lapse Templates: AI-powered and pre-made time-lapse templates are offered by the app which allows users to create compelling accelerated videos easily. These templates can automatically arrange photo sequences or clips and apply speed effects.
Steps for Creating a Time-Lapse Video from Image Sequences Using Filmora
As discussed, Filmora allows you to create a time-lapse video conveniently using the set of images you have. To learn how to use this functionality, read the steps mentioned below:
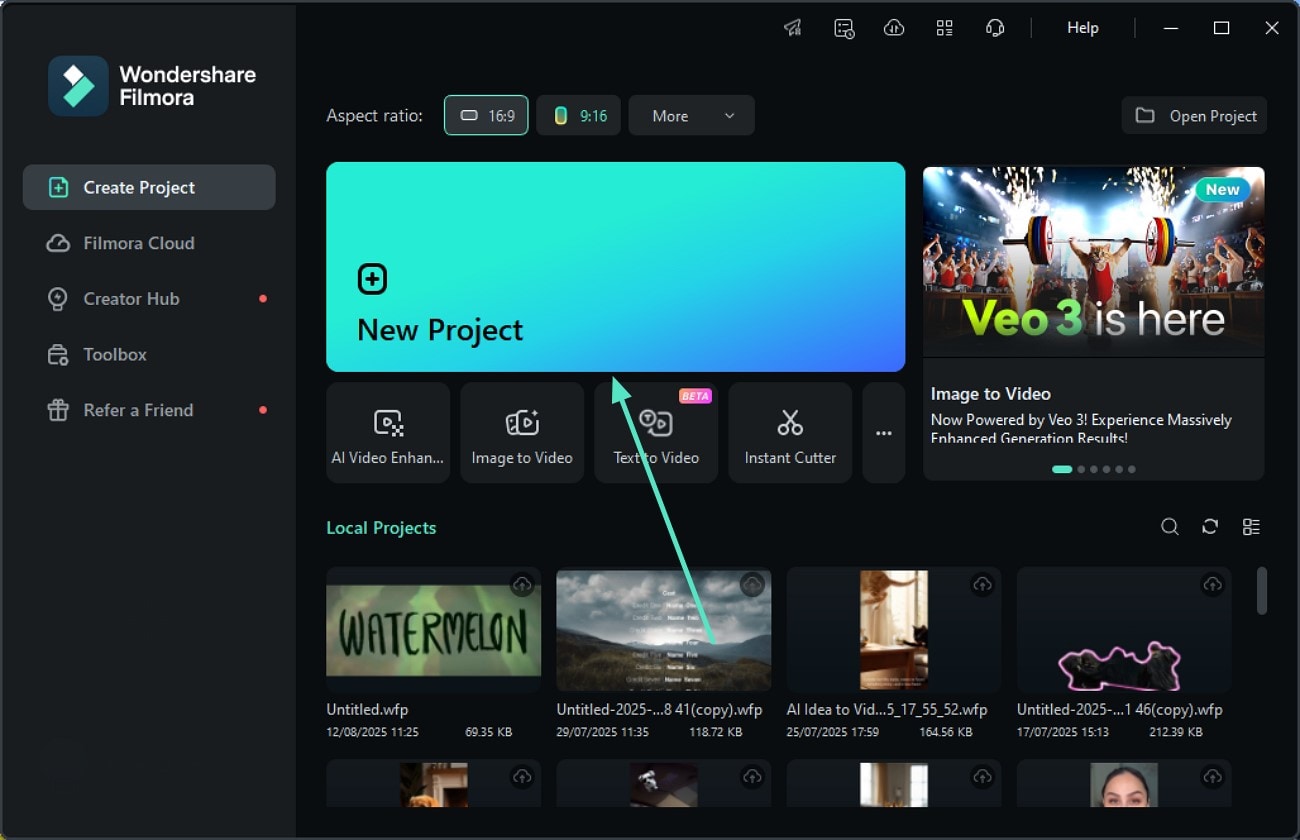
Step 1. Start By Creating a New Project
- To begin, launch Filmora on your desktop and click on the "New Project" option.
Step 2. Import The Image Sequence
- Head to the "Media" section and press the "Import" button to import the image sequence.
- Press the "Play" icon to preview the time-lapse video created with the image sequence.
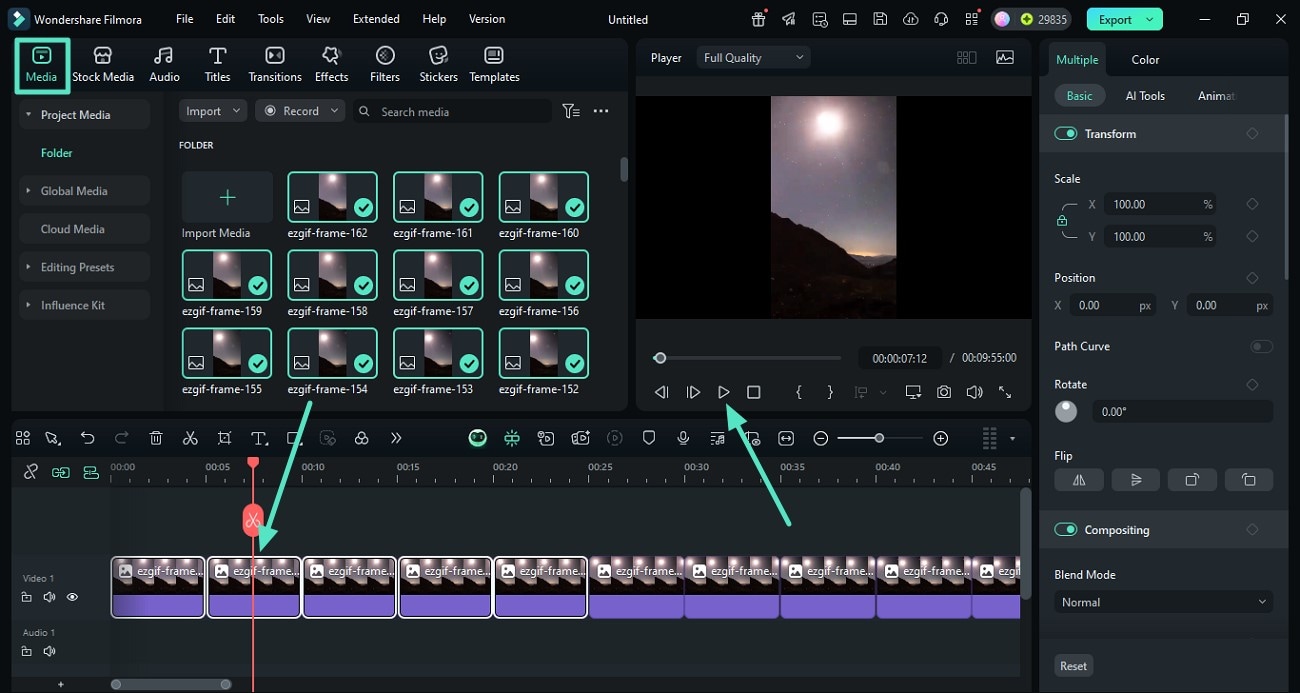
Step 3. Change the Duration for Each Image
- If you want to speed up the video more, head to the timeline and drag the end of each image.
- This will shorten the duration for each image in the frame.
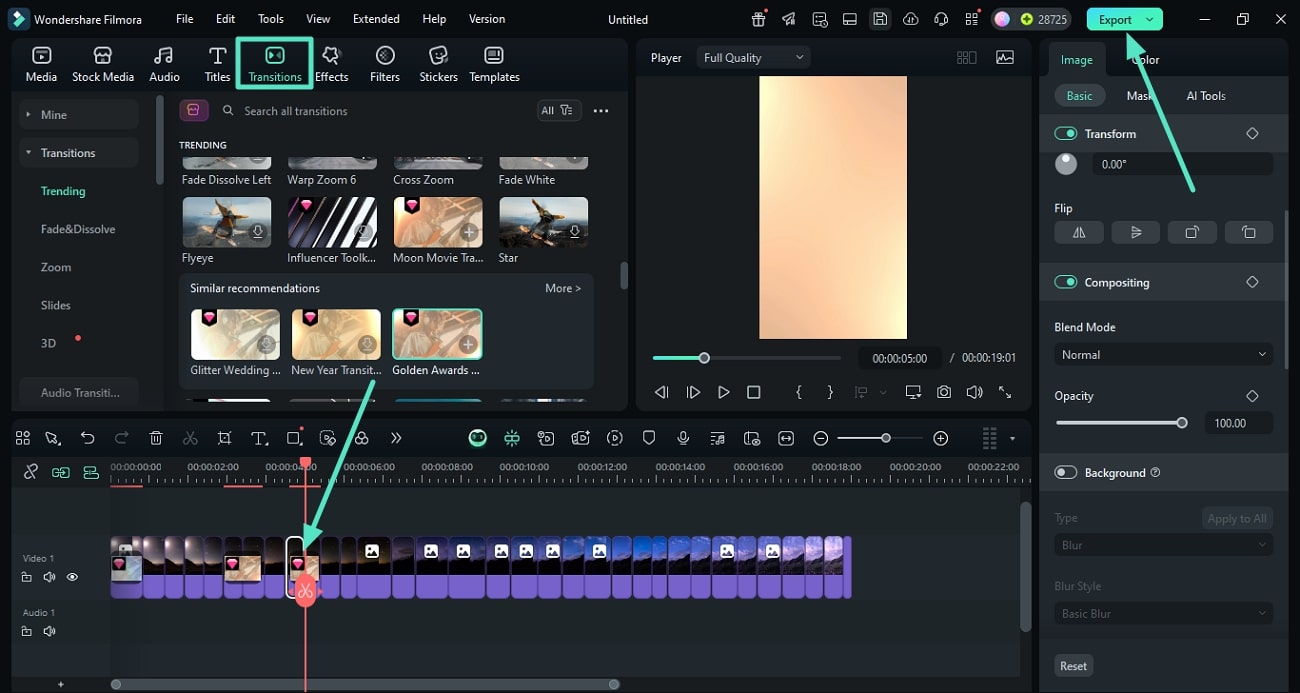
- To give a smoother flow, add transitions between the images by accessing the "Transition" section.
- Play the video again and once satisfied, hit the "Export" button to save the video.
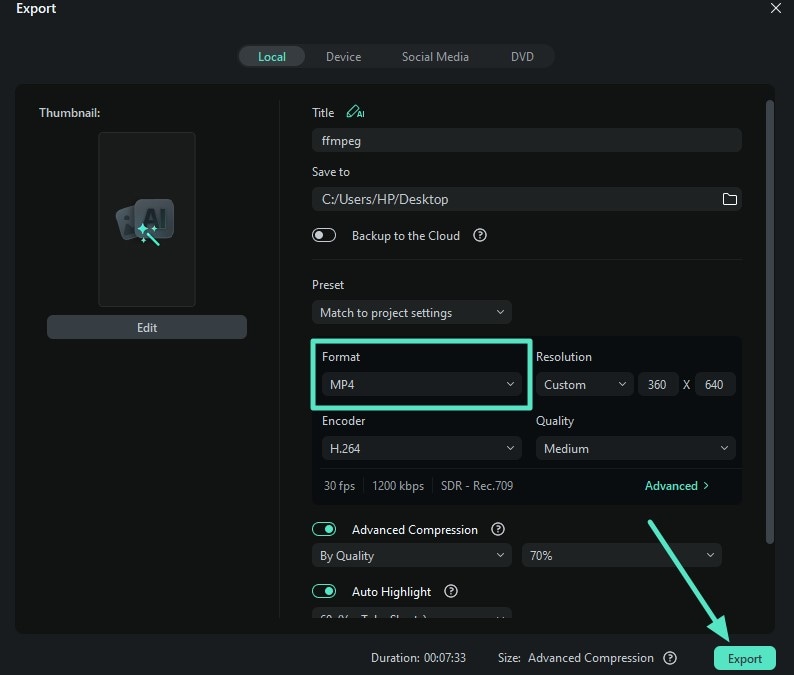
Step 4. Select Video Format and Export
- In the following interface, choose MP4 as "Format" to save the image sequence as a time-lapse video.
- If you are not satisfied with the speed, re-import and adjust the speed to make the timelapse smoother.
Part 5. What Can I Do to Improve My iMovie Time-lapse Videos?
To improve your time-lapse on iMovie videos, here are some practical tips that can make a big difference in quality and smoothness:
- Use a Tripod When Shooting: To keep your camera stable, use a tripod that will prevent your camera from recording shaky footage, especially time-lapses where small movements become very noticeable when sped up.
- Keep Consistent Lighting: You are advised to shoot in conditions where lighting doesn't change drastically between frames or clips. It is because consistent lighting helps avoid flickering and color shifts, which ultimately brings smoother results.
- Avoid Overly Long Clips: Try to use shorter clips or break long footage into segments because it will minimize export issues in iMovie time-lapse from video, making editing easier.
- Test Different Speeds for the Best Results: Test various speed multipliers to find the pacing that best captures the mood and flow of your footage. The reason is, sometimes, a moderate speed can bring better than maximum visual clarity.
Conclusion
To wrap up, this article discussed different methods to create a time-lapse on iMovie effortlessly from your Mac device and iPhone. However, creating time-lapse videos with iMovie has certain limitations and unsatisfactory results. For this, you can use apps like Filmora to create and enhance time-lapse videos effortlessly.
