
 100% Security Verified | No Subscription Required | No Malware


 ChatGPT
 Perplexity
 Gemini
 Claude
 Grok
Grok
Transition effects are necessary for making amazing videos, slideshows, and presentations. These are the dedicated effects appearing when one slide or clip replaces the other. Hence, any video editing software is incomplete without impressive transition effects.
Going by the same, Wondershare Filmora offers different video and audio transitions to help users. Wondershare Filmora users can bring the best transitions at the beginning or end of the video or between two video clips. These can be used while changing the mood of videos, changing the subject, passing the time, showing the change of direction, etc.
The dedicated transitions tab allows Wondershare Filmora users to apply different transitions quickly and easily. Let us go into detail about creating a smooth-cut transition effect in Wondershare Filmora in this step-by-step guide.
In this article
Steps to create a smooth cut transition effect in Wondershare Filmora Desktop:
Wondershare Filmora is a popular video editing tool used by content creators, including social media influencers, marketers, content creators, etc. The following are the quick and detailed steps to create a smooth cut transition effect in Wondershare Filmora:
 secure download

Step1Download and launch Wondershare Filmora
Before even jumping to the smooth-cut transition effect in Wondershare Filmora, the first step is to download and launch it on your system. It is easy to download this software on Windows and Mac devices. The quick steps for downloading and launching Wondershare Filmora are as follows:
- Go to the official website of Wondershare Filmora.
- Go to the Download button located in the top right corner of the official website.

- The Filmora Installer will download quickly for your Windows or Mac system.
- Double-click on the setup and start the installation process. Agree on the terms and conditions menu thus prompted.
- Once Wondershare Filmora is installed, it will start and run automatically on your system.
Step2Import the footage
The first step in creating a smooth cut transition effect is to import the footage. All you need to do is use the drag-and-drop functionality of the Wondershare Filmora. You can import 2 footage to the video editor interface with the quick steps mentioned below.
- Start by dragging the two footage to the timeline using the drag and drop functionality.
- Now, select the footage in the video editor.
- The next step is to copy the layer of the footage and lock the current layer.
- Then, paste the current layer over the other layer of the footage.
- Move towards the end of this step by unlocking the layer. Then you need to hide the below layer.

Step3Go to the effects tab and apply preset settings
After importing the footage and applying different layers. The next step is to go to the Effects tab in the Wondershare Filmora. Then, the preset settings are applied to the footage. The quick steps for the same are:
- Start by applying the crop presets to the above-layer footage.
- Select the first footage in the video editor.
- Right-click on properties and open the effects menu.
- Search the settings and change the top and bottom settings to 30
- You can select to blur the edges of the footage by ticking on the option.
- Repeat the same steps for the second footage.

Step4Go to the Transitions tab
It is time to go to the transitions tab and start putting it in your video clip. The quick steps for the same are:
- Select the speed blur category located on the left side of the interface.
- Go to the search box and type "flip."
- Start placing the transitions on the footage layers.
- Select the first transition, flip all three, and place it on the second layer of the footage.
- Select the second transition, flip all two, and place it on the first layer of the footage.
- Render this video part by unhiding the first layer and moving to the preview step.

Step5Lorem ipsum dolor sit amet eam quas malorum
It is time to preview the created video. The render preview option in the Wondershare Filmora ensures that there is no lag in the preview file on any system. It generates the rendered versions of the files placed on the timeline for a quick preview. In addition to it, it is easy to add a top to bottom transition in the video editing in this step only. The quick steps for the same are:
- Preview the created video file and check if there is a need to change the transition.
- If required to add the top to bottom transition, remove the existing transitions.
- Select the first footage and go to its properties menu.
- Go to the crop settings and reset these settings.
- Change the right and left parameters in the settings to 30.
- Repeat the same steps for the second footage.
- Select the second layer, and apply and flip all four effects.
- Select the first layer, and apply to flip all one effect.
- Render the video footage and go for a quick preview.

Steps to create a smooth cut transition effect in Wondershare Filmora Mobile:
After applying the smooth cut transition effect on your computer, you might be surprised to know that you can achieve the same effect on your iPhone. The process for Filmora transition is straightforward and allows users to create a smooth look directly from their phones.
As discussed earlier, the smooth cut transition effect of Filmora blends two clips naturally and creates a continuous flow. This effect is useful for fast-paced sequences where you want to maintain an uninterrupted feel. The mobile version makes it easy to apply by adding clips and searching for smooth cuts in the transition. To experience natural flow between your clips, follow the guide and create a polished video:
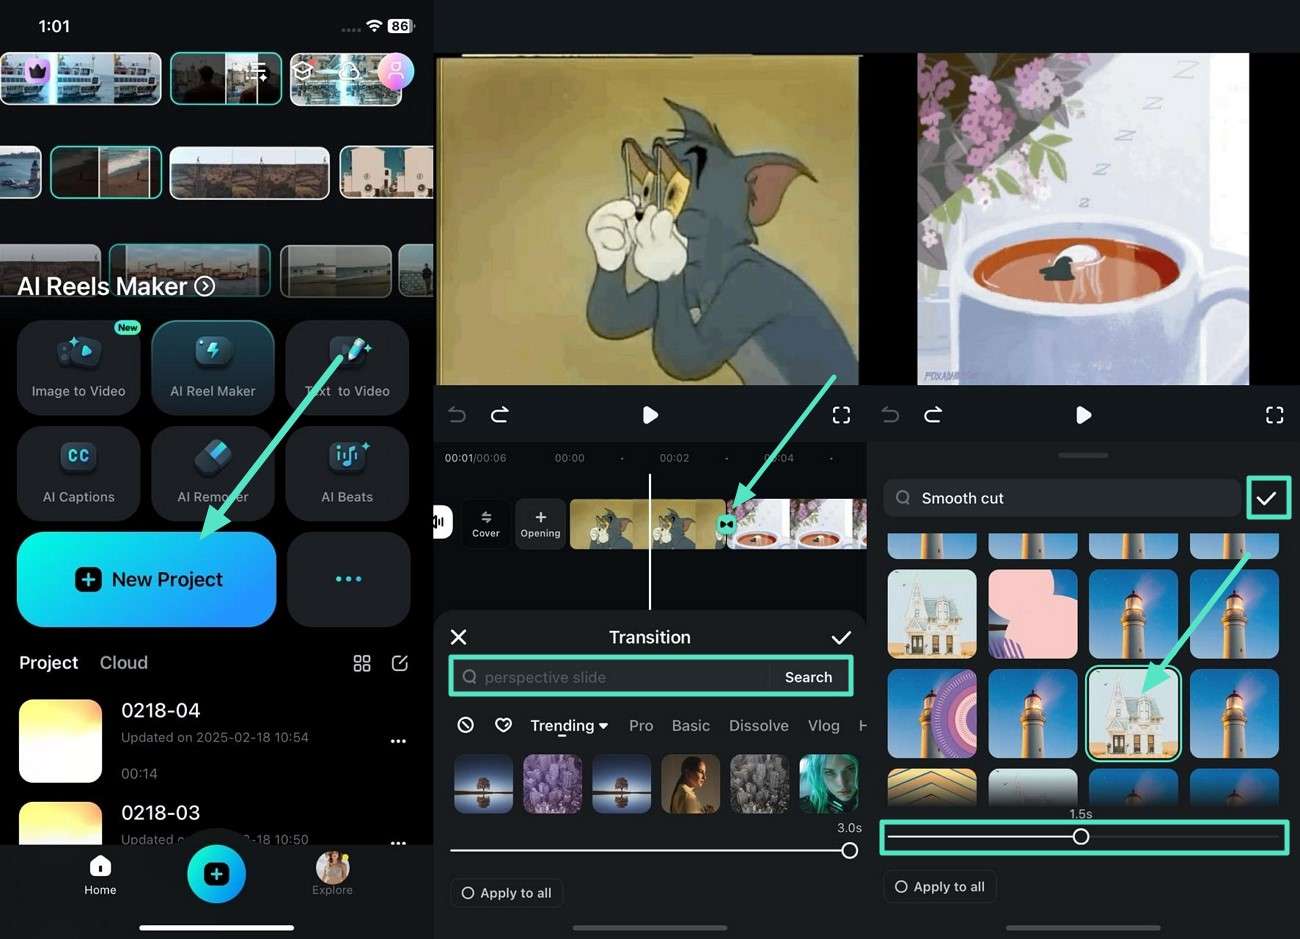
Step 1. Import Your Clips and Apply Smooth Cut Effect
Create a “New Project,” import two clips, and tap the “Transition” icon to reveal the menu. Afterward, look for “Smooth Cut” to pick an effect and move the slider to adjust the speed of transition before confirming the changes.
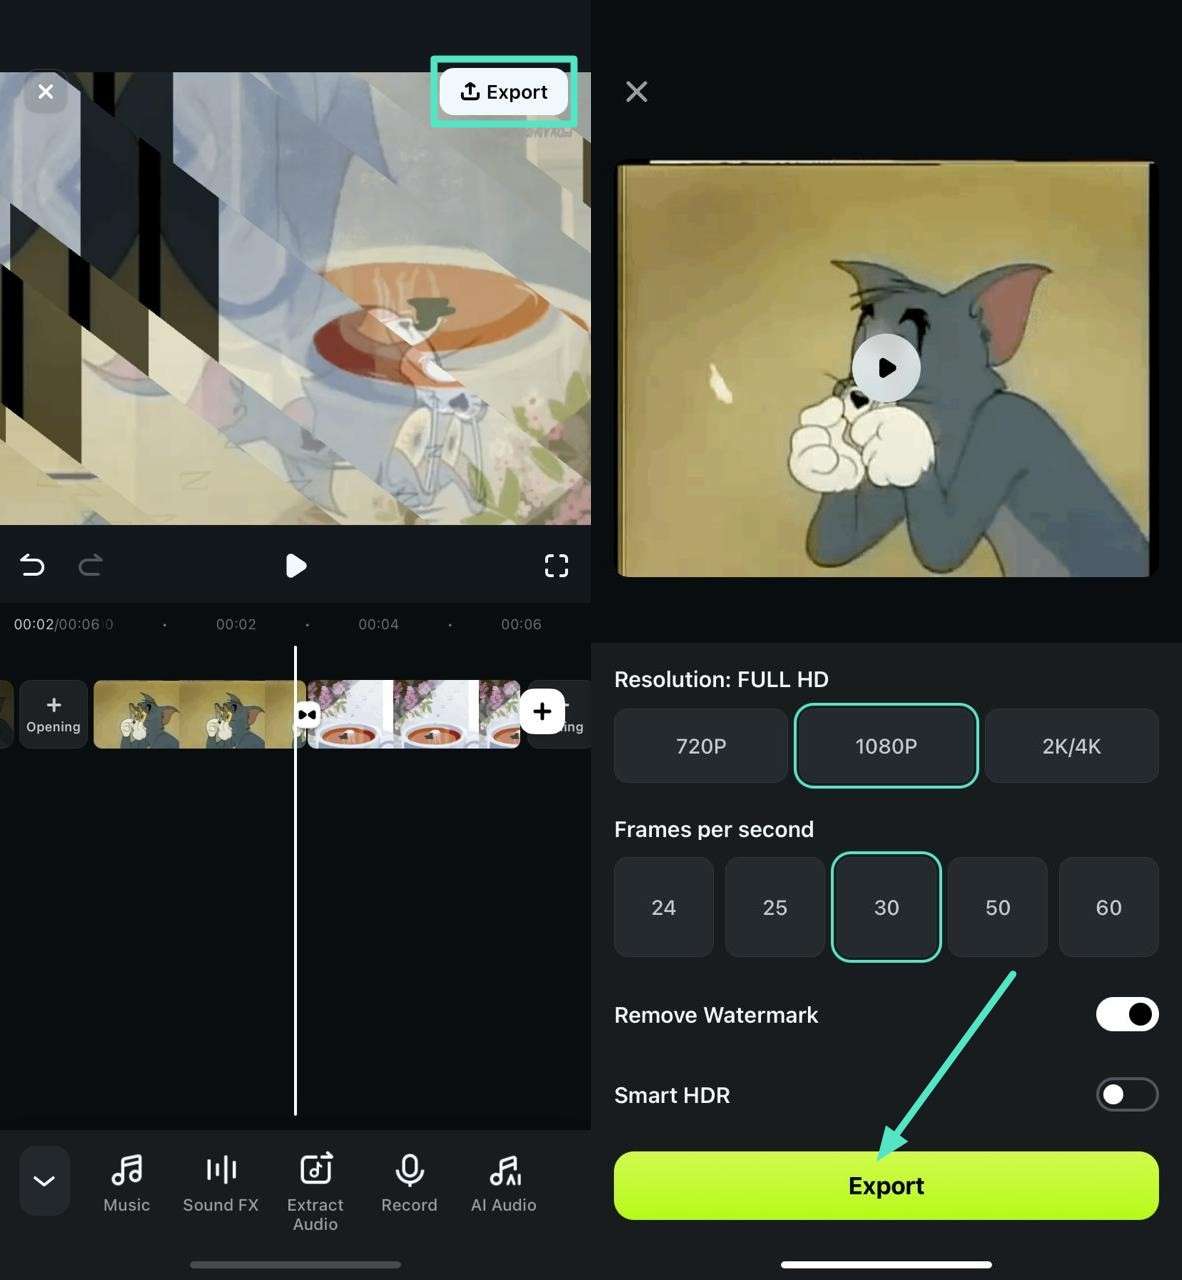
Step 2. Export the Final Video With the Transition
Once done, navigate to the "Export" button at the top-right and choose the appropriate resolution from the given options. Lastly, press the "Export" button to download your smooth-cut transition video.
Filmora for Mobile Filmora for Mobile Filmora for Mobile Filmora for Mobile Filmora for Mobile
Edit Videos on Your Mobile Phone with 1-Click!
- • Powerful Brand New AI Features.
- • User-friendly video editing for beginners.
- • Full-featured video editing for professional.


Conclusion:
Hence, Wondershare Filmora users can quickly create a smooth cut transition effect in their videos. It is easy to download Wondershare Filmora on your Mac or Windows system. All you need to do is import the footage to the interface and go to the effects tab.
The next step is to go to the transitions tab. It is easy to apply these effects to the first and the second layer. It is easy to check the preview of the created video, and if required, users can go for adding top bottom transition here.
Reset the crop settings of the first footage and select the right and left parameters to 30. The same is done to the second footage. After adding the different effects to created video, it is easy to save and preview the final footage. Beginners and professionals can go for these steps to incorporate a smooth-cut transition effect into their next video.
