Have you ever seen videos on social media apps or movies and seen a video in text like the title as the intro? The highly appealing and unique style makes the video introduction stand out. Not to mention, it creates an illusion of almost-transparent titles that showcase the video playing in a subdued manner in the background, thereby showcasing a modern, funky intro.

Now, are you planning to create an effect such as that on your own video project? Worry not; you do not have to hire video editing experts at enormous costs or opt for a video editing course, to name a few. With Wondershare Filmora, you can create the effect at more than half the cost and effort. Let's learn how that works.
In this article
- Accessing the software
- Add Sample Color
- Put the Title tile into the video
- Take a Snapshot
- Insert the background video
- Add the Black and White Effect
- Add the Screenshot to the Edit
- Use the Chroma Key Effect
- Export the Clip
- Add the Effect on the Video Clip
- Drop the Exported Video Version Next
- Render Preview and Export Final Intro
1. Accessing the software
The first step to kickstart the whole process is downloading the software into your system. For this, visit the official website of Filmora and click on the Download button at the top of the page or the description. This will automatically download an installer for the app on your device.
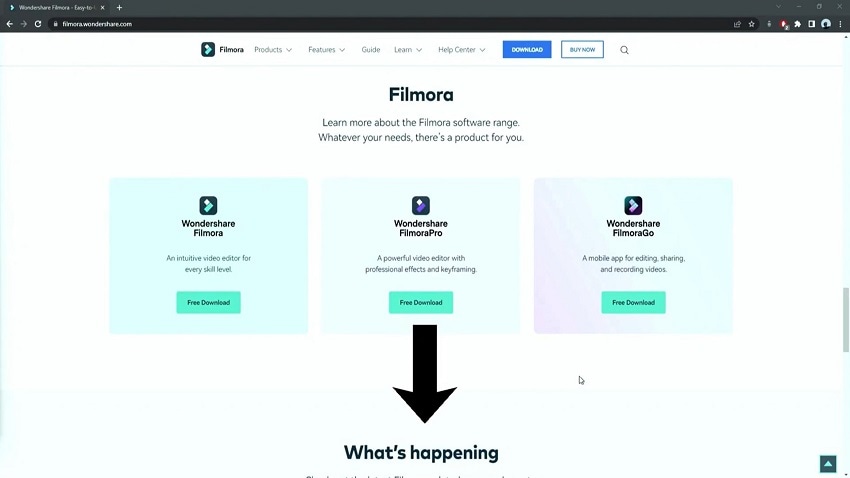
From the Downloads section of your Mac or Windows-based device in the browser, double-click on the installer. It will ask you to confirm the terms and conditions and press the Install button on the next pop-up prompt. Then will start the overall downloading process of the software into your device, and it will take some seconds, after which Filmora will automatically open to the homepage.
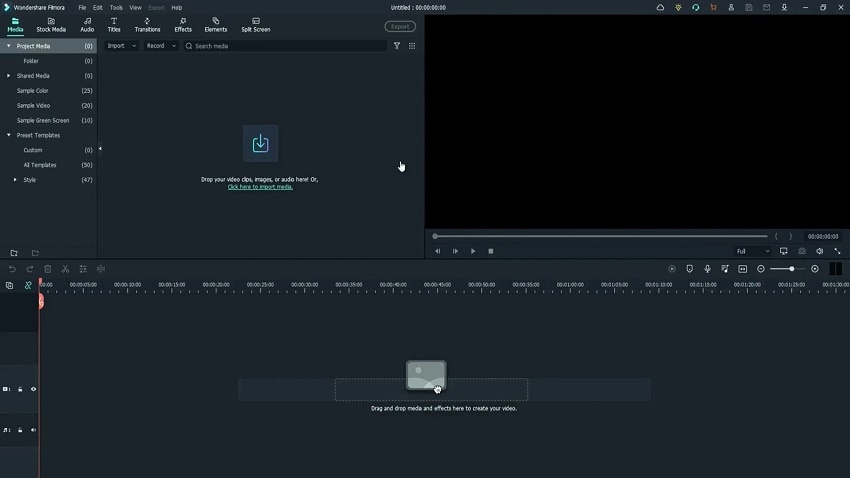
Click on the "Create New Project" button on the homepage, and that will launch the software to the editor window.
2. Add Sample Color
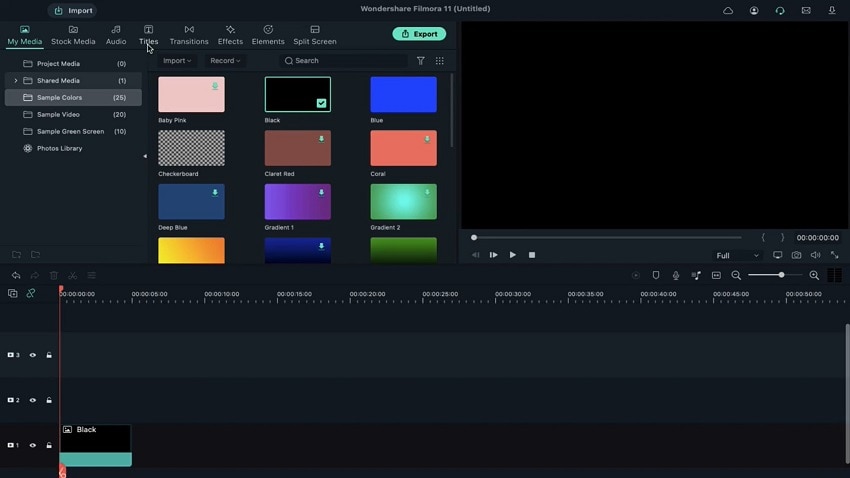
On the main editor window of Filmora, you have to go to the My Media section. From the drop-down list, click on the folder full of Sample Colors. Next, click on the black sample color option and drag it down to the editing timeline. Finally, drop it in the place of the Track 1 section on the timeline.
3. Put the Title tile into the video
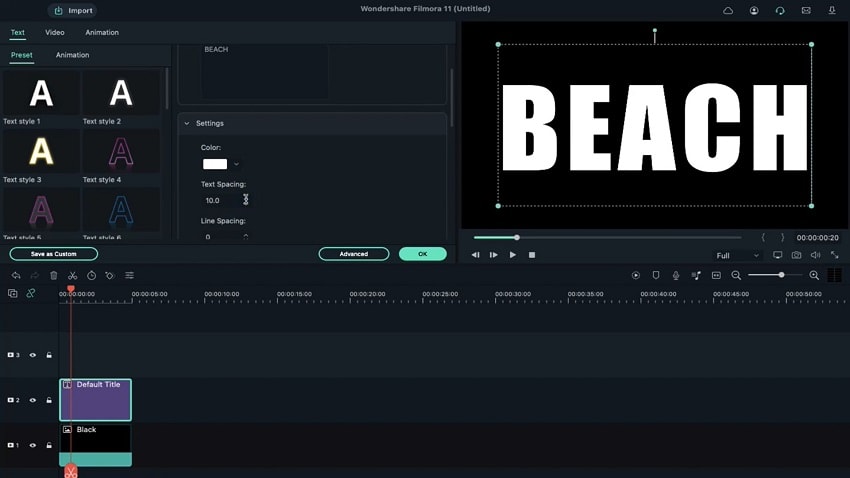
After you add the sample color to the timeline, you have to click on the Titles tab from the top main toolbar of Filmora. Out of the options you find here, choose the Default Title. Then, hold it and drag the title template onto the Track 2 section of the editing timeline, and drop it in place.
Then, double-click on it to open the editing panel for the text. You will see a text field where you can update the title wording instead of "Your Title Here". Then, you have to change the size of this title text to 280. Make sure to adjust the font style to whichever option you prefer, but typically a blocky style works. Click on the Bold icon to change the structure of the title text.
Scroll downward among the text editing parameters until you see the Text Spacing option. Whatever the default value here is placed as, you have to turn it to 10. After that, click on the OK button.
4. Take a Snapshot
After adjusting the size and dimension of the title you added, click on the Snapshot icon to take a screenshot of the Track 2 title clip that has been changed. Then, select both of the clips on Tracks 1 and 2 and remove them from the timeline.
5. Insert the background video
Next, go to the My Media tab again and choose the Project Media option. Right-click on the library section and tap on the Import button. This will open you to the device storage of your computer. From there, please search for the video clip you want to insert into your project as the main video background and import it into Filmora.
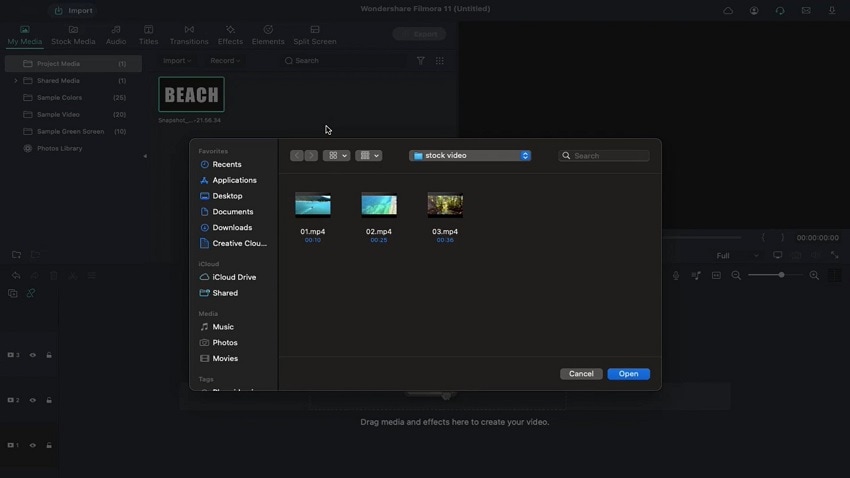
Then, when that is available in your media library section, hold it and drag and drop the clip onto the timeline in the Track 1 section.
6. Add the Black and White Effect
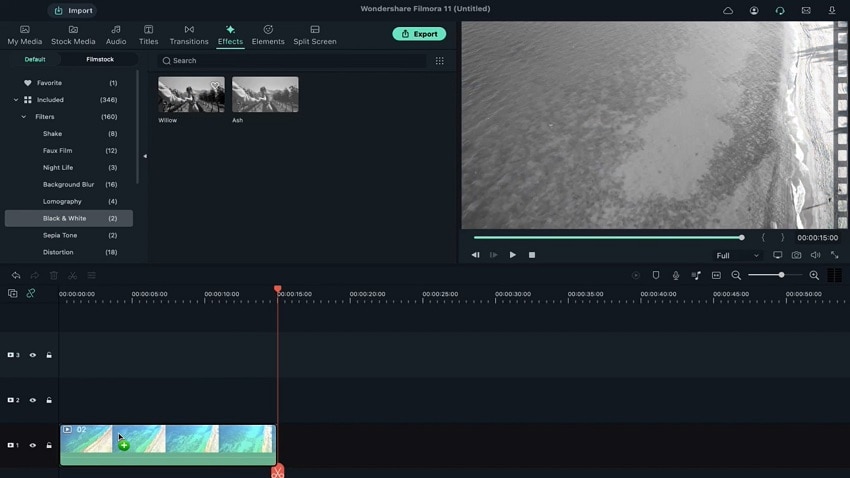
Move the playhead forward to the 15-second mark on the added clip in the timeline. Then, tap on the scissor icon to split this clip. Please tap on the excess amount of the video clip and delete it.
Following that, click on the Effects tab on the top toolbar of Filmora. Out of the list of various effects that you will find, tap on the Black and White category and choose the Willow effect. If you cannot find the Willow effect easily, you can directly search for it in the text search field above and select from there.
Then, drag the willow effect to the video clip in the timeline below, keeping a watch on the preview window. The effect will turn the video into its format of Black and White.
7. Add the Screenshot to the Edit
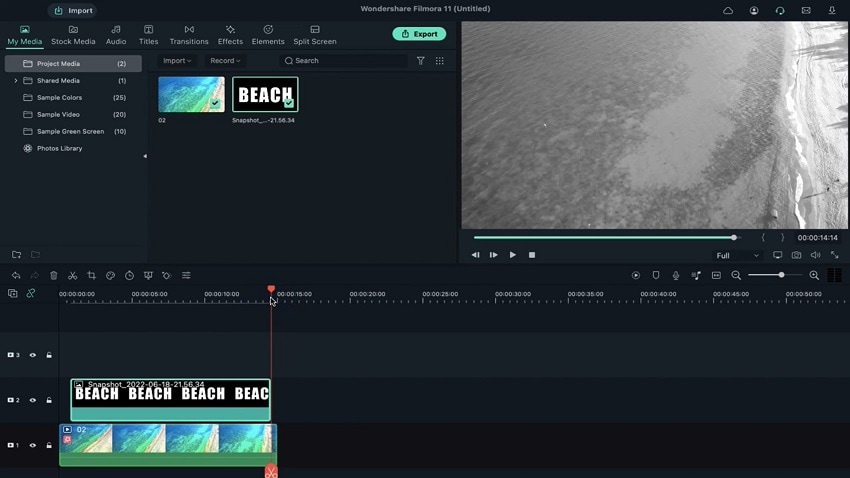
Again, scroll up to the My Media section and tap on the screenshot you created earlier. Then, drag it down onto Track 2 of the editing timeline. Then, use the playback to mark the beginning of the video two frames off of the beginning of the video. Then, move the clip to that position so that it starts from that point onward.
Next, move the playback to the 14-second mark and adjust the Track 3 clip to fit that section perfectly.
8. Use the Chroma Key Effect
Now, double-tap on the Snapshot clip and choose the Video tab. Activate the Chroma Key option and go to the color picker section. Choose the black color from the clip shown on the preview window.
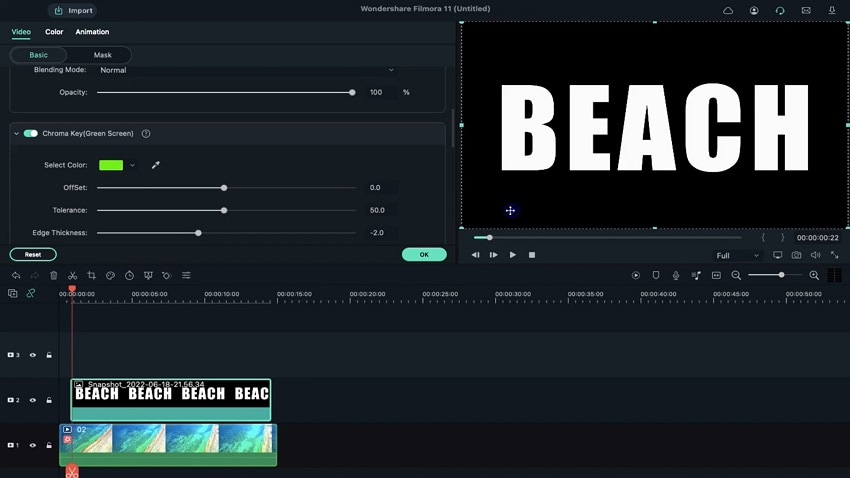
You must now click on the Crop option from the function bar. On the top, you will get the option for Pan and Zoom. Click on it and shorten the visible bright window by dragging it towards the center. Move this cropped rectangle to an all-white position. This will determine the end point of the text to be shown at the starting position of the video.
Move the playhead ahead in the timestamp and again click on the Chroma Key button from the function bar. When it opens, click on the Chroma key option in the editor and change the edge thickness value to a -7 number.
9. Export the Clip
Once done, you need to export this clip. To do so, tap on the Export button at the top of the screen. On the Export page, change the name of the video to the intro title text and go to Settings to see its resolution condition. For the best effect, you should choose the higher bit rate of the file while exporting. After you are done, tap on the Export button.
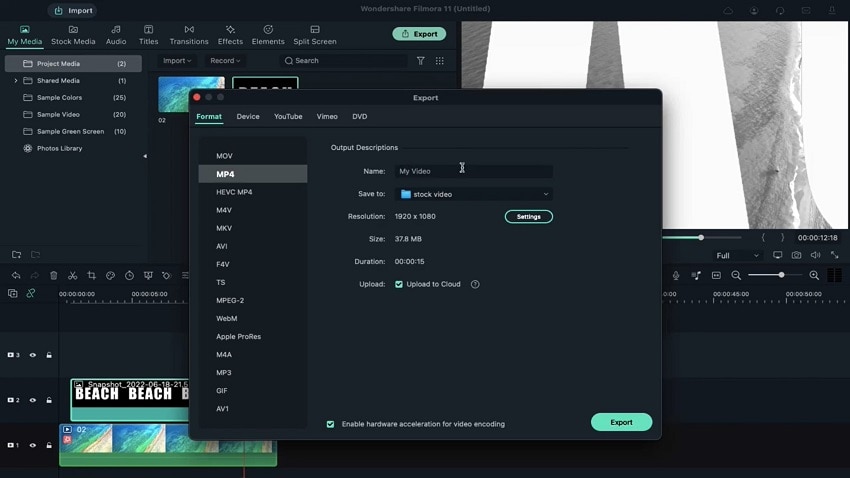
Once the video gets exported, delete the screenshot clip you took from the timeline.
10. Add the Effect on the Video Clip
Double-click on the background video clip on the timeline to open the text editor window. Tap on the Effects tab in this section and remove the Willow effect from your video.
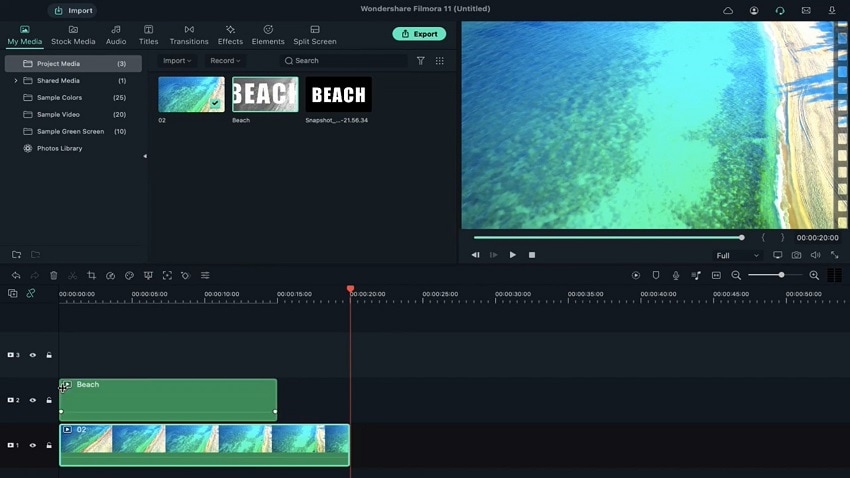
You must extend the video duration to 20 seconds in the lowermost editing window. After that, import the exported video clip from where you stored it after downloading.
11. Drop the Exported Video Version Next
Following this, you must import the video you exported into the timeline. For this, you have to click on the My Media section and go to Project Media. Then, right-click on the library section here and tap on Import. Choose the file and import it from the location where you saved it.
Then, drag and drop the file back into the timeline. Here, the next step for you is to adjust the playhead position for the new video clip. Move the play head to the 14th second and the 14th frame position to synchronize it with the Track 3 video clip.
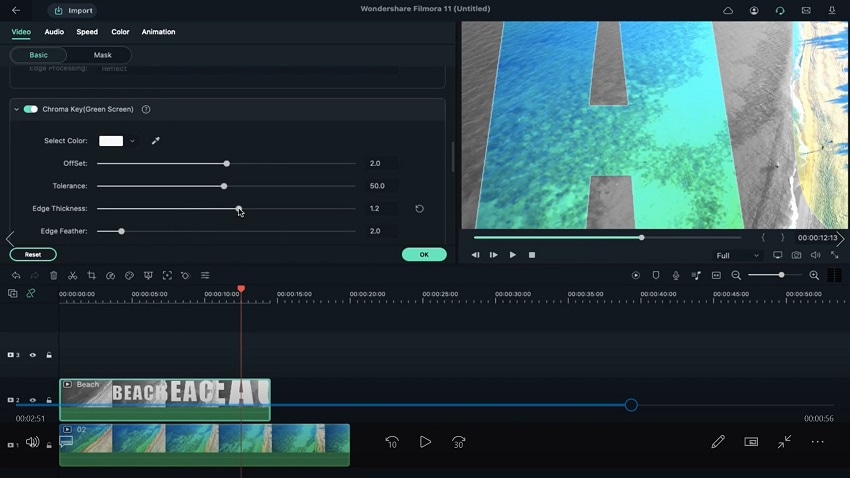
Then, double-click on the video, and under the video tab, choose the Chroma Key option. Then, tap on the color picker and choose to add white color from the preview window. After this, select the Edge Thickness parameter on the editor window and increase it to a value of 1.5.
12. Render Preview and Export Final Intro
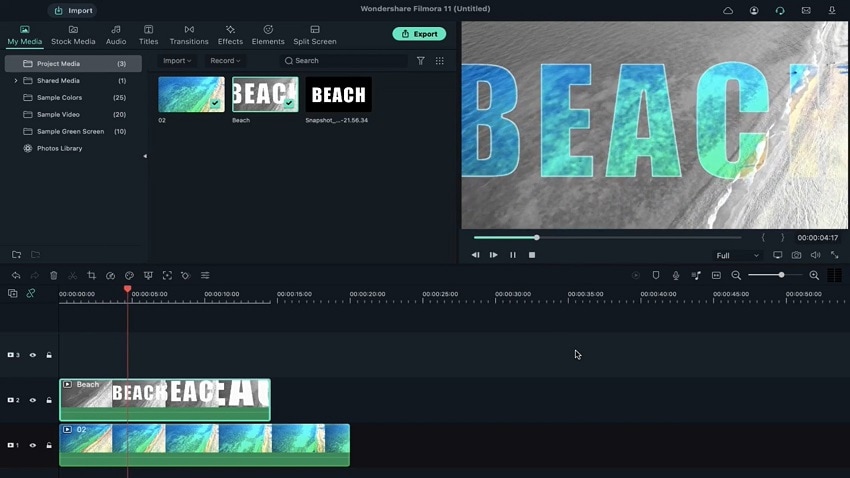
Once you are done, click on the Render Preview icon to watch how your edited video stands out. If you are unsatisfied with the outcomes, you can easily roll it back and make the changes. Export the file after you see the preview and are fully satisfied with the effect.
Conclusion
Following the steps outlined, you can create detailed and high-quality introductions on your videos in minutes. Try out the process and features on the software to create more effects and transitions, and play around with other dynamic title design ideas. Filmora has a complete list of title templates that you can also use.


