According to research, 69% of people view videos without sound in public places, and 80% of people are more likely to watch a video to the end if it has subtitles. Subtitles not only enhance accessibility for viewers who are deaf or hard of hearing but also cater to the population of viewers who watch videos on mute. Subtitles can significantly improve video engagement, retention, and even global reach.

Adding subtitles isn't a one-size-fits-all process as different types of captions require specific tools and distinct editing processes—whether open captions embedded in the video, closed captions you can toggle on or off, or subtitles for translations.
While many tools are available for adding subtitles to videos, this article will focus on how to add subtitles with Premiere Pro. This article will walk you through the process of identifying the right caption type for your video and how to create captions in Premiere Pro.
In this article
Part 1: Making Accessible Videos With Open & Closed Captions
An important part of creating accessible videos is understanding the difference between open and closed captions. These two caption types are distinct and cater to two different audience types.

Open Captions
Open captions are embedded into the video and cannot be turned on or off by your viewers. They are a permanent part of the visual content and are always visible regardless of your viewer’s preferences. These caption types are ideal for social media videos. Open captions are fully customizable in Premiere Pro, allowing creators to adjust font style, size, color, and positioning to match the video's aesthetic.
Closed Captions
On the other hand, closed captions are optional and can be controlled by the viewers. Platforms like YouTube or streaming platforms allow users to enable or disable these captions as needed. Closed captions often contain additional information beyond dialogue, such as sound effects or speaker identifiers, making them a vital tool for viewers who are deaf or hard of hearing.
Closed captions are stored as metadata, separate from the video itself, and are exportable in formats like .srt or .scc. This feature allows for easy updates or changes without re-editing the video.

When adding captions in Premiere Pro, it's essential to note the editing restrictions associated with each type. Open captions are editable within the video project while you’re still editing the video, but once exported, they become part of the video and can no longer be adjusted. Relatively, closed captions can be changed or replaced because they are stored separately as a different file. They offer flexibility for future modifications or translations, making them ideal for professional editing processes.
Learn More about Ways To Replace the BackgroundPart 2: How to Add Subtitles to Videos in Premiere Pro
Whether you prefer manual subtitle editing or an automated process, there are different ways to add subtitles in Premiere Pro that cater to the needs of different creators. You can either transcribe your video’s audio to create captions, add subtitles manually, or import downloaded or pre-created subtitles in a .srt file format.
Here’s how to add captions on Premiere Pro using these three methods.
Method 1: Manually Add Your Subtitles
This is the most time-consuming and tiresome method of adding captions in Premiere Pro.
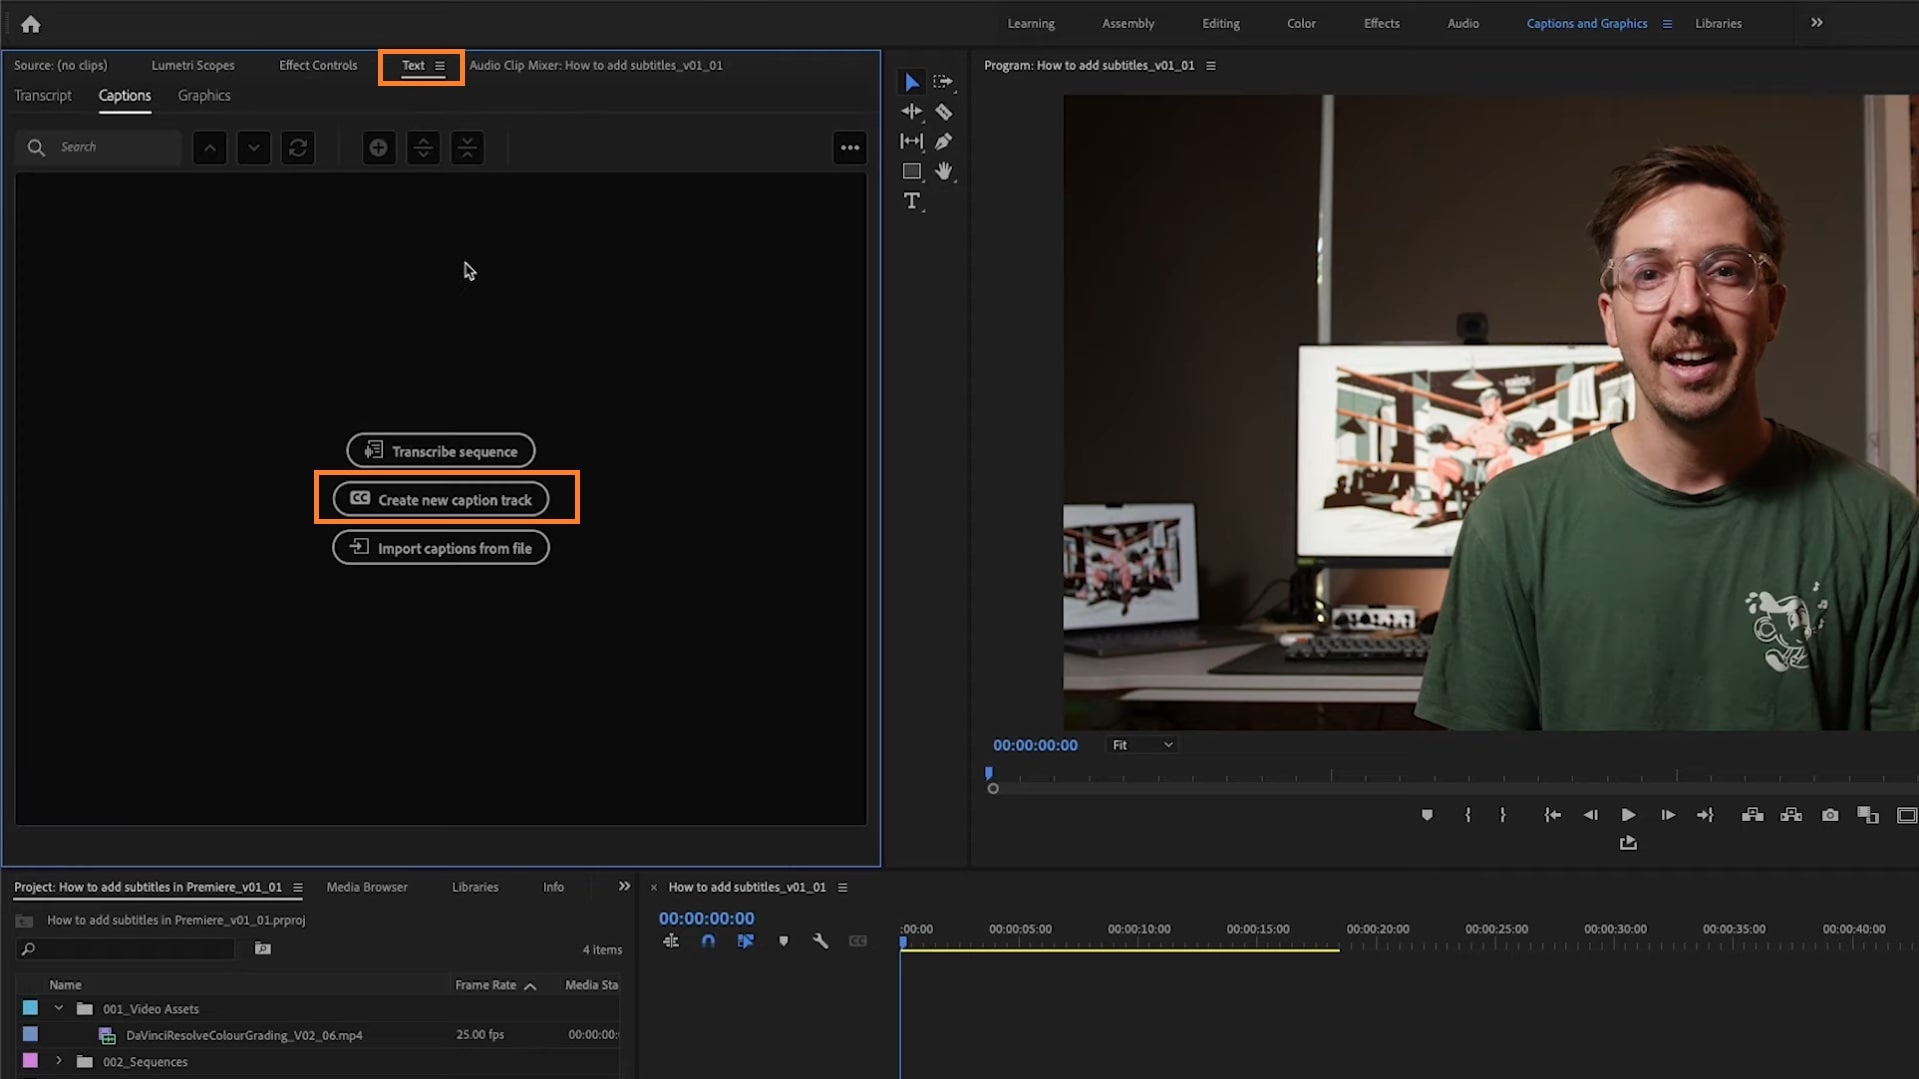
Step 1: Go to the Caption and Graphics tab at the top of Premiere Pro. To the left of your screen, open the Text tab and select Create New Caption Track to input captions manually.
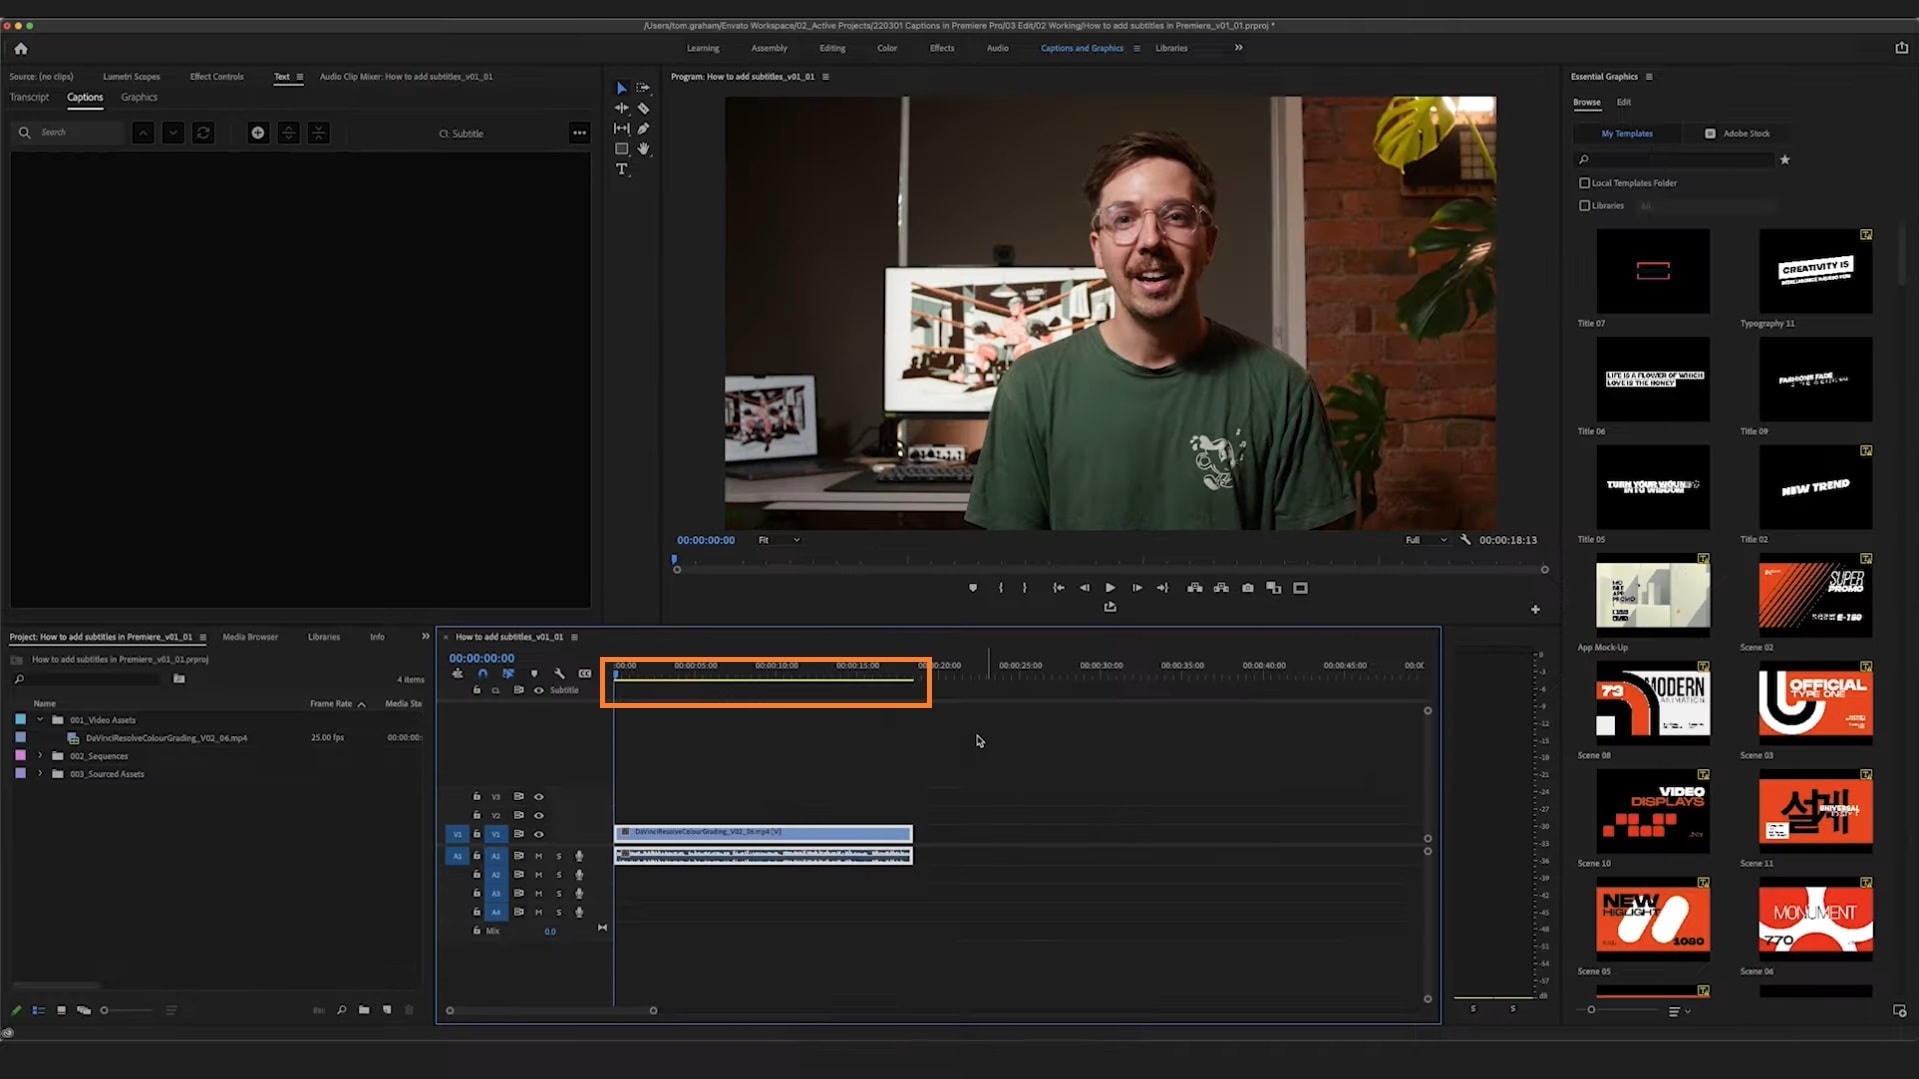
You’ll notice a little subtitle track at the top of the timeline.
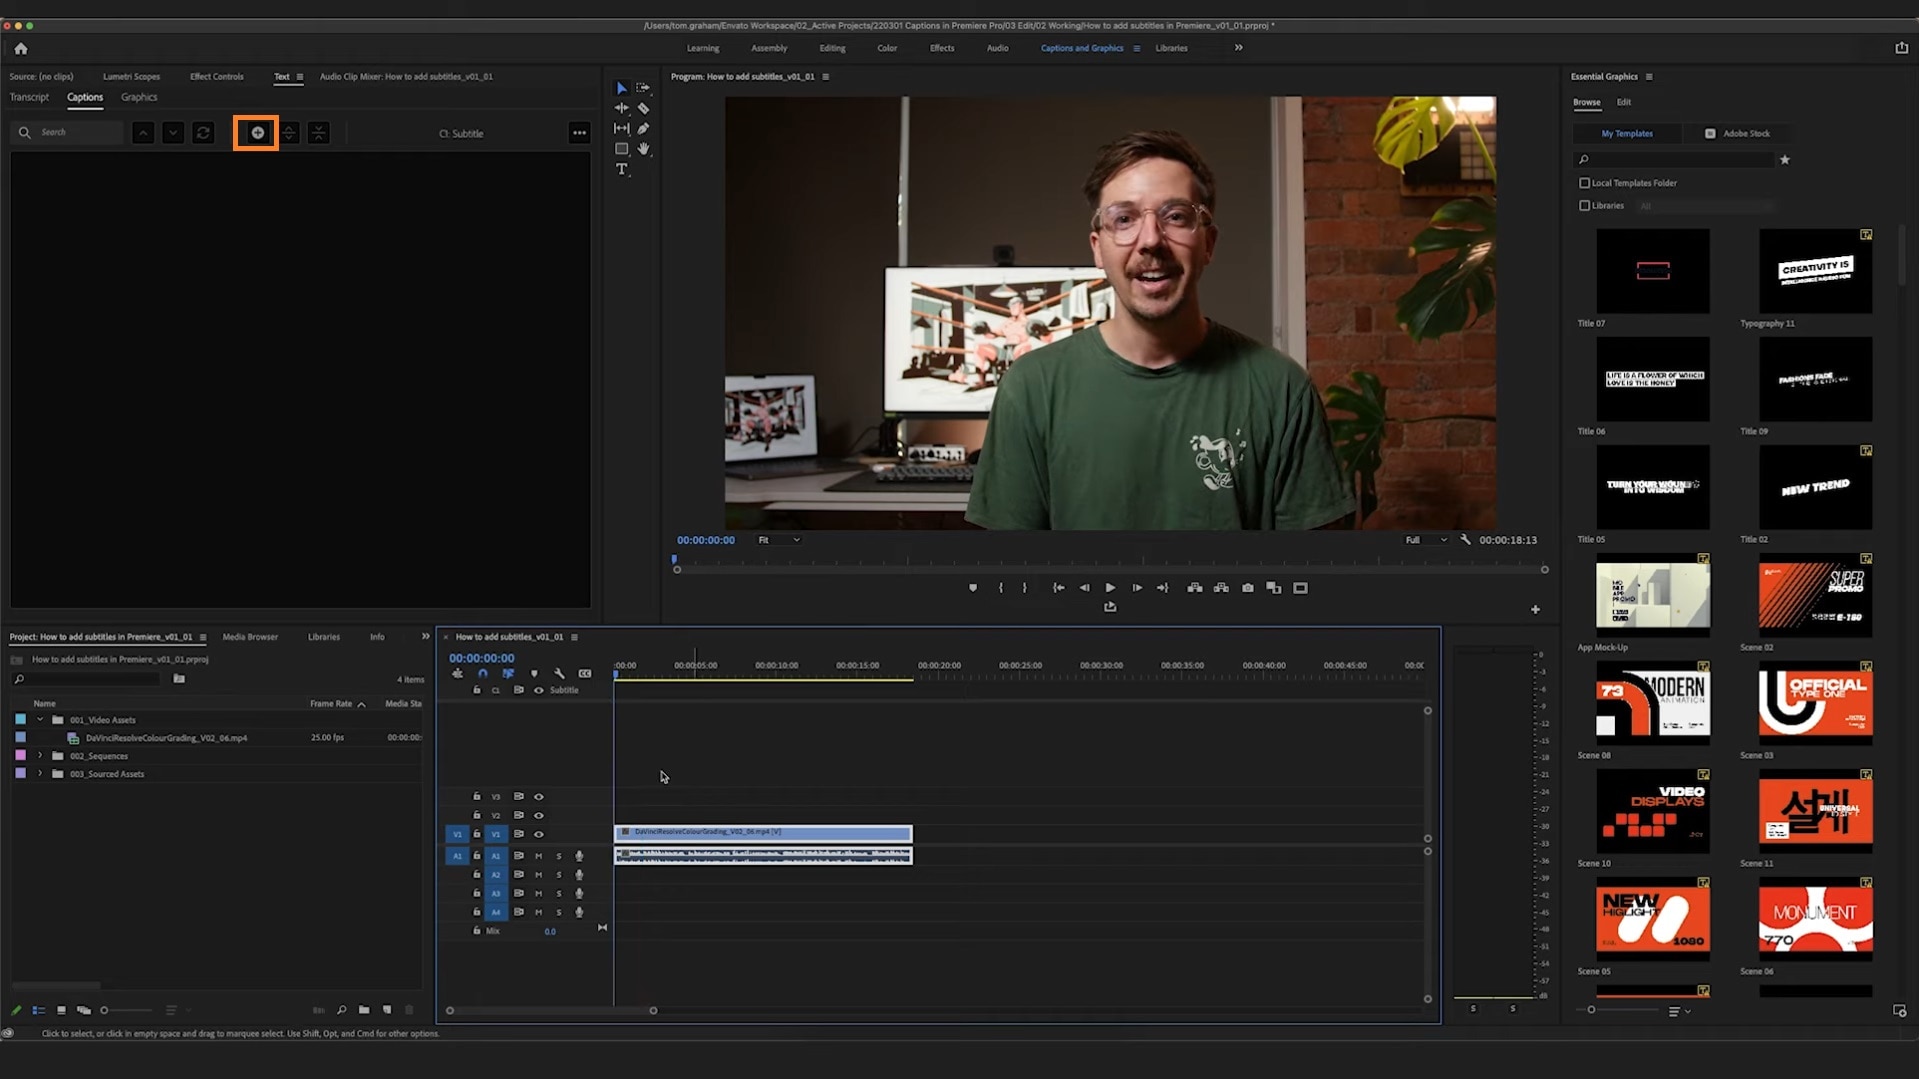
Step 2: At this point, you may want to play your video to get the line of text you’ll be inputting. Drag your playhead to the beginning of the subtitle track. Select the + button on the tab to add a new caption segment.
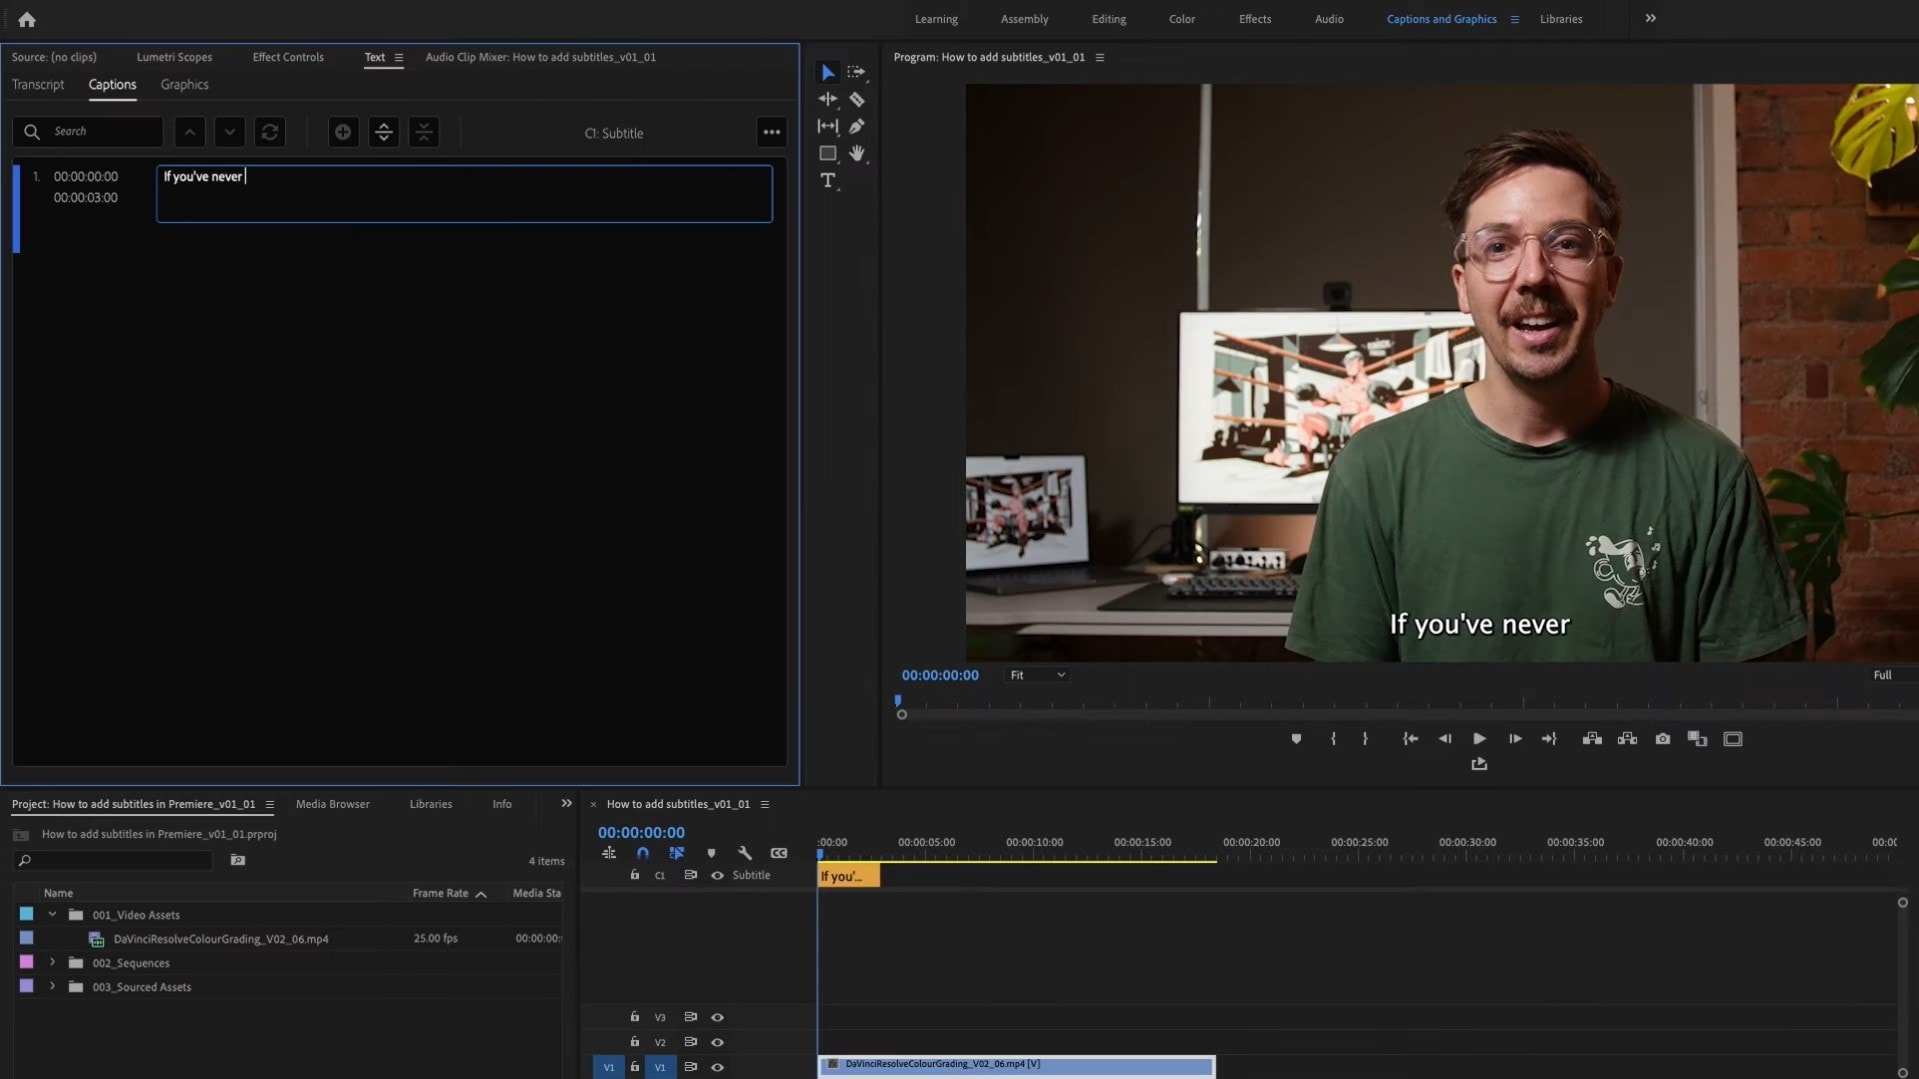
Step 3: Type in your subtitles into the captions editor box provided. Repeat the process until you’ve typed in all your subtitle texts.
Method 2: Using Auto Transcription
This method allows Premier Pro to automatically transcribe your video and adjust the transcribed text to fit your screen, regardless of your video’s aspect ratio.
Step 1: Go to the Text tab on the toolbar.
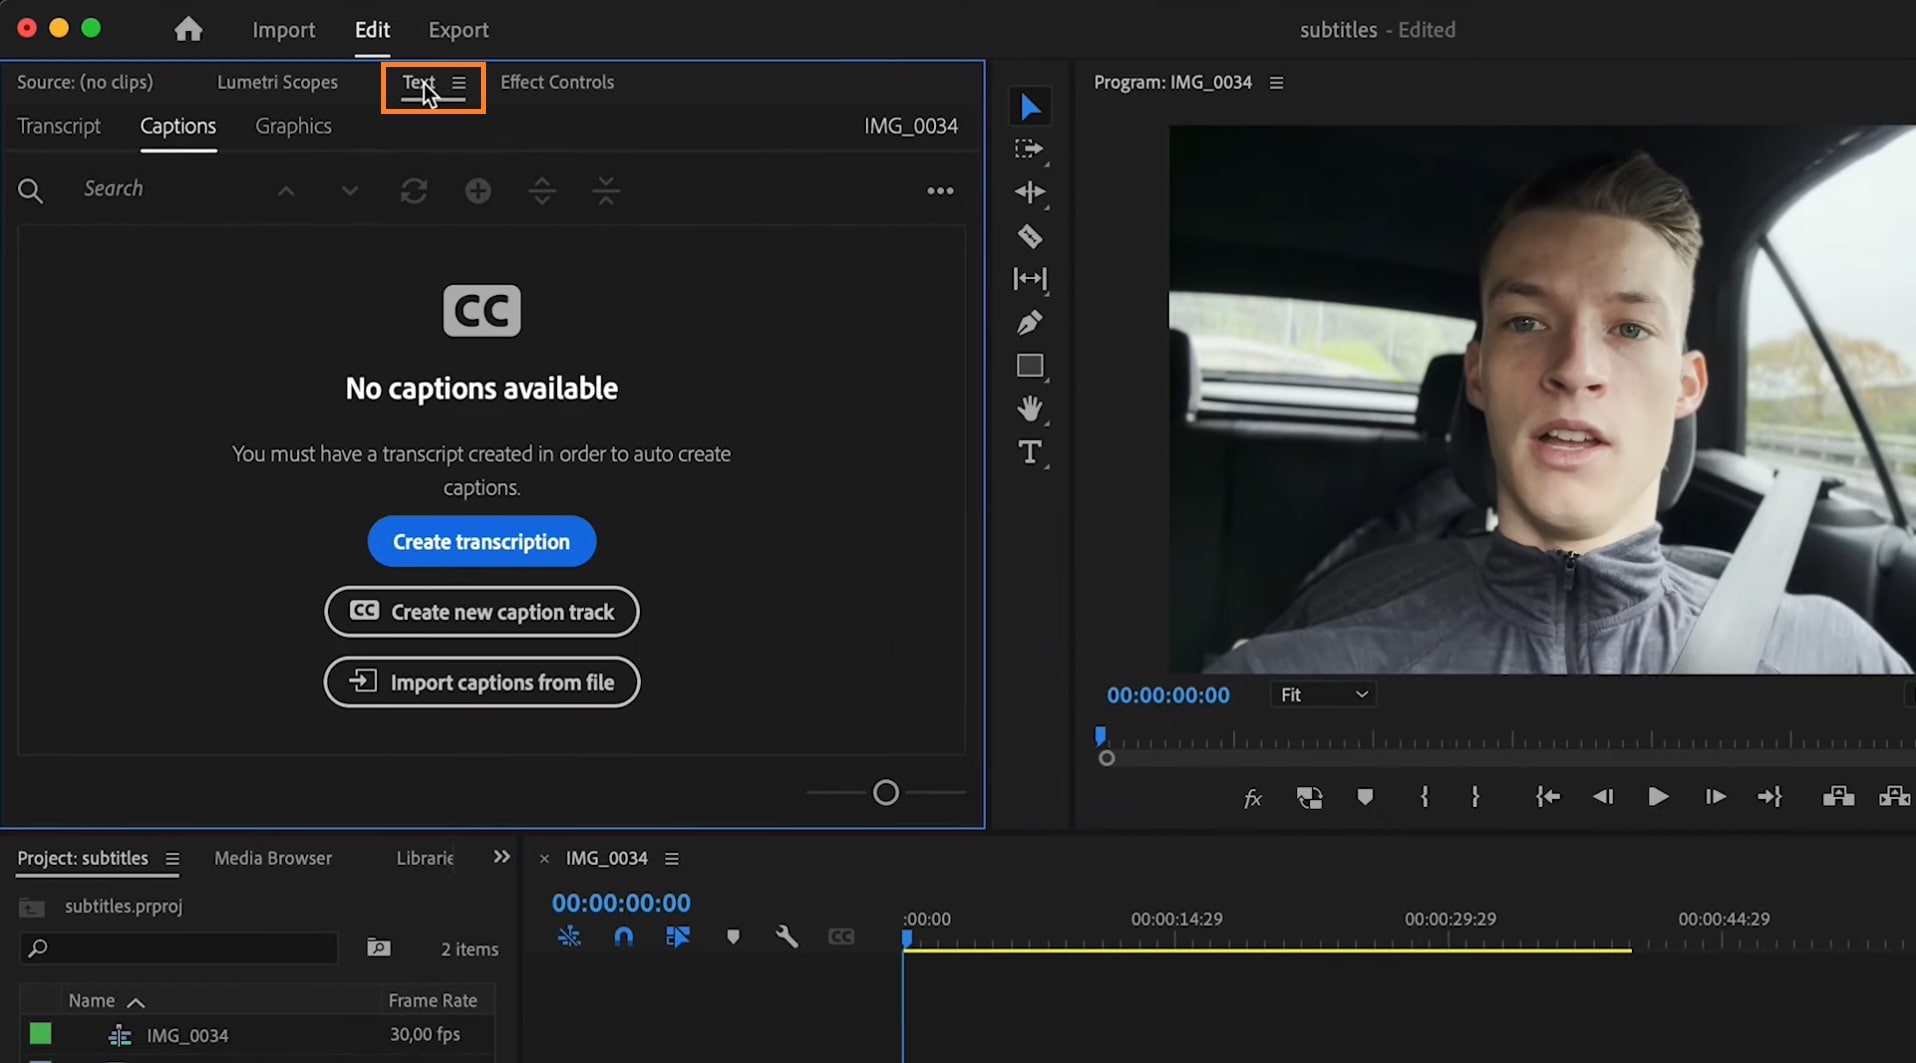
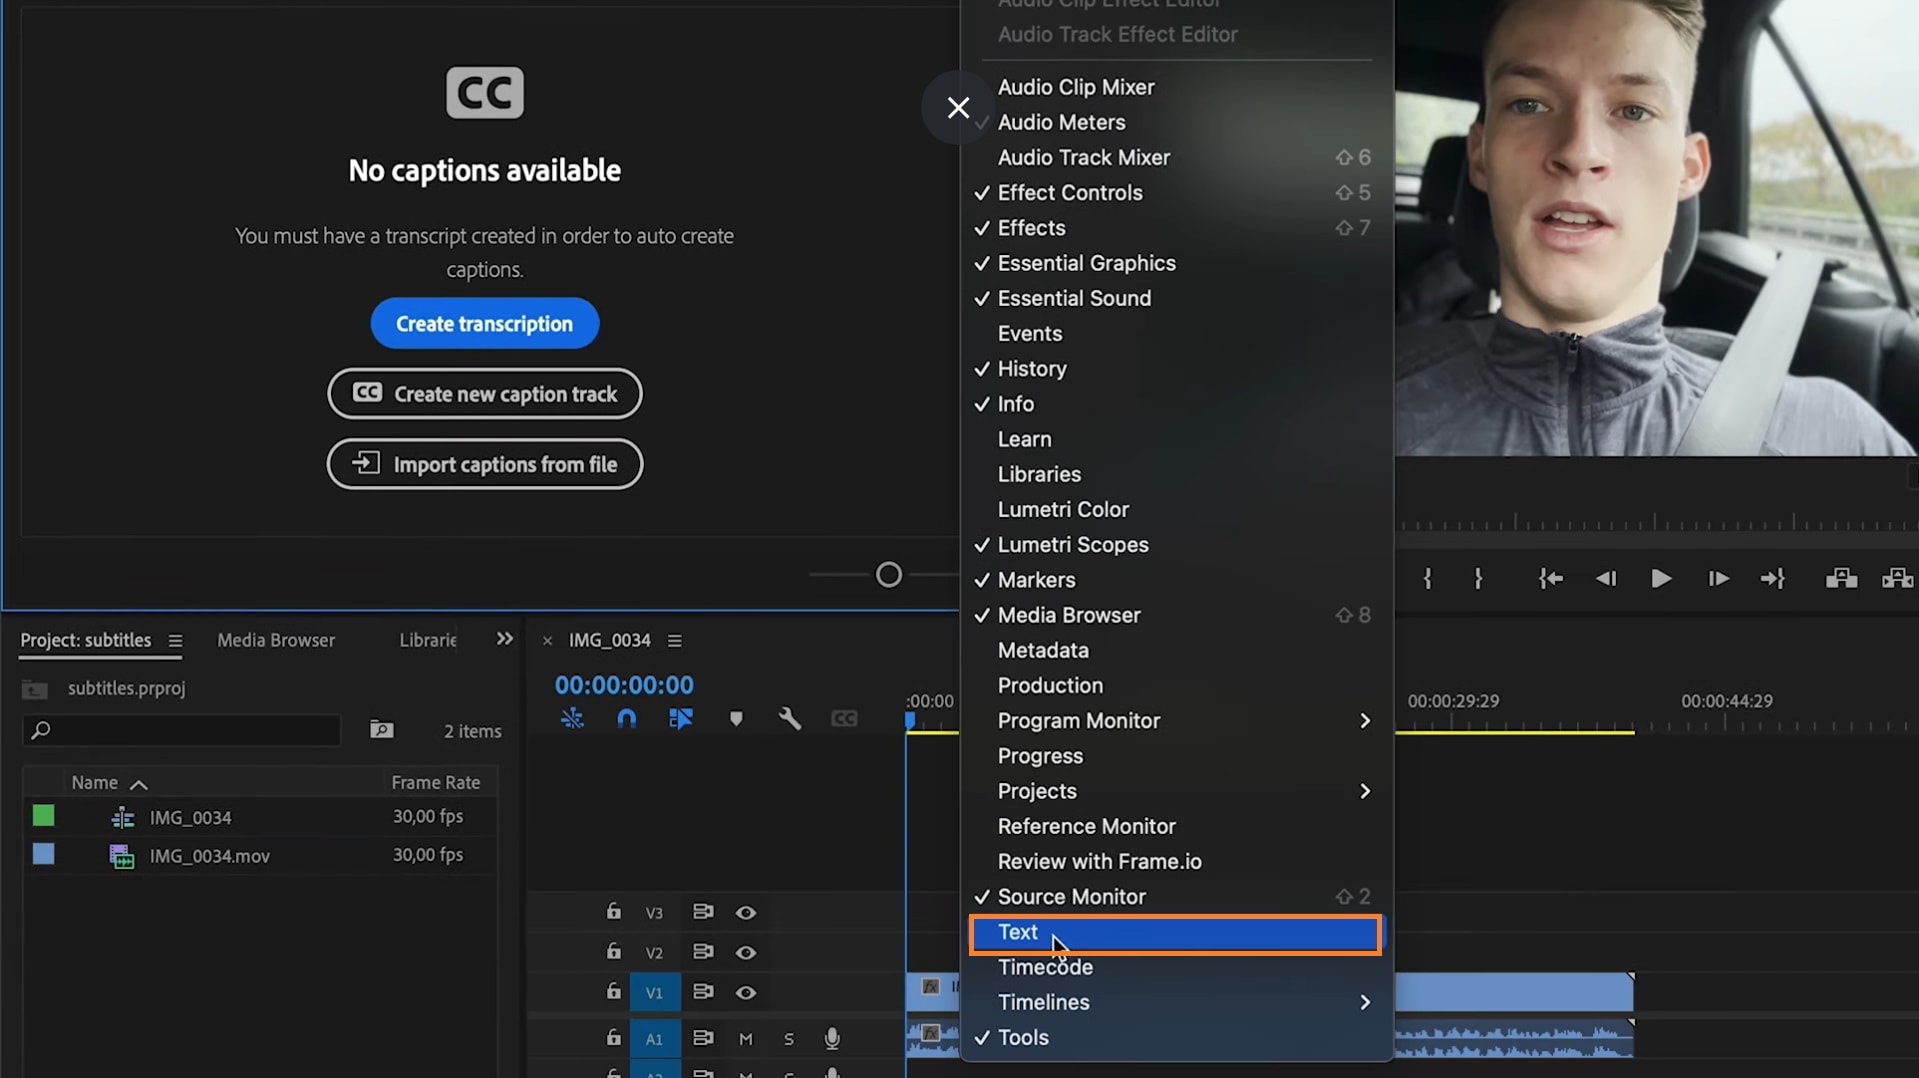
If the text tab is not visible on the toolbar, go to Windows on the toolbar and enable Text.
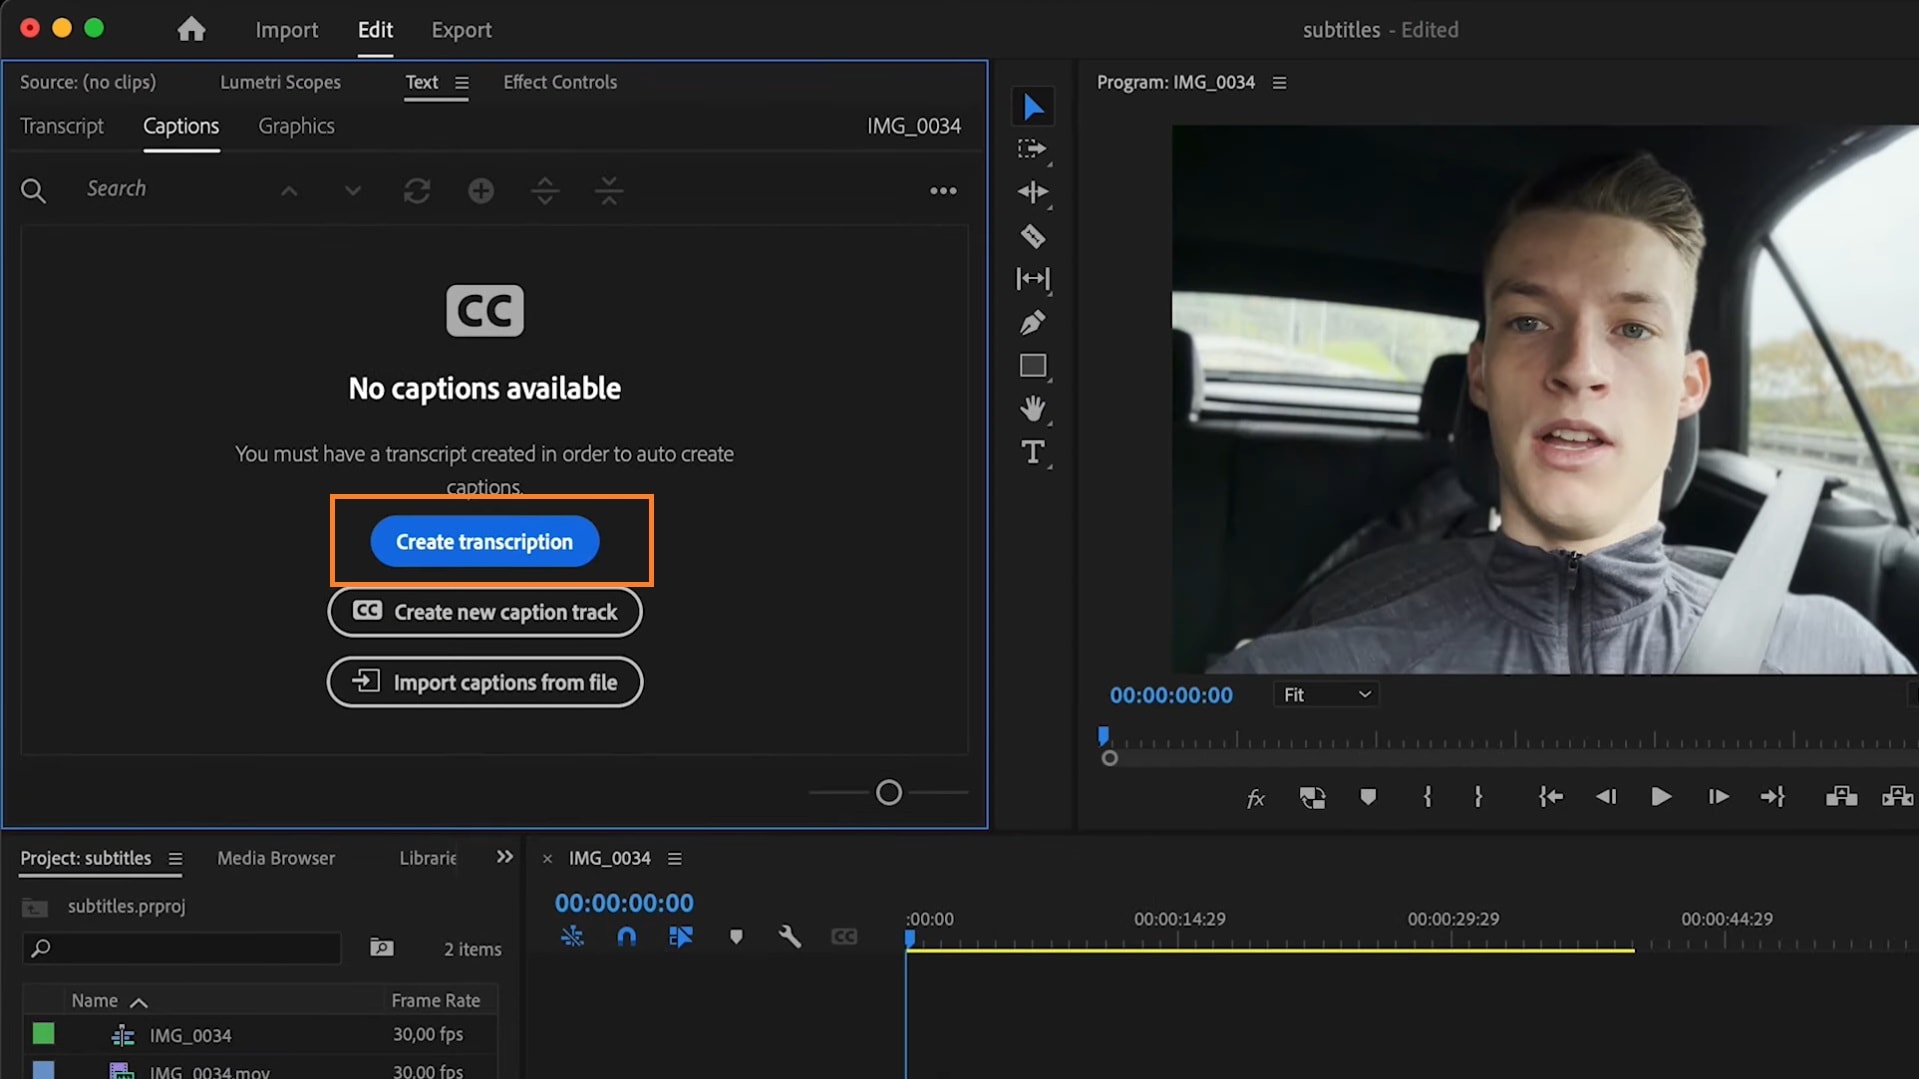
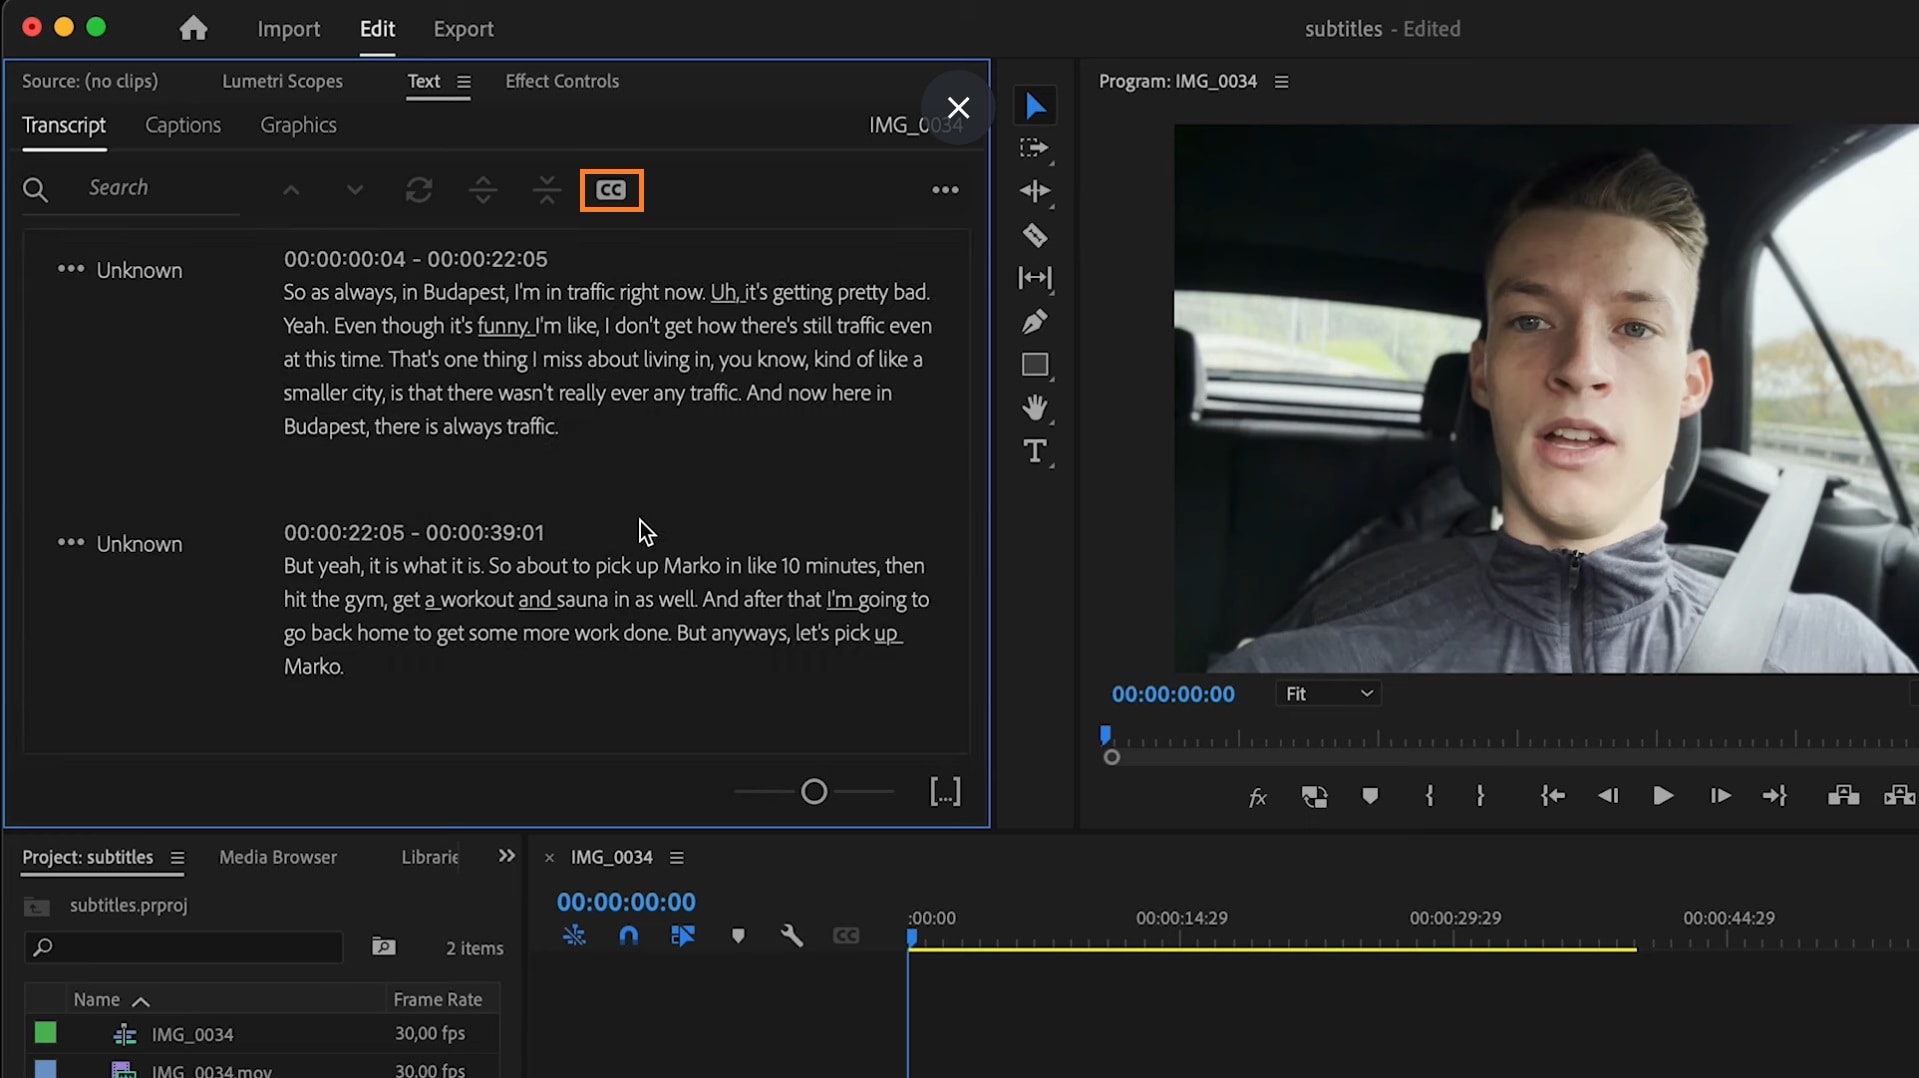
Step 2: Next, click on Create Transcription to auto-transcribe your video.
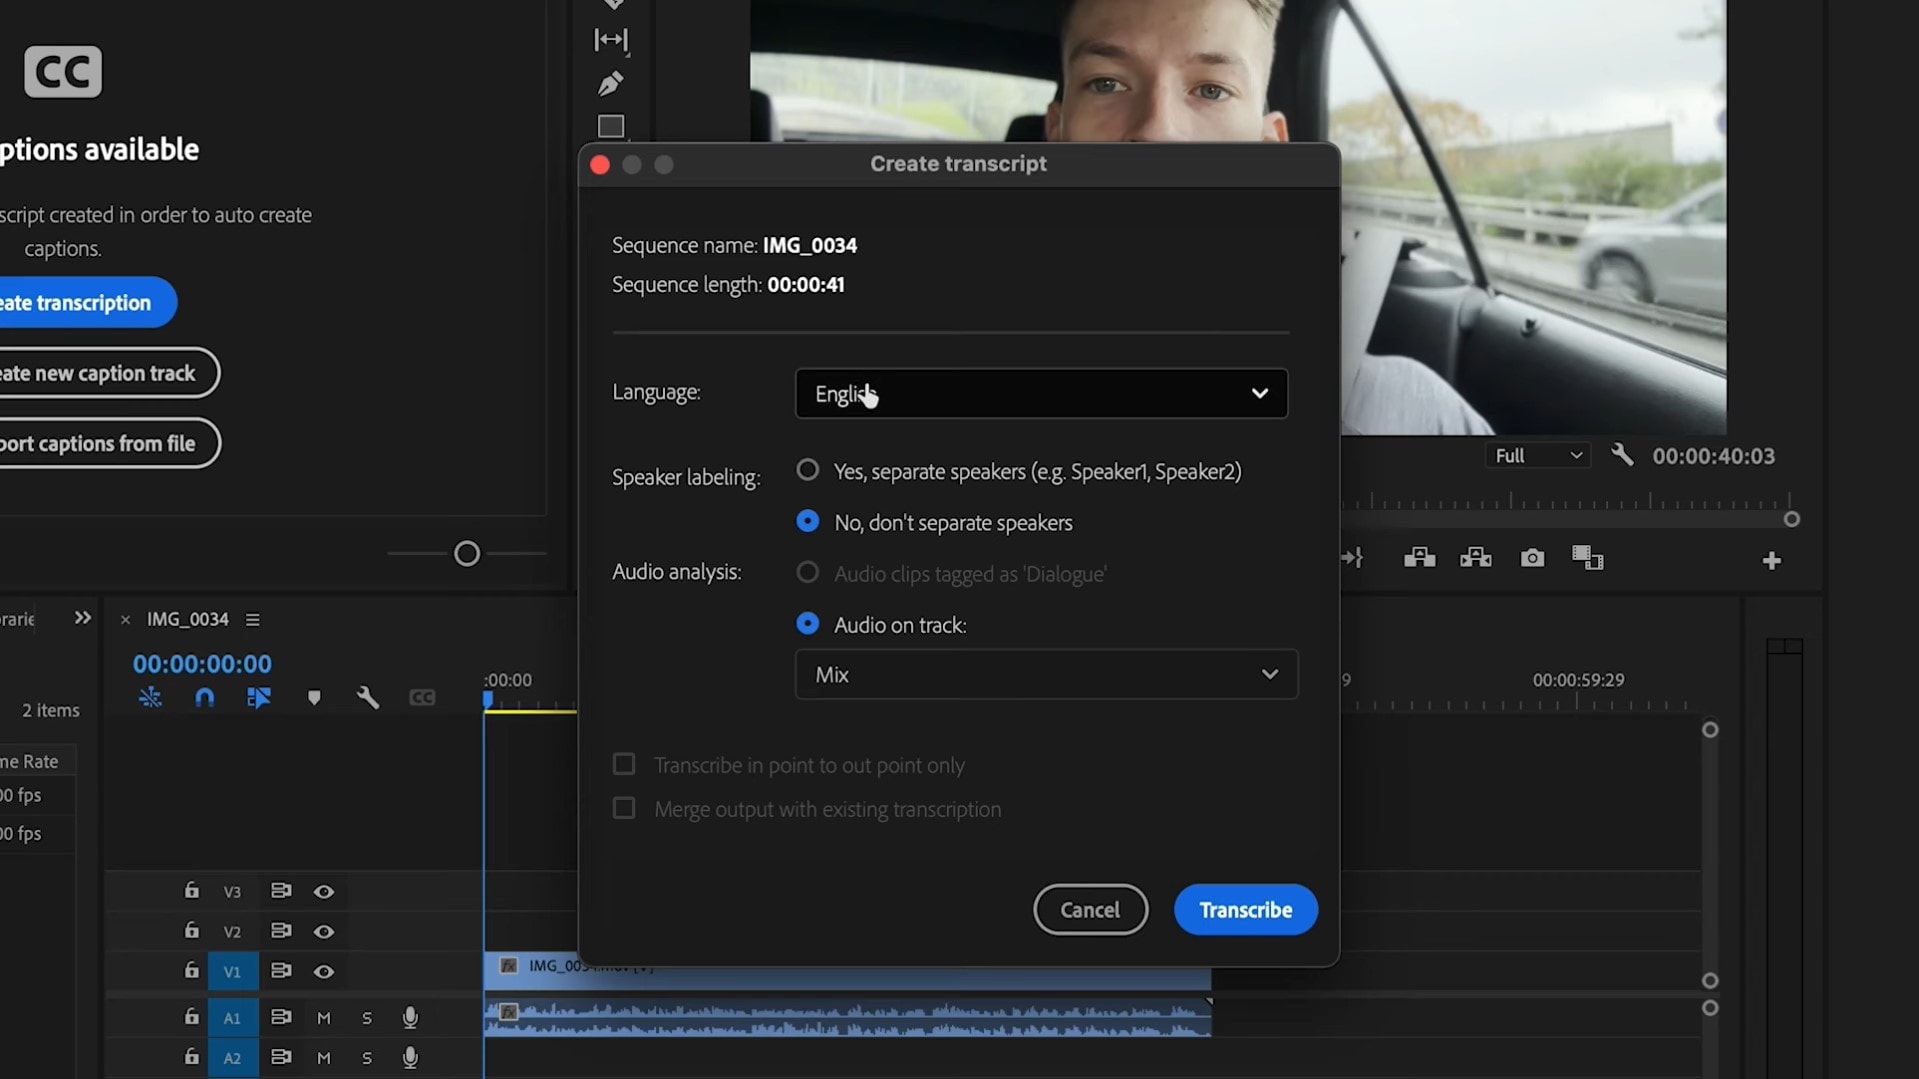
Set your transcription settings and select Transcribe. Choose what language you want the subtitle text transcribed in and the track you want to be transcribed if your video has multiple tracks.
After that transcription is done, review and edit the transcribed text to ensure the accuracy and precision of subtitles. Double-click on the text to make any necessary changes.
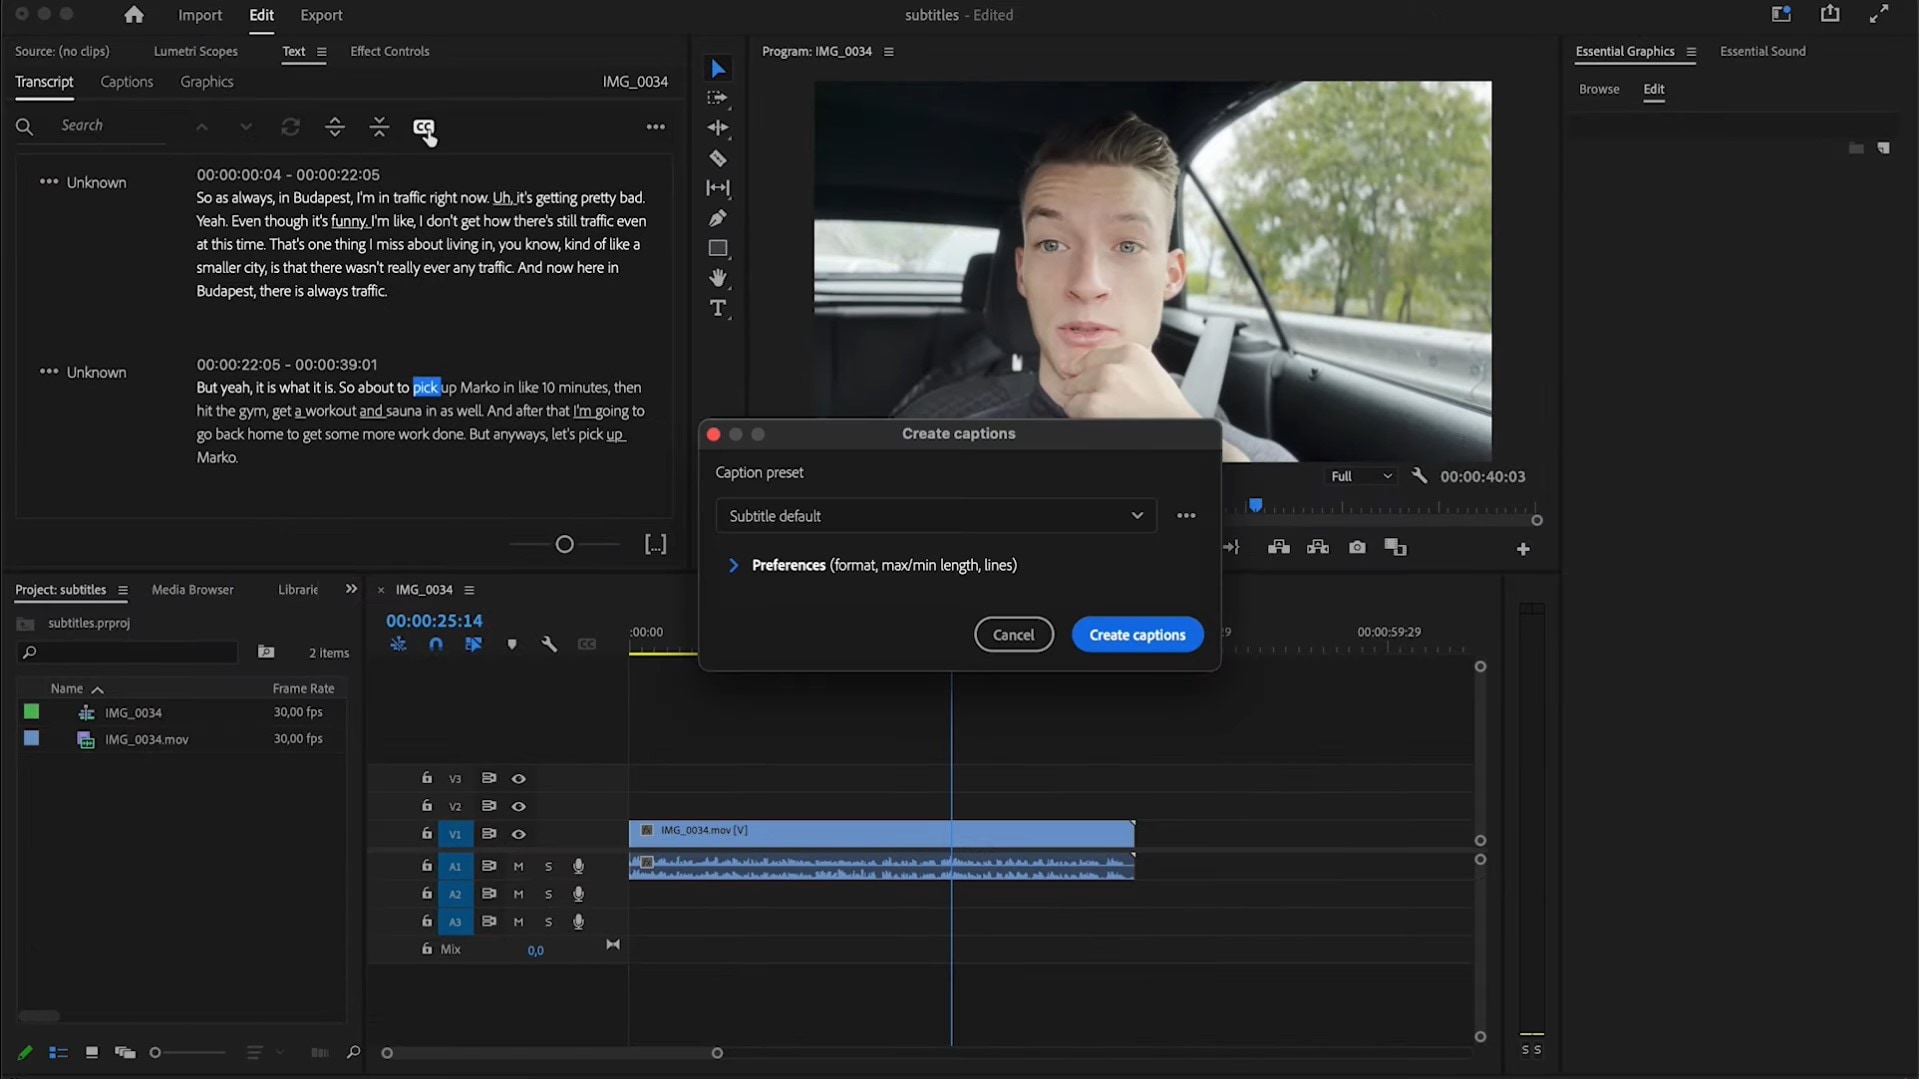
Step 3: Click the CC icon to create captions.
A dialogue box will pop up that will allow you to customize your caption presets. Here you can adjust your subtitle settings, subtitle style, character length, ideal line spacings, and caption duration. Once you’re done, click Create Captions.
Method 3: Add Subtitles from Third-Party Transcriptions
This is practically the easiest method of adding subtitles to videos with Premiere Pro. However, it requires you to have your subtitles already downloaded online or created in .srt or .scc formats using third-party tools like Wondershare Filmora.
Step 1: In the Captions subtab of the Text tab, select the Import Caption from File button.
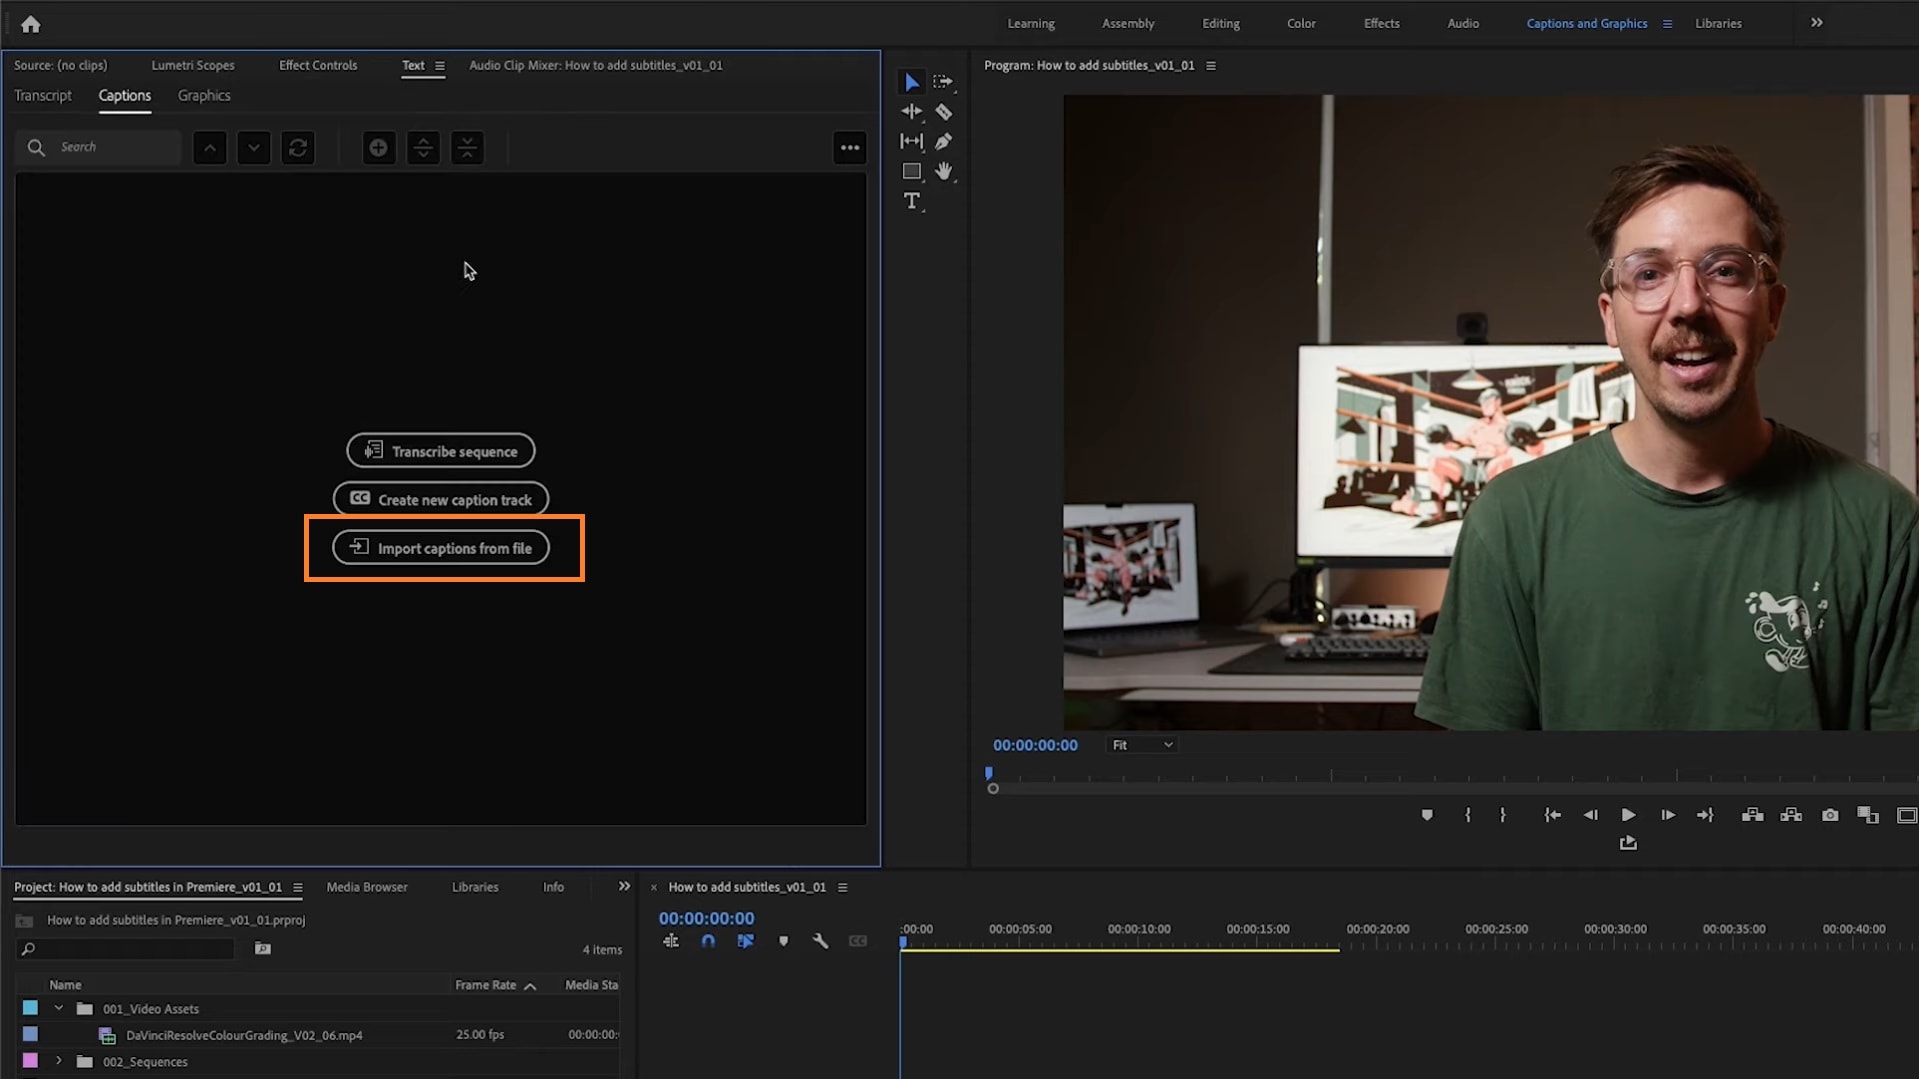
Then, simply drag and drop the subtitle file on your timeline and it will be automatically added to your video.
To Edit/Format Your Subtitles
Formatting your subtitles or changing your caption style in Premiere Pro is simple. Double-click on the caption in the subtitle box and the Essential Graphics panel will appear on the right side of your screen.
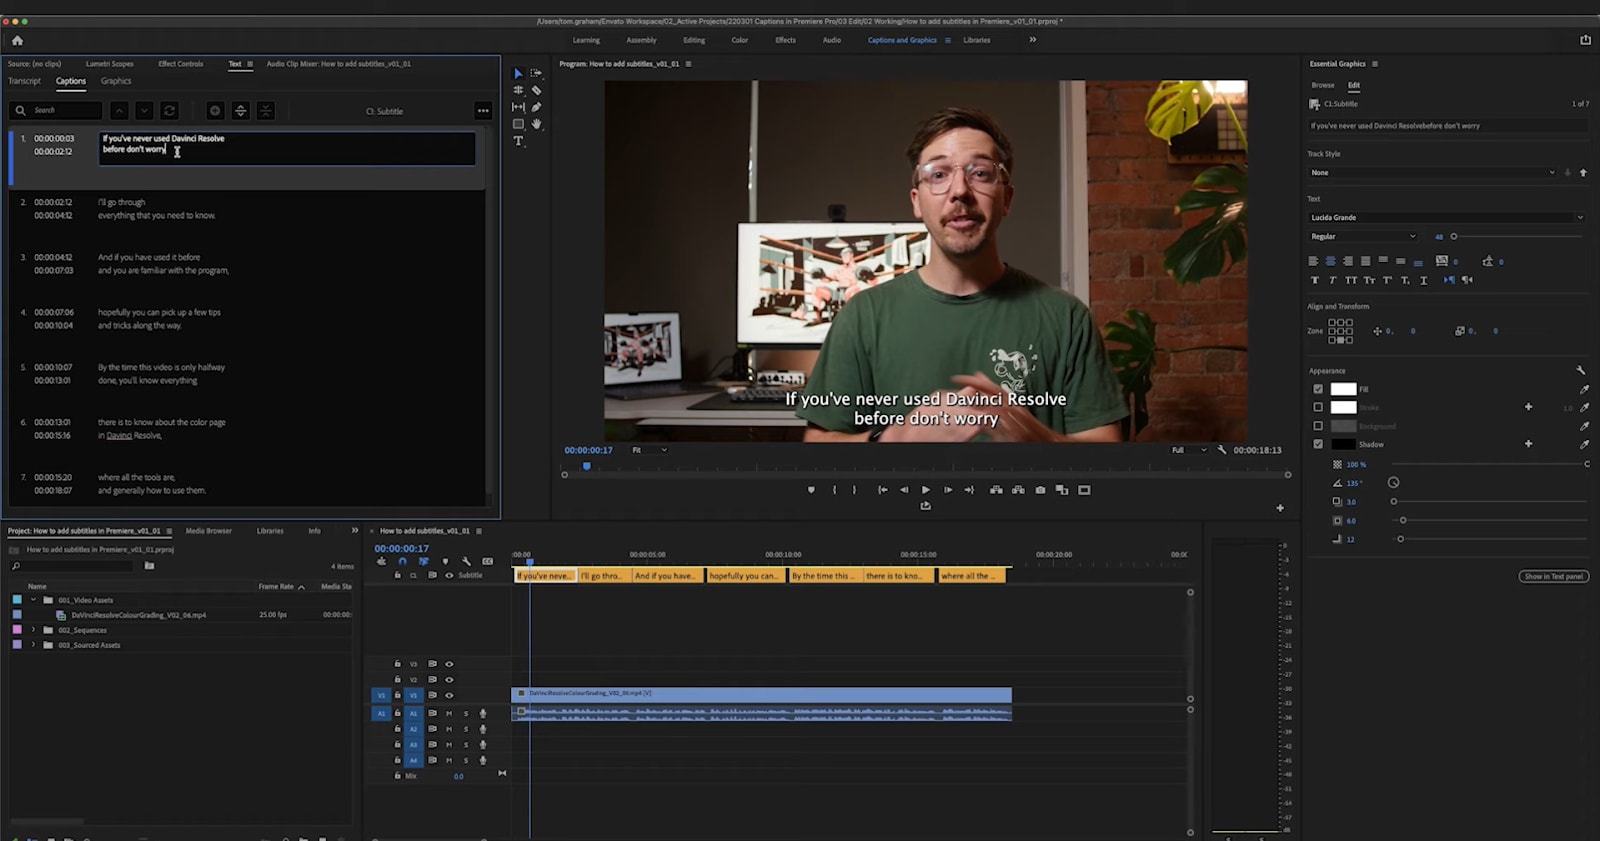
Adjust the subtitle text style on the text editor tab to suit your preference. You can change text alignment, font type and style, font positioning, and text appearance.
Differentiating Open & Closed Captions When Exporting
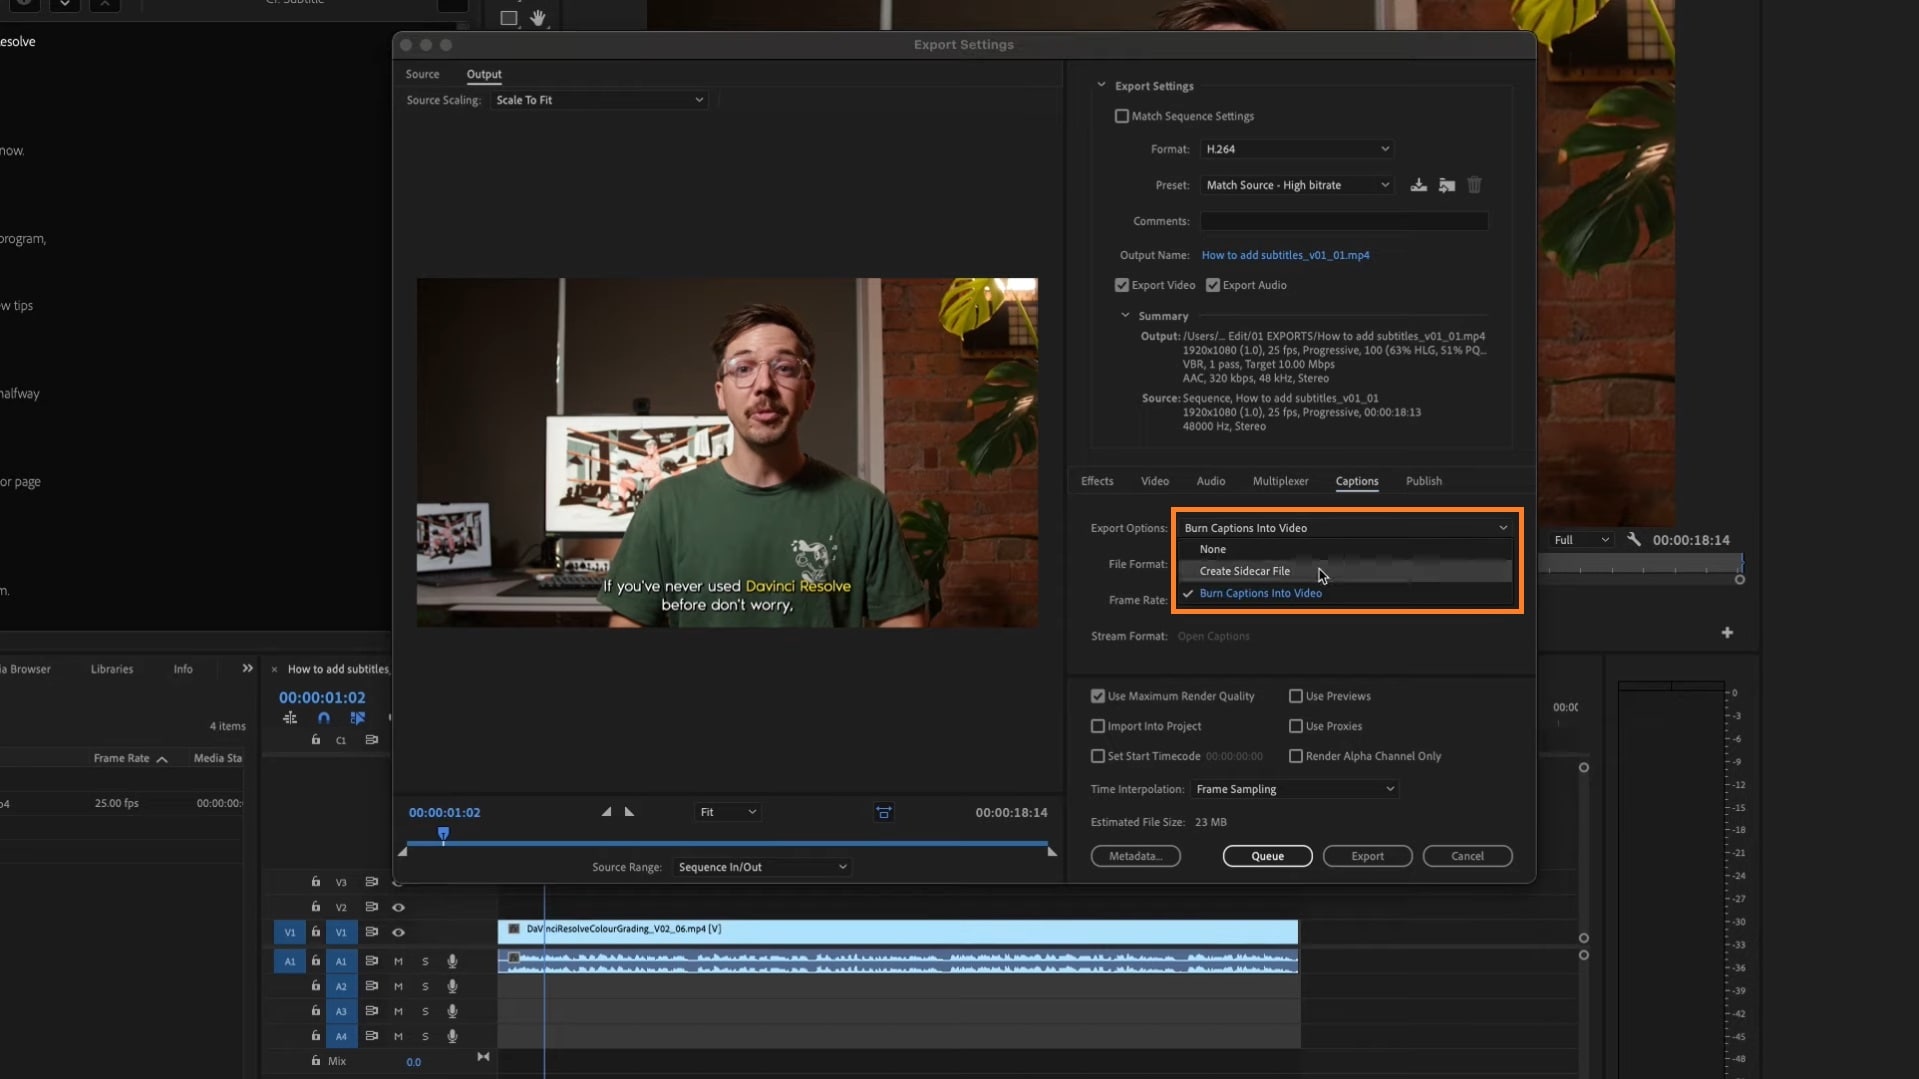
Mastering how to add titles in Premiere Pro is one thing, setting your subtitles to be either open or closed. While exporting your file, go to the Captions tab and change your Export options.
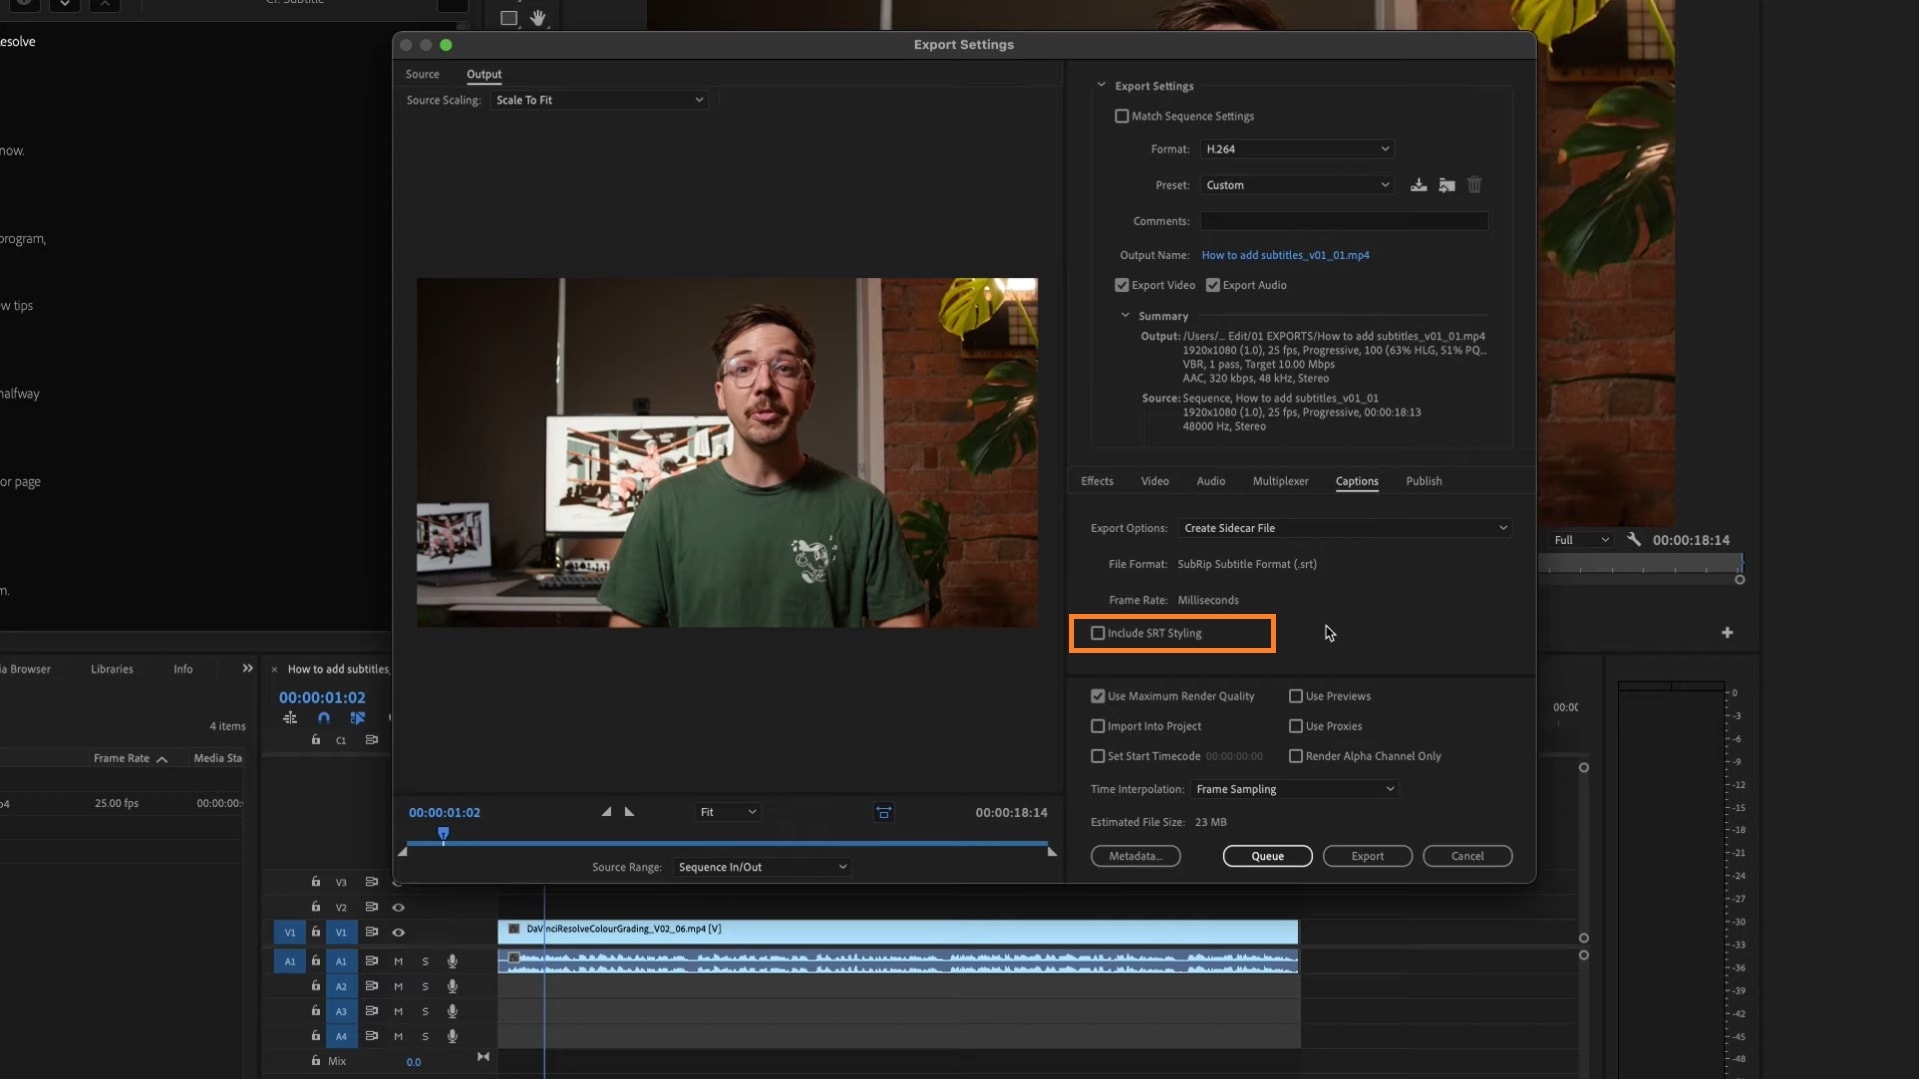
To set your subtitles to open so they cannot be turned on or off, set your Export option to Burn Captions into Video. Change it to Create Sidecar file to create closed captions embedded into your video. Choosing closed captions will allow you to export your captions separately as a subtitle .srt file.
Toggle Include Subtitle Styling to apply any text editing you made while adding subtitles to the .srt subtitle file.
Part 3: Caption Editing Tips: Increasing Accessibility in Premiere Pro
Adding captions to Premiere Pro goes beyond creating and editing subtitles effectively or syncing text to audio. Media accessibility, text style, and caption precision are crucial factors that make your videos more engaging and inclusive. Here are some essential tips to note when editing subtitles in Premiere Pro.
Creating Ada-compliant captions in Premiere Pro
The Americans with Disabilities Act (ADA) outlines standards for accessible media, including captions. A few generic instructions include:
- Ensure all spoken words and relevant sounds—like applause, cheers, or laughter—are accurately captured.
- Ensure that subtitles are displayed long enough and not too cluttered for viewers to read comfortably.
- Use a clear readable font.
- Ensure sufficient contrast between the text and background for clarity.
- Include a semi-transparent background behind captions for better visibility.

Adding Stylized Subtitles for Social Media Videos in Premiere Pro
When creating subtitles for social media videos, make them bold and eye-catching enough to hold your audience’s attention.
- Choose bright text colors that contrast with the video background.
- Pick fonts that align with your brand’s style. Fun, bold fonts work well for casual or engaging video content.
- Place captions properly in the frame to avoid overlaying them on other on-screen elements like logos, watermarks, or lower thirds.
Adjusting Timing and Font Editing
Poorly synced captions can be frustrating, and cause your viewers to lose interest in your videos as they could be more of a distraction than an accessibility feature.
- Drag the edges of subtitle clips in the timeline and align them perfectly with your video.
- Always playback your video after editing subtitles to check for sync errors.
- Avoid using more than two font styles to keep captions clean and professional.
- Also, use consistent text size and alignment throughout your video.

Adding Subtitles to Multi-Language Videos
Multi-language subtitling encourages accessibility by catering to diverse audiences. It simply involves adding subtitles for more than one language or having your subtitles written in multiple languages.
- Create multiple caption tracks on Premiere Pro and add separate subtitles for each language. Label each subtitle track clearly—e.g., English, Spanish, French—to avoid confusion.
- Import subtitle files for each language from credible translation tools.
- Explore language options when exporting captions as individual .srt files or embed specific languages directly into the video for platform-specific uploads.
Bonus: Auto Transcription using Premiere Pro vs Filmora’s Speech-to-Text
One of the most efficient ways for video creators to add subtitles in Premiere Pro is by auto-transcribing your video into subtitle texts. While Adobe Premiere Pro offers this option when adding subtitles to videos, it cannot be compared to video editing tools like Filmora whose Speech-to-Text (STT) feature is similar but more specialized, whether in precision or ease of use.

Filmora’s STT feature uses AI to analyze voices in your videos and convert them to subtitle texts with just one click. It supports the direct transcription of bilingual videos with a high degree of accuracy and precision. This tool allows you to export your subtitles directly in .srt format, making it easier to use on other platforms without relying on third-party tools.
Premiere Pro vs. Filmora’s Speech-to-Text
| Feature | Premiere Pro | Filmora |
| Ease of Use | Suitable for intermediate to advanced editors. | For beginner to advanced editors. Simple and time-saving workflow |
| SRT File Generation | Requires third-party tools to generate subtitles. | Built-in option for exporting subtitles separately in .srt formats. |
| Speaker Recognition | Advanced speaker differentiation. | Less detailed speaker recognition. |
- Superb video stabilization with low distortion.
- Vast video/audio effects and creative assets.
- Powerful AI for effortless content creation.
- Intuitive, professional yet beginner-friendly.
- Works on Mac, Windows, iOS, and Android.

How to Create Subtitles Using Filmora’s STT Feature
Step 1: Upload the video whose audio you want to generate subtitles. If the audio is a different file, upload the audio clip to Filmora.
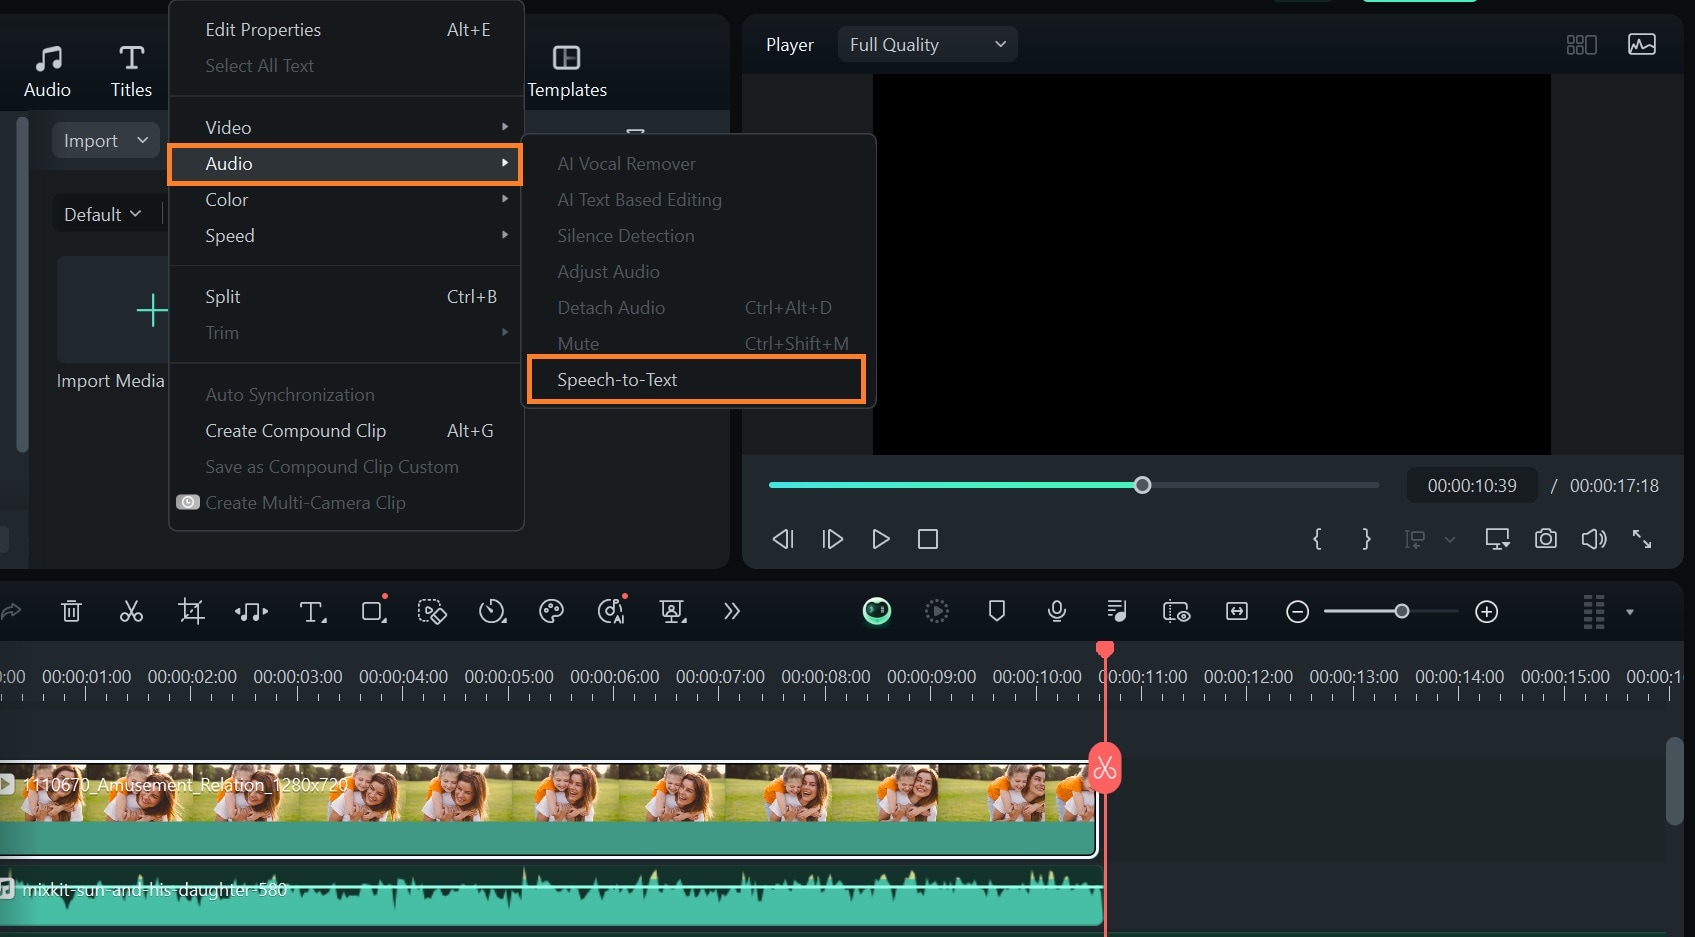
Step 2: Go to Tools > Audio > Speech-to-Text on the toolbar to activate the speech-to-text feature.
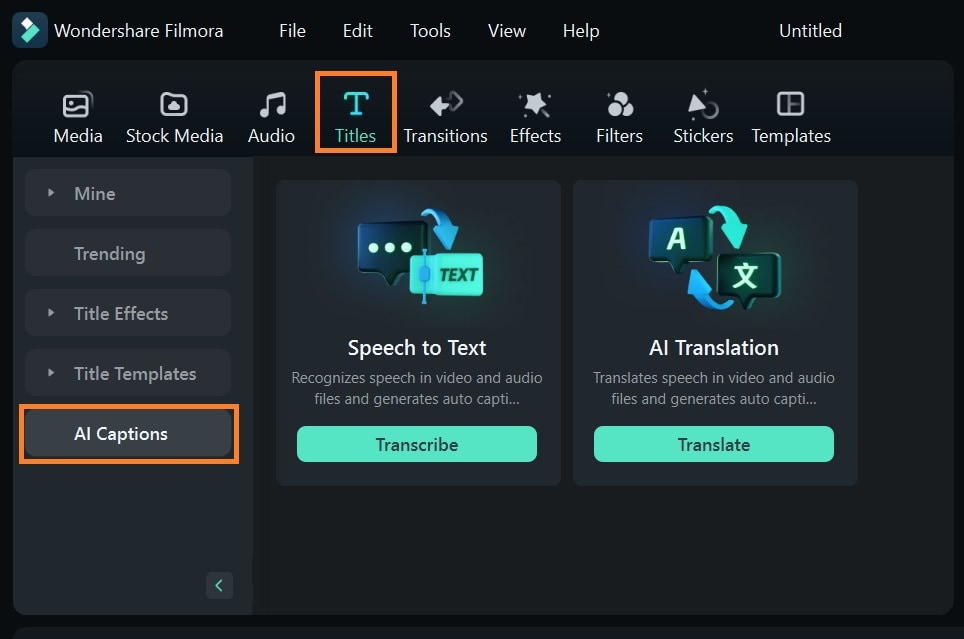
Or go to Titles > AI Captions and select the Speech-to-Text tool.
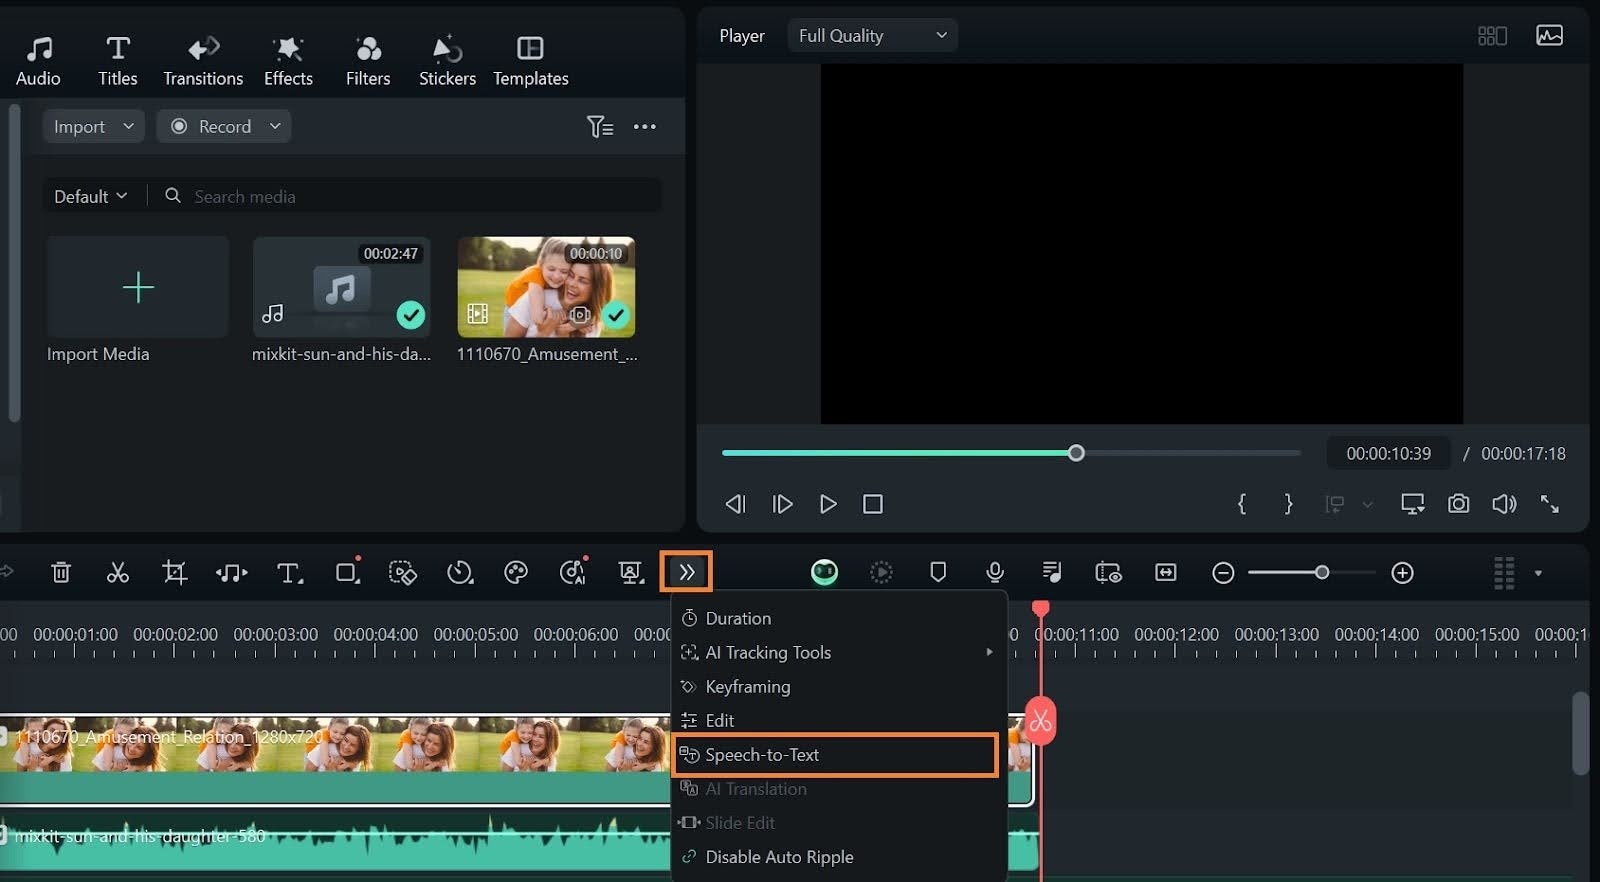
Alternatively, select the Speeach-to-text tool from the timeline toolbar. If the tool icon is not there, click on the arrow to the right of the timeline toolbar to reveal more editing options. Select Speech-to-text from the tool options provided.
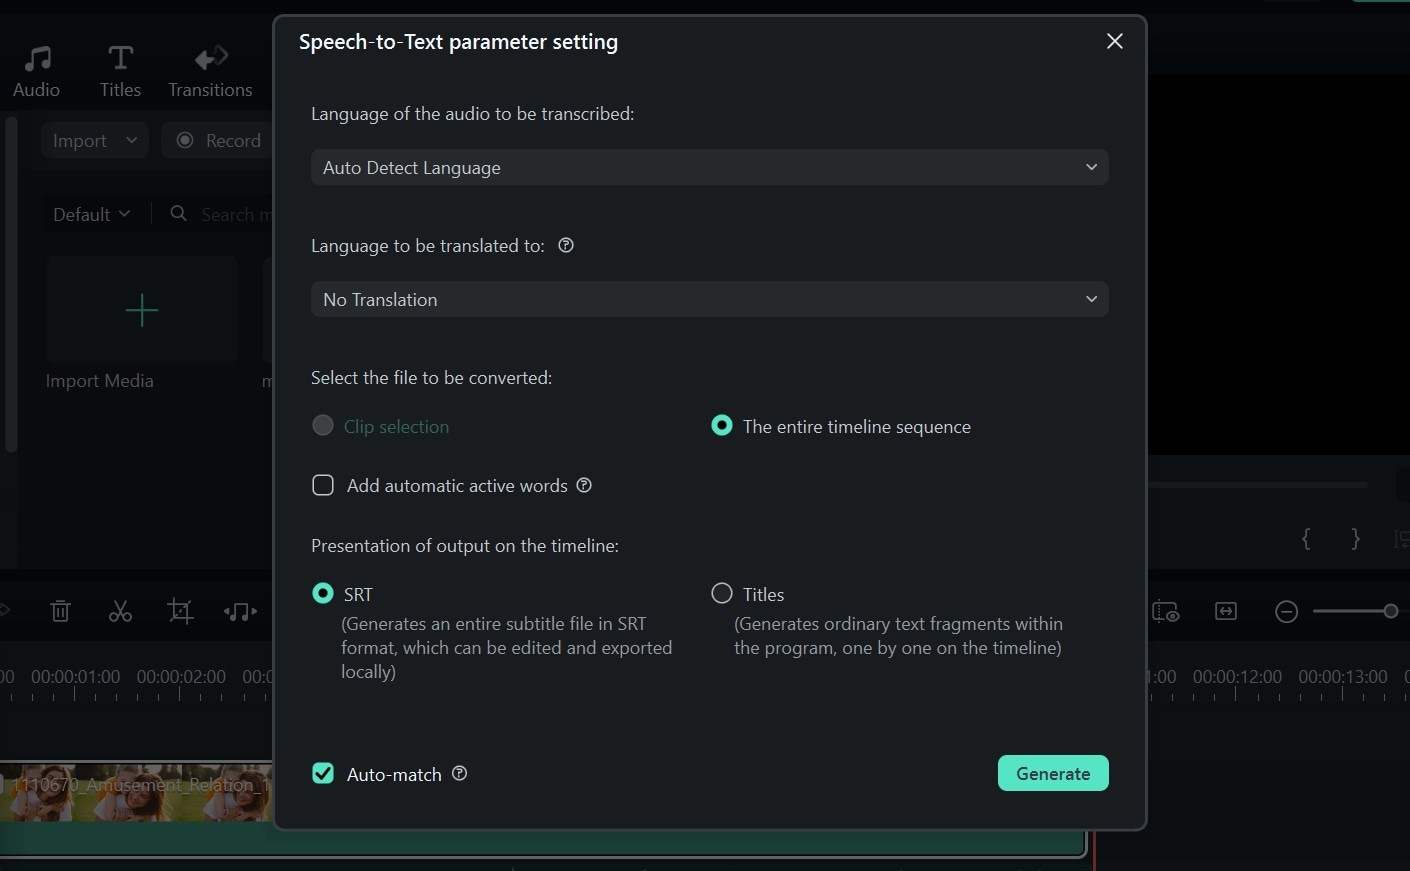
Step 3: A Speech-to-text editor dashboard will appear. Here you can set your text to be written in a different language from the audio you’re transcribing. You can also have your text written out in fragments on the timeline or generated in .srt format, edited, and exported. Click Generate
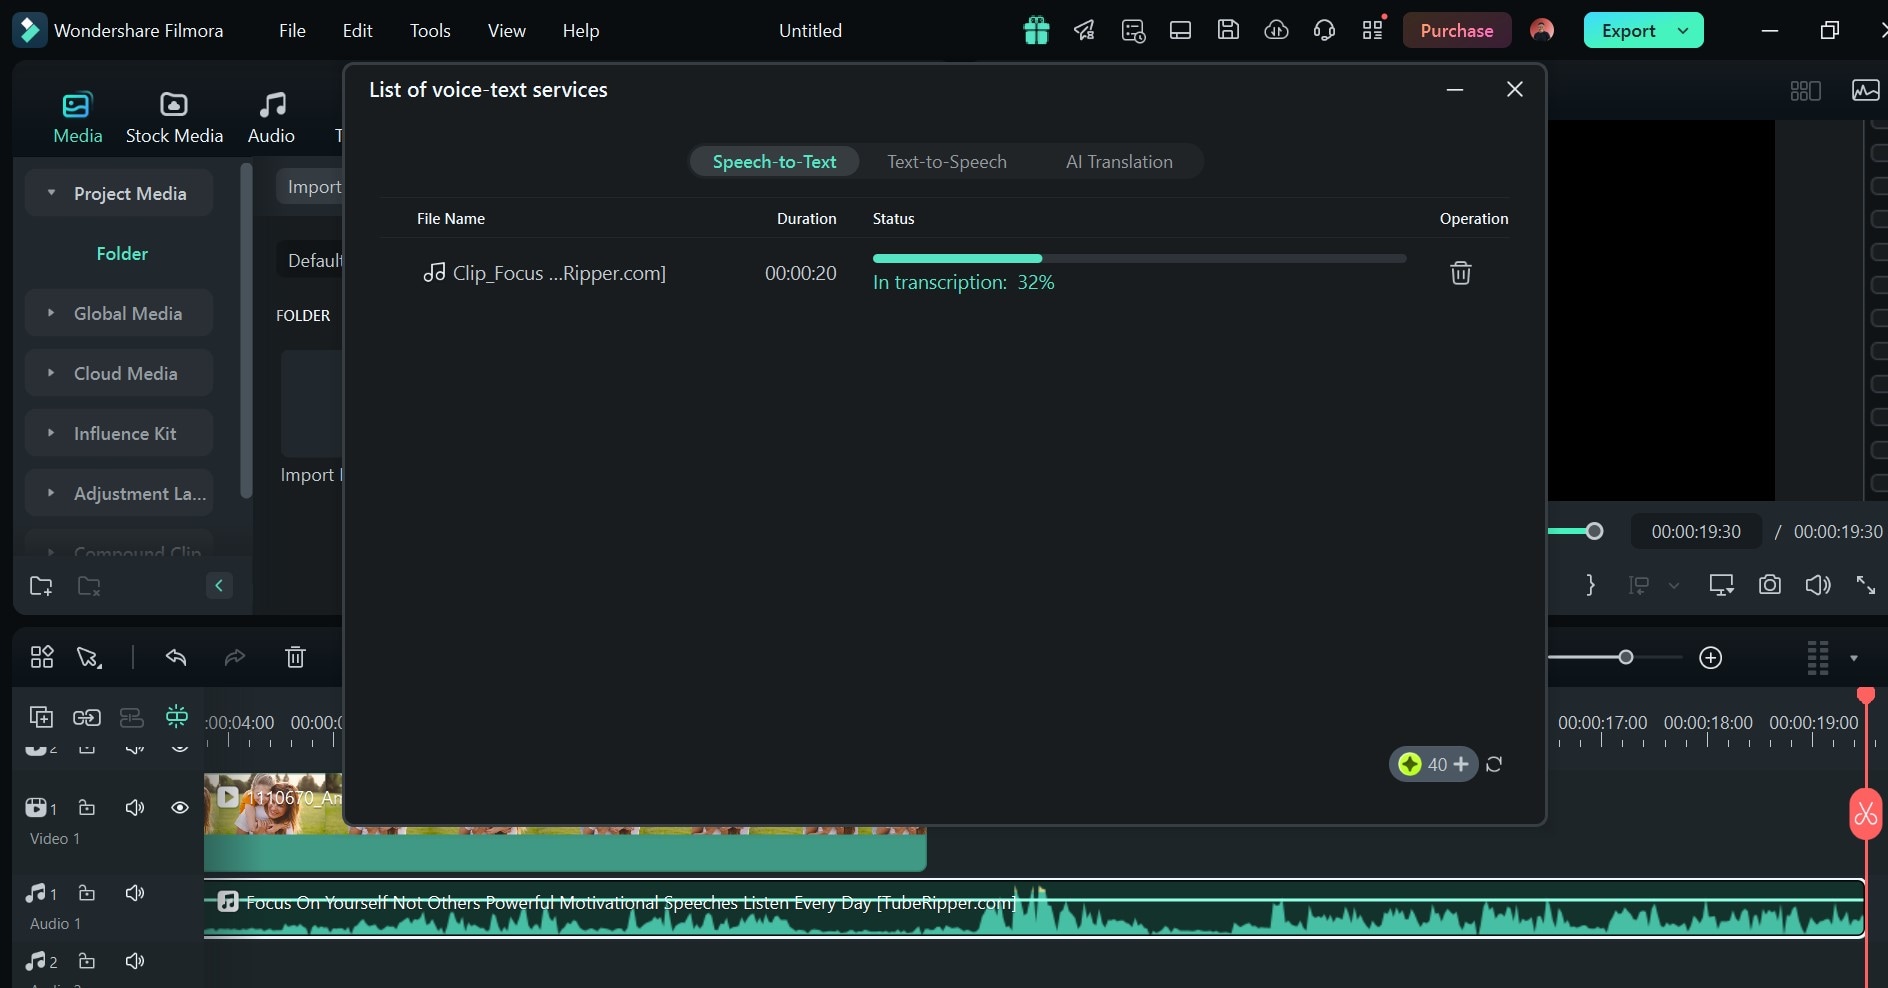
If you generate your subtitle in .srt format, your audio may take a minute to upload and transcribe. A dialogue box will pop up where you can monitor the upload or transcription process.
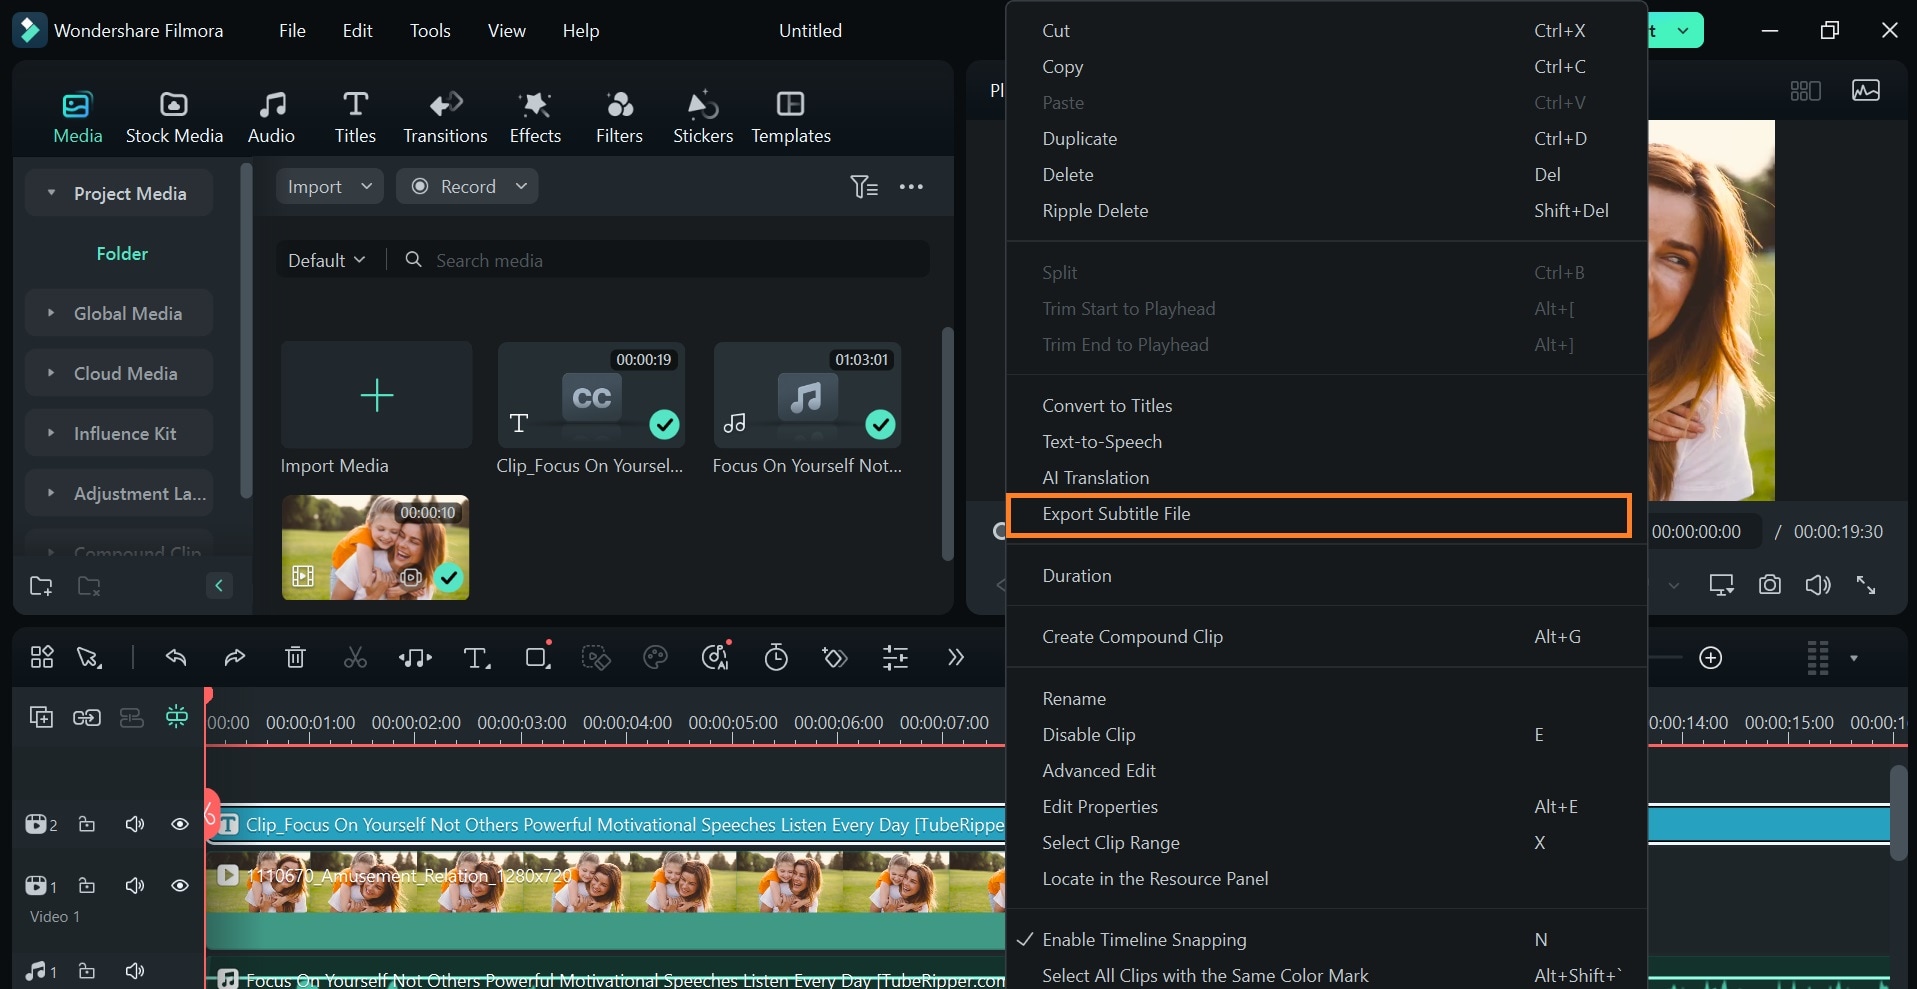
Once the upload/transcription is done, your subtitle will automatically appear in your video.
To download only the subtitle file in .srt format, right-click the subtitle clip on the timeline and select Export Subtitle File.
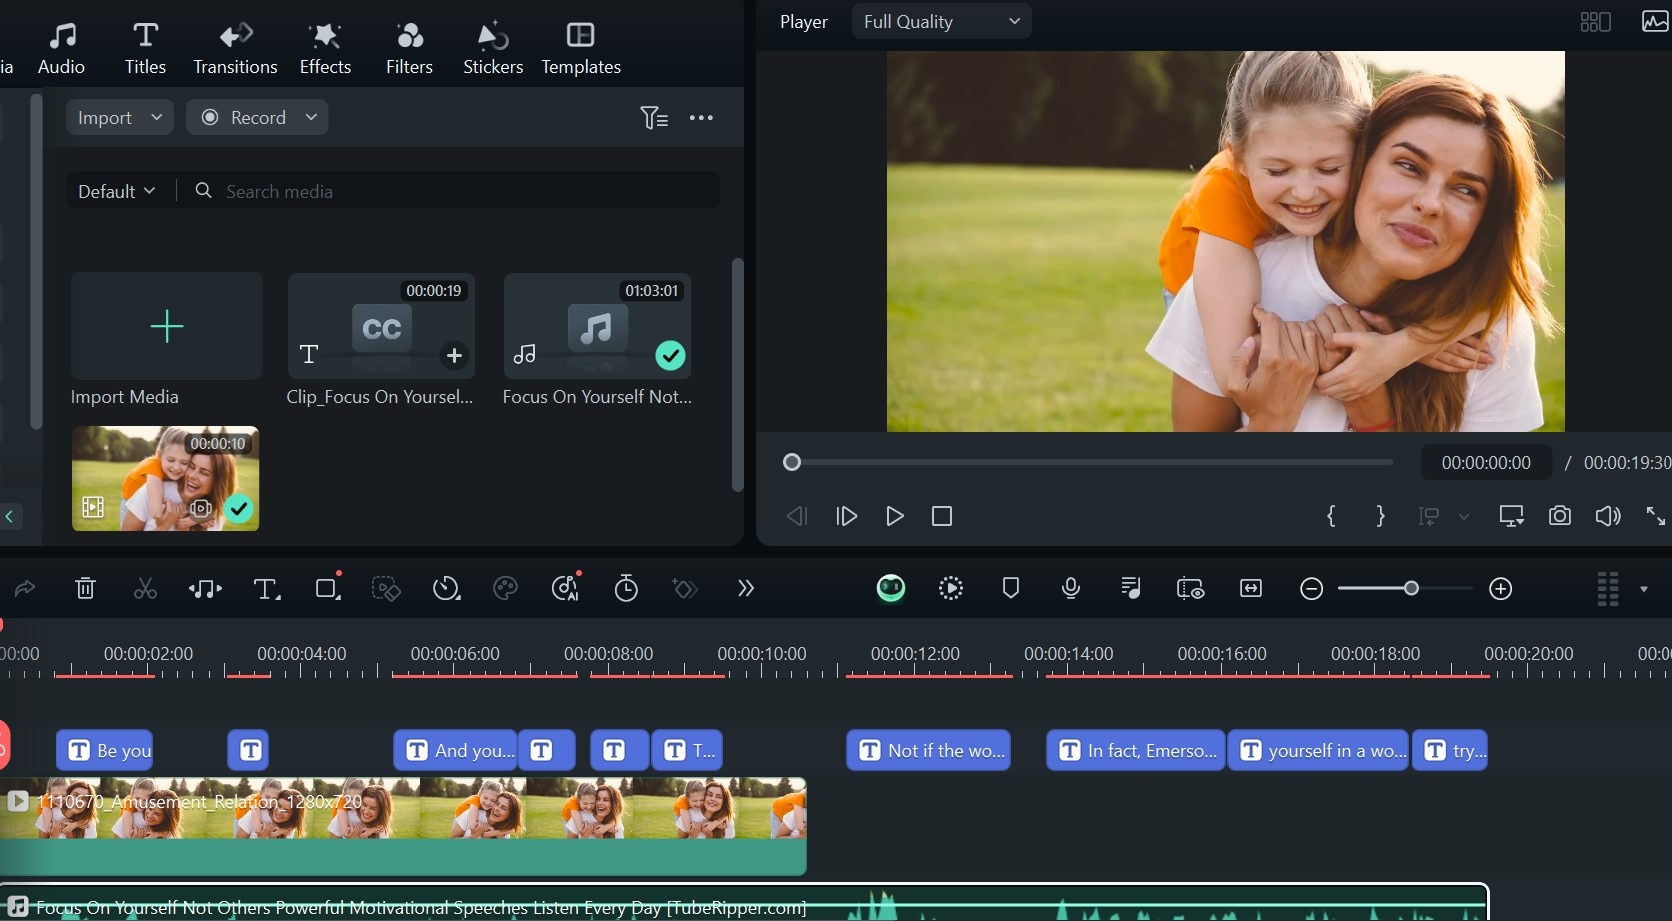
If you generate your subtitle in text fragments on the timeline, it will appear as shown in the image. You can manually edit and reposition your subtitle texts to suit your preferences.
AI Translation Tool
Apart from Filmora’s STT feature, the AI translation tool is useful especially when creating subtitles for multilingual videos. You can use it to generate captions in different languages from the video.
Here’s how to use Filmora’s AI Translation tool:
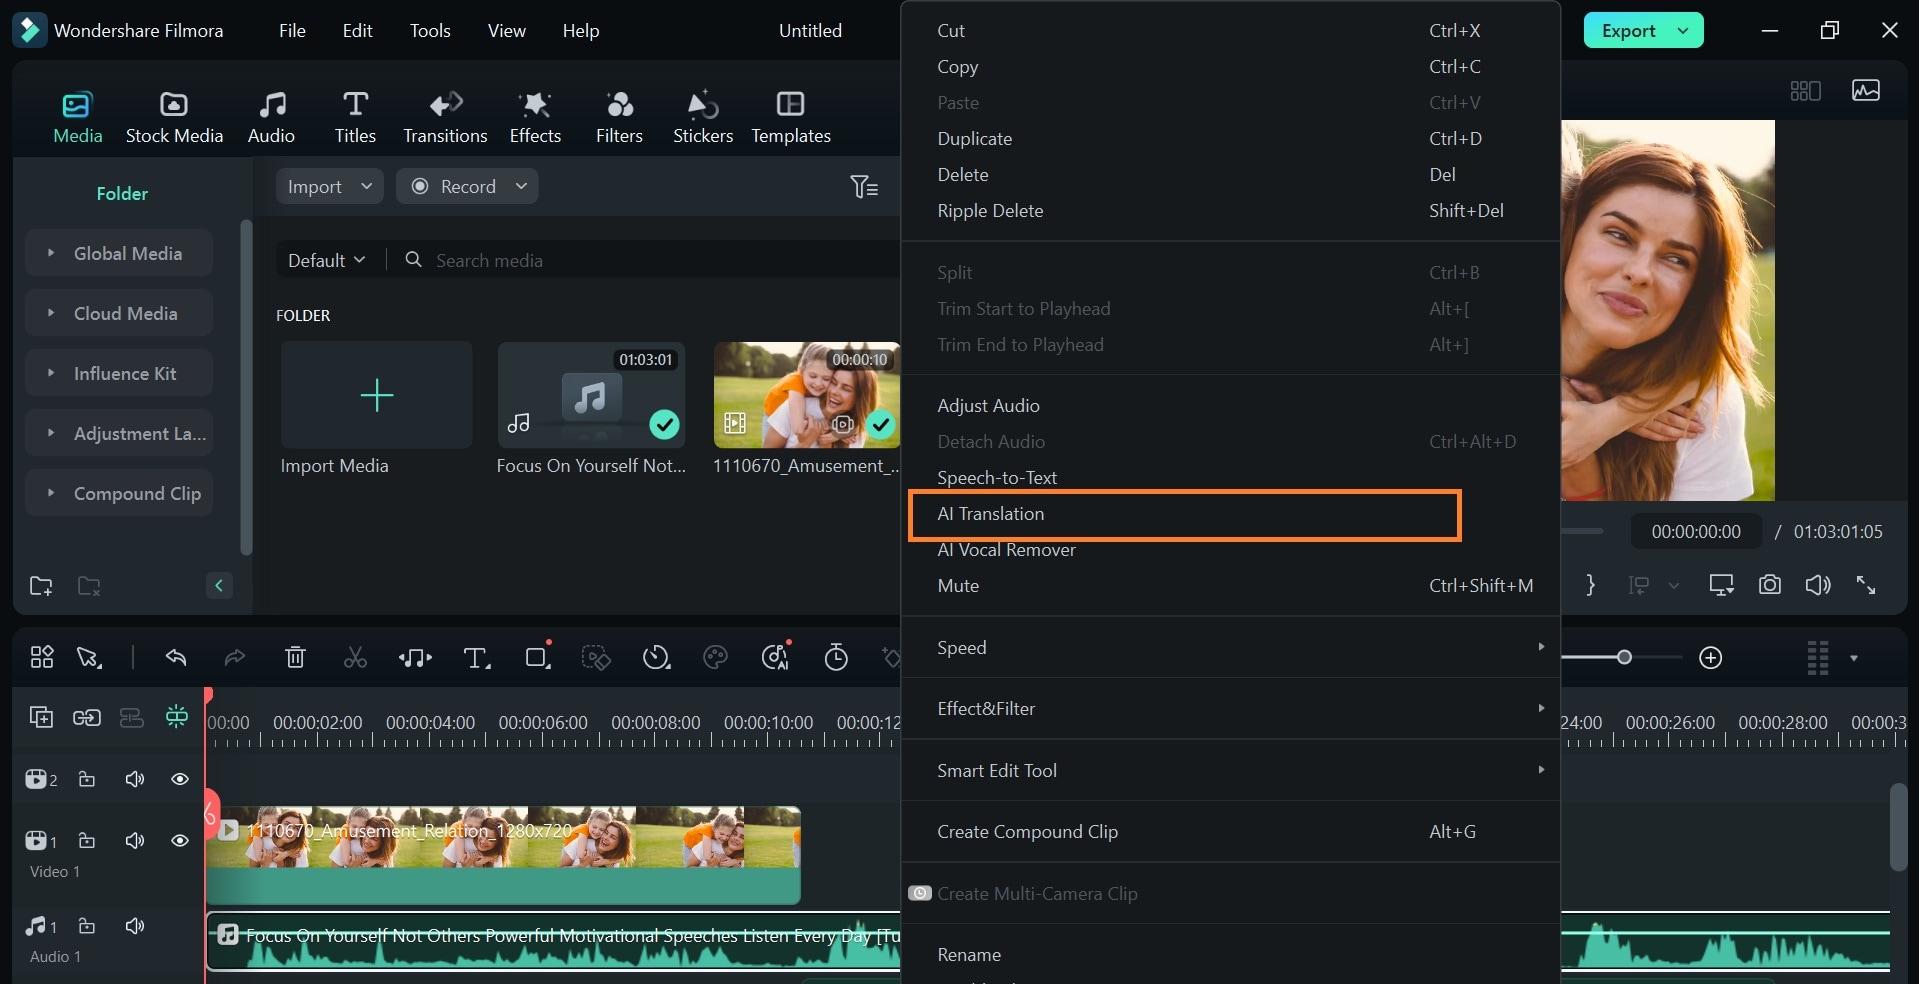
Step 1: Upload your audio or video file on Filmora. Drag and drop your media file(s) on the timeline. Right-click on your video or audio clip on the timeline and select AI Translation.
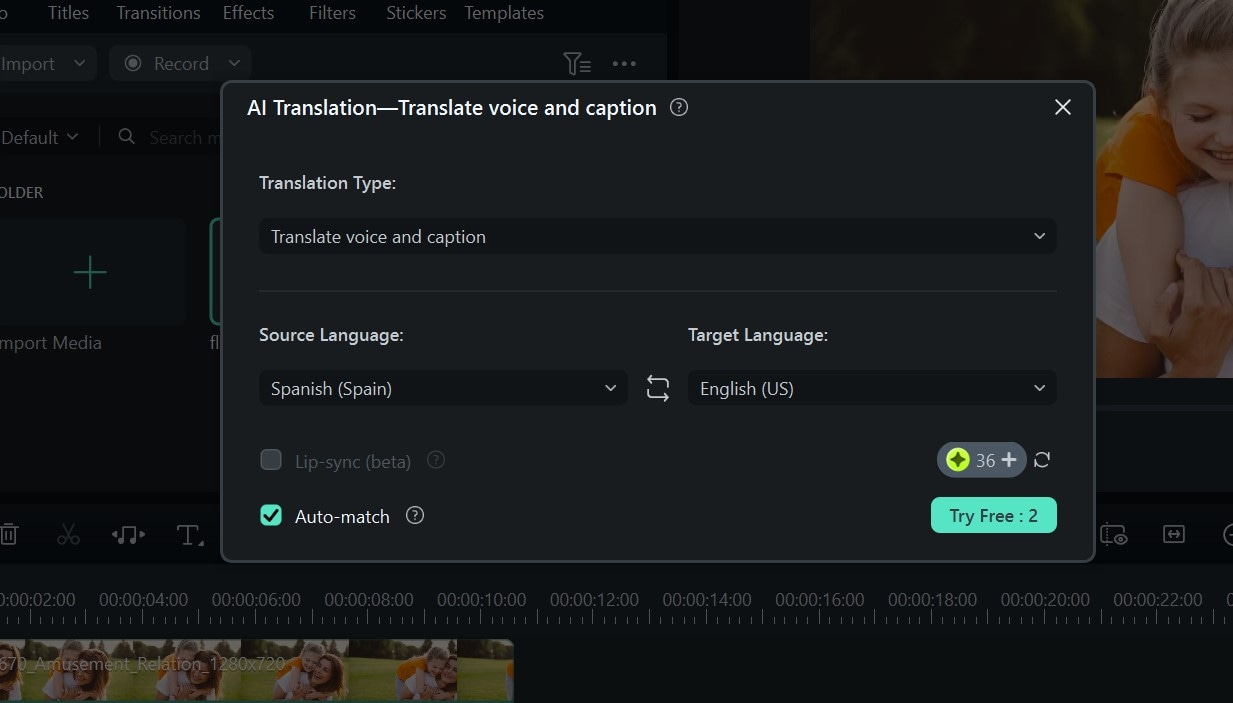
Step 2: Choose the language you’re translating your audio from and the language you want your subtitle text in. Ensure the Auto-match option is enabled so your transcribed text syncs naturally with your video. The translation should take a few minutes depending on the length of your video.
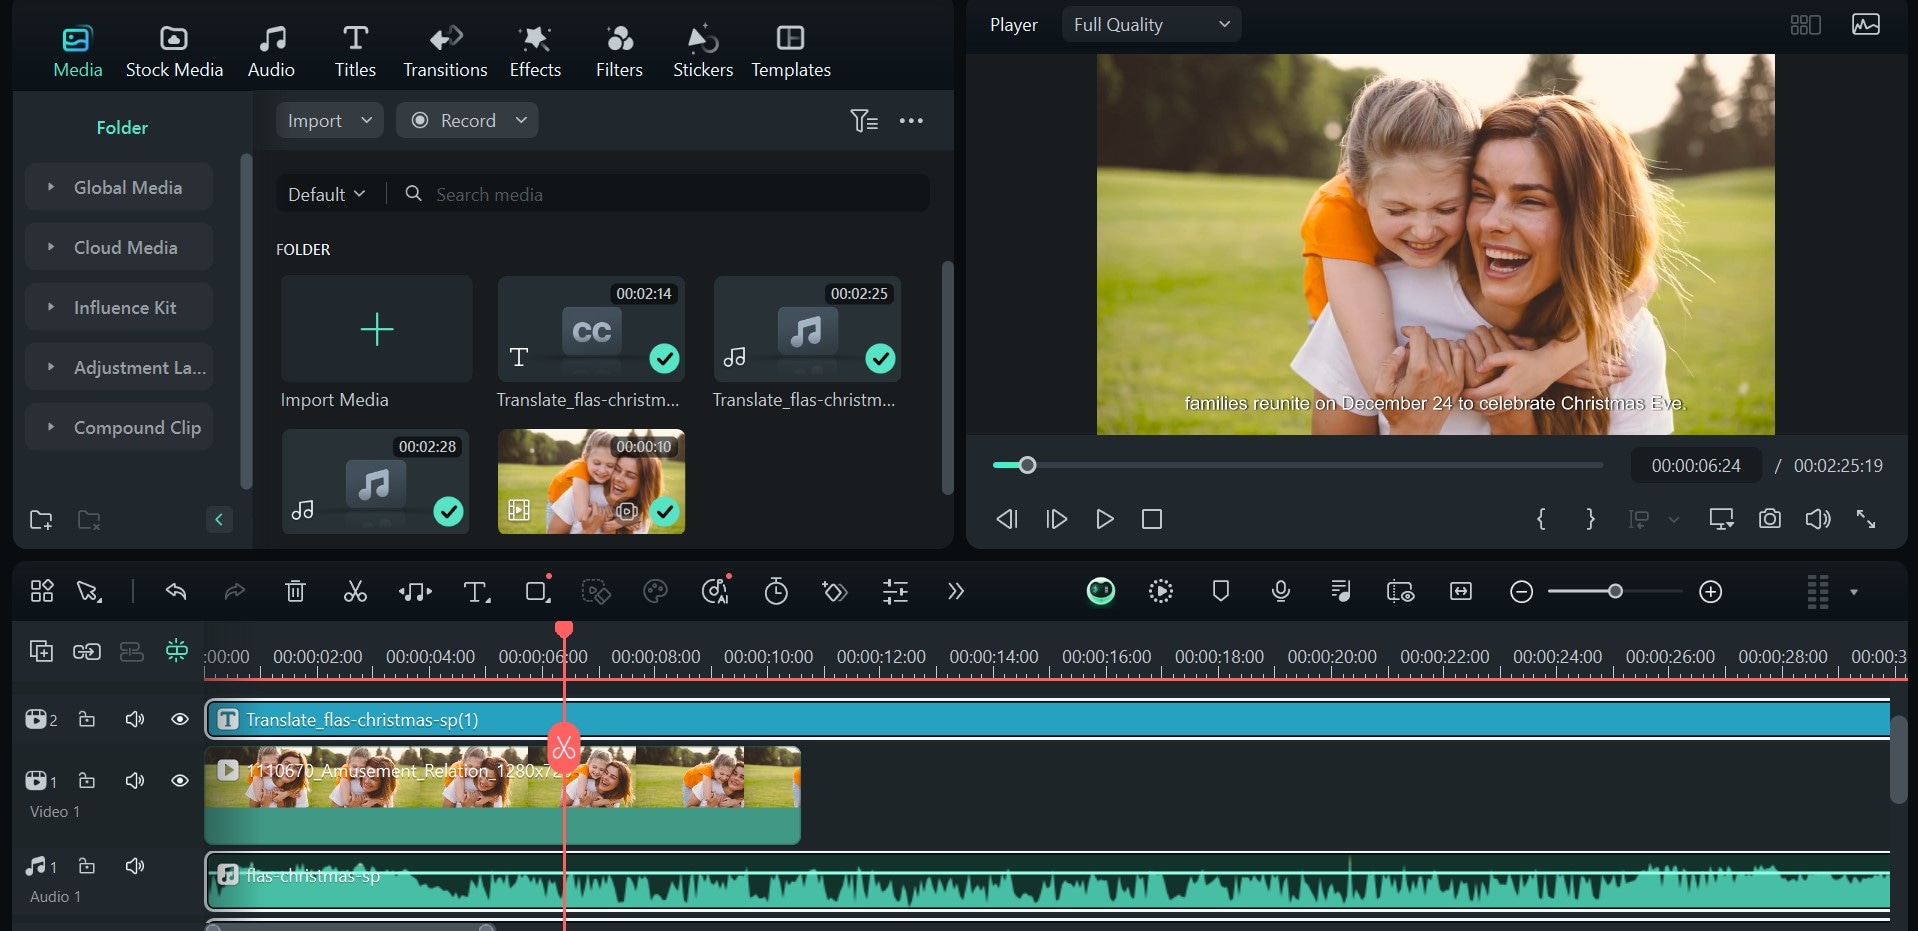
And there you have it; your subtitle text, translated from one language and written in another language!
Conclusion
Adding subtitles in videos has become a necessity for enhancing accessibility and increasing viewer engagement. You can add subtitles in Premiere Pro by manually typing it in and adjusting the subtitle clips to match the audio in your video, auto-transcribing the video and adding the transcriptions as captions, and uploading a subtitle file in .srt format. Either of these three methods will help you integrate subtitles into your videos seamlessly.
But, what if you don’t have the time and you need to get work done? Or do you have a video in Spanish you’re looking to create English subtitles for? Filmora’s Speech-to-Text feature is a more efficient version of Premiere Pro’s auto-transcription option. You can also use the AI Translation feature to create subtitles across languages. Quick, easy, and efficient!


