Adobe Premiere Pro is an excellent tool for video editing. It is a tool that can edit, create effects and filters, and do much more. In addition to this, you can even add different effects, such as VHS. The VHS effect in recent years has become significantly important due to its usage. This effect creates an old and jittery look to your video.
VHS effect has characteristics of old video tapes with lines and scales. It also adds distortion, noise, and color shifting to your videos. There are many filters and overlays that you can apply to get the VHS look. However, if you are using a PC tool, such as Premiere Pro, then you have to learn how to apply it. You can easily create a VHS effect Premiere look once you learn to add the effect to your video.
In this article
Part 1: What Are The Benefits of Using VHS Effects in Video?
Using VHS effects in your videos can bring several benefits. You can easily use multiple VHS effects in Premiere Pro. However, firstly, explore why incorporating VHS effects can be advantageous:
- Nostalgic Appeal: VHS effects can take your audience back to the era of VHS tapes. It creates a feeling of nostalgia and familiarity. Such effects also take you back to the 90s era by creating a similar look.
- Authenticity: Applying such effects mimics the characteristics of old tapes by adding imperfections. These effects also add color bleeding, distortion, and noise to your videos. It creates a sense of authenticity, looking like the video was recorded on genuine VHS tapes.
- Creative Style: These effects offer a unique style in terms of the video's appeal. It further enhances the storytelling and allows for artistic expression. They can set a particular mood, add decay, and contribute to specific genres like retro.
- Enhancing Period Settings: If your video is set in a specific time period, then these effects can help. By using VHS effects, you can make the video more authentic. Additionally, this reinforces the historical context of the narrative.
- Attention-Grabbing: In a world of crisp and high-definition visuals, uniqueness matters. Intentionally using VHS effects for your video, you can make your video stand out. The distinct and unconventional look captures viewers' attention.
- Cost-Effective Solution: You can use such effects to cut down your cost. Instead of investing in expensive props, VHS effects offer a more cost-effective solution. Digital software and plugins can apply these effects, eliminating the need for physical equipment.
Simply add video effects on Video with Filmora Video Effect Editor! Experience the magic of cool yet outstanding video effects, where your videos come to life in beautiful visuals.

Part 2: How To Add VHS Effect in Premiere Pro: An Overview
Do you know how you can add the VHS effect in Premiere Pro? Don't worry because this guideline will provide you with the required information. These simple steps will let you add your favorite VHS look to your video using Premiere Pro.
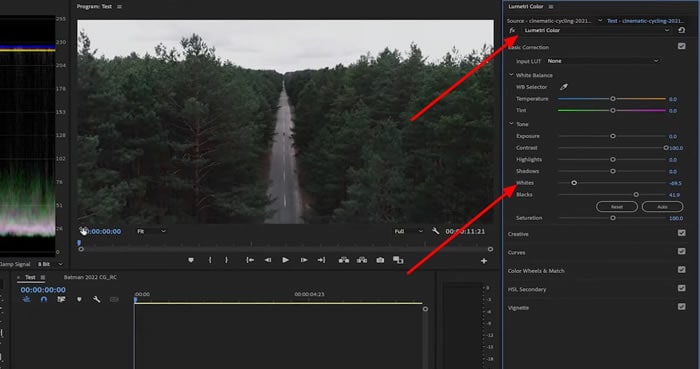
Step 1: Import your video into Adobe Premiere Pro. Open the "Lumetri Color" panel by clicking "Color" in the main toolbar. Further, choose "Lumetri Scopes" to access the graph window. Then, adjust the basic settings in the "Lumetri Color" panel. Continue to decrease the value of "Whites," increase the "Contrast," and set the "Blacks" to 10 on the graph.
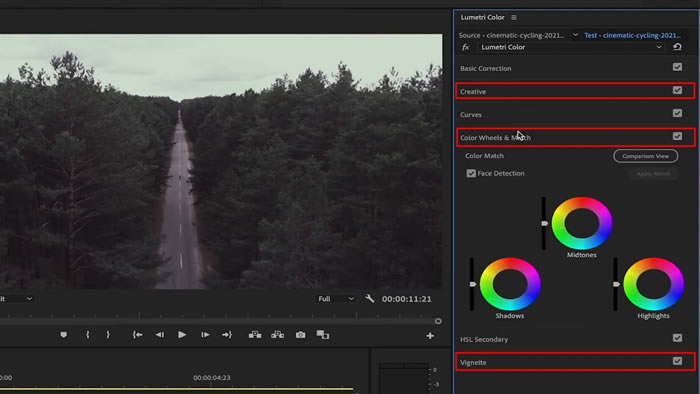
Step 2: Navigate to the "Creative" tab in the "Lumetri Color" panel. Increase the "Faded Film" and decrease the "Sharpness," "Saturation," and "Vibrance" to your liking. Use the color wheels in the "Color Wheels & Match" section to give the right tone. Further, proceed to increase the "Vignette" value from the same tab.
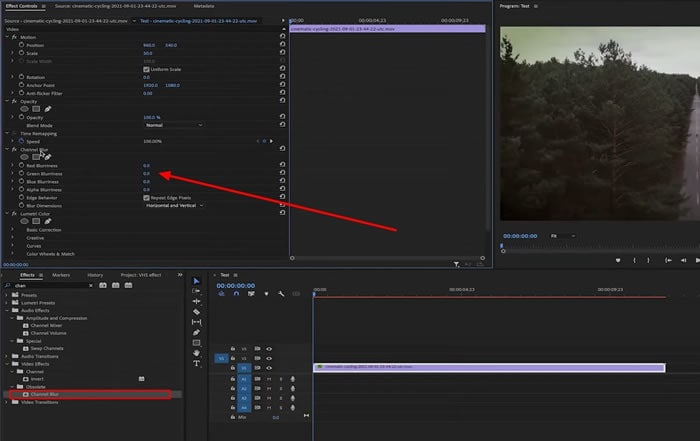
Step 3: Enable editing mode by selecting "Editing" in the main bar. Choose "Edit" from the lower section and search for the "Channel Blur" effect. Apply the effect by dragging and dropping it onto your video clip. Place the effect above previous adjustments and effects.
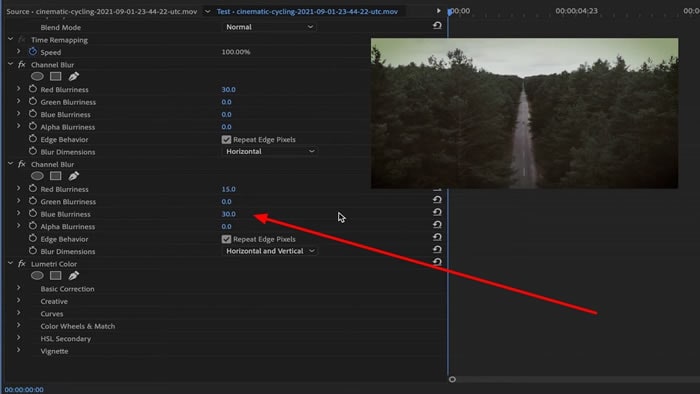
Step 4: In the "Channel Blur" effect tab, enable "Repeat Edge Pixel" and increase "Red Blurriness" to 30. Repeat the same step but this time increase "Blue Blurriness" to 30 and "Red Blurriness" to 15 and change "Blur Dimensions" to "Vertical."
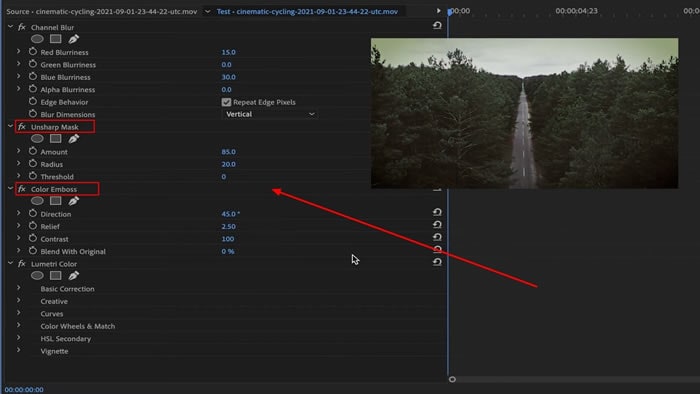
Step 5: Continue to add the "Unsharp Mask" and "Color Emboss" effects from the "Effect" tab. Proceed and change "Amount" and "Radius" for "Unsharp Mask" to 85 and 20, respectively. Slightly increase the "Relief" values for the "Color Emboss" effect.
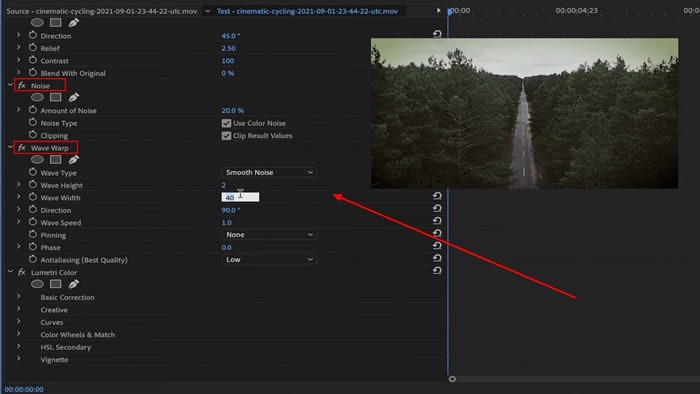
Proceed to apply the "Noise" effect from the "Noise & Grain" section and further adjust the "Amount of Noise" to your preference. Induce the "Wave Warp" effect and set the parameters of "Wave Height" to 2 and "Wave Width" to 1000. Change "Direction" to 0 and "Pinning" to "Horizontal Edges."
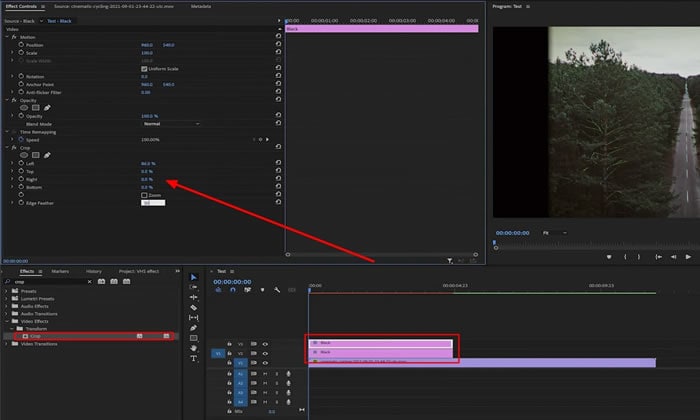
Step 6: You can crop your video to a 4:3 aspect ratio to give your video more authenticity. To do this, create two "Color Matte" layers using the "New Item" icon. Name and place them over the video clip. Apply the "Crop" effect to both layers. Set the "Left" option to 86 for the first layer and the "Right" option to 86 for the second layer. Set the "Edge Feather" to 30 for both layers.
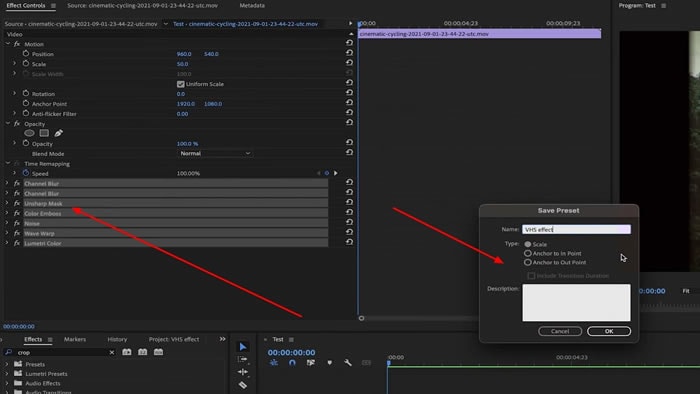
Make sure to save your VHS effect as a preset for future use by right-clicking and selecting "Save Preset." Finally, export your VHS effect Premiere Pro video to your desired format.
Part 3: Using Wondershare Filmora to Add The Perfect VHS Effect in No Time
Wondershare has provided us with so many tools and applications for different purposes. It has provided an amazing video editing tool called Filmora. Wondershare Filmora Video Editor provides easy editing options for the user. You can create highly professional videos with impressive results using Filmora. This tool offers multiple overlays, video effects, and filters to use.
| Feature | Filmora | Premiere Pro |
| Ease of Use | Easy editing, user-friendly options. | Requires learning, specific application. |
| VHS Effect Application | Built-in presets, 4 simple steps. | Multi-effect combination, detailed steps. |
| Effects Library | Multiple overlays, video effects, filters. | Many filters, overlays available. |
| Customization | Adjust opacity, transparency. | Extensive parameters, multiple effects. |
If you want to add VHS effect Vegas Pro overlays using Filmora, you can. In order to apply such effects to your videos, you need to follow the guide. There are 4 simple steps to add the perfect VHS look to your video in no time.
Step 1Open the Filmora
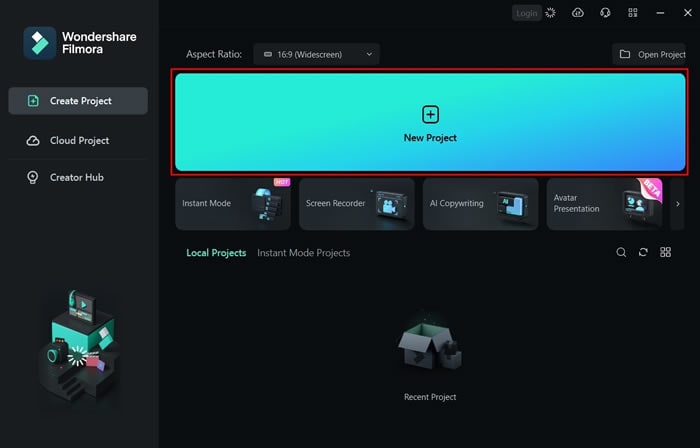
To apply a similar VHS overlay Premiere effect to your video, first access Wondershare Filmora on your computer. Then, click on the "New Project" tab in the main interface, which will take you to a new window.
Step 2Import and Arrange Your Video
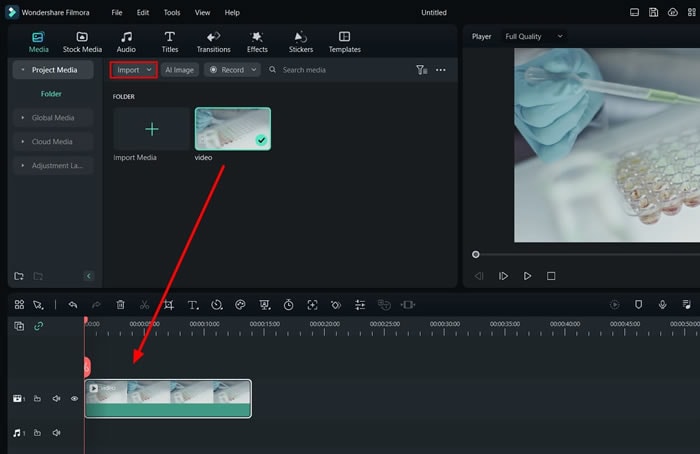
Next, import your video by either dragging and dropping it into the software or using the import media option. Once imported, drag and drop your video into the timeline area to begin working with it.
Step 3Apply VHS Effects
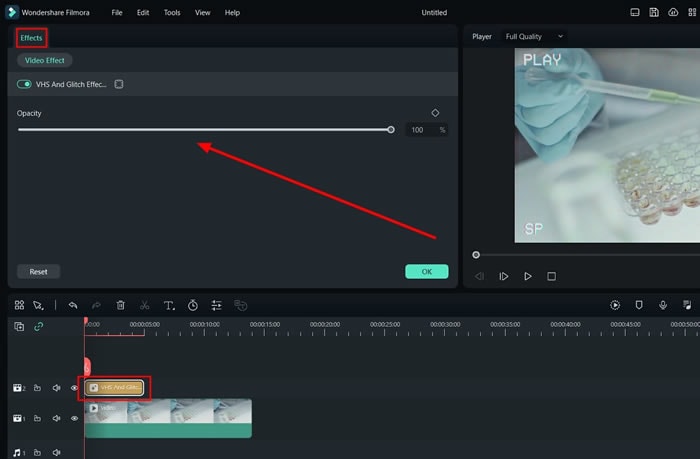
Access the "Effects" option from the top bar of the software. Search for "VHS" in the Effects panel to explore the various VHS effects available. Choose the desired effect that fits your style, then drag and drop your video on top of the timeline.
Step 4Adjust Opacity and Export
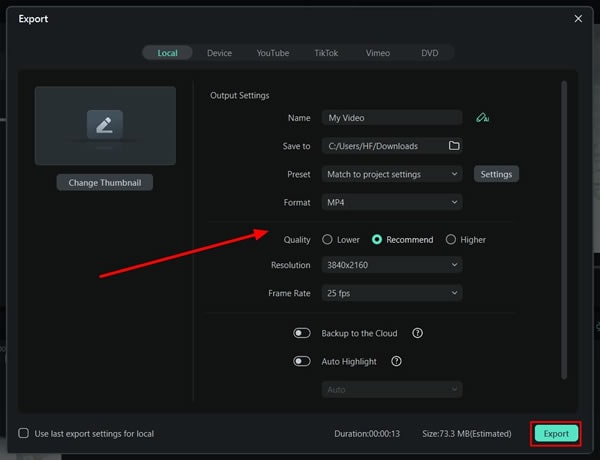
To refine the intensity of the VHS effect, go to the "Effects" tab located on the right side of the screen. From there, you can adjust the effect's opacity by changing its transparency. Then, click "Export" at the top left of the screen to save your video with the applied VHS effects.
Conclusion
To conclude, there are many different overlays, effects, and filters that you can use. However, VHS effects are some of the most popular ones. People use different VHS filters in Premiere Pro to give their content a distinctive look. You can add these effects using different online and offline tools. One of the most popular tools is Wondershare Filmora which helps you add the VHS look to your video.


