Every netizen swims in a sea of online information in today’s digital age. YouTube, the video giant, hosts a massive chunk of this content. But here’s the catch: watching videos can consume much of your precious time. Many creators stretch their content to the 10-minute mark or beyond to cash in on monetization. So, what if you need the info from a video but can’t spare the time to watch it?
That’s where converting YouTube videos into text comes in handy. It’s a helpful skill that can save you hours and boost your productivity. In this article, you’ll be guided through the steps involved in turning those lengthy YouTube videos into easy-to-skim text in different ways. Ready to learn this time-saving trick? Read through to learn more.
In this article
Part 1. Best Choice of Converting YouTube Videos Into Text: Filmora
These days, video editors have evolved beyond just cutting and splicing footage. Many now come packed with advanced features that let you make the most of videos, including converting speech to text. This nifty tool uses speech-to-text technology to extract spoken video content and turn it into written words. It’s a game-changer for consuming different informational videos or news available online, specifically on YouTube.
Enter Wondershare Filmora, a powerhouse video editor making waves in the content creation. While it’s known for its user-friendly interface and powerful editing capabilities, Filmora has another ace: its speech-to-text feature.
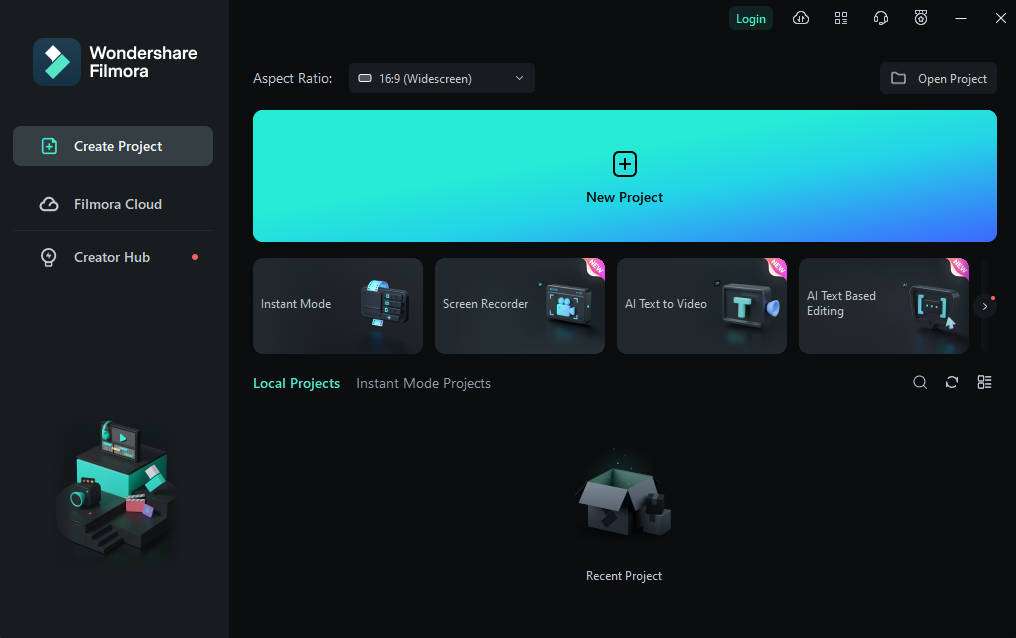
Filmora is more than just a video editor; it’s a complete toolkit for content creators. Whether you’re a YouTube newbie or a seasoned pro, Filmora offers a range of features that cater to all skill levels. Its intuitive design makes complex editing tasks a breeze, allowing you to focus on creativity rather than getting bogged down by technical hurdles. Here are some of the tool’s key features:
- Extensive editing tools. From basic cuts to advanced effects, Filmora has got something for you. Enjoy precision editing and crop tools, alongside
- Multi-track editing. Work with multiple video and audio tracks for complex projects.
- Screen recording. Capture your screen for tutorials or gameplay videos. You can also use this to record videos and transcribe them directly afterward.
- Audio editing. Fine-tune your sound with noise removal and audio equalizer features. This can help ensure accurate transcription for your downloaded videos.
Spotlight on Filmora’s Speech-to-Text Tool (STT)
Now, to show you what you’re looking for, here’s Filmora’s speech-to-text tool. This speech-to-text feature is a game-changer for content creators and researchers alike. Here’s why it’s powerful to convert YouTube videos into text:
- Accuracy. Filmora uses advanced AI algorithms to ensure high accuracy in transcription.
- Time-saving: Convert hours of video content into text in just minutes.
- Multiple language support. Transcribe videos in over 23 languages, expanding your content’s reach.
- Easy editing. The transcribed text is synced with the video timeline, making it easy to edit and correct.
- Subtitle generation. Automatically create subtitles from the transcribed text, improving accessibility.
- Export options: Save your transcriptions in various formats for further use or distribution.
If you can utilize Filmora’s game-changing speech-to-text tool, follow the steps below. These are pretty straightforward and will deliver results as soon as needed.
Step 1: Download, install, and launch Wondershare Filmora. Log in or sign up with a Wondershare, Facebook, Google, Apple, or X (formerly Twitter) account.
Step 2: On the toolbar, click Speech-to-Text after selecting a video or audio file. Alternatively, you can go to Tools > Audio > Speech-to-Text.

Step 3: Set the STT parameters. Select the language and target language (if any) and if you want to generate the transcription as an SRT or Titles. Once done, click OK.

Step 4: After generating the SRT file, right-click it and choose Export to access the SRT file.

AI-Powered Translation With Wondershare Filmora
But wait, there’s more! Filmora doesn’t just stop at turning YouTube videos into text. It takes things a step further with its AI Translate tool. This feature is a godsend for content creators looking to reach a global audience or researchers working with foreign language content.
Here’s why the AI Translate tool is a game-changer:
- Multilingual support. Translate your videos into multiple languages, expanding your reach.
- Time-efficient. There is no need to hire translators or spend hours translating content manually.
- Integrated workflow. Translate your transcribed text directly within Filmora, streamlining your process.
- Subtitle generation. Automatically create subtitles in different languages.
- AI voiceovers. Aside from transcribing and translating text, you can just as quickly impose a translated voiceover in your target language. It’s a helpful tool for an even better translation experience.
This tool opens up a world of possibilities. You can consume content in languages you don’t speak, create multilingual versions of your videos, or even study foreign languages by comparing original and translated subtitles. To learn how to use it, follow the steps below (be sure to have your YouTube video ready!)
Step 1: Select the Import button to upload the video you downloaded from YouTube.
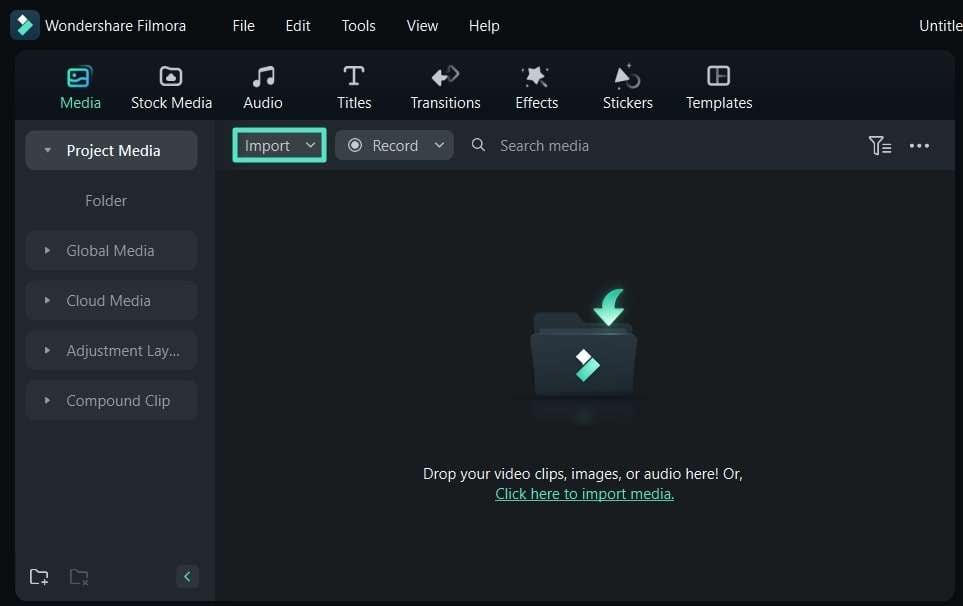
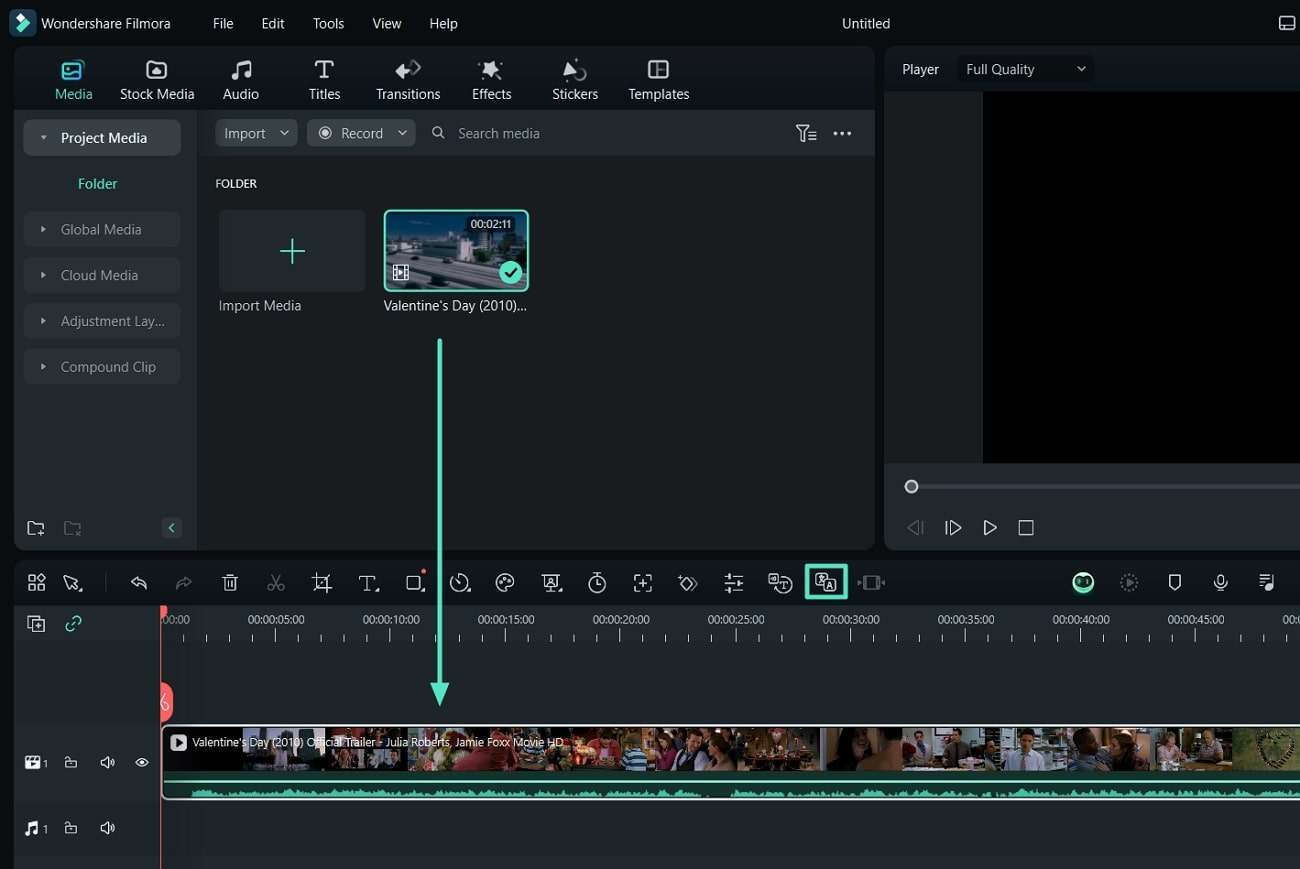
Step 2: After adding the downloaded YouTube video, click the AI Translation icon.
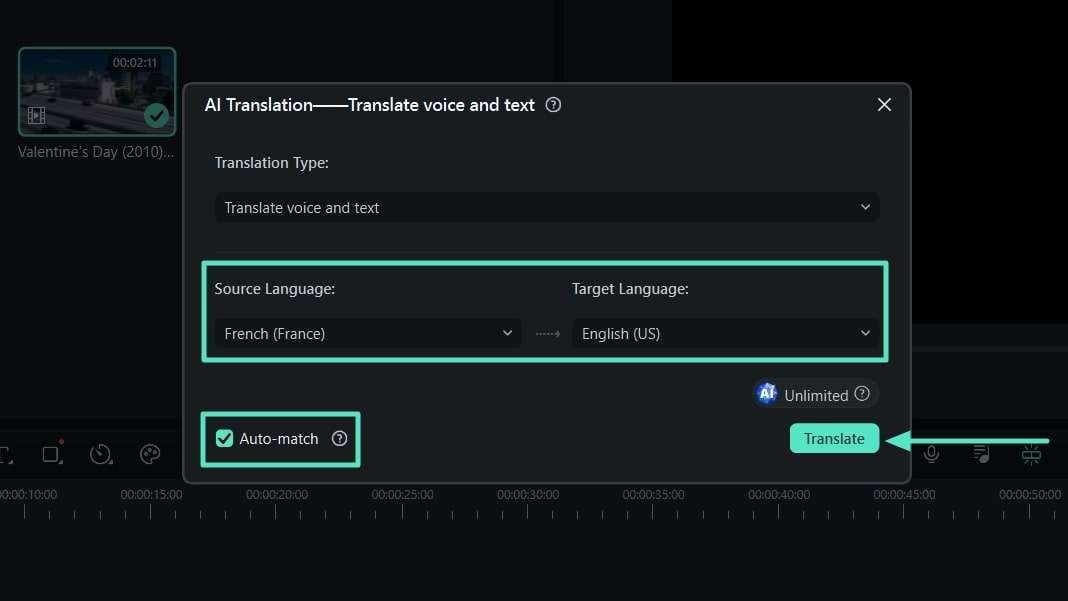
Step 3: Here, you can choose to Translate voice and text or Only translate text. To translate YouTube videos into text, use the second option.
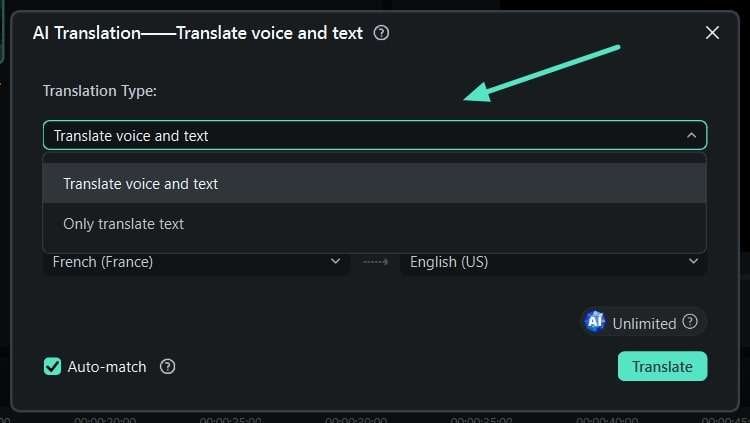
Step 4: Choose a Source Language and a Target Language. Then, click Auto-match to sync the transcription with your video. Once you’re done setting up, click Translate.
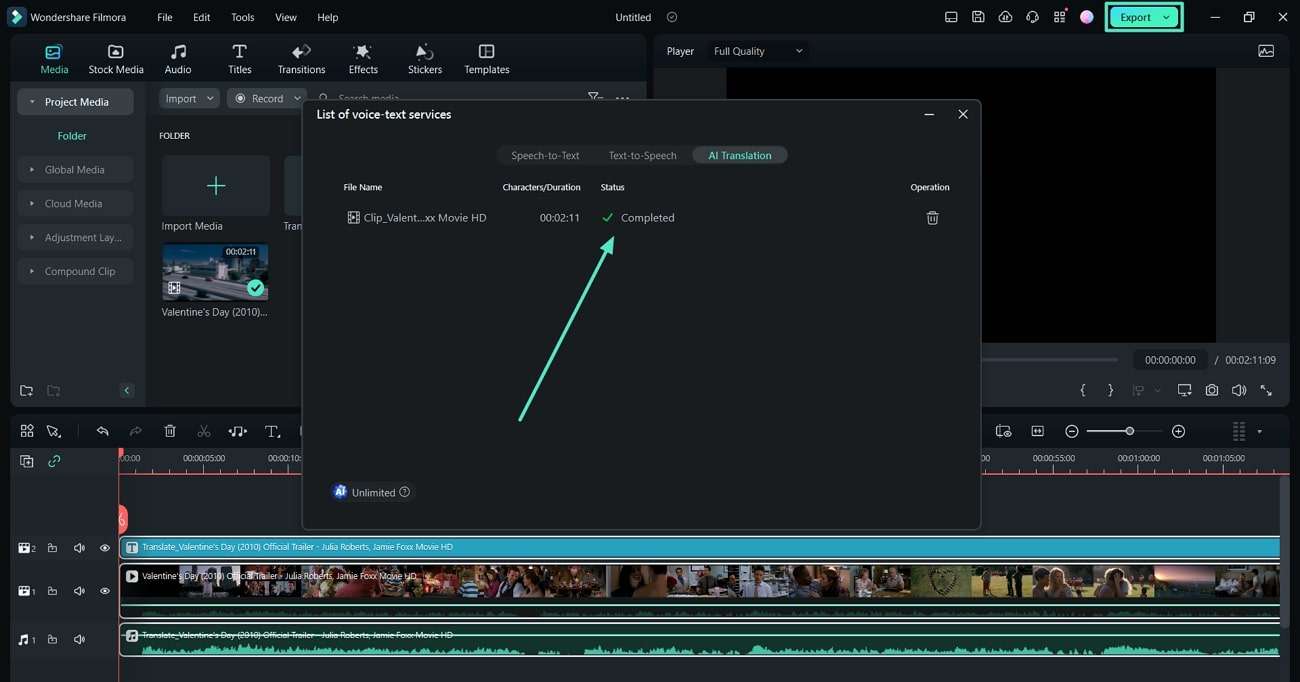
Step 5: Once you see the Completed prompt, click Export to share your video.
What Users Say About Wondershare Filmora
You’ve seen the power of Filmora. If you’re still not convinced, take a look at what other users like you say about Filmora:
“I recently started using the Filmora Pro app, and I’m genuinely impressed with its user-friendly interface and powerful editing features. It makes video editing a breeze, even for beginners like me. The various transitions and effects add a professional touch to my videos, and the export quality is outstanding. – Ashish D., Small Business Owner | G2
“Filmora UI is very clean and simple to understand. It’s great for beginners who don’t know how to edit. They can easily understand all the bar tools and editing banners. I also started my editing career with Filmora. It’s great. It has all the features, themes, and titles. Some are paid, and some are free, and Filmora runs on basic computers, we don’t require any high-end computer like a gaming PC. It works smoothly in normal pc also.” – Tejender K., Business Development Manager | G2
Part 2. How To Convert YouTube Videos Into Text Using Online Tools
While video editing software like Filmora offers powerful features, sometimes you need a quick and easy solution that can help you turn YouTube into text without any downloads. That’s where online tools come in handy. These web-based services can extract transcripts from YouTube videos with just a few clicks, making the process incredibly straightforward.
Using Maestra AI To Convert YouTube Videos Into Text
One standout option in the world of online transcription tools is Maestra AI. This powerful platform combines ease of use with advanced AI capabilities to deliver accurate transcriptions quickly. Here’s how you can use Maestra AI to convert your YouTube videos into text:
Step 1: Start by opening your web browser and navigating to Maestra. The clean, user-friendly interface will greet you, making it easy to find what you need.
Step 2. Once on the Maestra AI homepage, look for the Transcription option and click it. This will prompt you to browse your hard drive for your audio files. Locate your files and upload them.

Note:
You’ll need to download the audio for YouTube videos first. You can do this using various online YouTube to MP3 converters. Once you have the audio file, you’re ready to upload it to Maestra AI.Step 3: After uploading, Maestra AI’s advanced algorithms will go to work, transcribing your audio into text. The processing time depends on the length of your video. Once done, click Share or Export.

Part 3. How To Convert YouTube Videos Into Text Using Mobile Devices
In our increasingly mobile world, it’s no surprise that we often need to work on the go. Luckily, converting YouTube videos into text isn’t limited to desktops or websites. Wondershare Filmora, introduced earlier, offers a powerful mobile app that brings video-to-text conversion to your fingertips.
The Filmora mobile app is a compact version of its desktop counterpart, but don’t let its size fool you. It packs a punch regarding features, especially in video-to-text conversion.
- Automatic captions. Filmora’s mobile version features an auto-captioning feature, which serves as its speech-to-text function.
- Multi-language support: Transcribe videos in various languages.
- Edit transcriptions. Review and modify transcriptions directly in the app.
- Export options. Save transcriptions in different formats for further use.
- Cross-platform. Filmora mobile is available on Android and iOS.
To use Filmora’s auto-caption feature, follow the steps below:
Step 1: Click Captions on the app’s homepage. Follow the prompts to upload your video and choose a target language.

Step 2: On this page, click Batch Edit on the lower toolbar.

Step 3: Finally, copy-paste the auto-generated captions.

Conclusion
Converting YouTube videos into text is a game-changer for content creators, researchers, and busy professionals. We’ve explored three powerful methods: using Wondershare Filmora’s desktop software, online tools like Maestra AI, and the Filmora mobile app. Each option offers unique advantages, from advanced features to on-the-go convenience. While online tools provide quick solutions, Filmora is the most versatile choice.
With its powerful desktop software and feature-packed mobile app, Filmora offers a complete toolkit for video-to-text conversion. Whether you’re captioning videos, creating transcripts, or repurposing content, Filmora’s user-friendly interface and advanced AI capabilities make it the top recommendation for all your YouTube video conversion needs.
FAQ
-
1. How do I download a YouTube caption as a text file?
Open the YouTube video in your browser to download a YouTube caption as a text file. Look for the three dots (...) below the video and click on them to select “Open transcript.” Once the transcript appears, click on the three dots next to it and choose “Toggle timestamps” if you want to remove them. Now, please select all the text in the transcript, copy it, and paste it into a text editor of your choice. Finally, save the file with a .txt extension, and you’ll have your YouTube captions in text format. -
2. How do I copy the captions from a YouTube video?
Copying captions from a YouTube video is a straightforward process. First, play the video and turn on captions by clicking the “CC” button. Pause the video at any point, then right-click on it and select “Copy video URL at the current time.” Open a new tab in your browser, paste this URL, and add “&timedtext=1” at the end of it. Press Enter to load the page, which will display the full transcript. From here, you can easily copy all the text, giving you access to the complete captions of the video. -
3. Can I download a YouTube video with subtitles?
While YouTube doesn’t offer a direct way to download videos with subtitles, using third-party tools is possible. Popular options include 4K Video Downloader and ClipGrab. To use these tools, copy and paste the YouTube video URL into the downloader. Look for an option to download subtitles or captions along with the video. You can select your preferred one if multiple subtitle languages are available. Then, proceed to download the video with the subtitles included.


 100% Security Verified | No Subscription Required | No Malware

