Sometimes your video just doesn’t look right. Maybe the midtones feel muddy or the contrast seems weird even though your exposure is fine. Either way, that weirdness often boils down to one thing: the gamma curve. It’s not the flashiest concept in video editing, but it’s one of the most important when it comes to how your footage looks and feels.
Definition
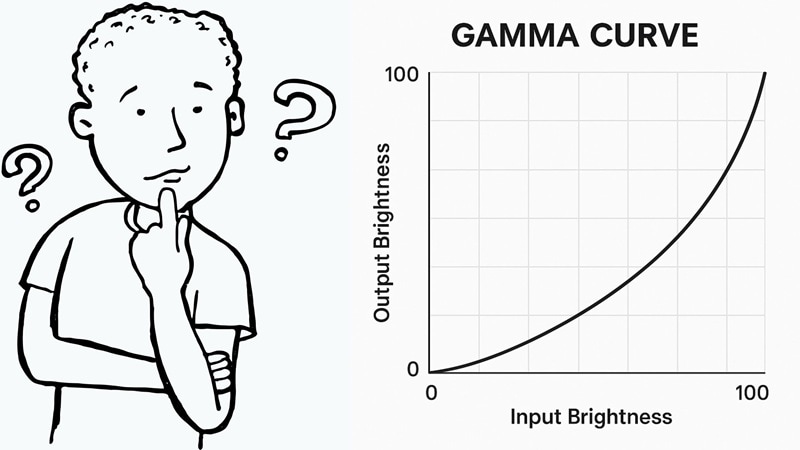
Basically, the definition of a gamma curve is a visual guide that maps how brightness levels change from the original capture to the final display. In video editing, it plays a big role in deciding how light or dark your midtones will look.
It leaves the deepest shadows and brightest highlights intact so nothing feels overexposed or washed out. It's like a volume knob for contrast, but only focused on the middle tones.
Gamma Curve Explanation in Action
To get a clearer gamma curve explanation, take a look at the photo below.
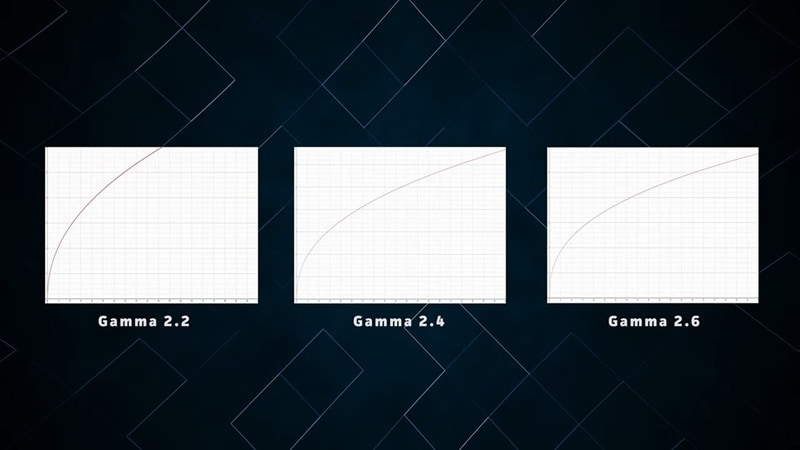
In this excellent video by Video Tech Explained, they highlight the three most common gamma curves used today;
Gamma 2.2:
This gamma curve is widely used for computer monitors and online videos. It keeps brightness levels looking natural in most everyday viewing environments and works well for casual content.
Gamma 2.4:
Often chosen for TV and home theater setups, this gamma curve delivers richer contrast and deeper shadows. It’s a favorite when you want a more cinematic look in a dimly lit room.
Gamma 2.6:
Designed for professional mastering and projection, this gamma curve gives extreme depth and precision in dark scenes. It’s mainly used in high-end post-production studios and for theater screens.
Key Elements of the Gamma Curve
Input-Output Mapping:
The gamma curve translates pixel brightness from the camera sensor into the image you see. It defines how tonal values are distributed so your footage looks balanced and visually pleasing.
Here, the gamma curve works more on the midtones than the highlights or shadows. It’s the secret to adjusting light levels without ruining detail in the brightest or darkest parts of your video.
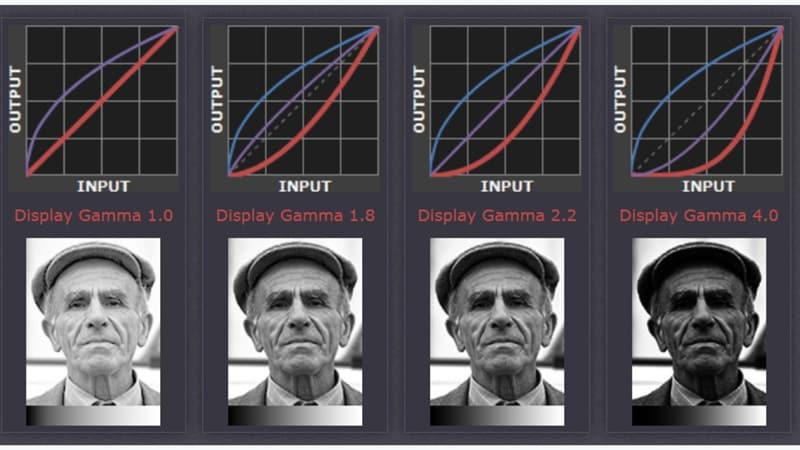
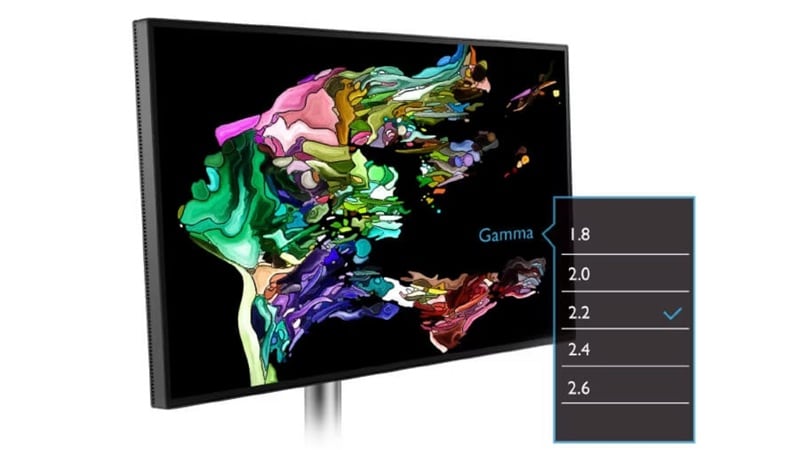
Standard Values:
Common gamma settings include 1.8, 2.0, 2.2, 2.4, and 2.6, each tailored to specific viewing needs. For example, 1.8 was popular on older Macs, 2.0 can be used for brighter displays, 2.2 is the standard for most PCs, 2.4 works best for TVs in dim rooms, and 2.6 is often reserved for high-end mastering or theater projection.
Now that you know the definition of gamma curve and its importance, it’s time to see where it truly comes into play. From subtle corrections to bold creative choices, here are some common uses of the gamma curve to enhance your clip:
Adjusting the gamma curve helps restore balance to footage shot in harsh or uneven lighting. It can smooth out overly bright midtones or lift shadows just enough to keep details visible without washing out the image.
Stylizing Looks:
Fine-tuning gamma can instantly shift the mood of your video, whether you want a warm, inviting tone or a dramatic, high-contrast style. It gives you creative control without redoing the entire color grade.
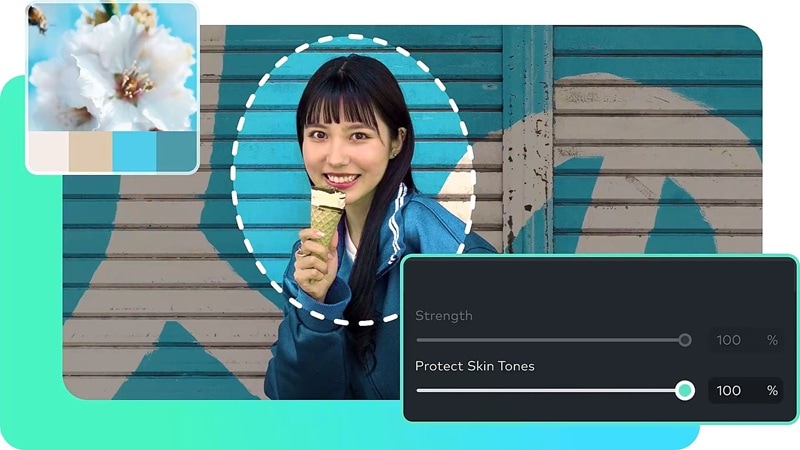
Enhancing Skin Tones:
Small gamma adjustments can make skin look healthier and more flattering, especially in close-ups. It’s a subtle tweak that can elevate the overall quality of interviews or beauty shots.
Specific Use Cases
Fixing Flat Log Footage:
Gamma correction is essential for bringing log footage to life. It restores depth, contrast, and color, transforming a flat and washed-out look into rich, dynamic visuals that are ready for final grading.
YouTube Video Color Fixes:
Many standout vlogs owe their vibrant, polished look to proper gamma adjustments. It boosts midtones, keeps colors balanced, and makes the footage feel more engaging without over-saturating.
Short Films And Commercials:
In creative projects, gamma curves are fine-tuned to set the mood. Whether it’s enhancing drama, building suspense, or creating a dreamy, ethereal tone, gamma plays a big role in visual storytelling.
Common Gamma Curve Mistakes to Avoid
Overdoing It
Pushing gamma curve correction too far can strip away the natural feel of your footage, leaving it overly processed and harsh on the eyes.
How to avoid
Make subtle adjustments and frequently compare before/after to ensure the changes enhance rather than overpower your footage.
Ignoring Display Gamma
A video that looks perfect on your screen might appear dull or washed out elsewhere if you don’t account for different display gamma settings.
How to avoid
Test your video on multiple devices and calibrate your monitor to ensure consistent appearance across different displays.
Mismatched Gamma Workflows
Combining clips from various sources without proper gamma correction can cause abrupt shifts in brightness and tone that distract from the story.
How to avoid
Apply consistent gamma correction to all clips in your project and use color management tools to maintain visual continuity.
How to Adjust Gamma Curve in Filmora (3 Easy Steps)
After learning the definition of gamma curve and seeing how it shapes your video, it is time to put it into action. Thankfully, many video editors now include gamma curve adjustments, but Wondershare Filmora stands out for being both advanced and beginner-friendly.
This all-in-one editor offers a full set of color correction tools, including precise curves for gamma correction. It also comes packed with AI-powered color controls and plenty of creative features beyond color work.
Here’s a simple guide to help you adjust the gamma curve in Filmora and bring out the best in your footage.
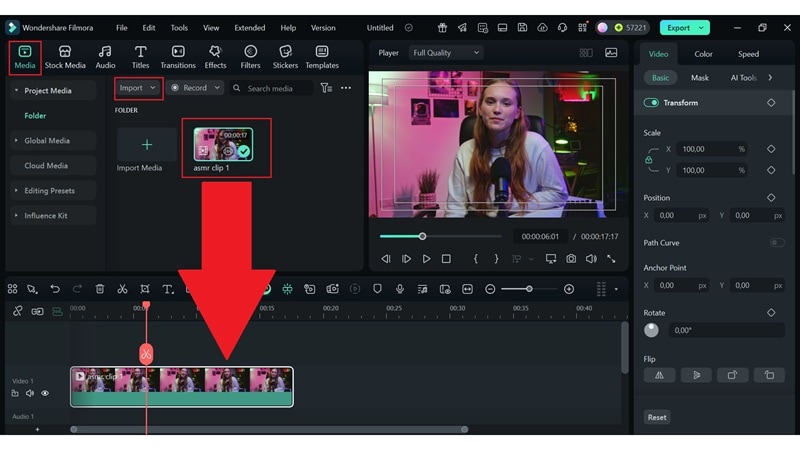
Step 1
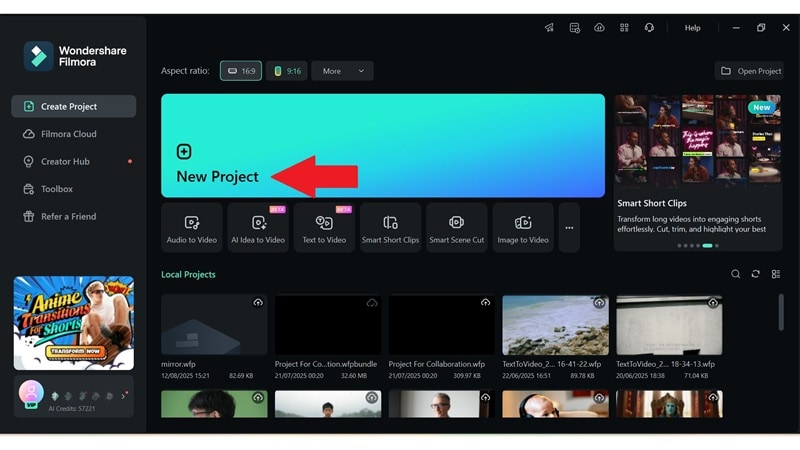
Open Filmora and start a new project: Get the latest version of Filmora installed on your device. Once it’s ready to go, launch the app and select "New Project" to begin editing with a fresh workspace.
Step 2
Upload your footage: In the main editing area, head to the "Media" tab and choose "Import" to bring in the video you want to work on. After that, just drag it down to the timeline and you’re ready to begin.
Step 3
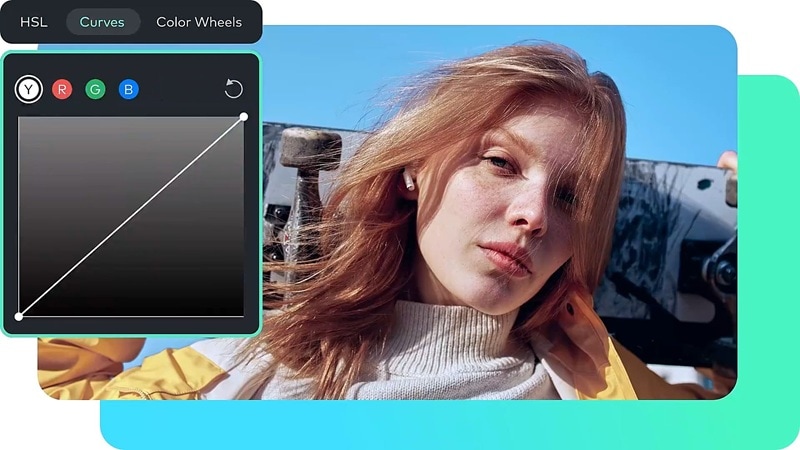
Adjust gamma correction. Now, click on your clip in the timeline. In the properties panel on the right, go to "Color" and pick "Curves". You’ll see Y, R, G, and B options below, which stand for luminance (Y) along with red, green, and blue channels. Click each one as needed and adjust the lighting of your clip by dragging points on the curve until it looks just the way you want. And that’s all there is to it.
Bonus: Pro Tips for Gamma Curve Adjustments in Filmora
Now that you know how to adjust the gamma curve, it’s time to make those edits work even harder for you. With Filmora’s powerful color correction tools, a few smart tweaks can take your video from good to stunning in no time.
Here are some quick ways to get the most out of your gamma adjustments:
Fine-Tune With Color Wheels:
After adjusting the gamma curve, use the Midtone Wheel to keep skin tones looking natural and the overall color balance in check. To do that, simply click the “Color Wheels” option in the property panel and scroll down to the “Midtones” section.
Check Before And After:
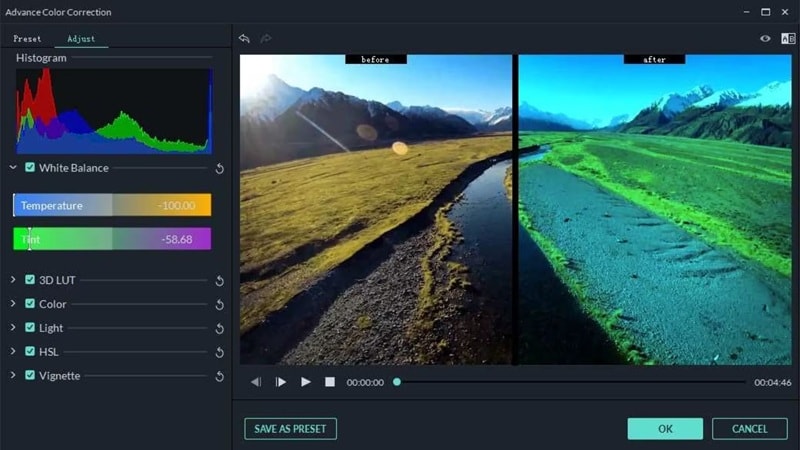
Enable Split Screen Preview to quickly see the difference between your original and edited footage, making it easier to judge the impact of your gamma adjustments.
Save As A Preset:
If you work with similar clips often, save your gamma curve settings as a Custom Preset so you can apply them instantly without repeating the same steps.
How does gamma differ from brightness or contrast?
Gamma focuses on adjusting the midtones without heavily affecting the darkest shadows or brightest highlights. Brightness shifts the entire image up or down in lightness, while contrast changes the difference between light and dark areas.
Can I adjust gamma manually in all video editors?
Most professional and advanced video editors like Filmora include gamma curve control, though some basic or mobile apps may limit this feature. If your editor supports it, you can fine-tune gamma for precise tone control.
What gamma value should I use for YouTube?
A gamma value around 2.2 is a safe choice for YouTube since it matches the standard for most computer monitors and online platforms, keeping your videos consistent across devices.