
Do you want the subtitles of your video to be more eye-catching?
Do you want to add text that compliments the theme of your video?
Captions make the videos more understandable. In the highly competitive market of today, there's so much you can do to enhance your videos.
What is the best software for you? DaVinci Resolve or Filmora? How to use them?
Let's start with how to add text to DaVinci Resolve.
In this article
How to add text to video DaVinci Resolve?
DaVinci Resolve offers a range of customization options for adding text to video.
It is available for both Windows and macOS. A free version is available with maximum features.
Choosing the right text title and animations or effects for the text is very important to deliver the message. The added text should complement the content of the video.
Customize the captions to the next level using DaVinci Resolve!
How to add text in davinci resolve? Let's learn more about it.
Learn More about Ways To Add Text

Step-by-Step Guide to Insert Basic Texts in DaVinci Resolve
Step 1 - Download and install DaVinci Resolve
Download and launch DaVinci Resolve after installing it.
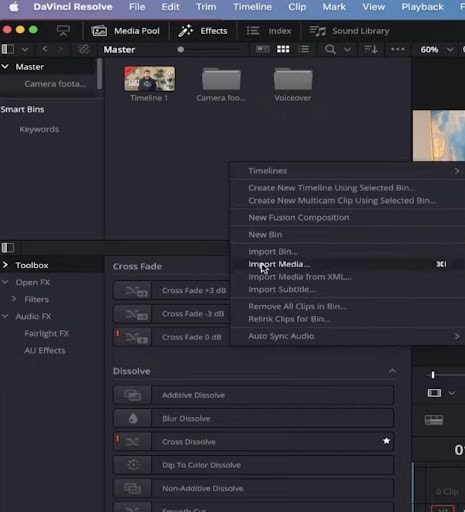
Step 2 - Import media
- Go to the Media Pool and right-click it to open the menu.
- Click on the Import Media.
- If you use Windows, the shortcut to upload media is Ctrl + I.
- Locate the folder and upload the video file.
- Drag the uploaded file from the Media Pool to the timeline.
Step 3 - Effects Library
- Open the Effects Library by clicking it.
- Find and click on the Toolbox to open the menu.
- Click on the Titles.
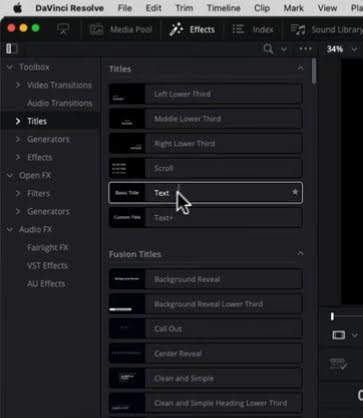
Step 4 - Add text to the timeline
- Choose from the title options.
- You will find a vast library of title designs.
- The Titles menu has two sub categories - Basic titles and Fusion titles. Fusion titles have more pre-added animation and effects.
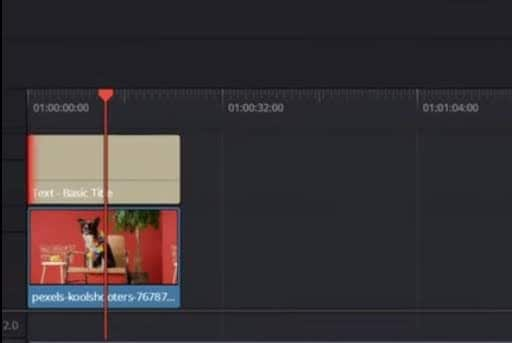
- Drag the title onto your timeline, placing it above your media.
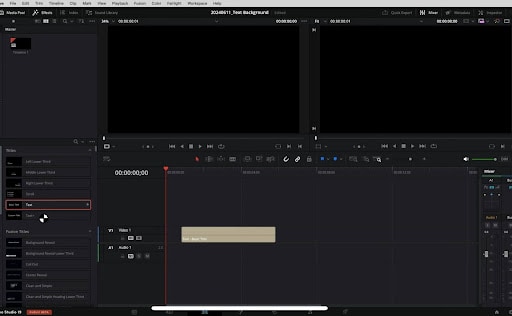
Step 5 - Text duration
- Drag the added title over the timeline to increase or decrease the duration.
- You can add as many titles as you like to your video according to the duration for which you want them to appear.
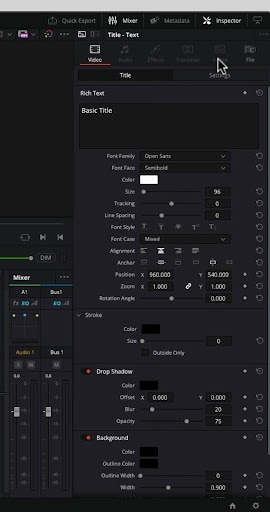
Step 6 - Text properties
- Go to the Inspector panel on the right side.
- You can customize the font, size, color, alignment, and position of the text.
- Select the text + title from the title library to enjoy more customizable text properties.
Step 7 - Save the file
- Find and click on the Deliver tab.
- Edit the export settings, and click on the Add to Render Queue.
- Now click on the Start Render button.
- Your video file will be saved at the location you have already selected.
You can add more crazy text effects to your videos. Let's learn how.
How to add text effects or Animate Text in DaVinci Resolve?
Are you done with basic text titles? DaVinci Resolve has a solution for you.
- Choosing the Text + title
For more advanced text animations, you should use the text +.
- From the title library, select the text + title.
- Drag it onto the timeline.
- Select the title you want to edit, and go to the Inspector panel.
You will find customization options from simple text options to position, opacity, and scale animations.

- Choosing the Fusion titles
In the title library, you will find a whole list of fusion titles below the basic titles.
- Select the Fusion title and drag it onto the timeline.
- Select the title on the timeline you want to edit, and go to the Inspector panel.
Transform, position, and add effects as you wish.
Advanced Text Options
DaVinci Resolve offers advanced options for developers or enthusiasts perfecting their professional projects. Like,
- Text + provides more advanced controls and layout options than the basic Text effect.
- Fusion Titles in the Effects Library allow you to create even more complex animated text using nodes.
- 3D text can be extruded and rotated in 3D space for a more dynamic look.
Some tips
While using DaVinci Resolve, keep in mind the following tips,
- Use the Video Transitions in the Effects Library to quickly add animations to text clips
- Adjust Zoom, Rotation, Shear, and other properties in the Settings tab
- Apply Drop Shadows, Outlines, and Backgrounds for added style
- Experiment with different fonts, colors, and layouts to make your text stand out
Everything has benefits and limitations. We have already discussed the benefits of DaVinci Resolve and how to avail them. Let us move to the limitations of using DaVinci Resolve.
Limitations of adding text to video DaVinci resolve.
- Collaborative project management is not available on the free version.
- Editing of Fusion titles is node-based. This makes it difficult for beginners to use.
- The interface of DaVinci Resolve is complex. Unfriendly for beginners.
- Some fonts and characters may not render properly.
- You may experience bugs or glitches.
- The hardware requirements for DaVinci Resolve are relatively higher than those for other tools.
An alternative for adding text without DaVinci Resolve
If you're looking for an editing program that is easy to use and has a good number of features, Wondershare Filmora is for you. It works on both macOS and Windows.
Filmora is an excellent alternative to DaVinci Resolve. If you are someone who wants an easy to use interface and smart editing, then this tool is for you. Free of technicalities!


Let's learn more about the key editing features of Filmora.
Features of text editing in Filmora
- Customizable Text Styles: Choose from a variety of fonts, colors, and sizes to match your video's style, making your text stand out.
- Text Animation: Add dynamic motion to your text with various animation options. You can choose from fade-ins, slide-ins, bounce effects, and more.
- Text Templates: 120+ pre-designed text templates for quick and easy title creation.
- Layering and Positioning: Easily layer text over video clips and adjust its position on the screen for precise placement.
- Real-Time Preview: See how your text looks on your video in real-time as you edit, allowing for instant adjustments.
- Speech-to-Text: Convert spoken words to on-screen text automatically, saving time on manual typing.
Both the tools - DaVinci Resolve and Wondershare Filmora, have their own benefits and limitations. Let's help you decide what will suit you the best! See the comparison below to understand the differences.
Comparison between DaVinci Resolve and Filmora in Text Editing
| DaVinci Resolve | Wondershare Filmora | |
| Support | Windows and iOS | Windows, MacOS, iPadOS, Android, iOS |
| Target audience | Trained professionals | Beginners and semi - professionals |
| User interface | Complex |
Simple |
| Bugs and glitches | ||
| Auto Captions | ||
| Customization tools | Extensive range for professional use | All the basic customization tools for social media and YouTube videos |
| Cost | Expensive One-time price at $295 |
Cheaper With a free trial |
Step-by-Step Guide to Insert Text & Text Effects in Filmora
Follow the given instructions step-by-step to add text to the video.
Step 1 - Download and install the latest version of Wondershare Filmora
You can get the latest version of the tool by clicking here. Then, launch the tool.
Step 2 - Create a New Project
- Click on the New Project.
- Adjust settings according to your needs.
- Click on the Import button to browse and upload the video.

Step 3 - Drag the file to the timeline
Drag your video file to the timeline.

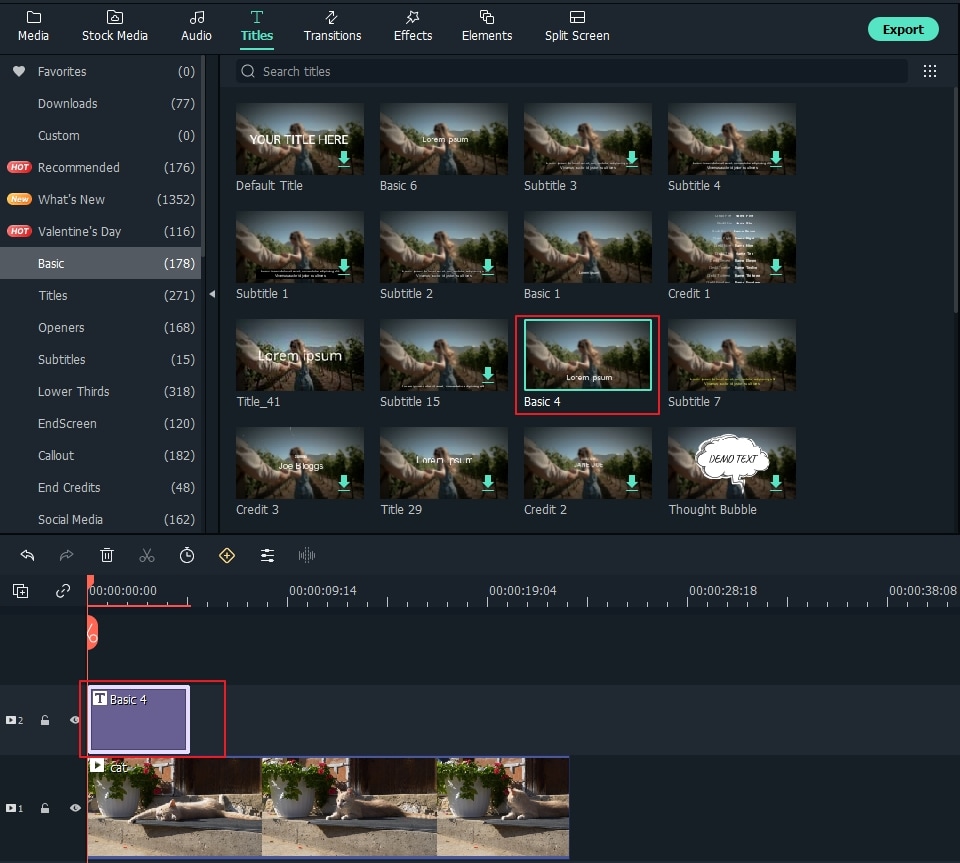
Step 4 - Explore various Title options
Click on the Titles tab to open preset templates. Double-click the template to preview it before adding it permanently.

Step 5 - Position the Title template and set the duration
Position the template above the timeline at the desired duration.
The default duration of the template is 5 seconds. Select the timeline first, then click the Timer icon to change the duration.
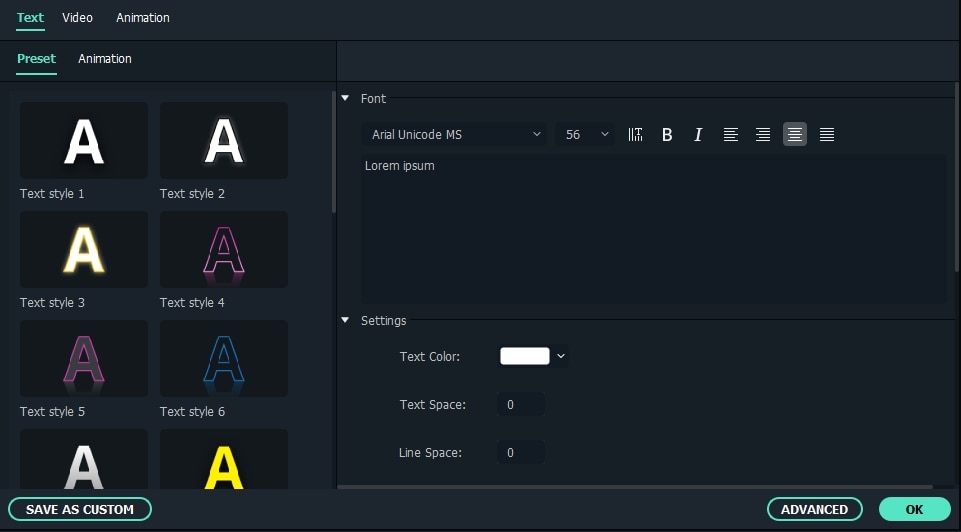
Step 6 - Select the text properties
Double-click the title frame to open the editing window. Type the text and explore the text fonts, sizes, and colors. Double-click the style you want to preview.
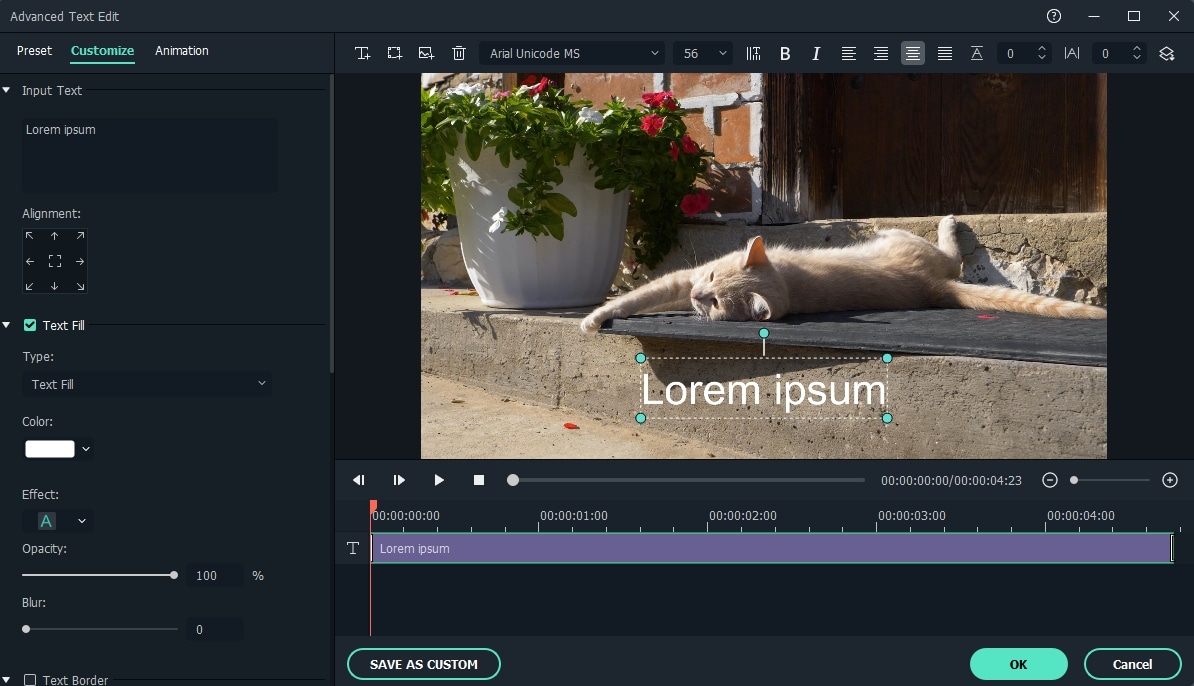
Step 7 - Customize the text animations
Change the text animation by clicking on the Animation icon. To further customize, click the Advanced button.
Step 8 - Save and export the video file
- Preview the video with added text by clicking on the Play icon.
- Click on the Export button.
- Select the output format and other advanced settings according to your needs.
- Click on the Export button.

Generate automatic captions with one click. Filmora offers animated automatic speech-to-text captions. Subtitles become more personalized, making videos more engaging for viewers.
Let's move to the step-by-step guide to learn how to add automatic captions.
Step-by-Step Guide on How to use Auto Caption to Add Text over Video
Follow the given instructions step by step to add Text via Auto Caption,
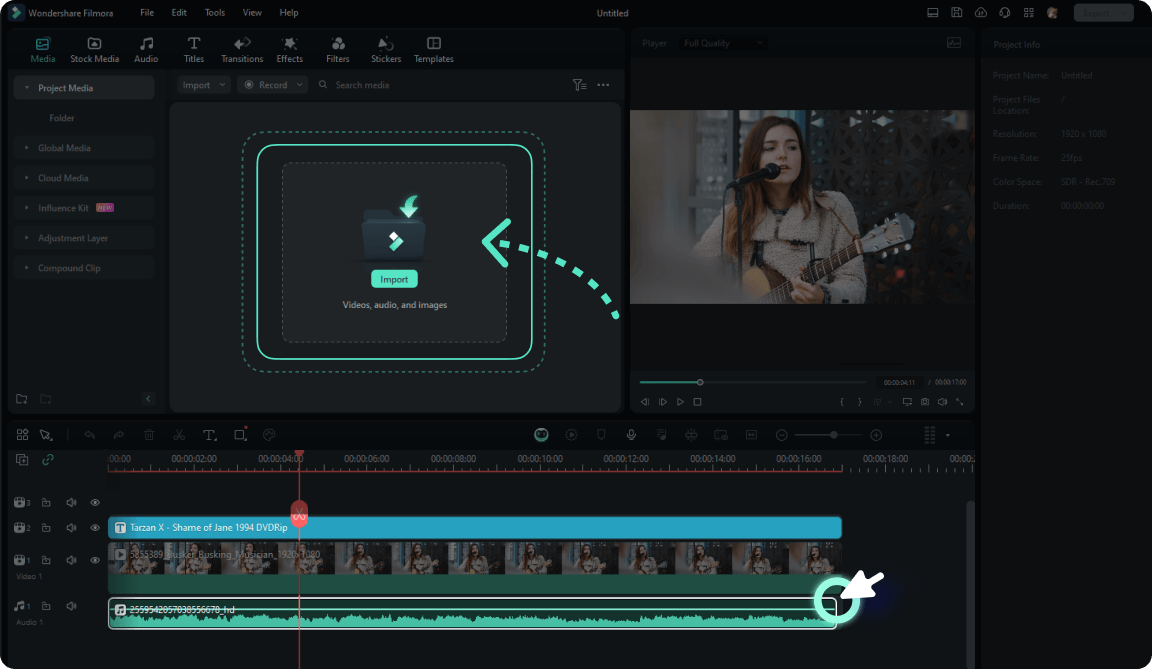
Step 1 - Enable Speech-to-Text
Upload your file. Find and select the Speech To Text feature (above the timeline shown in the picture).
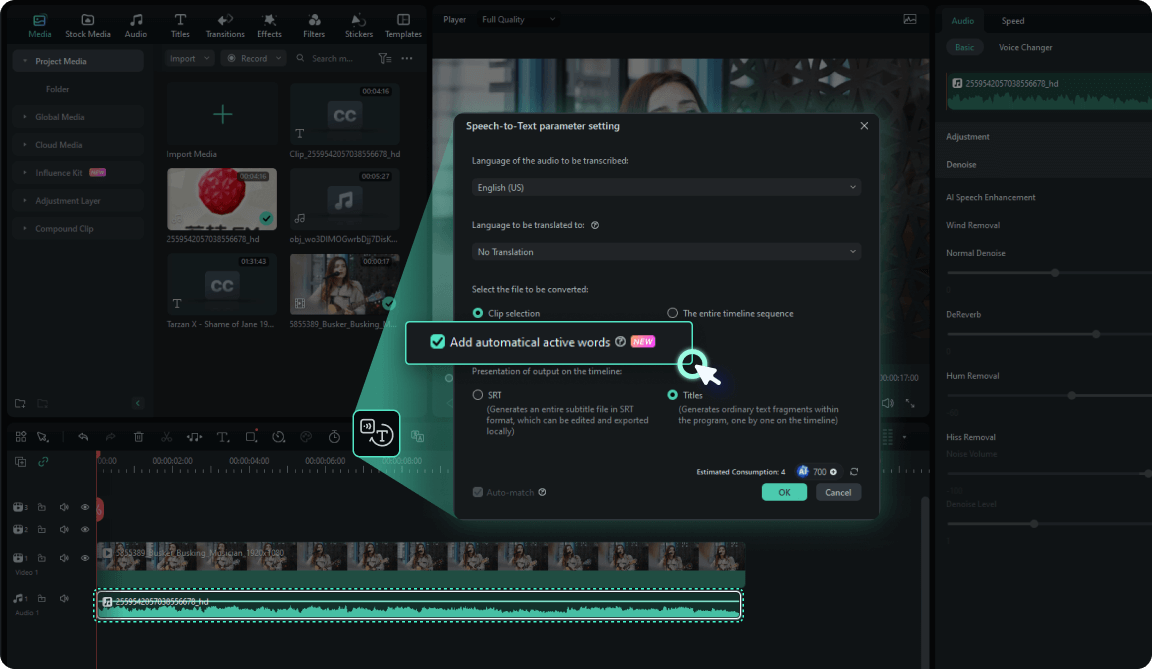
Step 2 - Add automatic active words
To generate dynamic caption animations, enable the Add automatic active words option in the STT settings.
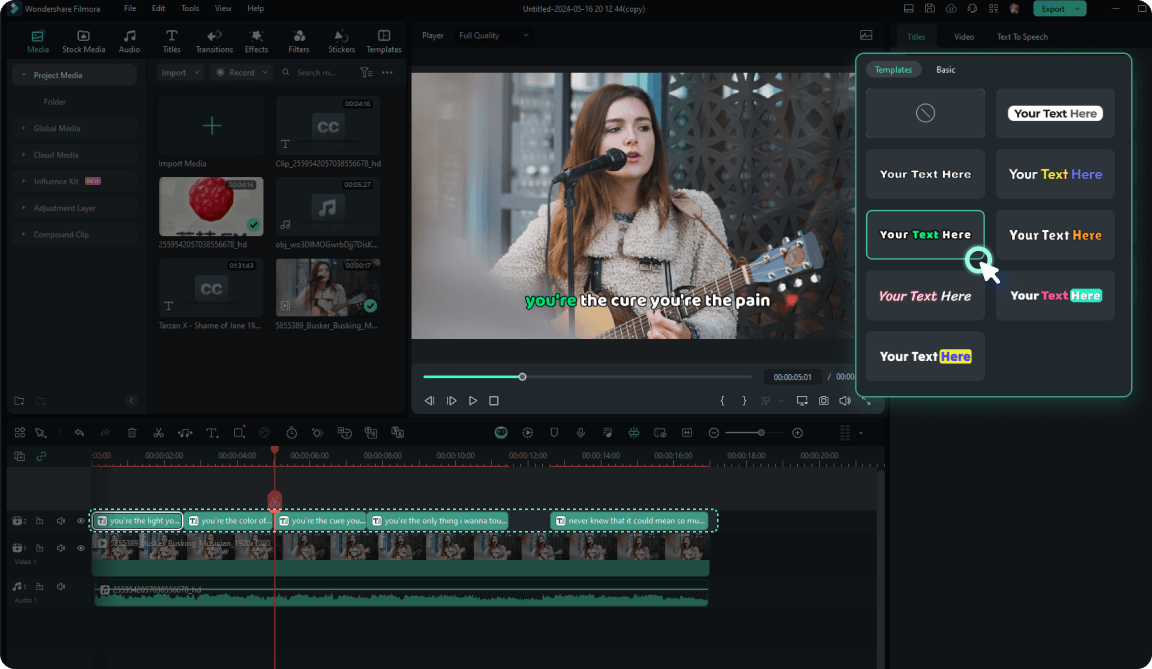
Step 3 - Customize the auto - caption
Select from the preset templates. Further, customize it to engage your viewers.
Conclusion
Although adding text to your videos is very simple. The actual fun begins when making it stand out. DaVinci Resolve lets you personalize your videos more. Whereas Filmora has some smart features, like auto caption or speech-to-text, that triumph over the complex tools of DaVinci Resolve.
This is all from the guide to add text to videos - DaVinci Resolve and Filmora. We hope that we have provided you with enough information.
