
 100% Security Verified | No Subscription Required | No Malware


 ChatGPT
 Perplexity
 Gemini
 Claude
 Grok
Grok
Blur filters are more than a way to hide things. They help direct focus, create atmosphere, and add style. Blur effects can enhance your content, whether you're trying to protect privacy, draw attention to a subject, or build a cinematic look.
With Wondershare Filmora, blur background filters are no longer limited to professional editors. The tool makes it easy to use aesthetic blur filters for all kinds of content. Are you ready to learn how to apply them to your videos? Keep reading!

Table of Contents
Part 1. What Are Blur Filters in Video Editing?
Blur filters are video effects that soften selected areas of your footage. They can be applied across the frame or targeted to specific parts, like faces or backgrounds. The goal may be to conceal, emphasize, or create a visual mood.
There are different types of blur filters used in editing:
- Gaussian Blur softens an area with a smooth, balanced effect.
- Directional Blur mimics motion and is useful in action scenes.
- Radial Blur creates a focal blur from the center out.
- Mosaic Blur breaks visuals into pixelated blocks for privacy.
Creators commonly use blur filters to:
- Hide faces or sensitive data using the blurry face filter.
- Emphasize subjects by using a blur background filter to simulate depth.
- Add a dreamy look for an aesthetic blur filter in reels or vlogs.
While modern phone apps can apply basic blurs, they often lack accuracy. Many cannot track movement or isolate details precisely. This can lead to messy results and limited creative options.
Wondershare Filmora solves these limitations with intuitive tools for tracking, masking, and adjusting blur with full control. Next, see how you can start applying blur filters in Filmora step by step.

Part 2. How To Apply Blur Filters in Wondershare Filmora
Applying blur filters in Filmora is both powerful and easy to learn. The platform gives you the tools to do it in a few simple steps. Here's how to use the tool if you want to blur the full frame, mask a face, or create a dreamy aesthetic:
 secure download

Add Blur To the Entire Frame
Download and install Filmora on your computer. Next, launch the tool and log in or register a Wondershare account to get started. Follow the next steps:
01of 03Create new project
Create a new project. Import your video clip and drag it to the timeline.

02of 03Add blur effect
Go to the Effects panel, then select Video Effects. Find the Blur effect that you want. Drag this effect directly onto your clip in the timeline.
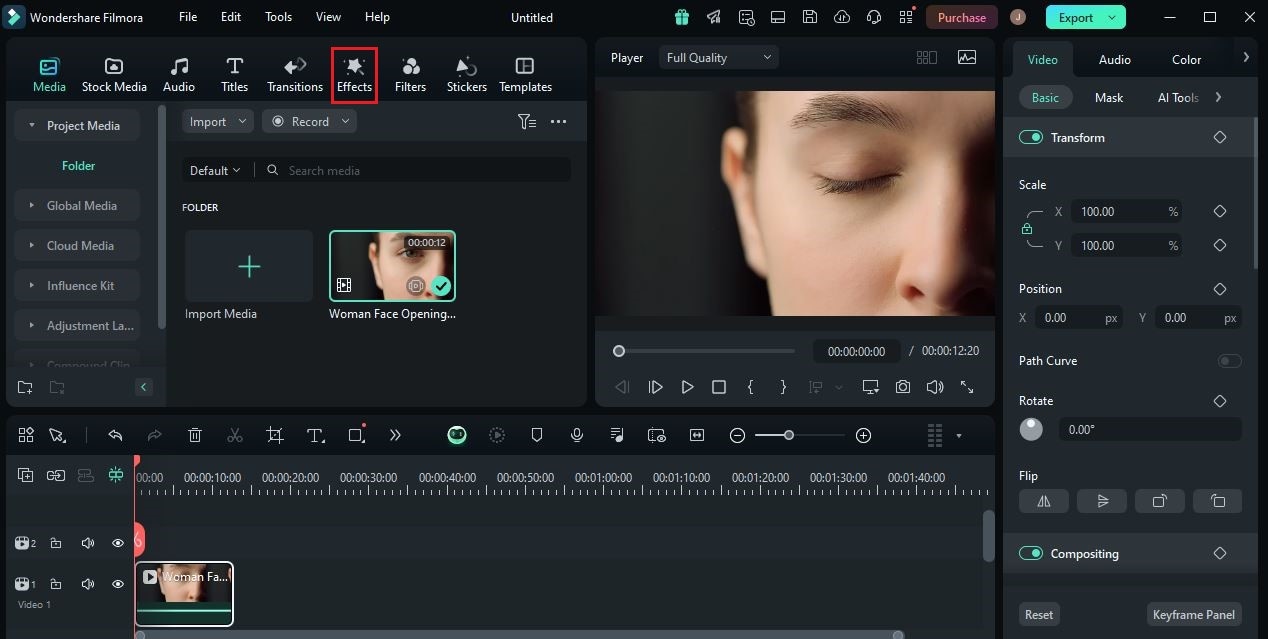
03of 03Adjust settings
Click the clip, then open the Effect Settings panel. Here, you can adjust the blur and duration depending on the mood you're going for.

This technique works well for transitions, intros, or moody cinematic shots.
Use the Blurry Face Filter
Here are the steps to use the blurry face filter:
01of 03Start motion tracking
Import your footage and drag it to the timeline. Select the clip and click Video > AI Tools > Motion Tracking in the right toolbar.

02of 03Track the face
Draw a tracking box around the moving face you want to blur. Click the Motion Tracking icon to start. Then, attach the Mosaic Blur or Gaussian Blur to the tracked object.

03of 03Use mask for static faces
If the face is not moving, use the Mask tool. Apply a shape mask over the face, then go to the Effects panel and drag a blur filter onto the masked area.

This process is ideal for protecting identities or adding humor in vlogs and reaction videos.
Apply a Blur Background Filter
Here's how to add a blur background filter:
01of 03Duplicate the clip
Add your main clip to the timeline. Duplicate the clip by right-clicking it and choosing Duplicate.

02of 03Blur the background
Place the duplicate clip above the original on the timeline. Apply a Blur to the lower clip to serve as the blurred background.
03of 03Isolate the subject
On the upper layer, use the Mask tool to isolate your subject. Refine the edges using the sliders for a natural blend.
This technique simulates depth of field and is perfect for interviews, tutorials, or sit-down vlogs.
Make an Aesthetic Blur Filter Effect
Here are the steps to make an aesthetic blur filter effect:
01of 03Apply soft blur
Start by applying a Blur over your clip as described earlier. Lower the opacity slightly to create a soft-focus look.
02of 03Add visual layers
Add visual layers such as light leaks, color overlays, or dust film effects from Filmora's Effects panel.

03of 03Adjust timing
Adjust the playback speed to slow motion and sync with ambient or emotional music.
The result is a cinematic reel with a dreamy atmosphere, perfect for story intros or travel montages.
Filmora's blur tools are flexible, precise, and easy to master. Try it today and bring your video ideas to life with powerful blur effects.
Part 3. Best Scenarios To Use Blur Filters
Blur filters are versatile and effective across many video types. Below are the most popular scenarios where applying a blur effect can elevate your visuals and storytelling.
Vlogging and Travel Videos
Blur effects help guide attention to the people or moments that matter most:
- Blur backgrounds in public locations to highlight the speaker.
- Use soft blur with panning shots to create a cinematic bokeh effect.
- Apply blur transitions to switch scenes more smoothly.
This creates a polished and personal vlog style.
TikTok and Instagram Reels
Social content thrives on style and humor. Blur filters enhance both:
- Apply the blurry face filter for playful edits or to hide expressions.
- Create aesthetic blur filter intros for "Get Ready With Me" or "Day in My Life" videos.
- Combine blur with music timing to add rhythm to scene changes.
Blur gives your content visual flair without needing heavy effects.
Tutorials and Explainers
Blur can help simplify what the viewer sees and increase understanding:
- Blur sensitive information like emails or passwords in screen recordings.
- Dim background clutter and focus attention on what you're demonstrating.
- Guide the viewer's eyes to text, objects, or key points on the screen.
This is especially useful in software tutorials or how-to videos.
Product or Food Content
In product showcases, blur creates professional, ad-like shots:
- Use blur background filters to make the featured item stand out.
- Apply soft blur to give food videos a smooth, elegant look.
- Use focus pulls where the background comes into clarity, then fades.
Pairing blur with good lighting and music makes content more visually compelling.
In the next section, discover why Filmora is the top choice for adding blur filters to any type of video.
Part 4. Why Filmora Is the Ideal Blur Filter Tool
Filmora is designed to make advanced video editing accessible without losing creative flexibility. When it comes to blur filters, it offers the perfect balance of power and ease. Here are its main features:
Beginner-Friendly Workflow
Filmora's interface is simple and logical. You can:
- Drag and drop blur effects without navigating complex menus.
- Use masking and motion tracking with real-time previews.
- Apply changes without needing advanced editing knowledge.
This makes it ideal for first-time users who still want pro-looking results.
Creative Freedom With Full Control
Filmora offers deep customization to match your style:
- Adjust blur strength, shape, and placement manually.
- Combine blur filters with color grading, titles, or overlays.
- Use keyframes to animate the blur over time for dynamic shots.
You can fine-tune every detail to suit your vision, whether it's clean and subtle or bold and artistic.
All-In-One Editor
With Filmora, you don't need separate apps or plugins:
- Edit video, add blur, insert audio, and apply text all in one timeline.
- Choose from export presets for vertical and square formats for TikTok and Instagram.
- Use Filmora's built-in stock library for visuals, music, and effects.
Everything you need to produce and publish content is in one place.
Performance and Flexibility
Filmora is lightweight yet powerful:
- It runs smoothly on most devices with GPU acceleration.
- It supports high-resolution output with minimal rendering time.
- It works across Windows, macOS, and even mobile through FilmoraGo.
For creators who want both simplicity and control, Filmora is the ideal tool for working with blur filters.
Conclusion
Blur filters can completely change the look and feel of your video. They help focus attention, protect privacy, and add emotional or aesthetic depth. If you're on TikTok, Instagram, or YouTube, they can elevate your content with a few simple edits.
Filmora makes it easy to apply everything from a blurry face filter to a full aesthetic blur filter scene. Its drag-and-drop tools, tracking options, and creative features allow you to blur with confidence. Start using Filmora today to transform your footage into something cinematic and professional.
Ready to enhance your videos with professional blur effects?
Download Wondershare Filmora now and start creating stunning visual content!
secure download 