
 100% Security Verified | No Subscription Required | No Malware
Sometimes, your video may feel too long, contain awkward pauses, or include parts you don’t need. If you’re wondering how to cut parts of a video in iMovie or how to trim audio in iMovie, especially on your iPhone, this guide is here to help. Using iMovie's mobile editing tools, it's easy to cut a clip in iMovie on iPhone or cut audio in iMovie to create a smoother final product. Whether trimming the start of a scene or adjusting background music, knowing how to cut audio in iMovie can significantly enhance your workflow.
In this step-by-step guide, we’ll cover how to trim video in iMovie for iPhone, detach and edit sound, and offer pro tips to boost your mobile editing skills.
In this article
Part 1. How to Trim and Cut Video and Audio in iMovie on iPhone
Editing videos on your iPhone is quick and easy with iMovie. Whether you need to cut a clip in iMovie on your iPhone to remove extra footage or trim audio in iMovie to adjust your sound, iMovie has the right tools to help. Below are simple step-by-step guides for cutting video and trimming audio on your iPhone.
How to Cut Parts of a Video in iMovie
If your video has unwanted sections, you can cut a clip in iMovie on your iPhone using the split tool. This allows you to remove mistakes, trim unnecessary pauses, or rearrange footage.
- Open iMovie on your iPhone and start a new project or select an existing one.
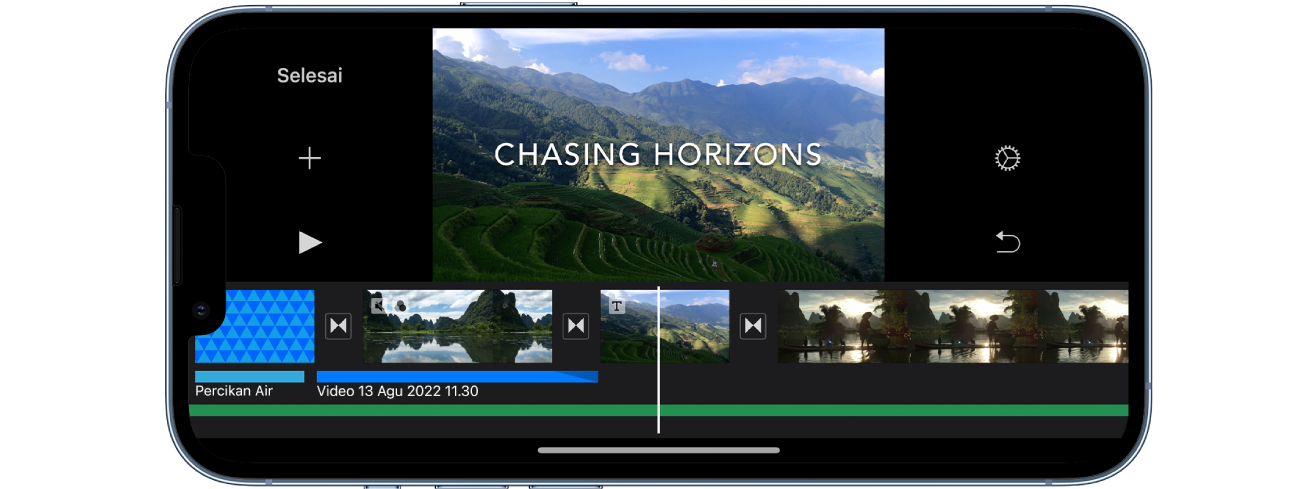
- Tap on the video clip in the timeline to highlight it. Swipe left or right to move the playhead (the white vertical line) to the point where you want to cut the clip.
- Tap on the video clip again to bring up the editing options.
- Select Split from the menu to divide the clip into two separate sections.
- Repeat the process at different points in the clip if you need to cut out multiple sections. Tap on the unwanted part and press Delete to remove it.
- Adjust the remaining clips by dragging them in the timeline to smooth the transition.

Tip: If you accidentally delete a clip, use the Undo button at the top of the screen to restore it.
How to Trim Audio in iMovie
Trimming audio helps keep your video clean by removing unwanted noise or extra silence. You can also adjust the audio's length to match your video's timing.
- Open your iMovie project and tap on the audio clip in the timeline. Once selected, yellow trim handles will appear at both ends of the audio clip.
- Drag the left trim handle to remove any unwanted silence at the beginning. Drag the right trim handle to shorten the audio clip or match it with your video length.
- If you need to remove a section from the middle, move the playhead to the part you want to cut. Tap the audio clip, then select Split to divide it into two separate sections.
- Tap on the unwanted audio segment and press Delete to remove it. Adjust the remaining audio clips so they align perfectly with your video.

Tip: Use fade-in and fade-out effects to smoothly transition the audio between clips.
Part 2. How to Detach and Split Audio from Video in iMovie on iPhone
Detaching audio from a video allows you to edit the sound separately, replace it with background music, or remove unwanted noise. iMovie makes it easy to split audio from video in iMovie on iPhone so you can customize your video's sound to match your needs. Follow these steps to detach and split audio for better editing control.
How to Detach Audio from Video in iMovie on iPhone
If you want to remove or replace the original audio, you must detach it from the video first.
- Open iMovie and load your project. Then, tap on the video clip in the timeline to select it.
- Tap the Actions (scissors) icon at the bottom of the screen. Select Detach Audio from the menu.
- The audio will now appear as a separate blue-colored clip below the video.
- Tap on the detached audio clip, then press Delete if you want to remove it. If replacing the audio, tap + and select a new background track or voiceover.

Tip: Once detached, you can move the audio separately to match different parts of the video.
How to Split Audio from Video in iMovie on iPhone
Splitting audio allows you to cut unwanted sections or adjust the timing of your sound without affecting the video.
- After detaching the audio from the video (see steps above), tap on the audio clip in the timeline. Move the playhead to the point where you want to split the audio.
- Tap the audio clip again to bring up the menu. Select Split to cut the audio into two separate sections.
- Repeat the process if you need to cut multiple sections.
- Tap on any unwanted segment and press Delete to remove it.
- Drag the remaining audio clips to reposition them if needed.

Tip: If you only want to adjust the volume without cutting, tap the audio clip, then use the volume slider to increase or decrease the sound. By detaching and splitting audio in iMovie, you can enhance your video's sound quality, sync it perfectly with visuals, or replace it with better background music.
Part 3. A Smarter Alternative to Cut Audio and Video on iPhone
 secure download

iMovie is a great tool for basic video and audio editing on iPhone. Still, if you want faster editing, more advanced features, and AI-powered tools, Filmora is a better option. With the Filmora app, you can trim and cut videos precisely, remove unwanted audio effortlessly, and apply professional effects in just a few taps.
Why Filmora Mobile is a Better Choice
| Feature | iMovie | Filmora Mobile |
| Ease of Use | Simple, but limited | Intuitive, beginner-friendly |
| Trimming Video | Manual trimming with trim handles | AI-powered Auto Cut + manual trimming |
| Cutting Video | Split tool with basic functionality | Precise split tool with advanced editing features |
| Trimming Audio | Basic trimming with limited effects | AI-powered trimming and customizable sound effects |
| Detaching Audio | Simple detach option | Full audio control with noise reduction |
| Background Music | Limited selection | Large royalty-free music library |
| Advanced Features | Basic editing only | AI-powered tools, effects, and filters |
| Availability | iPhone only | Available on iPhone and Android |
Filmora for Mobile Filmora for Mobile Filmora for Mobile Filmora for Mobile Filmora for Mobile
Edit Videos on Your Mobile Phone with 1-Click!
- • Create viral-ready videos from images instantly.
- • User-friendly video editing for beginners.
- • Supports over 20 languages for captioning and bilingual subtitles.


How to Trim and Cut Video in Filmora Mobile on iPhone
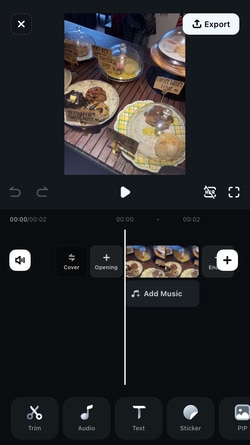
Step 1Open Filmora Mobile and Start a New Project

Step 2Import the Video You Want to Edit
Select and tap Import to upload the video you plan to trim or split.
Step 3Set the Playhead on the Timeline
Drag your video onto the editing timeline and move the playhead to the point where you want to make a cut.
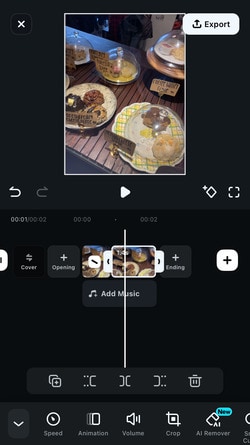
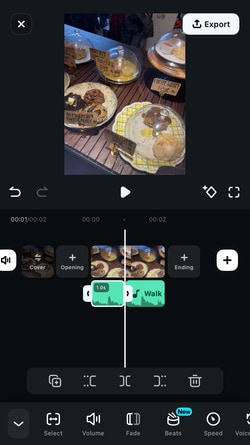
Step 4Use the Trim or Split Tool to Edit Your Video
Tap the Trim menu and select the Split tool to divide your video. You can also drag the edges of the clip inward to trim unwanted sections.
Step 5Export Your Edited Video
After making your edits, tap Export to save the trimmed video to your device.
How to Trim and Cut Audio in Filmora on iPhone
Filmora allows for precise audio trimming, making it easy to remove background noise, sync sound perfectly with video, or adjust volume levels.
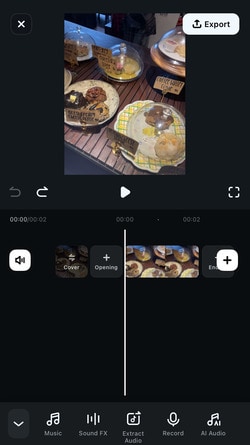
Step 1Import Your Video and Choose Background Music
Open Filmora and import your video. Tap Music to select a soundtrack, voiceover, or background audio from the available options.
Step 2Split the Audio Clip on the Timeline
Drag the audio to the timeline. Move the playhead to your desired cut point and tap Split to divide the audio into sections.
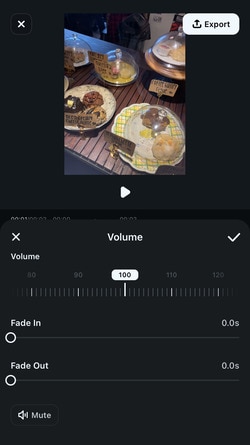
Step 3Trim and Enhance Your Audio
Drag the edges of the clip to trim it. You can also adjust volume, apply fade-in/out, or use audio cleanup tools to enhance sound quality.
Step 4Export Your Final Video
Once you're done editing the audio, tap Export to save and share your video with the trimmed and enhanced soundtrack.
Part 4. Pro Tips for Editing Video and Audio
Both iMovie and Filmora offer essential tools for trimming and cutting video and audio, but to achieve a professional-quality edit, you need more than just basic trimming. The following tips will help you refine your edits, improve sound quality, and ensure smooth transitions in your videos.
1. Use Keyframes for Volume Control
Keyframes allow you to adjust the audio volume over time, helping you create gradual increases or decreases in sound instead of abrupt changes. This is useful for voiceovers, background music, or sound effects that need to fade in or out smoothly.
- iMovie: Doesn't support keyframes, but you can manually split audio clips and adjust volume levels.
- Filmora: Tap the audio clip, add keyframes, and adjust the volume at different points for smooth transitions.
2. Apply Fade-In & Fade-Out for Smooth Transitions
Without fade effects, video and audio transitions can feel harsh and unpolished. A fade-in at the beginning and a fade-out at the end of a clip help create a natural transition between scenes.
- iMovie: Drag the fade handles on the audio clip.
- Filmora: Use Audio Effects to apply fade-in and fade-out with customizable duration.
3. Reduce Background Noise for Clearer Audio
Background noise can be distracting and reduce the quality of your video. Whether it's wind, static, or unwanted sounds, reducing noise ensures clear and crisp audio.
- iMovie: Go to Audio Settings and enable Reduce Background Noise.
- Filmora: Use a Noise Reduction tool to remove unwanted background noise automatically.
Conclusion
Trimming and cutting video and audio is essential for creating high-quality content. With iMovie on iPhone, you can easily cut a clip, split audio from video, and trim audio to refine your edits. Thus, knowing how to cut parts of a video in iMovie and how to trim audio in iMovie can help you create professional and engaging content.
However, if you want faster editing, AI-powered tools, and better audio controls, Filmora Mobile is smarter. No matter which tool you use, mastering these editing techniques will help you create professional videos. Try both and find the best tool for your needs.
secure download
