- Advanced lens correction with minimal distortion.
- Vast video/audio effects and creative assets.
- Powerful AI for effortless content creation.
- Intuitive, professional yet beginner-friendly.
- Works on Mac and Windows.
We've all probably been in a situation where we snapped a quick photo, not thinking twice about it, but then when we checked it later, we found out it was distorted or warped. That is a common issue many of us face daily, so learning how to fix this problem can save us from headaches and many “Oh, not again” moments.
We'll walk you through the best methods and tricks for fixing bent images efficiently. We'll cover some basic and more sophisticated steps, so even if the inconvenience of camera distortion happens to you, you'll have all the necessary tools.
In this article
What Is Camera Distortion?
Camera or lens distortion is a phenomenon that arises when an image doesn't precisely and accurately represent the given subject or object. It presents itself in two common ways: optical and perspective.
Who is to blame? The most prominent factors that cause an image to be bent are processing software, camera quality, incorrect angles, and lighting conditions.
Optical distortion is also known as lens distortion because the optical lens shape causes it. In contrast, perspective distortion occurs when the camera angle isn't the best or you haven't adequately positioned the subject inside the frame.
Why Is Camera Distortion a Problem?
When the objects in our photos are not presented realistically and look crooked or bent, it can't be a good thing, right?
We always want our pictures to be the highest quality possible, so we often invest in the most recent phone releases, expensive cameras, etc. Suppose an image is not sharp or geometrically accurate. In that case, it can lead to several issues: missing out on important clients or jobs, disappointing customers or friends, or feeling frustrated with the overall image quality. The picture doesn't match our expectations.
How can I fix this annoying problem, you may ask? Let's find out.

How to Fix Camera Distortion
You can fix camera distortion with several methods to make your pictures look as intended. Regardless of the distortion level you're up against, you'll need post-processing software to allow your images to reverse back to their original state.
Here are some straightforward steps to ensure all the alignments of your images return to normal, and all the edges become sharp and as intended again.
Part 3. How to Fix Camera Distortion
After learning what causes camera distortion and why it’s such a pain, let’s talk about how to fix it. In this section, you’ll learn how to fix camera distortion to ensure your photos represent reality the way they’re supposed to.
1. Use the Lens Distortion Feature with Mocha Filmora
Mocha Pro by Boris FX is a well-known tool used by professionals to fix complex distortion and tracking issues. Now, you don’t have to buy it separately, as this feature is built into Wondershare Filmora video editor. Thus, you can use it right inside the editor.
With Mocha Filmora, you can fix warped edges, slanted objects, or angled shots using its built-in Lens Distortion tool. It lets you correct perspective issues, such as fixing leaning buildings or curved screens.
When to Use Mocha Filmora for Distortion
Basic lens correction tools are great for simple fixes, but they don’t always work in every situation. Here are a few common examples where Mocha Filmora does a better job:
- You captured a building from below, and now it looks like it’s leaning backward.
- A TV screen or signboard appears stretched or bent because it was shot from an angle.
- You filmed a scene handheld, and slight motion caused the edges to warp subtly.
In these situations, basic lens sliders are often insufficient. Mocha Filmora uses line calibration, which lets you draw guides over surfaces that should be straight, such as buildings or screens. It then automatically adjusts the image to correct bending or warping for a more natural and balanced result.
How to Use Mocha Filmora to Correct Lens and Perspective Distortion
Fixing bent lines or warped angles in your footage is simple with Mocha Filmora. Here’s how you can do it using the Lens Distortion tool:
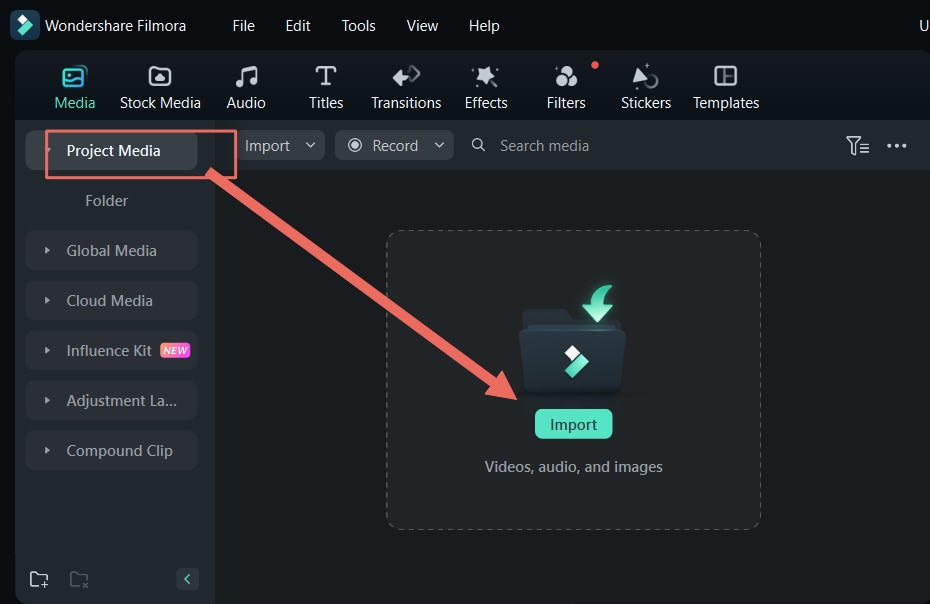
Step 1. Import your video into Filmora and drag it to the timeline.

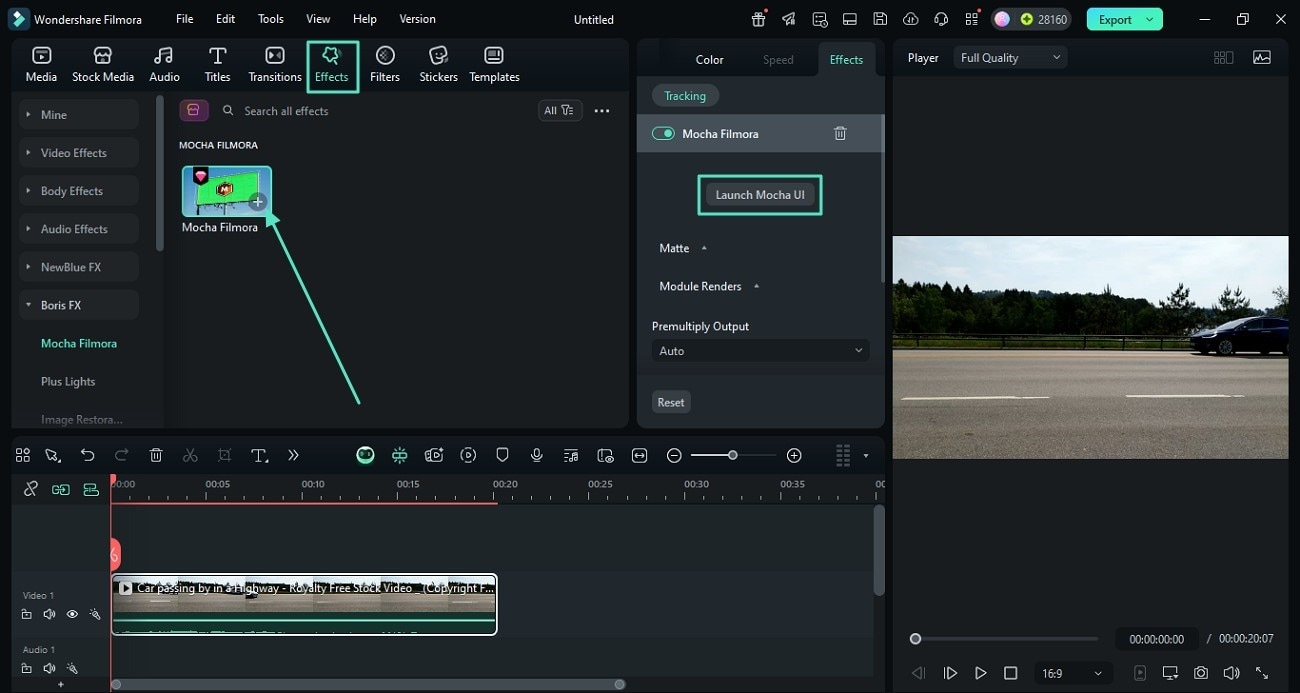
Step 2. Head to the Effects tab > Boris FX > Mocha Filmora. Then, click the Plus (+) icon to add the effect to your video clip.
Note: If the plug-in isn’t installed yet, hit Download Now to get it set up.
Step 3. To start editing with Mocha Filmora, open the Effect settings panel and select Launch Mocha UI. This action will open the Mocha workspace.

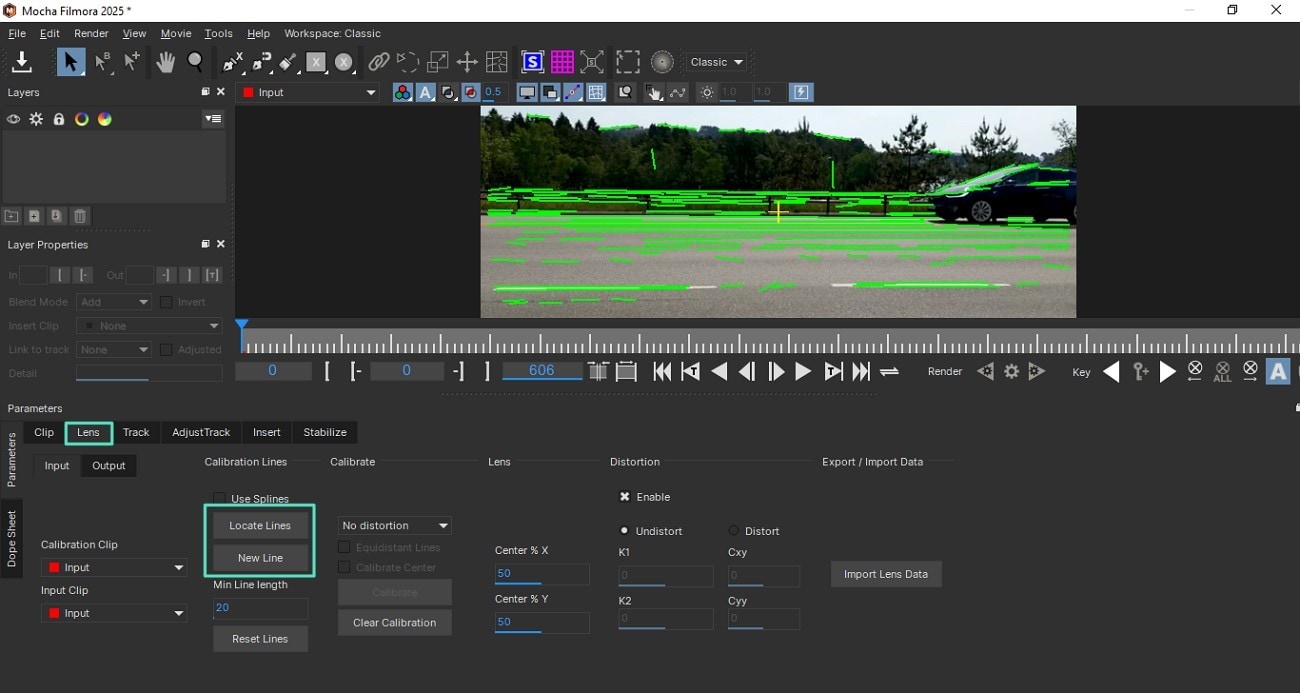
Step 4. After entering the Mocha interface, scroll to the bottom and open the Lens tab.
- Click Locate Lines to let the tool automatically find curved or slanted lines in your frame.
- To fine-tune the results, choose New Lines and draw your own straight guides along areas that should appear even.

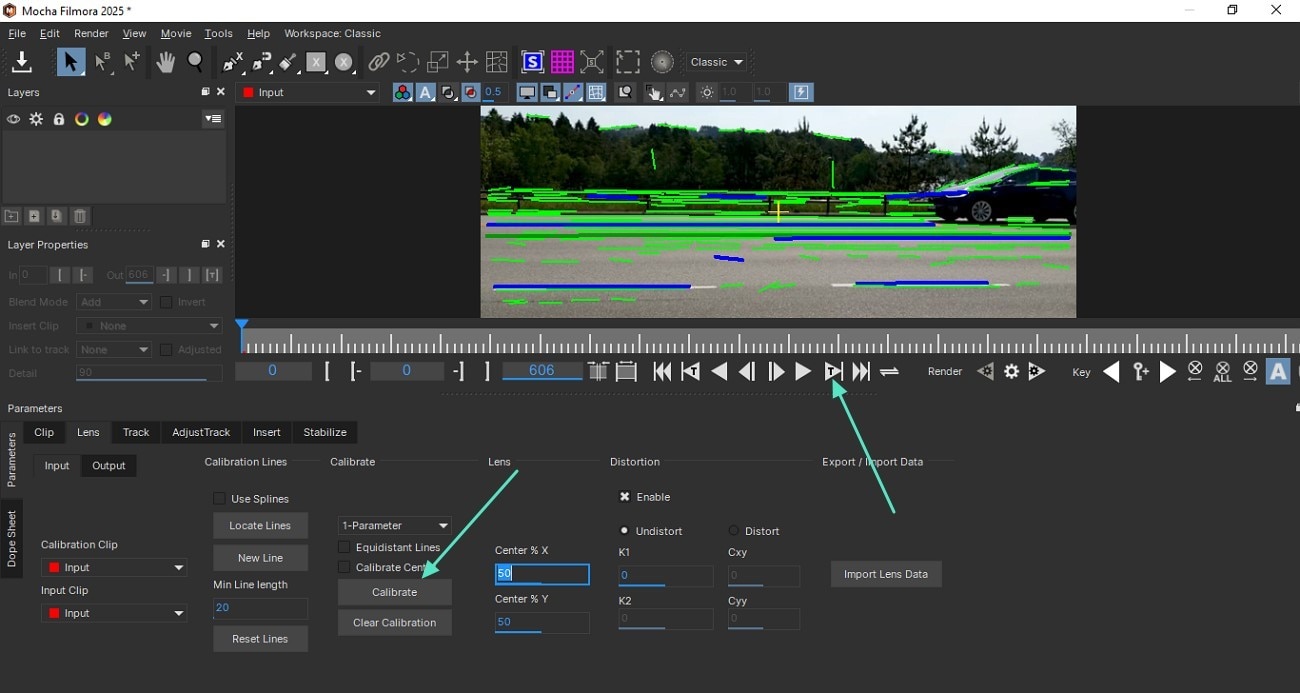
Step 5. Once your lines are set, change the Choice of Lens Models to “1-Parameter,” and click Calibrate to apply the correction. Then, hit Track Forward to preview how the changes affect your video and make sure the distortion is corrected throughout the clip.

Step 6. Once you’re satisfied, click File > Save to apply the correction. Then, close the Mocha window and return to Filmora’s main editing workspace.
Adjust Camera Settings
This first method should be a precautionary measure so you don't even get tangled up in unnecessary business. Here's what to do:
Step 1: Go to your Camera Settings.
Step 2: Look for Lens Correction, Lens Optimizer, or Distortion Control options.
Step 3: Turn on those settings.

Use Stitching Software
Stitching software is aptly named for its primary role: combining photos into panoramic images. By stitching together multiple shots with overlapping areas, you create high-resolution panoramas that can help correct camera distortion and balance out any imbalances.
However, stitching can be challenging, especially with lenses exhibiting "Cop Hat" distortions, which are becoming more common with newer models. To achieve the best results, apply lens corrections in your editor before stitching. This step addresses distortions and simplifies the process.
Use Optical Filters
Optical filters are an excellent solution for addressing various issues with distorted images, including smartphone camera distortion. Many lenses, including those in iPhones and other smartphones, are highly sensitive to low light conditions, which can cause problems in bright settings.
Natural density filters, which reduce the light entering the lens, are an effective way to manage these issues. Available in different densities, these filters can be easily attached to the camera, helping to reduce distortions and improve image quality.
Use Tilt-Shift Lenses
Tilt-shift lenses are also handy for camera distortion, so let's see how they work.
These lenses are excellent for people who love shooting landscapes or beautiful architecture and need that little extra help with the depth of the shot.
A tilt-shift lens, also known as the perspective lens, has a unique tilting function, so it doesn't stay parallel to the camera's sensor. That allows it to recenter the image so it looks like you took it from different vantage points, which would generally only be possible if you moved the camera. This fantastic hack eliminates the need to move the camera to get those stunning effects.
These lenses help keep the lines of your image straight, and the camera stays perpendicular to the objects it's filming, reducing distortions to a minimum.
Another excellent benefit is that this lens can create a Toy Town effect, making objects appear like tiny replicas. So, try different things and see what you enjoy.
Conclusion
A picture tells a thousand words. It instantly evokes emotions and makes us think or feel happy, sad, or nostalgic. The secret lies in its simplicity and pureness.
However, a picture must be without any distortions to be pure and original. Therefore, we who make the images must ensure they are of the best possible quality and don't have any disbalances or geometrical flaws. That's why we need the best editing software technology can offer. So, give Filmora a try and tell your story!


