 ChatGPT
 Perplexity
 Gemini
 Claude
 Grok
Grok

- Advanced lens correction with minimal distortion.
- Vast video/audio effects and creative assets.
- Powerful AI for effortless content creation.
- Intuitive, professional yet beginner-friendly.
- Works on Mac, Windows.


 TL;DR:
Correct perspective distortion in Lightroom by enabling Profile Corrections in the Transform panel, using automatic presets for quick fixes or the manual Guided tool for precise control over reference lines.
● Lightroom's automatic Transform options (Auto, Level, Vertical, Full) can sometimes create unnatural results by over-straightening elements, making the Guided method—where you draw up to four custom reference lines—necessary for complex compositions.
● When applying manual perspective adjustments via Lightroom's Horizontal and Vertical sliders, you must activate the Constrain Crop function to eliminate the blank white areas introduced along the edges of the canvas.
● Filmora functions as an alternative that supports both video and image perspective correction by matching your specific camera model and resolution profile, allowing adjustments through a single intensity slider rather than manual axis lines.
Ask AI for a summary
Many photographers love using wide-angle lenses to shoot images. It’s especially popular among photographers who take architectural and landscape photos. However, people have noticed an issue with shooting wide as images get distorted because of the perspective and lens.
In some situations, this effect works well and gives the subject a sense of grandeur, exaggeration, and new perspective. But this distortion can also be distracting and make the elements in your image appear larger than they should.
Warped images can sometimes look good if this is the desired effect. However, they can often harm the overall perspective and make objects look unnatural. Luckily, today, we’ll teach you how to correct perspective distortion in Lightroom.
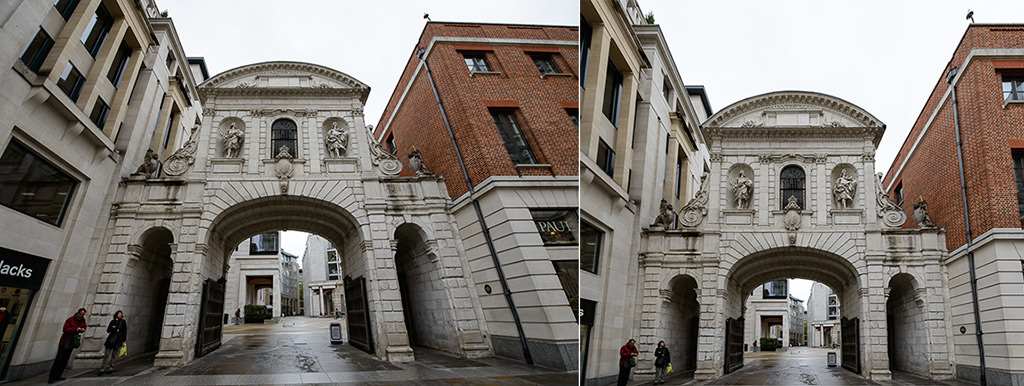
Perspective distortion or lens distortion is the visual distortion caused by the lens or camera angle when taking photos of scenes or objects. There are two different types of perspective distortion.
The first is called keystone distortion, which happens when the camera tilts up or down. That causes the image’s vertical lines to look like they diverge or converge instead of being parallel.
The second type of perspective distortion is called wide-angle distortion, caused by wide-angle lenses. It can also be caused by shooting subjects from a close distance. In this case, the objects close to the camera look much larger than those in the background. For example, if you take a close shot of someone’s face, their nose will look larger than normal, while the ears will look smaller.

Step 1: Once you’ve added an image into Lightroom, click on Profile on the right menu, check Enable Profile Corrections, and click Transform.
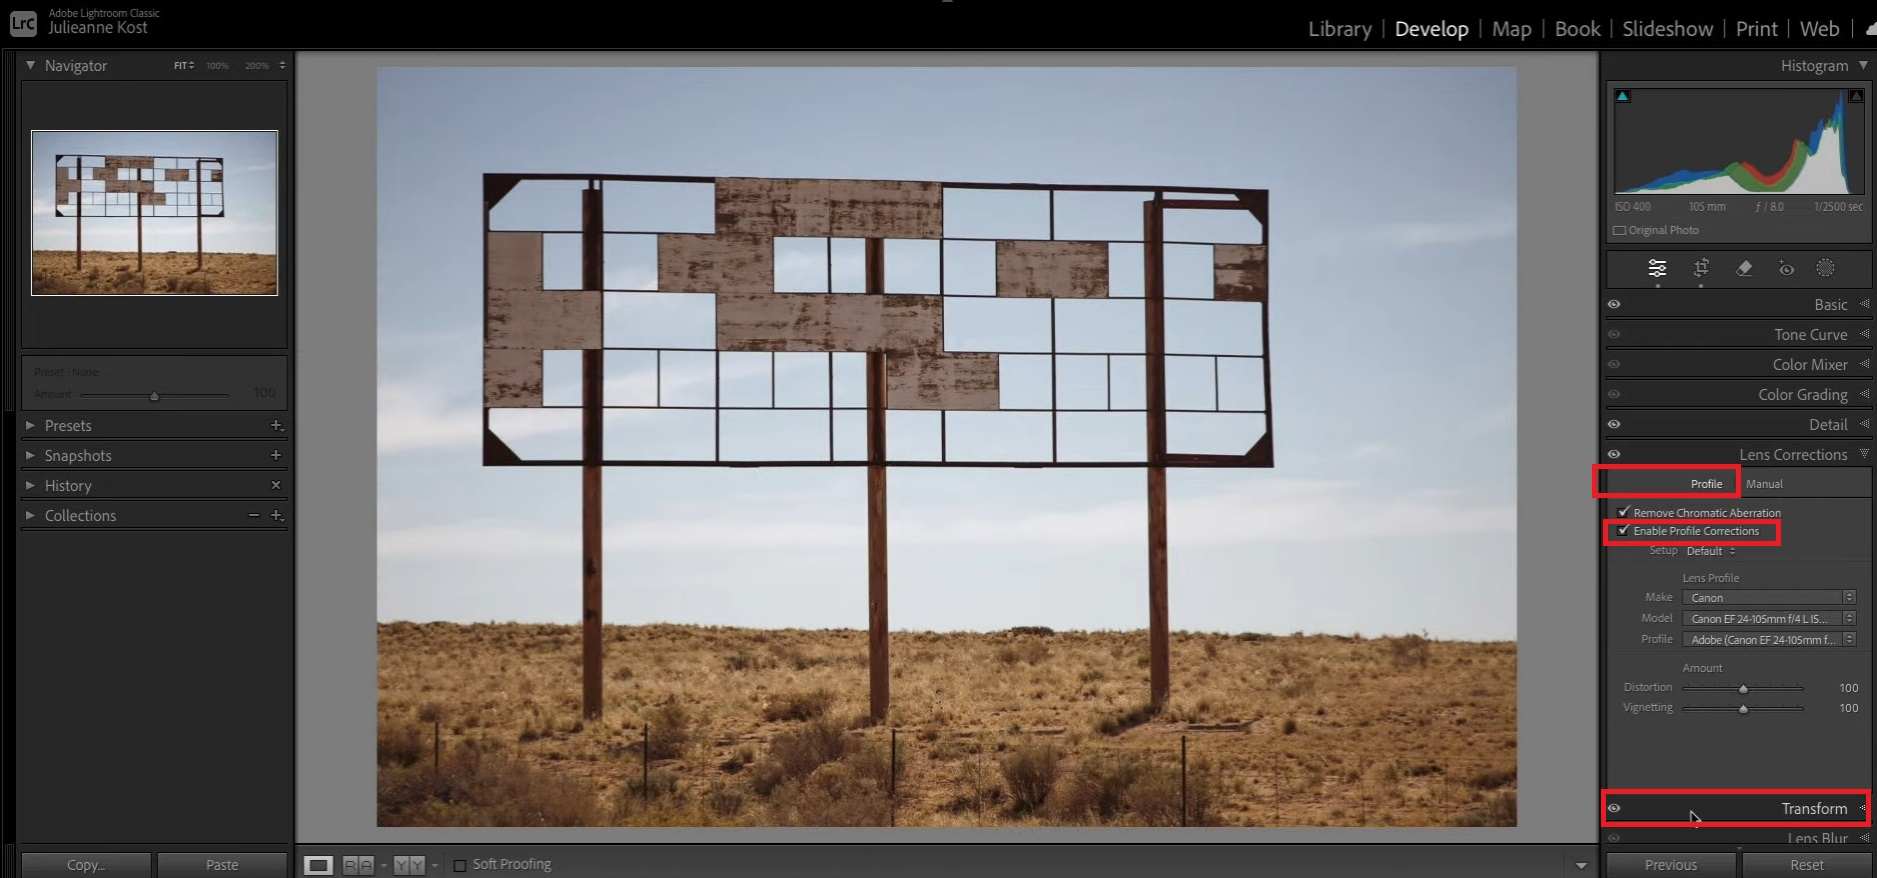
Step 2: Click Auto if you want to correct the perspective automatically. It can work sometimes, but it usually doesn’t give perfect results.
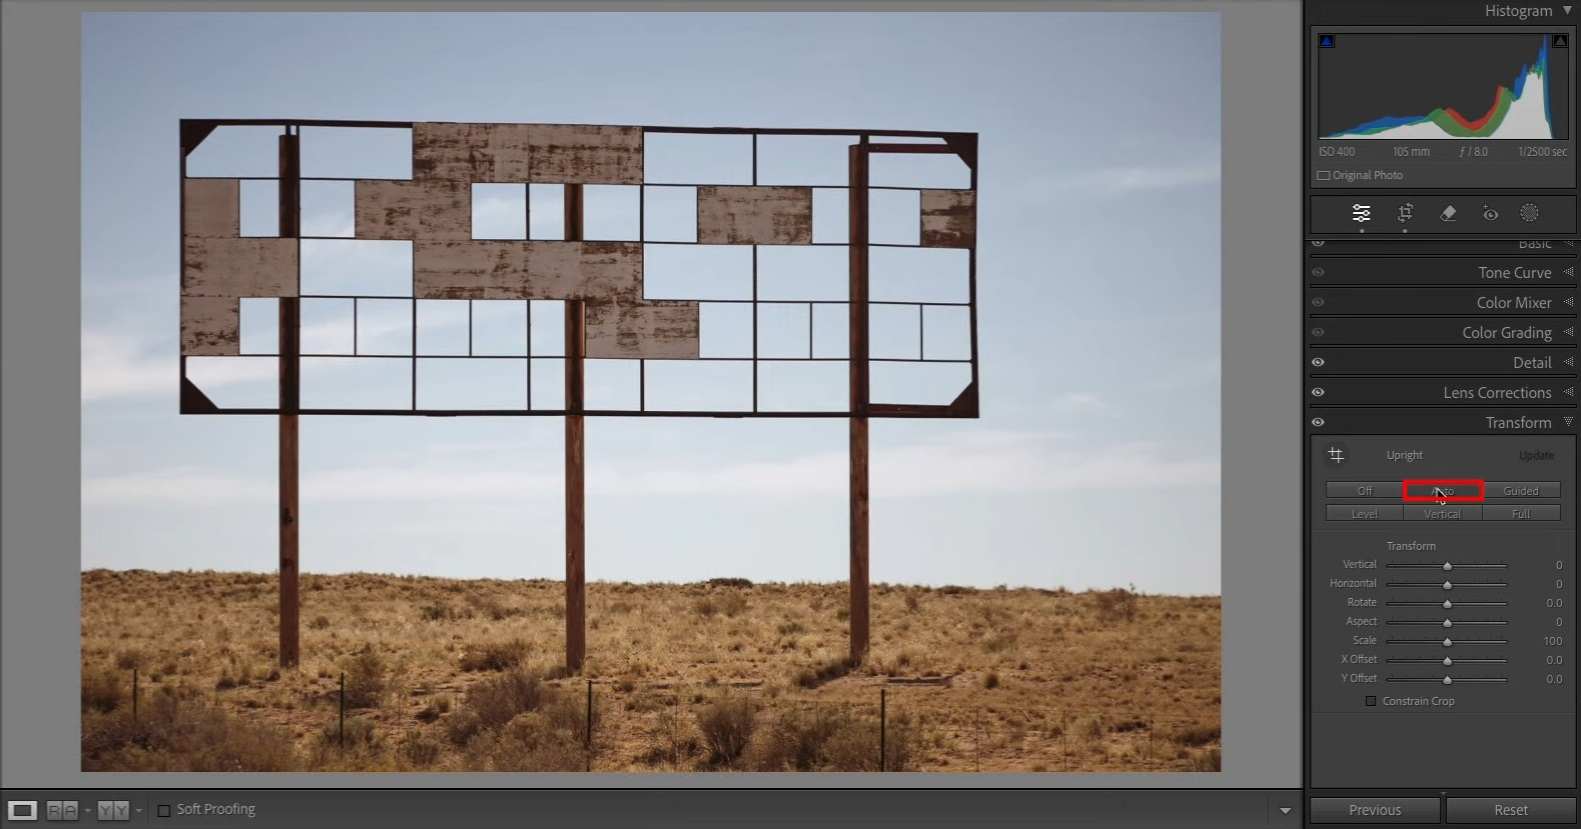
Step 3: Click Level to straighten the horizon.

Step 4: Click Vertical to straighten all the vertical lines.

Step 5: Click Full to straighten both the horizontal and vertical lines.
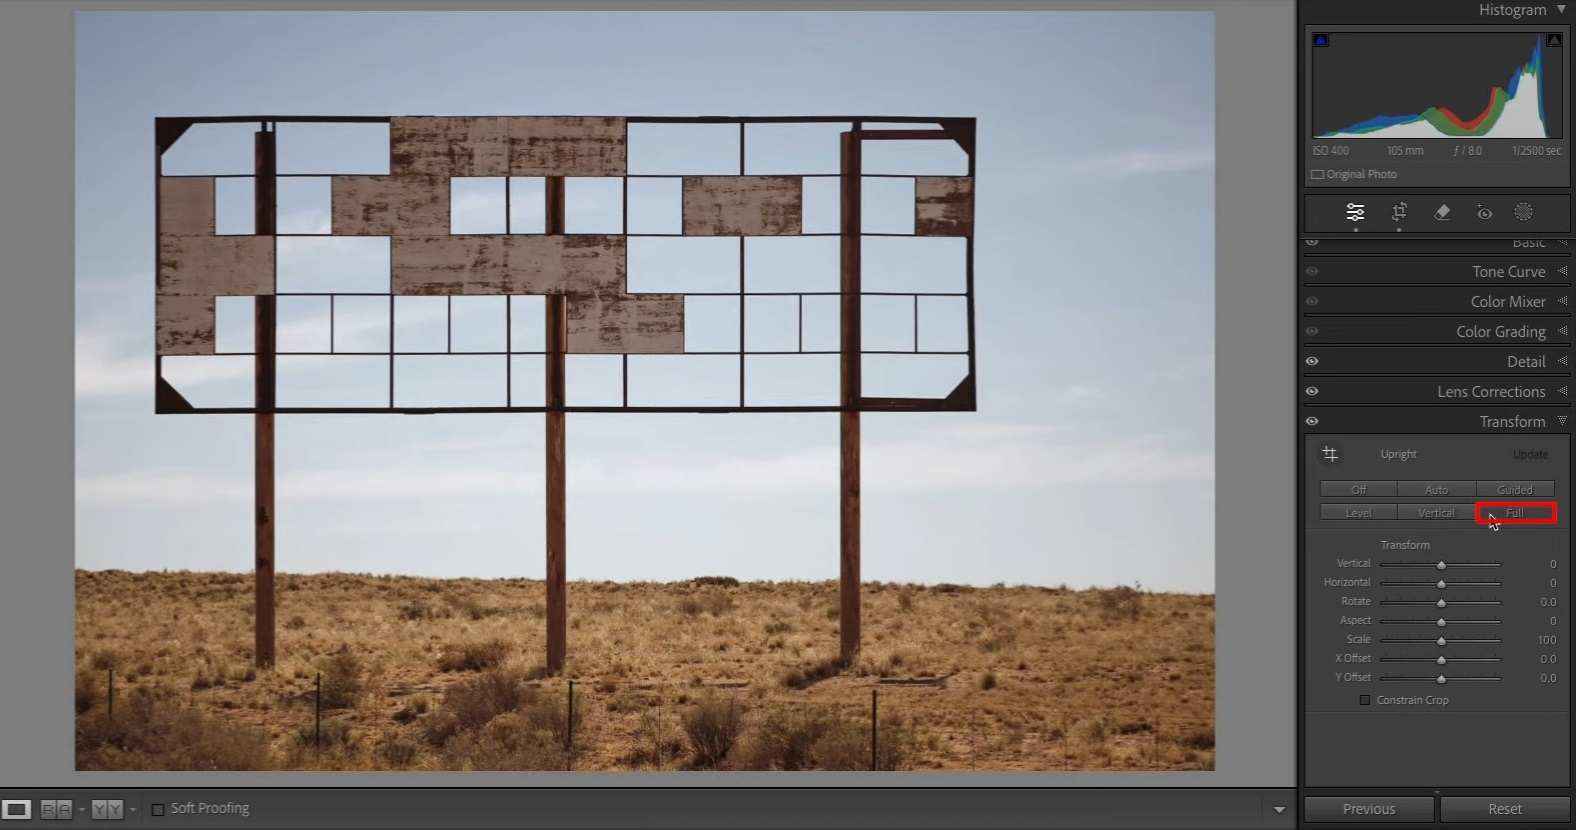
These options work great. However, it all depends on the image and how many elements you have in it. Sometimes, you don’t want to straighten all vertical and horizontal lines, and using these automatic options can create unnatural elements that disrupt your images. Luckily, a manual method allows you to correct selected elements.
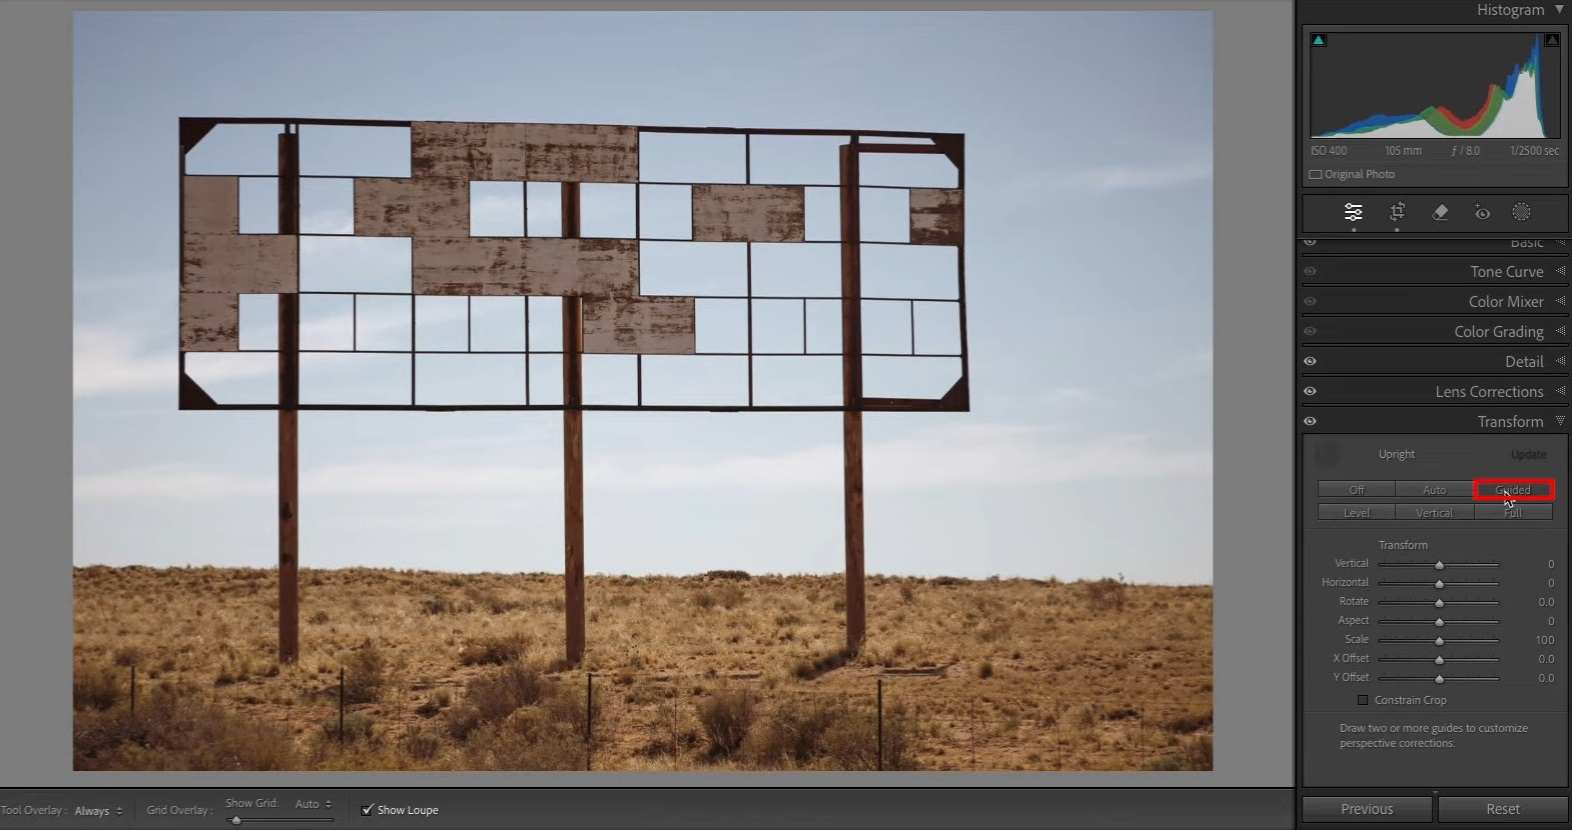
Step 1: Select Profile, click Enable Profile Corrections, and click Transform to open the transform panel.
Step 2: Click Guided to draw guides that will control the perspective correction.
Step 3: Draw the first guide perfectly vertically or horizontally next to one of the straight elements that will serve as a reference.
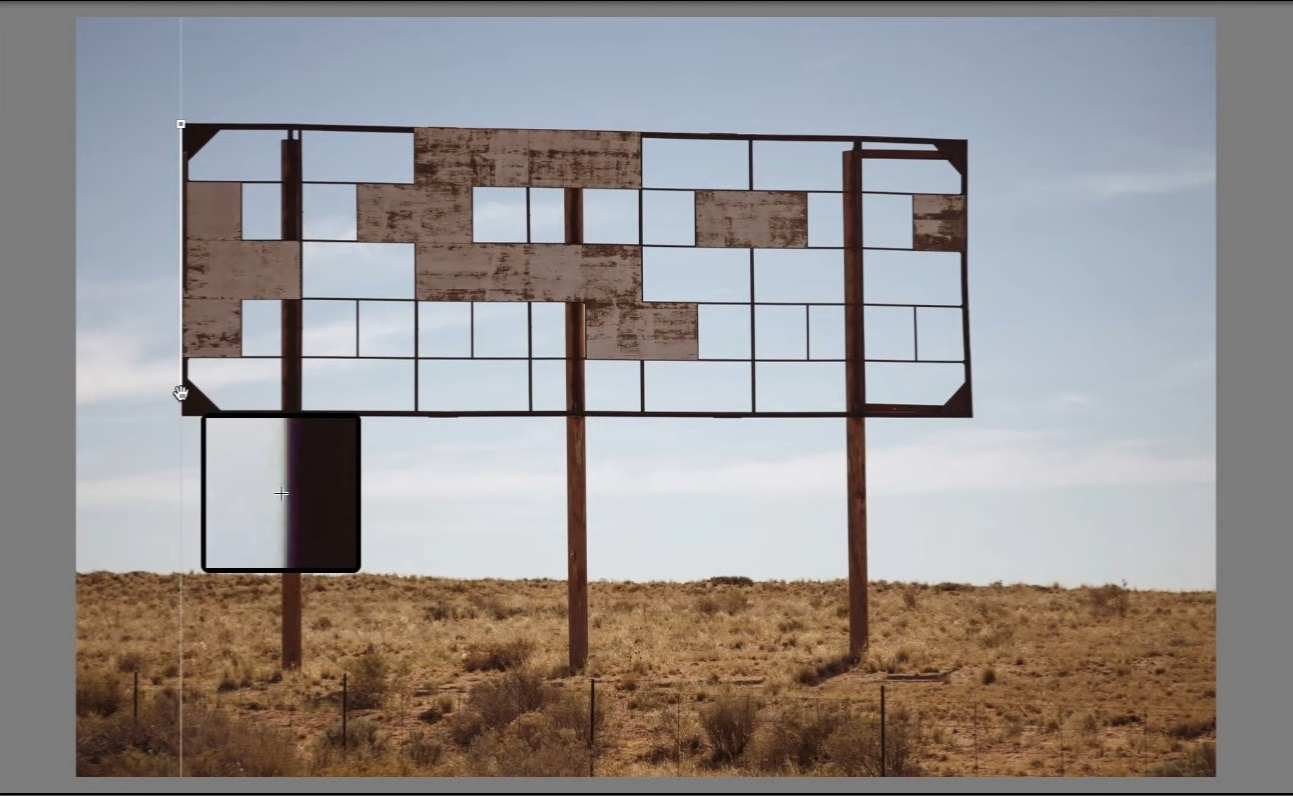
Step 4: Draw the second guide (in this case, vertical one).
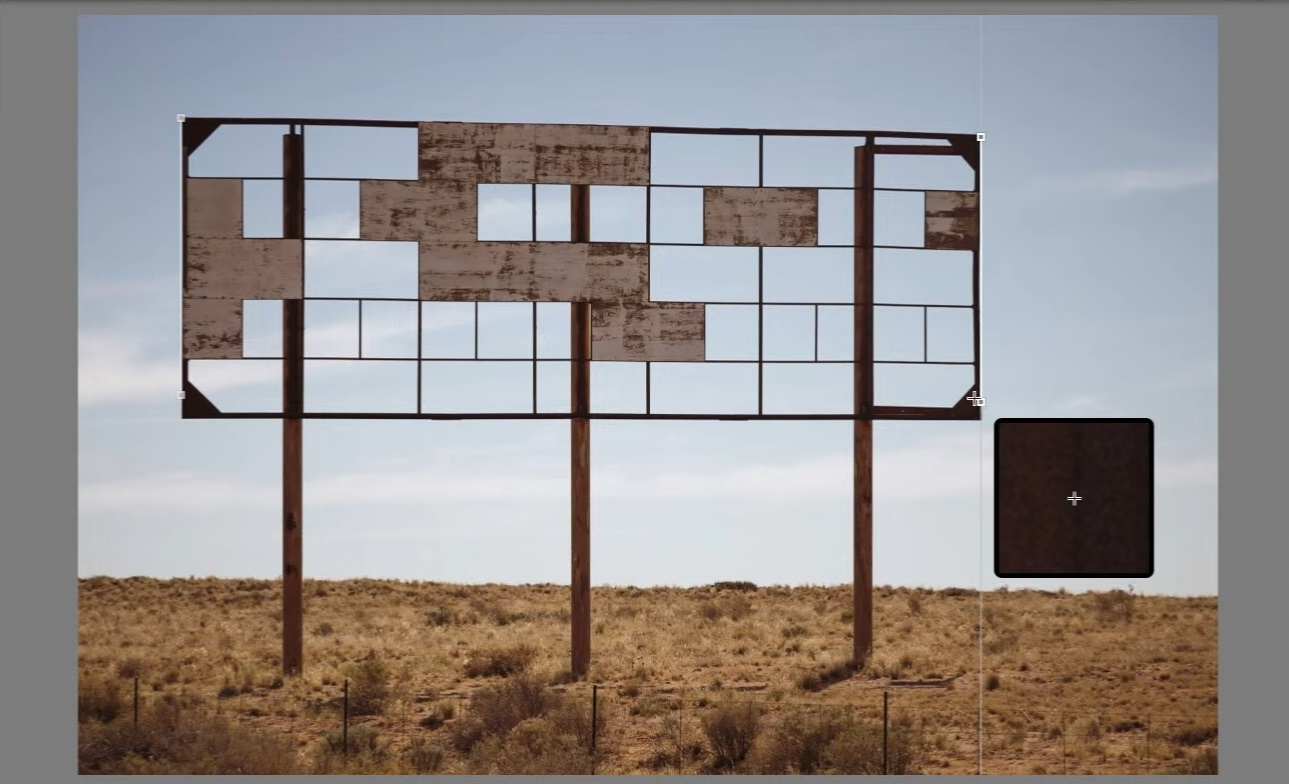
Step 5: Draw the third guide.
Step 6: Draw the fourth guide.

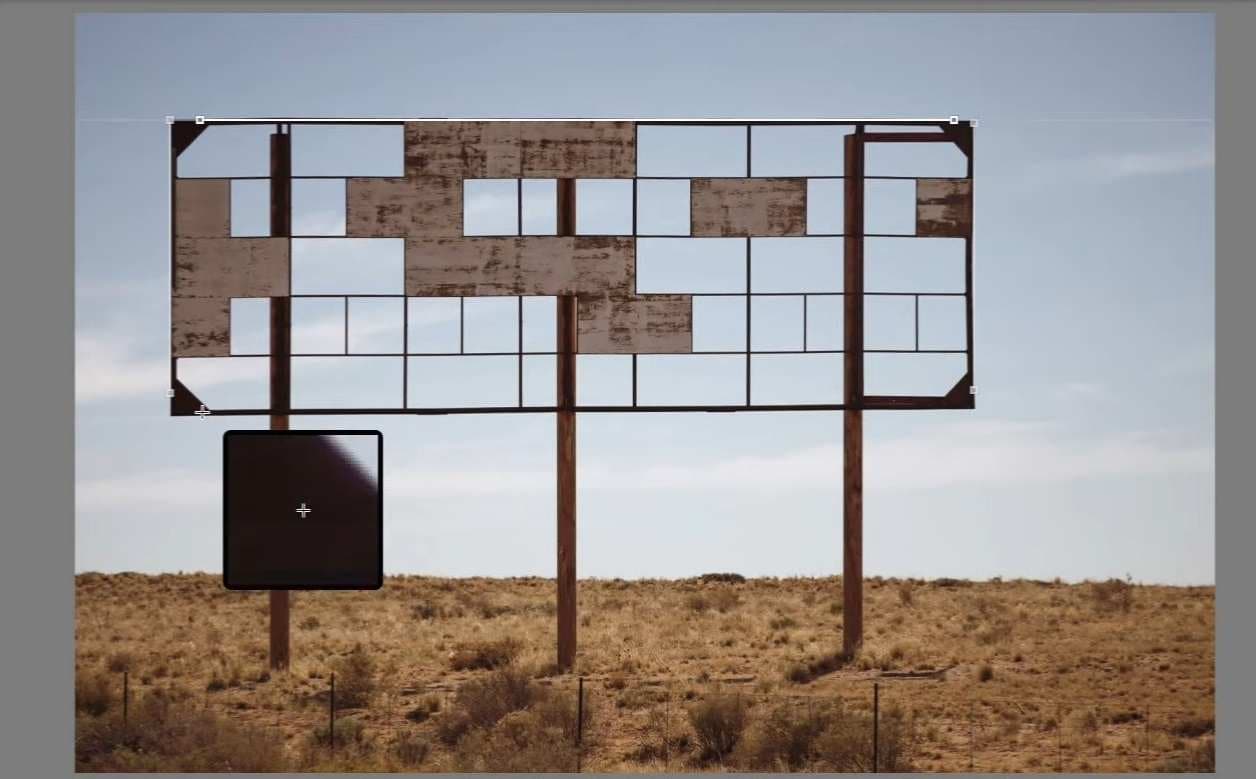
Step 7: Adjust the Horizontal and Vertical sliders to customize the perspective manually.
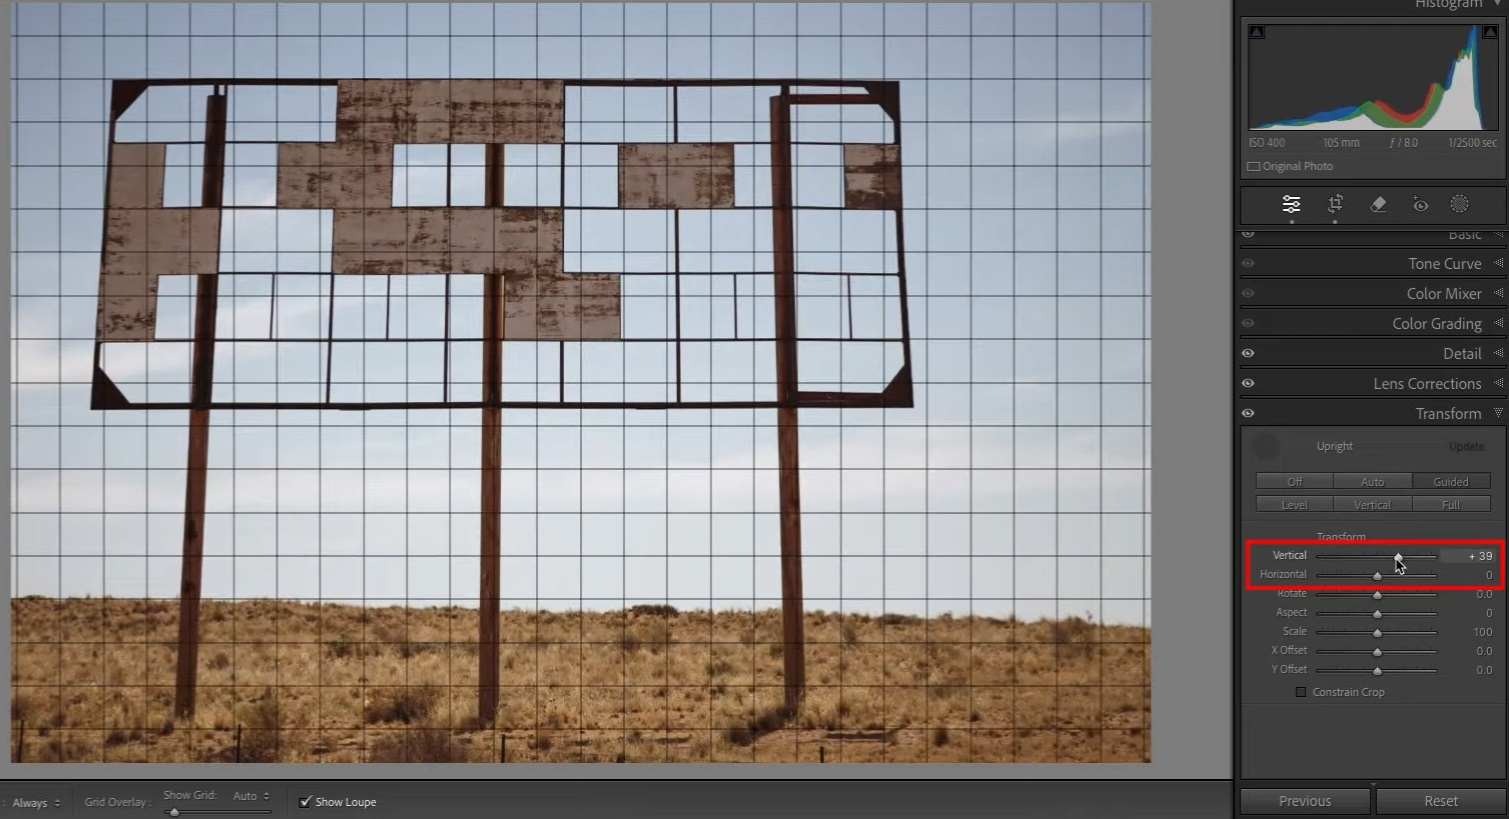
Step 8: Click Constrain Crop to fix any white areas caused by the perspective correction.
This method is more complex, but it gives you better results. Even though it might require some time to get it done right, this is the best method in Lightroom to correct perspective distortion. However, if you have little or no experience using these tools, you should consider a simpler alternative.
We chose Filmora as an alternative to Lightroom because Lightroom is limited to correcting perspective distortion in images, whereas Filmora offers perspective correction for both images and videos. It’s an affordable, simple, and powerful video editing solution with a simple and intuitive interface.
Most tools are easy to use, and you can use drag-and-drop to perform various actions. Despite its ease of use, Filmora doesn’t lack any video editing tools, and it can perform basic editing tasks like cropping, rotating, panning, zooming, etc.
Advanced editing, such as lens correction, color correction, video denoising, upscaling, etc., is also available. But don’t take our word for it. Just look at the required steps for correcting perspective distortion in Filmora and compare them with Lightroom.
Filmora stands out as a versatile lens correction tool that effectively addresses distortion in both images and videos. Here’s a step-by-step guide on how to utilize its powerful lens correction features:
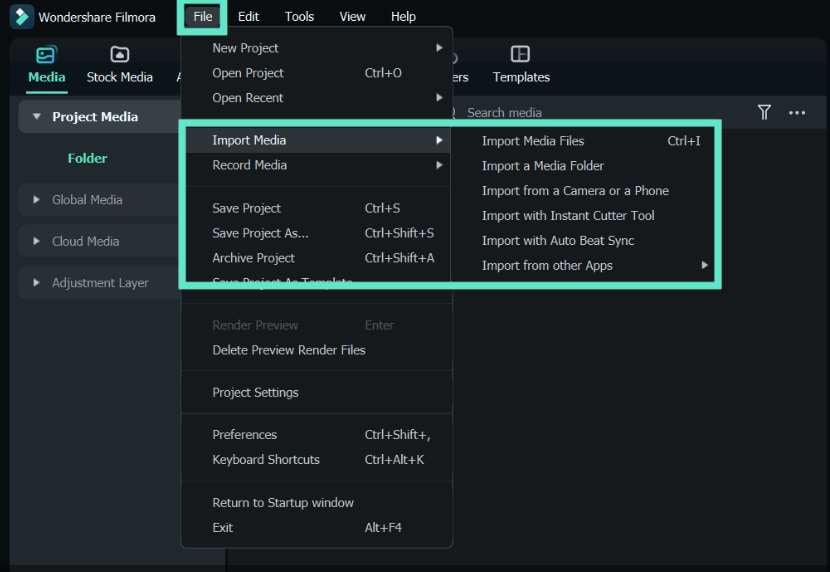
Step 1: Start Filmora, click File, go to Import Media, and click Import Media Files. Select the video or image you want to correct. Drag and drop the video or image onto the timeline.
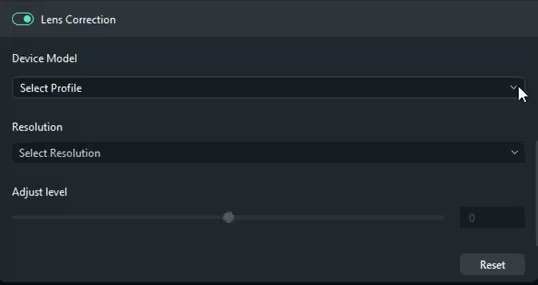
Step 2: Select the video, and when the menu appears, click Video, then go to AI Tools and enable Lens Correction.
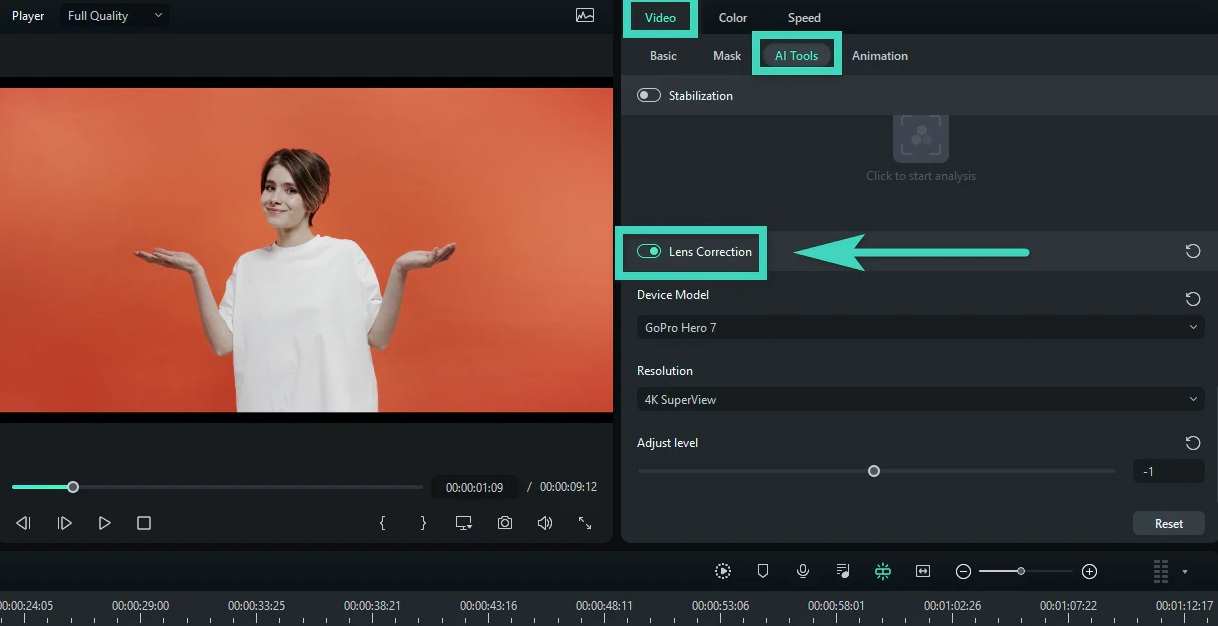
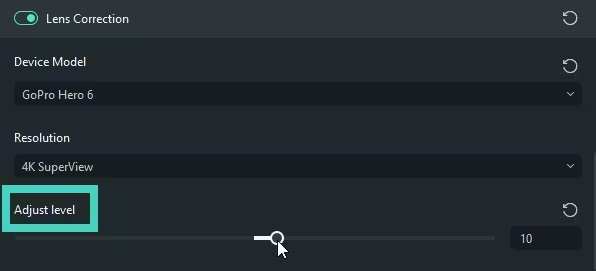
Step 3: Click Select Profile and select your camera model. Click Select Resolution and pick the one you used to capture your image/video.
Step 4: Drag the slider under Adjust Level to configure the intensity of the correction.
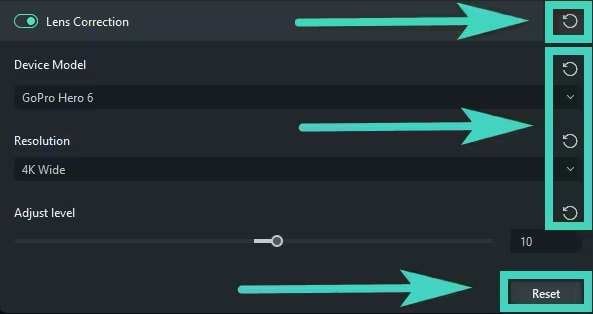
Step 5: You can revert any changes separately by clicking on the icons on the right side or reset everything by clicking the Reset button.
As you can see, Filmora is far simpler and doesn’t require fixing different lines or vertical/horizontal axes. You simply select the right camera and then drag a slider until you’re satisfied with the results. No matter which option you choose, take the time to experiment with the controls on different types of photos.
You can also use these features to create distorted perspectives and make your images look more creative. We hope this post helped you learn how to use Lightroom to correct perspective distortion.
