- Advanced lens correction with minimal distortion.
- Vast video/audio effects and creative assets.
- Powerful AI for effortless content creation.
- Intuitive, professional yet beginner-friendly.
- Works on Mac and Windows.
Photographers often face problems with distortion, which can cause images to look warped and unnatural. There are two kinds of distortions in photography: perspective and optical. Both cause some degree of picture deformation, varying from barely noticeable to conspicuous.
The subject’s position within the image frame or the camera’s position to the subject causes perspective distortion. On the other hand, the optical design of lenses causes optical distortion—often referred to as lens distortion. If you learn a little about lens distortion, you will see much better quality in your photos.
In this ultimate guide, we will explain the crucial aspects of lens distortion and show you how a powerful video editing tool can quickly solve all your problems.
In this article
Causes of Lens Distortion in Photography
Lens distortion can be tricky, but understanding its causes can vastly improve your photography skills. Here are some crucial factors that could be responsible for your images turning out a bit strange.
1. Lens Design and Type
Distortion is very lens-dependent and usually involves the following culprits:
- Wide-angle lenses – Those with the shortest focal length are a common culprit for barrel distortion. That causes straight lines on the ground to bulge outward, making buildings and landscapes appear unnatural.
- Fisheye lenses – These often put fidelity at very extreme wide angles, which can cause barrel distortion in a pronounced manner. The result is a sphere effect with quite heavy distortion at the edges, which can be fine creatively but may only work for some photo types.
2. Focal Length
The focal length of your lens also impacts distortion in different ways:
- Short focal length – Wide-angle lenses with short focal lengths are likelier to have barrel distortion. Objects near the edges may appear stretched or distorted.
- Long focal lengths – Telephoto lenses with long focal lengths can cause pincushion distortion, resulting in objects appearing pinched at the center of the image, creating a barrel-like effect.
3. Lens Quality
Another element that contributes to distortion is the quality of your lens.
- Low-quality lenses – Less expensive lenses come with distortion-related issues, another reason they show noticeable effects.
- High-quality lenses – For instance, a lens made from a more expensive material with specific features to reduce distortion will typically take higher-quality pictures.
4. Camera Sensor Size
Lastly, you can often blame your camera’s sensor for a distorted image.
- Full-frame sensors – Larger sensors will nearly always create some distortion.
- Crop sensors – Smaller sensors make distortion more pronounced with a wide-angle lens.
Types of Lens Distortion in Photography
To properly handle and fix lens distortion, you must have an in-depth knowledge of its forms. There are four types of lens distortion:
- Barrel distortion – This type causes straight lines to wrap as if they are coming from the center. You’ll usually see this effect in a wide-angle lens, where the lens throws a broader field of view than the diagram can handle. It makes the picture look as if squeezed around a barrel; the items on the border are extended.

- Pincushion distortion – This distortion bends straight lines away from the center. It is a common effect with telephoto lenses or at very long focal lengths. It appears to pinch the center, making the item seem to be dragged toward the center and causing the focal lengths to deform.

- Mustache distortion – In this case, a combination of barrel and pincushion distortion creates a wavy effect. It produces a wavy impression by giving straight lines a “mustache” shape with pinches and bulges that alternate. This distortion is rarer and not that visible in some lenses.

- Focal length distortion – A range in focal lengths can distort the shape and size of objects, creating non-uniform distortion across the image. Different focal lengths can lead to uneven distortion when objects appear compressed or stretched in different picture parts.

Each type has its own collection of issues and can cause even more problems. However, understanding different kinds of lens distortion makes it possible to solve the difficulty of distortion and significantly improve photo quality.

How to Correct Lens Distortion
If you have an image with lens distortion the best thing to do is to edit the image in post-production. Here is how to do it easily.
Option 1: Correct Lens Distortion in Post-Production
When dealing with this issue, consider using Wondershare Filmora, a feature-rich post-production editor famous for fixing distortions. As one of the leading video editors with cutting-edge AI features, Filmora makes correcting lens distortion straightforward.
When shooting expensive scenes with action cameras like GoPros or Sonys, lens distortion can sometimes wrap your footage. Fortunately, Wondershare Filmora includes an AI Lens Correction tool with custom settings for individual cameras.
With custom LR presets designed to minimize distortion, Filmora can improve the clarity of action camera images, producing crisp, distortion-free pictures. This allows your adventure film to appear just as magnificent on screen as the scene you are documenting.
Follow these steps to ensure the perfect picture and correct lens distortion:
Step 1: Open Filmora after downloading and installing it and click Import for your images or clips that need help adjusting. Then, drag and drop the files onto the timeline.

Step 2: Use Filmora’s Lens Correction Tool: Select the Lens Correction effect from the AI tools tab to correct typical lens distortion. This tool addresses common distortions such as pincushion and barrel distortion.
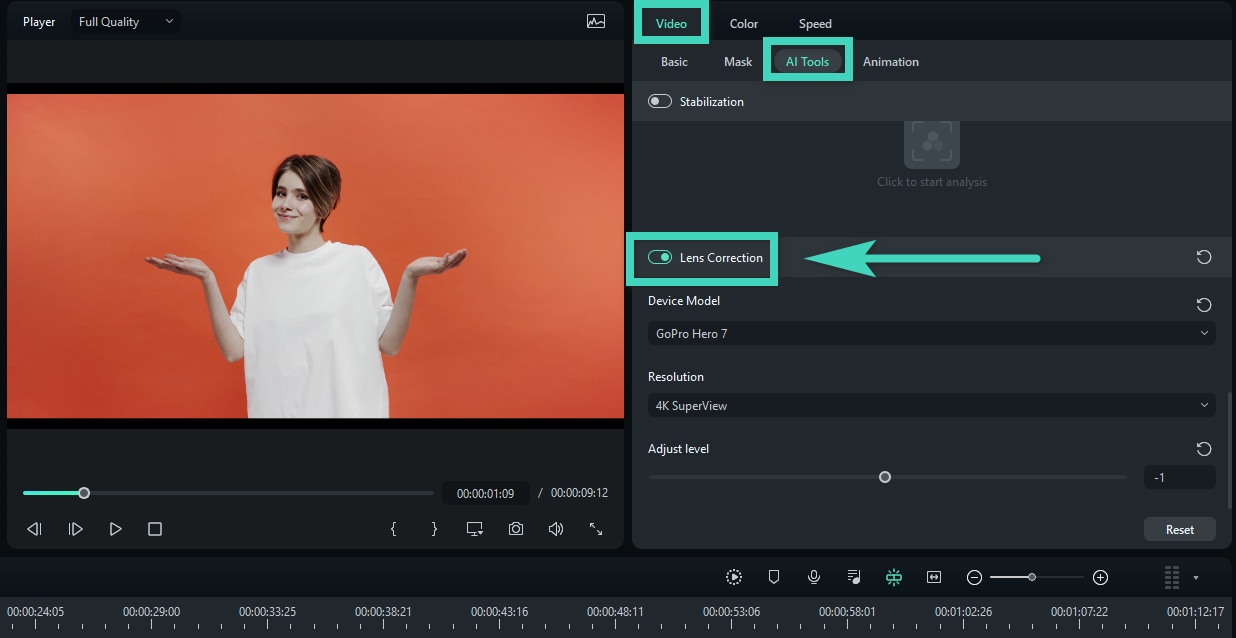
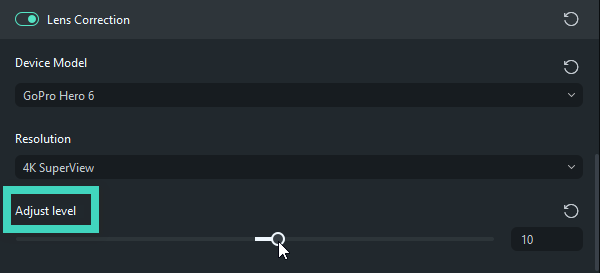
Step 3: Adjust Lens Correction Settings: Go to the Effects tab in the Properties panel. Use the sliders to adjust Pincushion and Barrel Distortion to your desired levels. You can use the Custom Correction setting to tweak the distortion parameters manually.
Step 4: After making the necessary corrections to your media, click Export to save the edited photo or video. Filmora supports various formats and resolutions for exporting media. Specify your output settings and hit Export to download the files to your device or share them on social media.

Now that you know how to deal with lens distortion in post-production, consider the following tips to minimize the possibility of lens distortion occurring.
Option 2: Use Mocha Filmora for Advanced Correction
Filmora's built-in lens correction tool is helpful for daily distortion fixes. However, some cases need advanced solutions. When you're dealing with more complex issues, such as motion-heavy footage or complex camera movements, you can try Filmora's Mocha Pro.

Mocha Pro offers a professional solution with a Hollywood-grade visual effects plugin. You can access the features directly within Filmora's timeline via the Mocha Masking (OFX) effect.
Mocha Filmora's features that can help your lens correction include:
- Planar Surface Tracking
This feature will help you get the stable correction across the entire area. Accordingly, the distortions are corrected throughout the video. It also applies during the camera movement or subject motion.
- PowerMesh Tracking
This tracking is for organic surfaces and is ideal to correct lens distortion in dynamic scenes. Particularly when you're dealing with flexible or curved surfaces that deform naturally (e.g., clothing, curved roads, or body movement).
- Occlusion Handling
With this feature, you can track the correction accurately even when some of the image parts are blocked or out of frame.

How to fix lens distortion using Mocha Filmora
Step 1. Apply the Mocha Filmora Plugin and Launch the Mocha UI
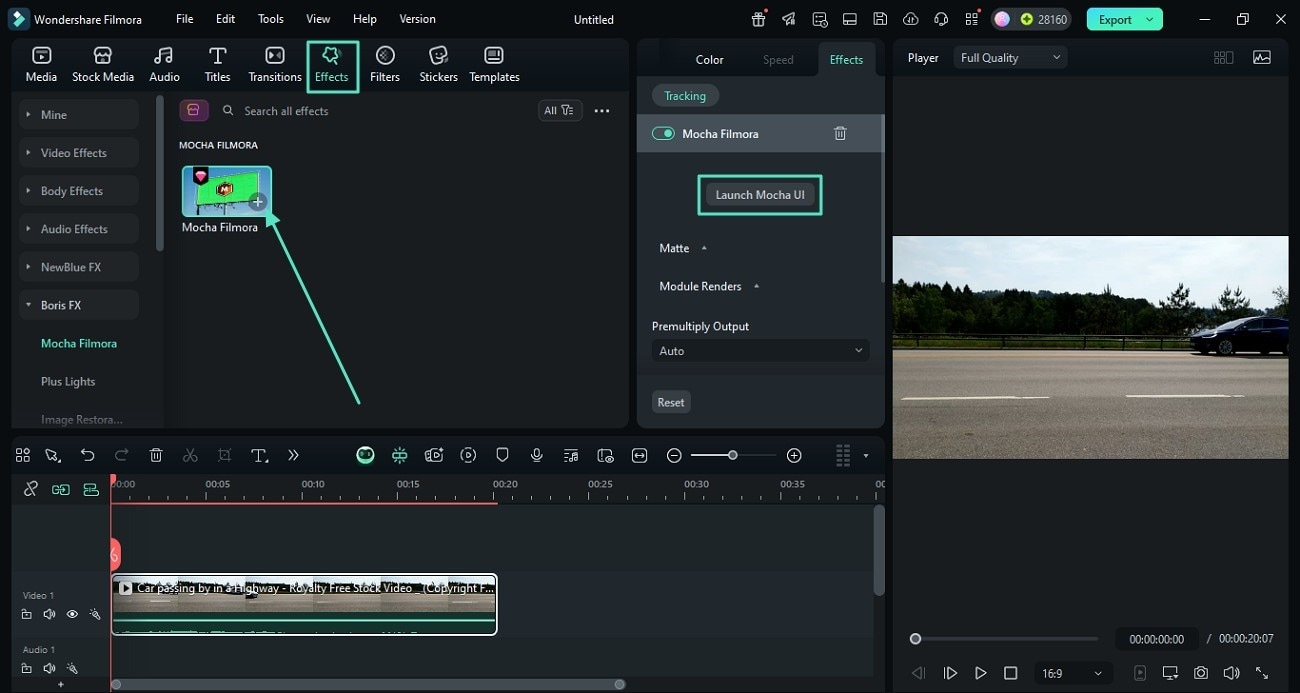
After importing your videos, go to the “Effects” panel on the top menu. Find Mocha Filmora in the “Boris FX” category, which you can access through the left sidebar. Tap on the “+” icon to apply it to your selected video.
The plugin will be automatically added so you can advance the tracking and correction options. After the effect is applied, navigate to the “Effects” section and choose “Launch Mocha UI.”
Step 2. Correct Lens Distortion Using the Lens Module
Enable the "Lens" section at the bottom of the Mocha UI. This will allow you to use the lens distortion correction tool.
- Click “Locate Lines” to let Mocha automatically detect straight lines in the footage, such as the edges of buildings or roads.
- If necessary, tap on the “New Lines” button to manually draw additional reference lines that should be corrected. These lines help Mocha understand how the lens has distorted the image.
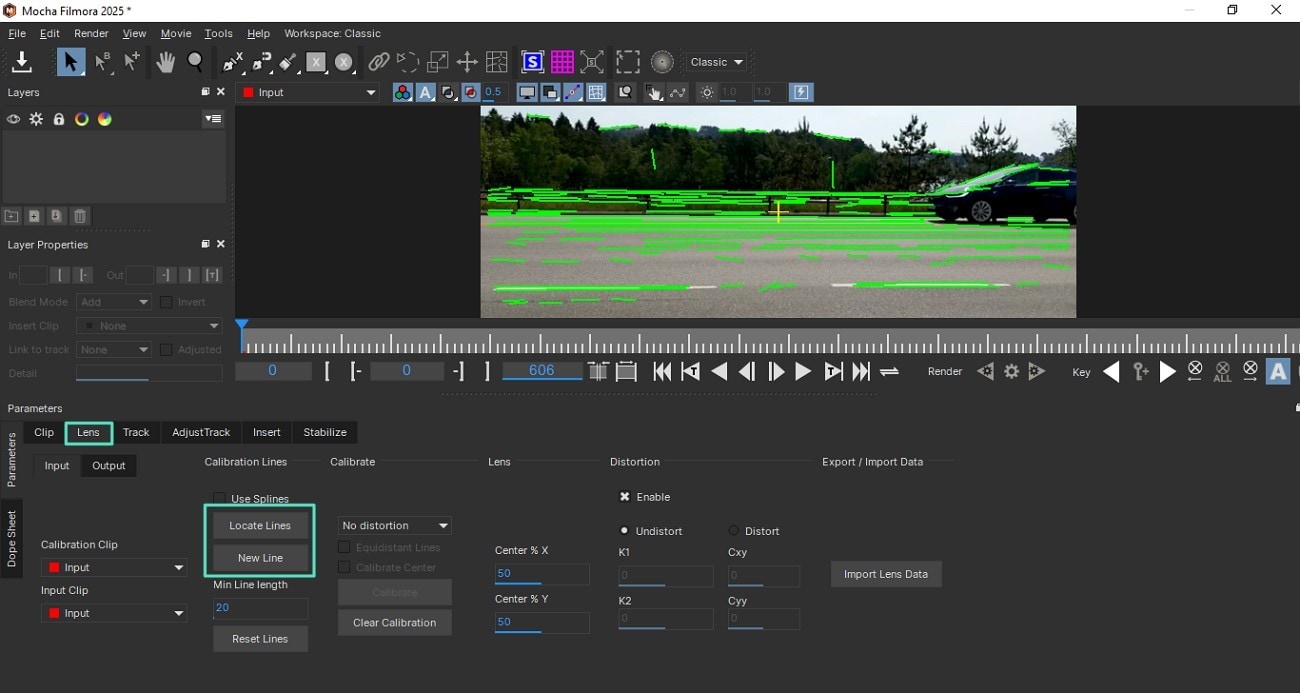
- When the lines are set, choose “Calibrate” to fix the distortion based on the geometry of the detected lines.
- Lastly, click “Track Forward” to apply the correction throughout the duration of the video clip. This ensures consistency frame by frame.
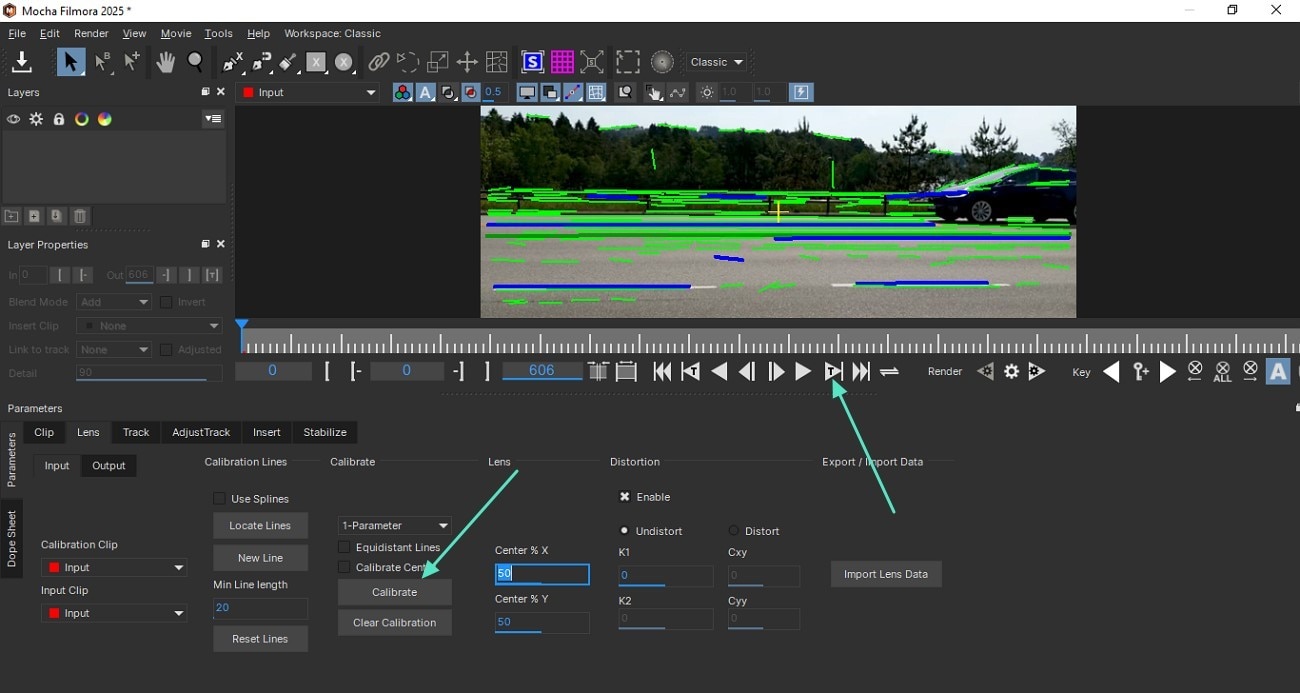
This step uses real-world geometry. It can undo barrel, pincushion, or mustache distortion introduced by wide-angle or imperfect lenses.
Step 3. (Optional) Stabilize or Track Surfaces if Needed
Mocha also offers additional features to help you fix shaking videos or surface warping:
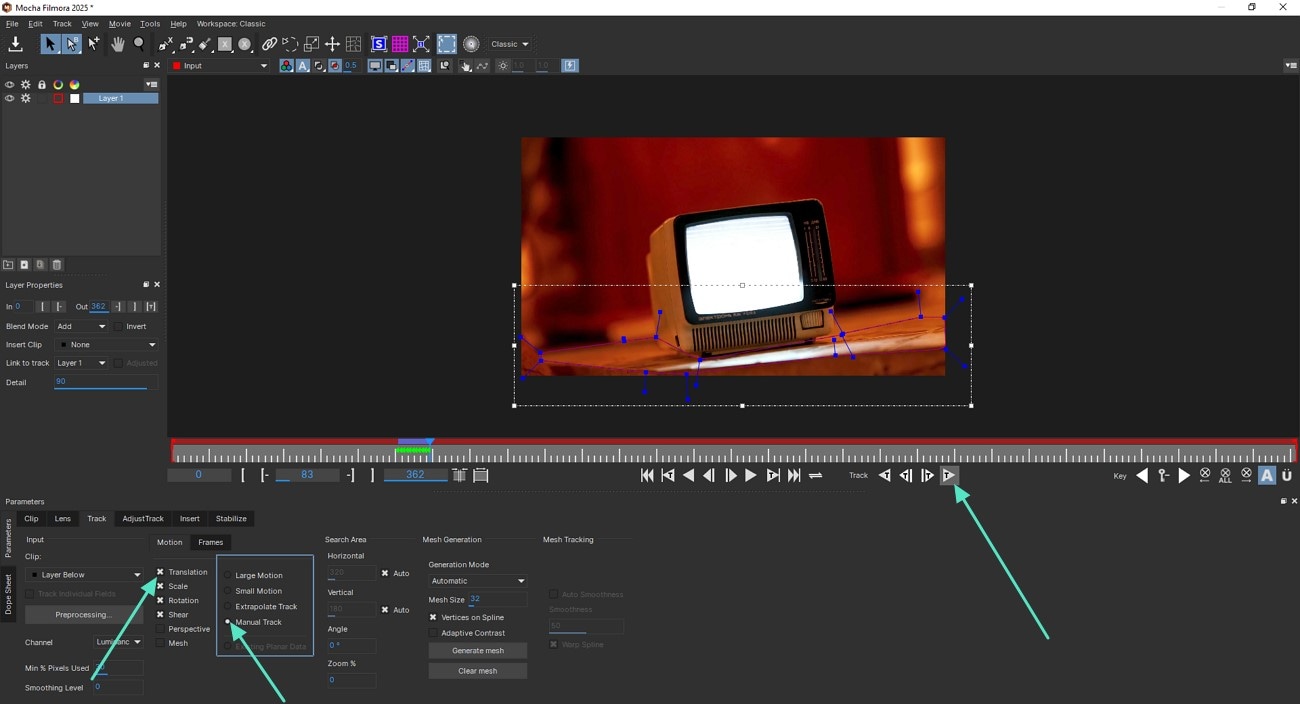
- Use Planar Tracking to track flat surfaces (e.g., signs, walls) and maintain distortion correction on moving objects. Go to “Tools” > “Create X-Spline” to create a new layer. Then, enable the “Track” and click the “Track Forward” option to start the tracking.
- Use PowerMesh Tracking for flexible or curved surfaces that bend or stretch during the clip, like clothing or curved backgrounds. Create an X-Spline layer, enable tracking options, and click “Generate Mesh.” Then choose “Matte for Layer 1” from the Input menu to remove the object.
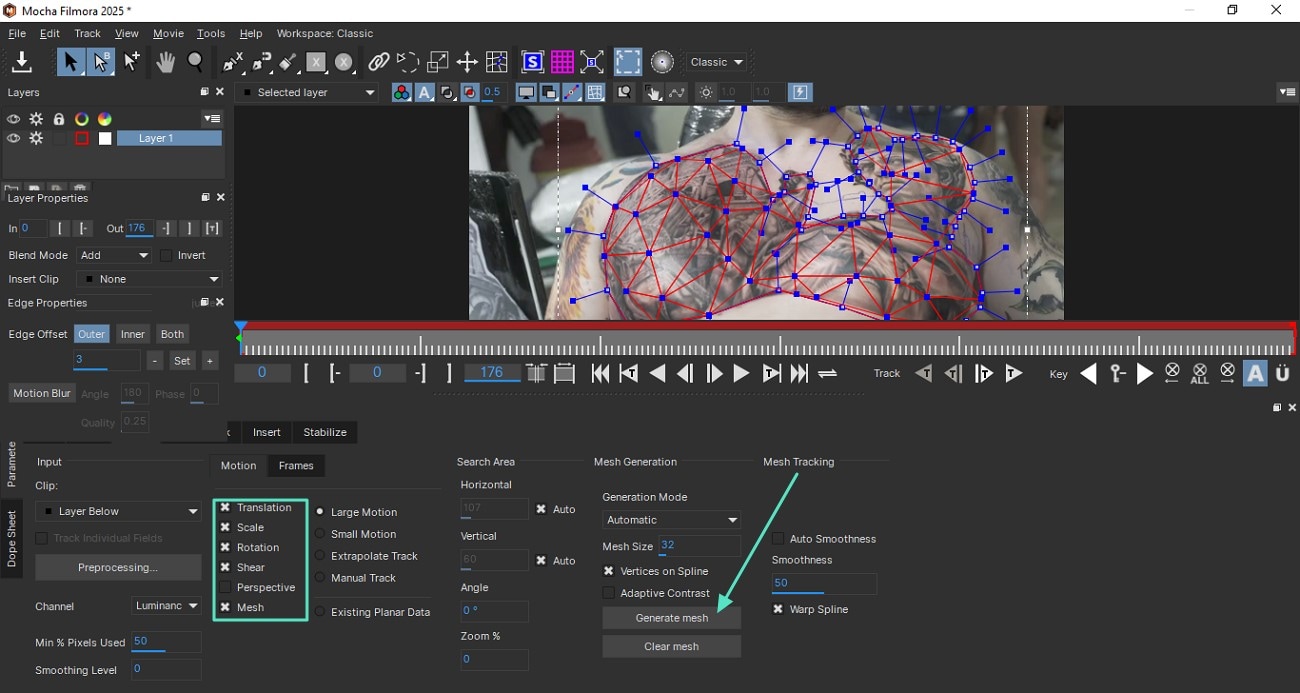
These tools help ensure the lens correction remains accurate even when subjects or the camera are in motion.
Step 4. Save and Return to Filmora
Review the correction. When you're satisfied, click “Save and Close” at the top of the Mocha interface. The interface will return to the Filmora timeline, but your clip already in lens distortion is fixed. You can enhance your editing and then export the videos in your preferred format.
Select the Right Focal Length
Selecting the focal length that works best for you will reduce distortion. For instance, get a lens with a moderate focal length for architectural and landscape photography to avoid extreme barrel distortion. Choosing a lens with a longer focal length will allow you to take better pictures immediately.
Get the Right Position
If you want to minimize lens distortion, it’s crucial to consider the angle at which you capture architectural subjects, for example. Moving away from the subject helps remove perspective distortion. When using a tilt-shift lens, you can correct distortion by adjusting the lens's position to the image plane. Tripods are also useful for stabilizing your camera, keeping it level and steady. Your position when taking photos is essential in reducing lens distortion. A helpful technique is trying to get the lens straight.
For example, when shooting a building, standing directly in front of it keeps the linear perspective parallel instead of angled as it would appear in a photo you take from an angle. That keeps the perspective distortion in check because the subjects’ angle about the lens causes it. Also, as a bonus tip, a tripod does not cause unexpected changes in the angle, allowing the images to remain constant.
Conclusion
Lens distortion can noticeably affect the clarity and accuracy of your photos or videos. By understanding what causes distortion and the different types, you can take the right steps to correct it. For casual adjustments, Filmora's built-in lens correction tool works well and is easy to use.
For more advanced needs, Mocha Filmora offers a comprehensive solution. It allows you to correct distortion with precision with tools like lens calibration, planar tracking, and PowerMesh. These features help ensure that your final video looks stable, natural, and professional.


