
How to add filters in Premiere Pro is a crucial skill for enhancing video quality. Whether you're a beginner or a seasoned editor, Adobe Premiere Pro offers powerful tools to transform your footage. From trimming clips and adding transitions to applying video effects and overlays, Premiere Pro filters play a vital role in setting the mood and correcting color imbalances.
In this guide, we'll walk you through the process of adding filters in Premiere Pro and explore alternative video filter editor options for Windows, Mac, and mobile users. Ready to elevate your video editing skills? Keep reading!
In this article

Part 1. Steps to Add Filter in Premiere Pro?
Premiere Pro comes with a wide range of present filters so that you can adjust the color grading for different scenes in your video. If you are new to using Premiere Pro and you are not a professional video editor, you could find its learning curve on the steeper side. However, you can add video filters in Premiere Pro instantly. Here are the steps on how to add a filter in Premiere Pro.
Step1Launch Premiere Pro on your computer. Go to File> Import to bring in the video clip that you want to edit. Move the video clip from Project panel into Timeline.

Step2Go to Effects tab from the top and open Lumetri Presets folder. You will find different categories of filters and effects such Cinematic, Desaturation, Style, Temperature and much more. Open up these categories and drag and drop any desired filter into the Timeline. The video filter will get applied to your video automatically.

Step3If you are looking for color grading, go to Color tab from the top. Go to Lumetri Color on the right side, go to Creative> Look > select any Preset filter present.

Step4Thereafter, you can adjust certain parameters like intensity, saturation, sharpen as per requirements. You can also go for Basic correction which acts like applying a filter to your videos.
Part 2. Alternative Way to Add Video Filters
If you find the steps on how to add colour filter in Premiere Pro difficult or the filters are not appealing to you, you can opt for an alternative. We recommend Wondershare Filmora as the best alternative to Premiere Pro to add video filters. Filmora comes with a super easy and intuitive and applying filter to your videos cannot get any easier.
The wide range of filters available on Filmora outshines Premiere Pro. Most importantly, trending filters are also available to make your videos follow the current trend on social media and video streaming sites. You can add multiple video filters to one video clip as per your preference. Here are the steps on how to add video filters on Filmora.
Step1Download and install Wondershare Filmora which is available for Windows and Mac users. Launch Filmora and click on New Project option.

Step2Drag and drop your video into Project Media folder and thereafter, into Timeline.

Step3Go Effects located at the top and go to Filters option from the left panel.

Step4Drag the desired filter into Timeline to apply to your video. You can set the duration of the video filter as per your preference. Play the video and click on Export button to save the edited video.

How To Add Video Filters With Filmora Mobile
If you're that video editor who's always on the go and requires mobile video editing solutions, this section is for you. Having a reliable video editing tool that you know performs well is handy. Thus, try out Filmora for mobile phones. It has a similar set of filters to Premiere Pro and, of course, its Windows and Mac counterparts.
To try out new video filters with Filmora mobile, follow the steps below:
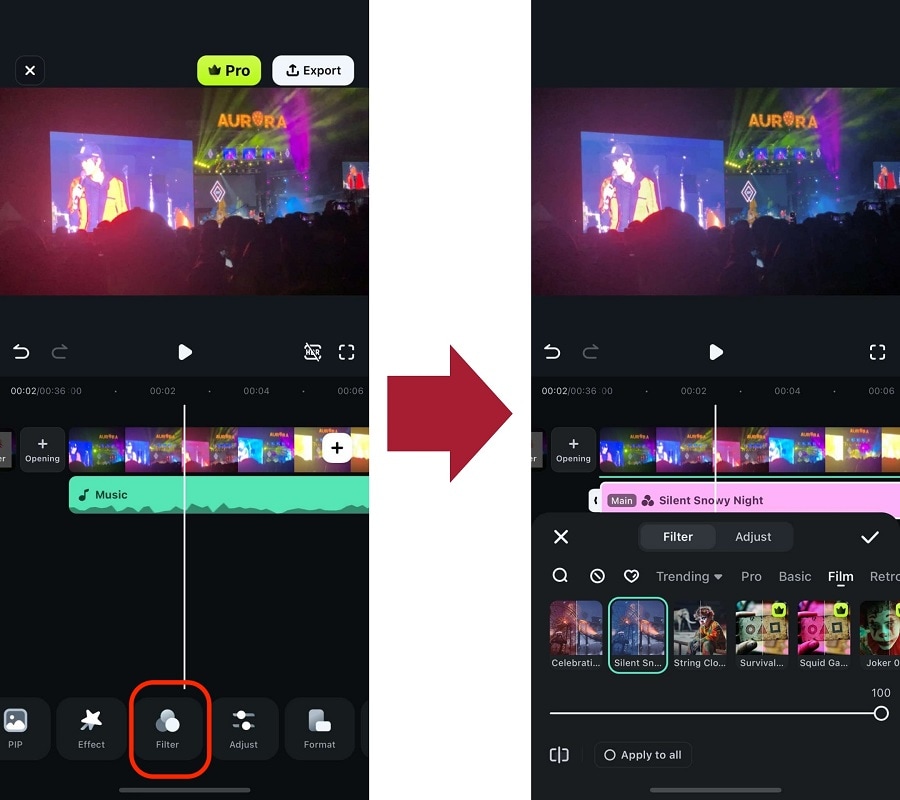
Step 1: Install and download Filmora on your Android or iOS device.
Step 2: Make a New Project, then Import the video to which you want to add a filter.
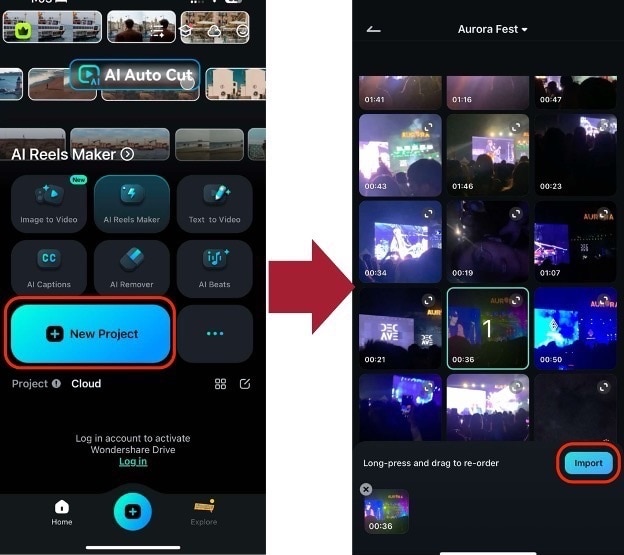
Step 3: From the bottom toolbar, find the Filter menu. Then, choose the filter that suits your needs.
You can create beautiful videos with Filmora's filters in a few easy steps. If you've enjoyed its easy use, try it today and download it on your mobile device.
- Discover a variety of filters to match your video's mood.
- Learn how to apply and adjust filters for the best effect.
- Make your videos stand out with professional-grade aesthetics.


Part 3. Free Premiere Filter Presets to Use
Adobe Premiere Pro comes with a handful of video filters. However, you can add various free Premiere Pro filter presets and apply them to your video. Here is the list of the free Premiere Pro filter presets to use on your video.
- Retro Preset Pack: There is a craze to have retro filters on the video so that the video looks different and takes the audience back to the golden old days. This is a collection of filter presets where you can get different old-school styles. Starting from VHS filter effect to RGB split, there are ample filter presets to make your video look retro.
- Cinematic LUT Pack: There is no doubt that cinematic videos always look class apart from the rest of the videos and this is the perfect collection of video filters you need. Use these filters to deepen and sharpen colors and cut down brightness so that the video becomes eye-catching and eye-soothing. This is a must-have video filter you should have in Premiere Pro so that you can make regular videos look extraordinary.
- Panoramic Transitions Pack: Transitions are a part of video filters in Premiere Pro and if you want something different in transition effects, you should opt for Panoramic transitions. Starting from fish-eye effect to spinning effect, you can apply them when you move from one scene to another or one clip to another.
- Free Animated Text Preset Pack: Text is an important part of any video and you need video filter presets to apply to the textual part. Instead of the regular text filters, the animated text presets are extremely eye-catching. Starting from shake animations to bounce animations, 13 free animation titles can transform your video especially the part where texts are the main highlights.
- Glitch Effects Pack: If you make videos for social media or you make informational videos, glitch effects must be in your videos. You can get quick attention of your audience with glitch effects, make scene transitions, and add some comedy scenes. Your video will have some extra kick and look more interesting to watch.
Conclusion
If you are using Adobe Premiere Pro to edit your videos, adding filters to your videos could be quite common. We have illustrated how to add filter to video in Premiere Pro to enhance your video quality and outlook. We have also listed the must-have free Premiere Pro filter presents. If you are looking for an alternative to add video filters, we recommend Wondershare Filmora.
