When it comes to video production, there is no doubt that LUTs are very useful nowadays. Many video editors are opting for this tool to streamline their workflows, discover various styles, and savor convenience. In the same way, LUTs can also be used for photo editing. Yes. That is absolutely right. The use of LUTs is not limited to videos only. That’s why you should explore it, too. Start with the free Lightroom LUTs. There are tons of them online that you can instantly download and apply to your photo editing projects.
In this article, we will talk about the highlights and benefits of Lightroom LUTs. We will also suggest some of the best LUTs that you should try for your photos. Lastly, we will discuss briefly how to use LUTs when editing videos. Most video editing apps nowadays offer lots of presets that look similar to the free Lightroom LUTs. Continue reading below to learn more.
In this article
Can You Add Lightroom LUTs to Videos?
As the name suggests, Lightroom LUTs are designed for photos. They consist of certain color configurations created on Adobe Lightroom, a popular image editor for various devices. But don’t sweat it. In a way, you can also try to apply the free Lightroom LUTs to your video content. How so? It’s very simple. Just make sure that the LUT file you wish to use is compatible with your video editing app. On this subject, Wondershare Filmora can surely assist you very well. Aside from highly advanced tools, it also has the facility to import and run LUTs from various resources. Do you want to give it a shot? If that is so, then read the discussions below for more details.

Key Features
Wondershare Filmora is packed with tons of features that can help you apply Lightroom LUTs and render stunning videos. Below are some of them. Check out the list and familiarize yourself for future reference.
- 3D LUTs: It basically allows you to apply LUTs to your video content. By default, Wondershare Filmora offers several selections in this regard. If one of them looks identical to your preferred Lightroom LUTs, you can definitely use them. Meanwhile, you can import free Lightroom LUTs in case you find some from other sources.
- Simple and advanced video editing: It is equipped with various tools that can help you facilitate different video editing techniques in a snap.
- High-quality creative resources: It offers a huge library of creative assets that you can access and use within the platform. Among them are stock pictures, video footage, audio bits, effects, filters, and many others.
- Ready-made video templates: It has tons of custom-tailored video templates that you can easily customize based on your preferences.
- Artificial intelligence: It provides access to a number of AI-powered tools that you can easily integrate into your creation process. To name a few, these are AI Copilot Editing, AI Text-Based Editing, AI Smart Masking, AI Voice Cloning, and more.
- Flexible export options: It allows you to render and export videos in numerous formats. Among the supported file types are MP4, WMV, AVI, MOV, F4V, MKV, 3GP, MPEG-2, WEBM, GIF, and MP3.
Step-By-Step Guide
Wondershare Filmora is not that complicated to use. If you need to import and apply some free Lightroom LUTs, you can definitely do it in a snap. Do you want to try it on your end? If that is so, then check out the tutorial provided below. Read the instructions very well and follow the indicated steps accordingly.
Step 1: Download the Wondershare Filmora application from its official website. Right after, install it on your computer.
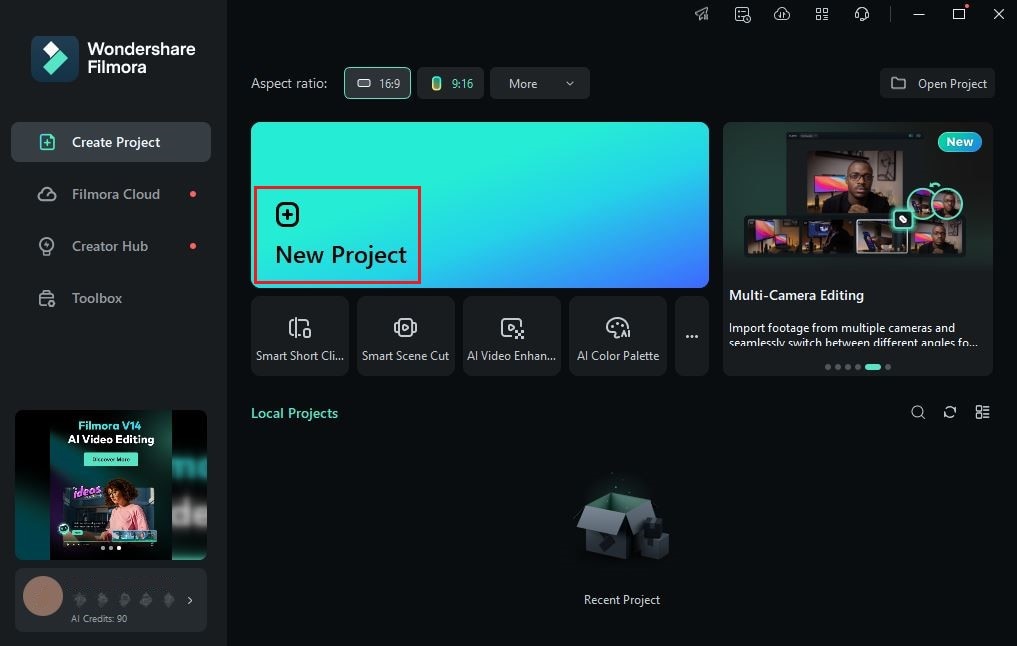
Step 2: Run the newly installed video editing software on your desktop afterward. Once it fully loads up, head over to the main dashboard and tap New Project to start editing. Alternatively, scroll down a little to the Local Projects section and open an existing session if there is any available.

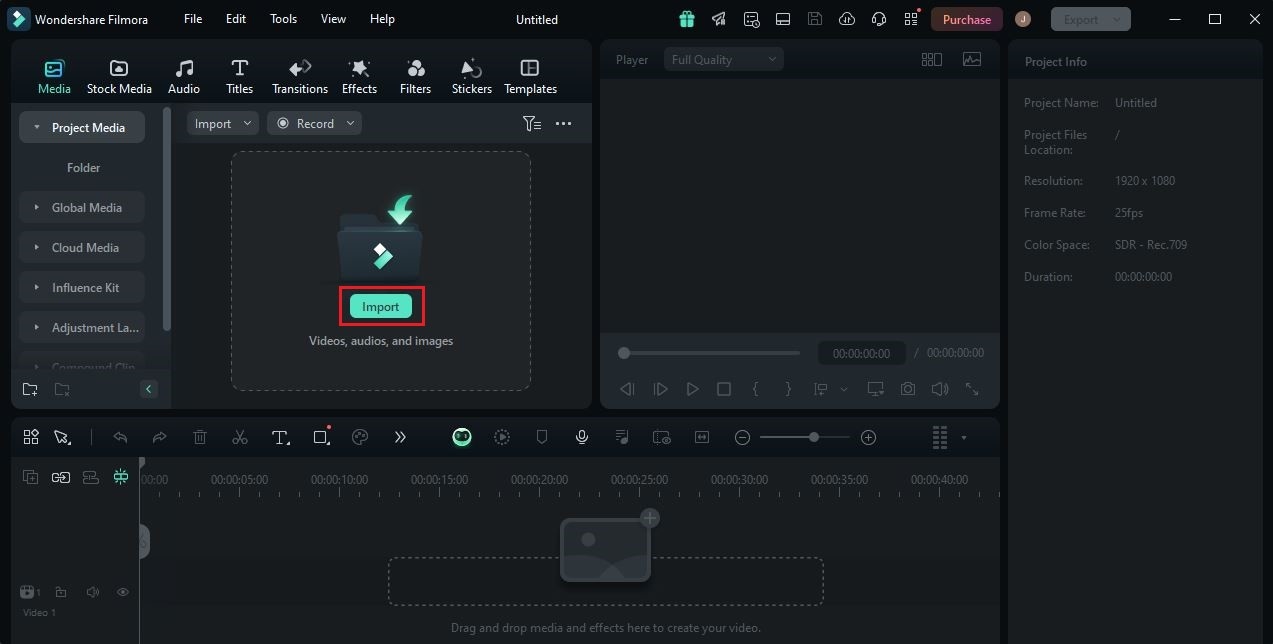
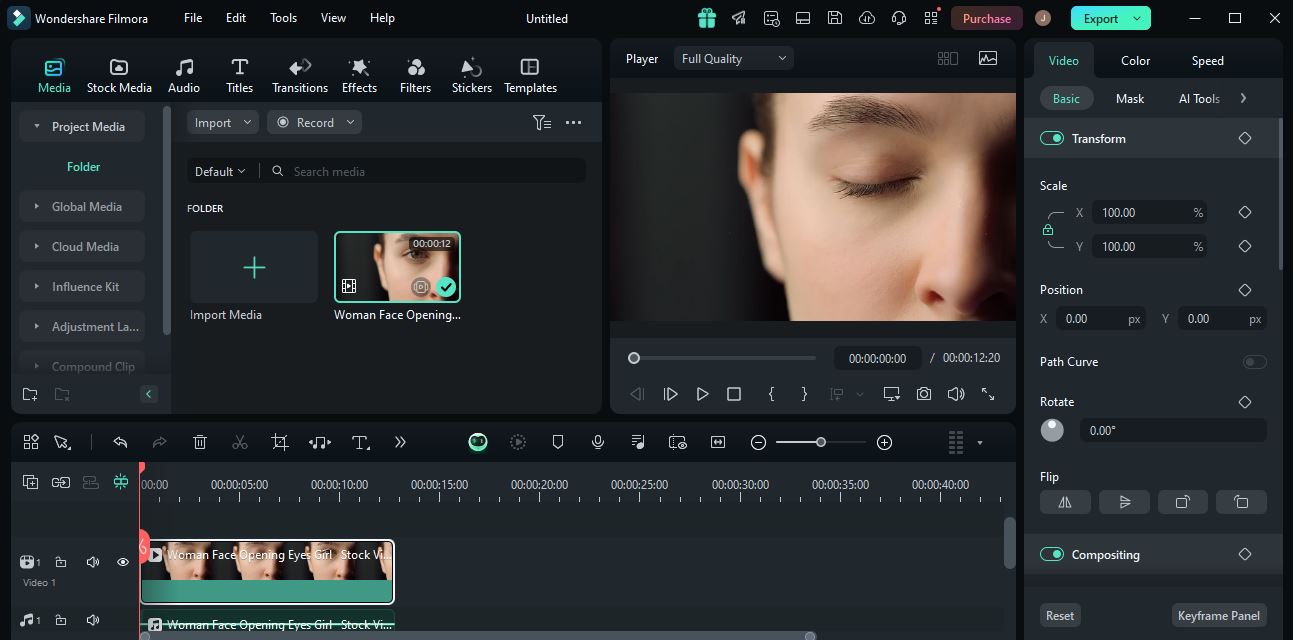
Step 3: After that, go to the Elements Panel and click the Import button under the Media tab. Select all the files you are going to use and then upload them to the platform. Once completed, grab the files one by one and drag them from the Elements Panel to the Editor Timeline.

Step 4: At this point, you may now commence the actual video editing. Start by finalizing the arrangement of the assets based on your preferences. At the same time, make all the adjustments needed. For instance, you may trim or split the video clips, fix the timing of the sound effects, and many others.

Step 5: Once done, you may now apply the Lightroom-inspired LUTs to your video content. Don’t worry. It is not as complicated as you think. To get started, simply go to the Editor Timeline and then select a video asset.
Step 6: Immediately, a new panel will open on the right-side corner. From there, click the Color tab. Go over the options under Basic and find LUT. Switch on the toggle button next to it. If you wish to use the default LUT selections of Wondershare Filmora, click the LUT Preset and menu and select the option that looks very similar to the free Lightroom LUTs. On the one hand, tap Add and upload the file that contains the Lightroom LUTs you prefer to use.

Step 7: The selected or imported Lightroom LUTs will be instantly applied to your video content. But hold on. You can make a few adjustments in case you wish to enhance its appearance further. To do that, all you have to do is move the Strength and Protect Skin Tones sliders to your desired level or enter a specific percentage into their respective input fields. The changes will be applied as soon as you reconfigure these options.

Step 8: Finally, play and review the output. Check if the Lightroom LUTs work well with your video content. If you’re satisfied with the result, click the Export button right above the Preview Panel to render the video and save a copy to your computer. Otherwise, continue making adjustments until a desirable outcome is achieved.
Exploring the Power of LUTs in Lightroom
People assume that LUTs are only applicable to video editing. Well, that is totally understandable, as most video editors are using LUTs to enhance the color of video content. However, keep in mind that LUTs or Look-Up Tables can also be a great tool for photo editing. Yes. That is right. In fact, the majority of photo editing apps out there support this feature very well. One of the most popular examples is Adobe Lightroom. It is a well-equipped photo editor that you can use to perform a variety of image-processing tasks. Among them are basic photo editing, color grading, red-eye reduction, and many others. On top of that, it also offers a digital storage feature that lets you keep and organize your work. When it comes to LUTs, Lightroom offers tons of selections. You will not run out of options. For sure, there is a corresponding LUT that will certainly fit the video style you wish to achieve.

Should you try the free Lightroom LUTs? In a way, we can say that it is highly recommended. Apart from convenience and aesthetics, Lightroom LUTs have a lot more to offer. Do you want to know what those are? If that is so, check out the list provided below.
It streamlines your photo-editing tasks.
Adobe Lightroom is equipped with lots of color correction and color grading tools. You can adjust them manually if you wish to create your own video filters and visual effects. However, that is a lot of work. If you wish to keep your process simple, the free Lightroom LUTs can help you streamline your tasks. Generally, all you need to do is select a LUT and apply it to your photo. It’s just as simple as that.
It lets you apply various styles.
As previously indicated, Adobe Lightroom has a huge library of individualized LUTs. Each of them carries a unique style and trademark. Therefore, don’t hesitate to explore the collections and try them once in a while. Doing so can help you experiment with the latest trends and find a distinct style that works on your outputs.

It makes your photos look professional and consistent.
Color consistency is sometimes hard to achieve if you are adjusting the settings manually. Well, that is totally understandable. There might be some input discrepancies in the process, especially if you’re editing multiple images at once. That’s why you should opt to use Lightroom LUTs if you’re very particular when it comes to consistency. For sure, it can help you generate coherent and professional photo outputs later on.
It allows you to experiment with video colors conveniently.
There is no denying that color grading and color correction procedures are not simple. Sure. Adjusting the settings is very easy to do. For the most part, you just have to move the sliders from one point to another. However, coming up with the right input requires critical thinking. Not everyone is capable of making such experimentations, especially if not familiar with the platform and its color grading functions. If you’re one of them, you should use the free Lightroom LUTs. It will make your editing process a lot more convenient since the configurations are already set. You can just make some minimal adjustments in case necessary.
Free Lightroom LUTs You Should Try
As mentioned earlier, there are tons of free Lightroom LUTs that you can apply to your projects. You just need to select the perfect option that fits your photos very well. Don’t worry. You will not run out of choices. That one thing is for sure. Below is the list of free Lightroom LUTs that can help you enhance your photos in a breeze.
Rich

The first on the list is Rich. It is one of the modest Lightroom LUTs that focuses on enhancing the quality of the photos. Generally, it brings out the real color tone of the photos by increasing the vibrance, contrast, and temperature. You can also notice that it somehow uses a brownish tint that makes photos look a lot more natural. This is a perfect choice if you prefer subtle quality improvements.
Kinfolk

Kinfolk is one of the Lightroom LUTs that creates a vintage-like effect. Yes. It uses specific contrast, highlight, and shadow configurations that increase the brownish color tone of the photos. You can try to use this photo filter if you want to add a dramatic vibe to your materials. For sure, it wil help you achieve such effects.
Theo Preset

Next is Theo Preset. These Lightroom LUTs are quite similar to Kinfolk as their appearance looks vintage and classic. However, Theo Preset is more focused on calibrating the yellow, green and blue color tones of the photos. You can see it from the photos that use this preset. If you’re looking for such effects, then you should really try Theo Preset.
Churros Bundle

Are you looking for some Lightroom LUTs that create a masterpiece by setting the contrast low? If you wish to try such effects, Churros Bundle is the right option for you. It basically employs such techniques to tone down the brightness and induce a calming feeling. Churros Bundle works best on photos filled with too many colors, such as historical buildings, heritage, and the like.
Fairytale

If you prefer to use photo filters with dark ambiance and deep shadows, Fairytale is indeed an ideal choice. It basically utilizes the green and blue color tones to turn the photo into something that looks mystical and extraordinary. Are you looking for this type of visual effect? Then so, give Fairytale a shot and apply it to your photo.
Conclusion
It’s probably fair to say that content creation becomes much more manageable with the aid of LUTs. You can add a variety of effects to your materials without the need to undergo complicated procedures. Generally, all you have to do is select a LUT and then apply it to your project. It’s just as simple as that. That’s why you should explore this feature and try it once in a while when editing your photos or videos. As for the former, tons of free Lightroom LUTs are there around. You can use the default selections offered by Adobe Lightroom or download free Lightroom LUTs from other sources.
On the one hand, you may also apply such effects to your video content. To do that, download Wondershare Filmora. Aside from advanced video editing features, it also allows you to perform LUT reconfigurations in a snap. Give this app a try and make the most of its amazing benefits.


 100% Security Verified | No Subscription Required | No Malware

