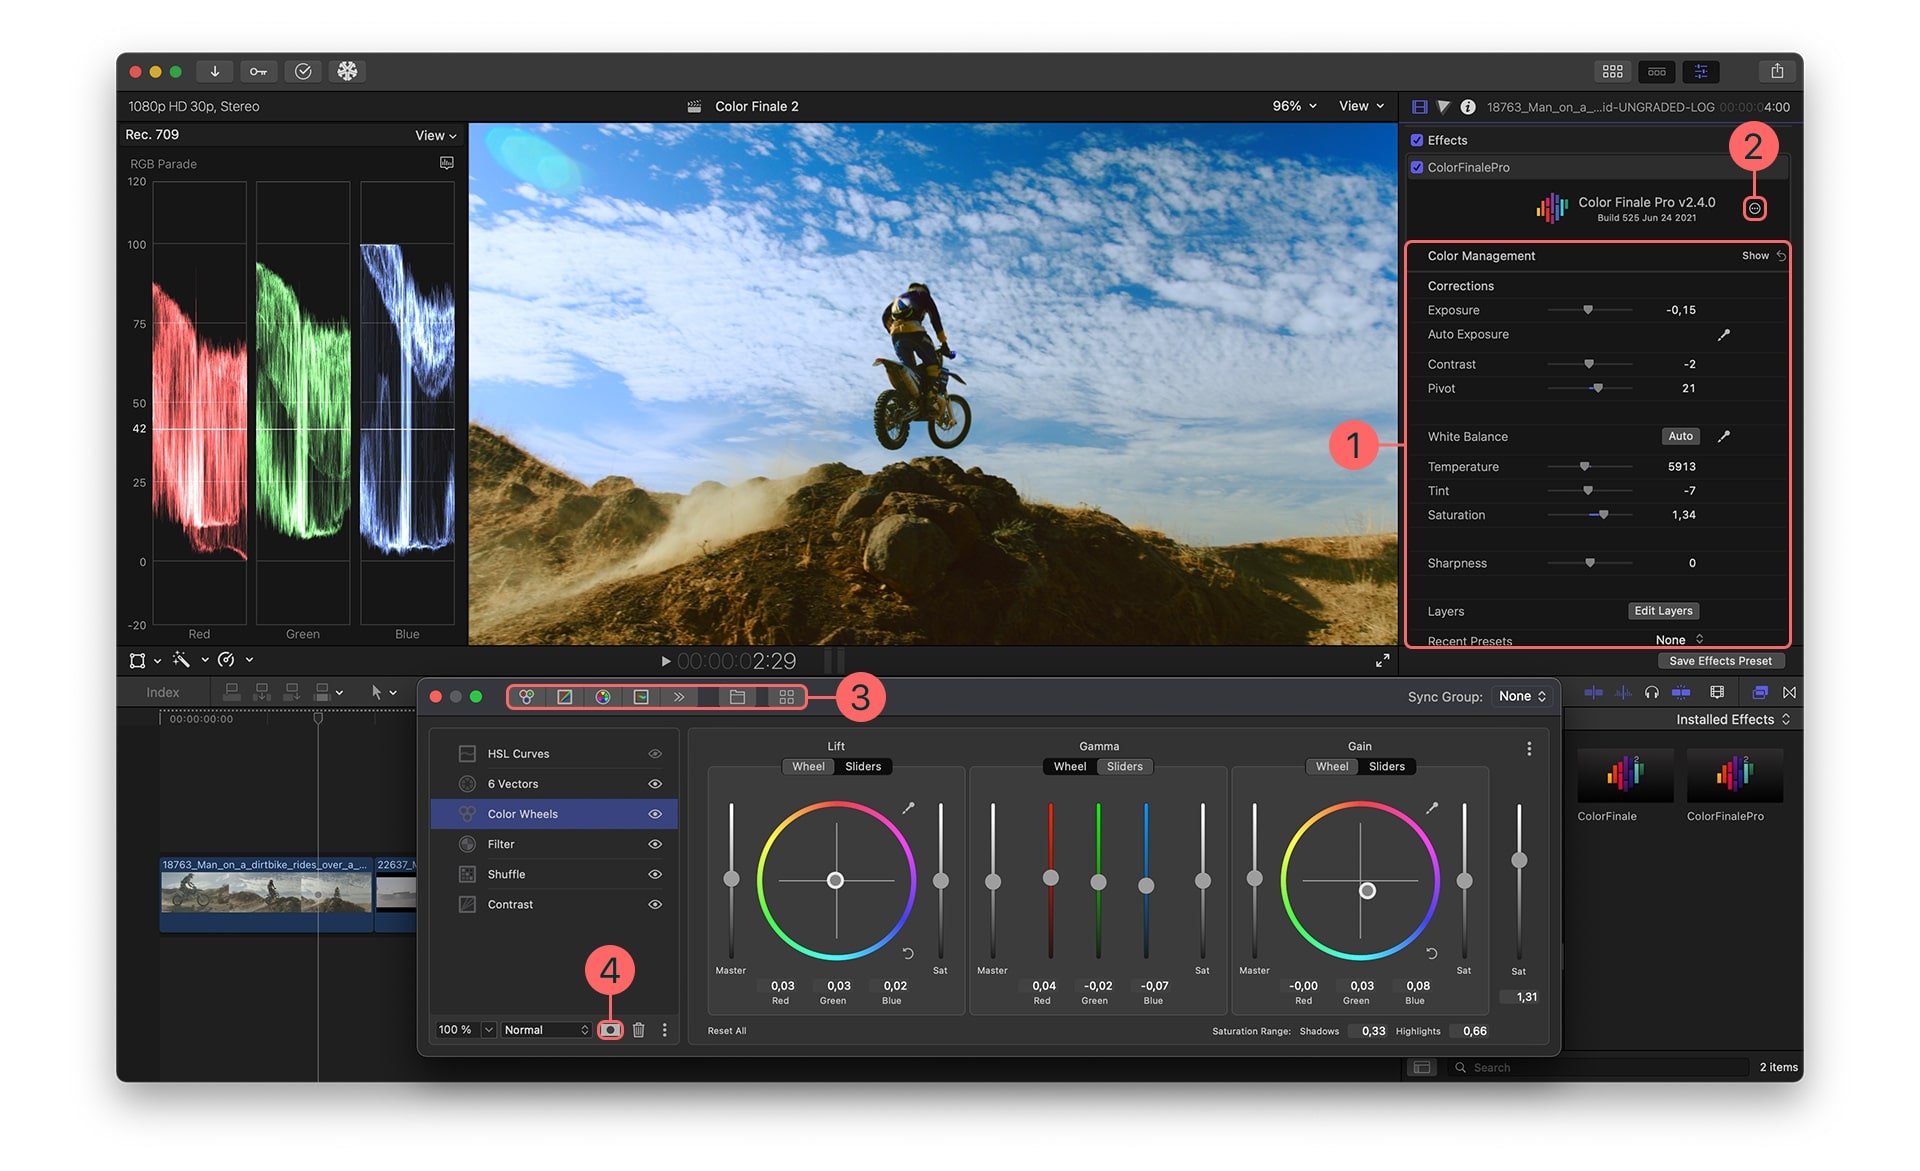
Color grading and correction are among the most vital parts of a professional post-production process. Yet, regardless of price, many video editing applications don’t offer everything editors need for these two processes, prompting many users to look into additional plugins that provide the required functionality.
Color Finale is one such application, which is what today’s review will explore.
Stay around as we examine Color Finale, a powerful color correction and grading plugin for Final Cut Pro. We’ll dive deeper into its features, show you how to install and use it, and provide a fantastic Color Finale alternative you might enjoy even more.
In this article
What Is Color Finale?
As mentioned, Color Finale is a dedicated, all-in-one, robust video editing plugin with powerful color grading and correction features for Final Cut Pro, a video editor of choice for many Mac users.
It adds professional color correction tools, such as color profiles, white balance, detail enhancement, and more, significantly increasing Final Cut Pro’s built-in color grading functionality.
There’s even a Color Finale Transcoder, which adds the missing RAW media formats into Final Cut Pro and allows users handling RAW video files to apply seamless color corrections.
Color Finale Pro ups the ante, adding even more features as a plugin, including group grading, the ability to save new grades as presets, color management with ACES working color space, log wheels, a camera matrix, an area tracker, masks, a film grain emulator, and a details/sharpness tool.
Who Should Use Color Finale?
Despite its simple user interface and semi-automated workflow, Color Finale isn’t exactly geared toward video editing beginners. This robust plugin and its efficient, real-time processing color grading features are intended for professional video editors, colorists, videographers, and vloggers, as it deals with high-end post-production color grading processes.
Main Features of Color Finale
As it was designed and created by color grading experts with over 20 years of industry experience, Color Finale is a fully-fledged Final Cut Pro plugin with numerous color correction features. The tool has recently received a significant update, and these plugins are now known as Color Finale 2 and Color Finale 2 Pro, with the former offering the following features:
-
Grading Tools
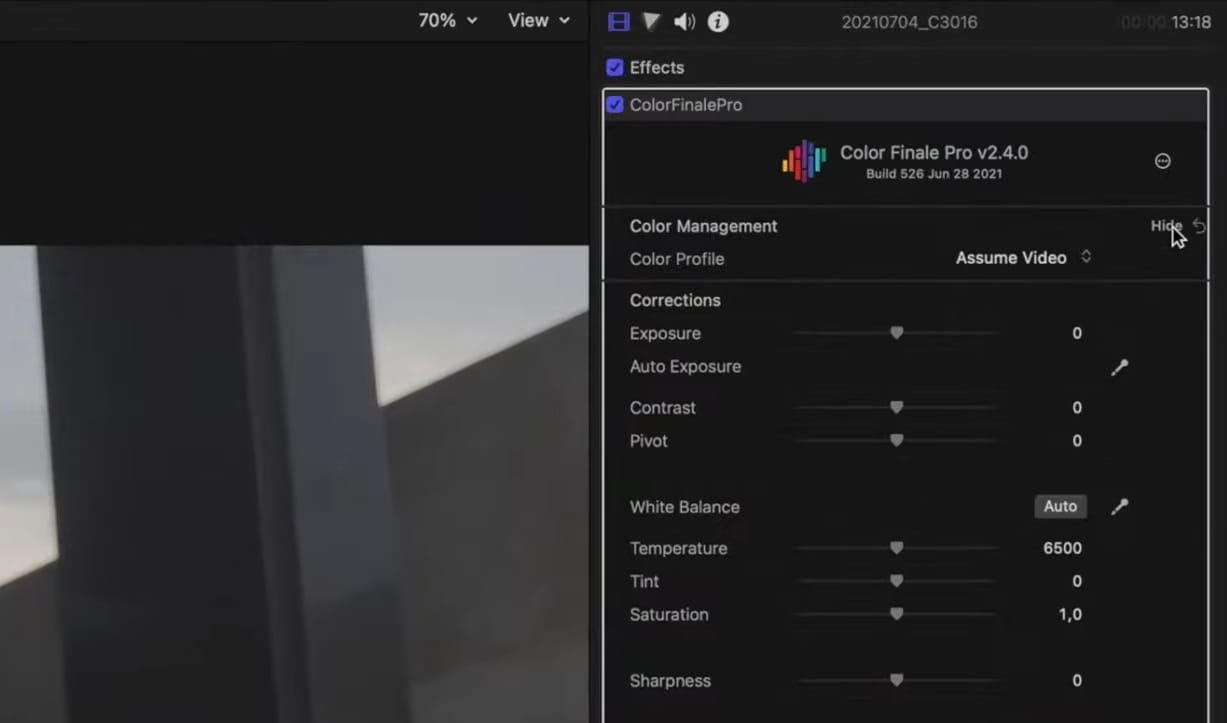
Powerful color grading features are the primary reason for installing the Color Finale add-on on top of your Final Cut Pro, and these tools are well worth the cost, even if the latest versions of FCP include many of these features natively.
Featuring everything from color profiles to simple corrections like exposure, contrast, and pivot to more advanced tools like temperature and sharpness, Color Finale’s grading tools are all you could ask for, and they’re effortless to use.
-
Layer-Based Grading System
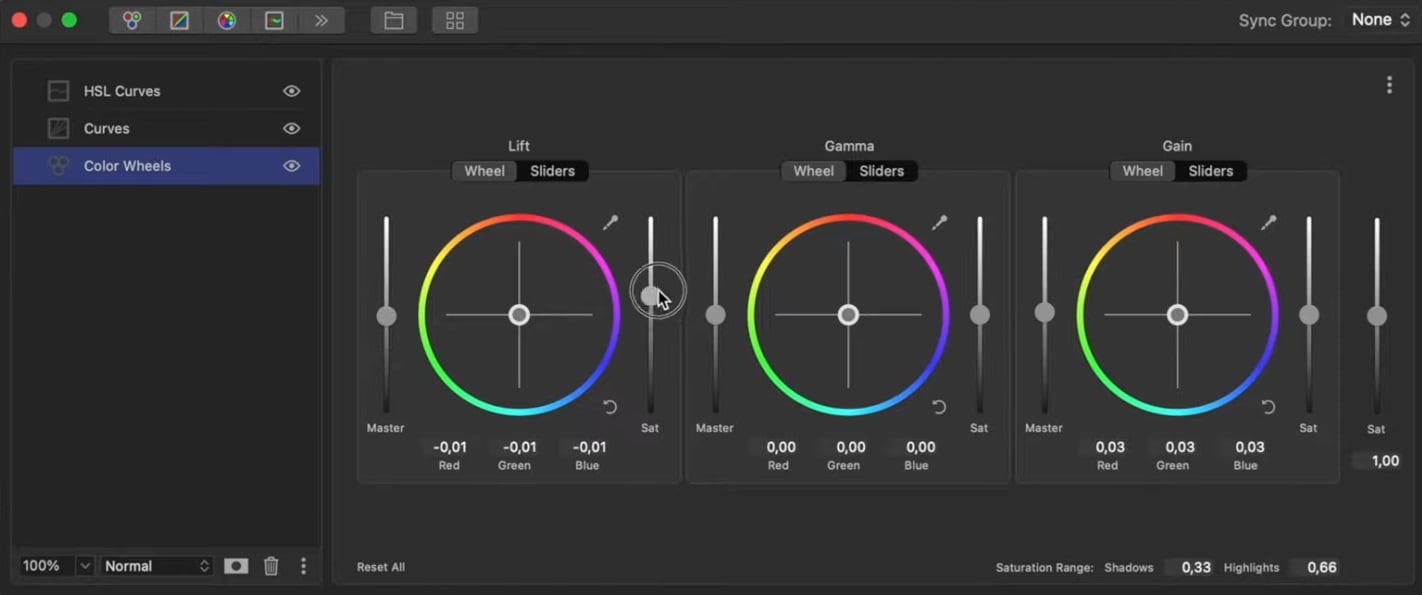
Color Finale’s additional tools are in the plugin’s Layers Panel, which you can access from the Effects Panel on the right. This panel sits on top of your standard Final Cut Pro interface. These layers include typical features like color wheels, RGB and HSL curves, vector offsets, and more, but that’s not all.
Unlike Final Cut Pro’s built-in features and layers, which don’t offer many customization options, Color Finale’s layers allow users to rename, group, and control the mix of those layers in groups, helping create a specific look and applying it in a few clicks.
-
Masking Tools

By itself, Final Cut Pro natively offers only two masking tools: a shape mask and an HSL (color) mask. The Color Finale plugin builds upon this functionality, offering seven options you’ll find by tapping the Masks button at the bottom of the Layers Panel.
While relatively slow, the shape masks in Color Finale are also trackable. At the same time, the HSL (color) masks also have a blur option, a feature that isn’t natively available in Final Cut Pro.
-
LUTs and Presets
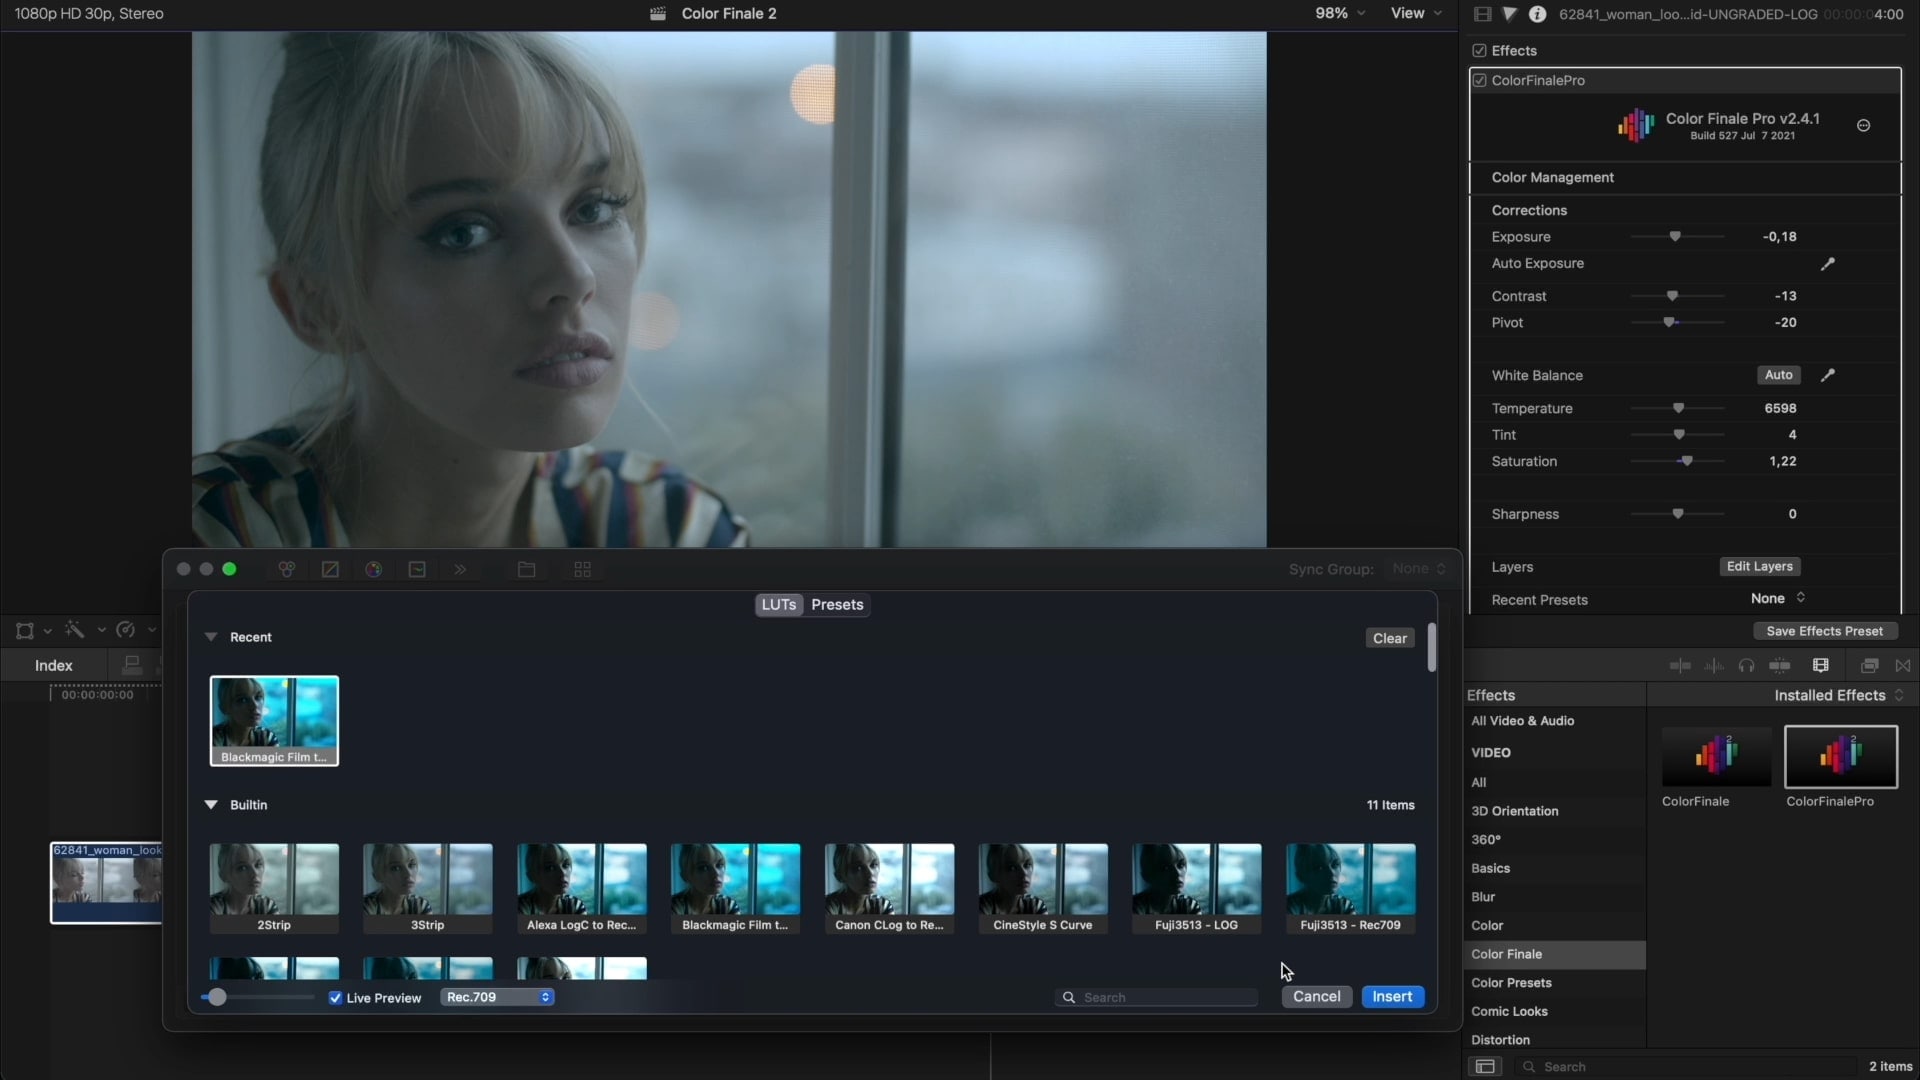
Besides significantly enhancing Final Cut Pro’s layers and masking functionality, Color Finale also includes LUTs and Presets, which you can access by clicking the last button in the Layers Panel. These single corrections can’t be altered but can be applied instantly, and a decent number of these come with the Color Finale plugin.
Additional LUTs and Presets can be added to Color Finale from the plugin’s official website, but it’s worth noting that some of these packs and bundles aren’t free. The plugin also lets you export your color corrections as LUTs in the .cube format so that you can share them.
How to Install and Set Up Color Finale
With Color Finale being in its second iteration, known as Color Finale 2, it’s recommended that you use Final Cut Pro 10.7.X and newer, so you should check that and update the video editor before continuing. Apart from that, installing Color Finale 2 and setting it up to work with Final Cut Pro is a breeze.
Here’s what you’ll need to do:
Step 1: Head to Color Finale’s official website and download Color Finale 2.

Step 2: Open the downloaded DMG file to launch the installer and fill out your details.
Step 3: Leave the Serial Number field blank if you’re trying the Color Finale 2 plugin and want to use the free seven-day trial and tap Continue.
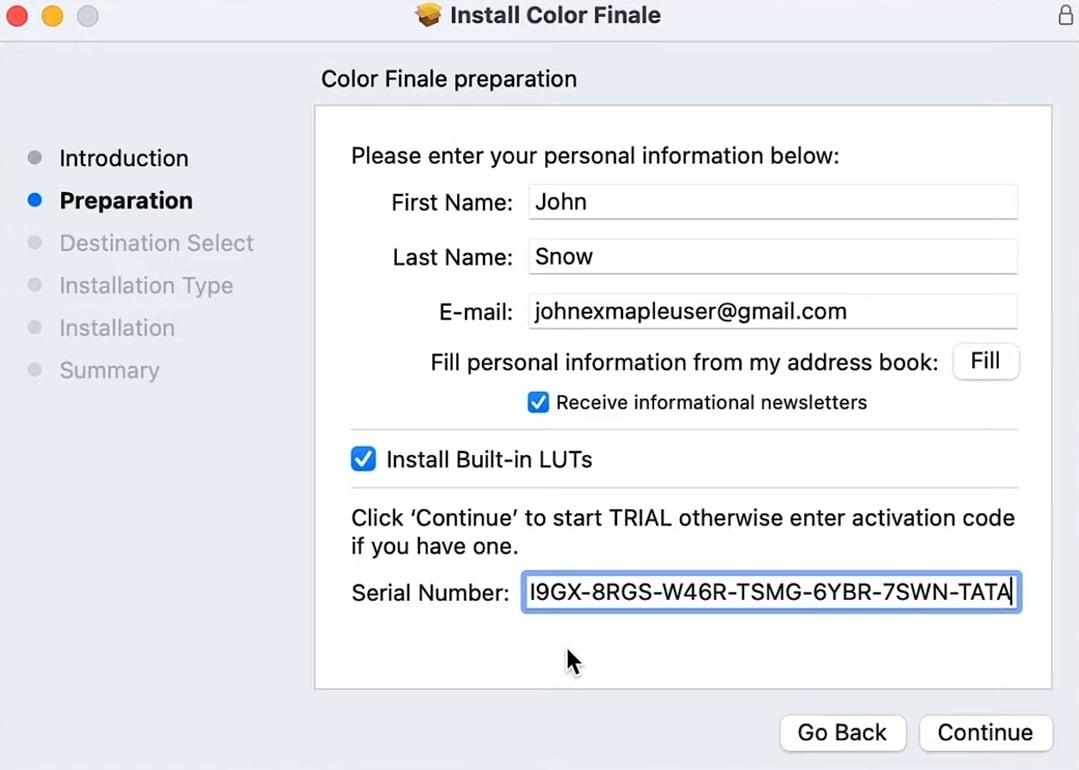
Once you’re done, the installer will notify you of a successful plugin installation and automatically add the Color Finale 2 plugin to your Mac’s Final Cut Pro video editing software.
How to Use Color Finale for Color Grading
With the Color Finale 2 plugin added to your Final Cut Pro editing software, you’re finally ready to use the addon’s professional color grading tools. Here’s how you can go about doing that:
Step 1: Open Final Cut Pro, import your clip, and add it to the Timeline.
Step 2: Head to the Effects Browser and find Color Finale in the Installed Effects section.
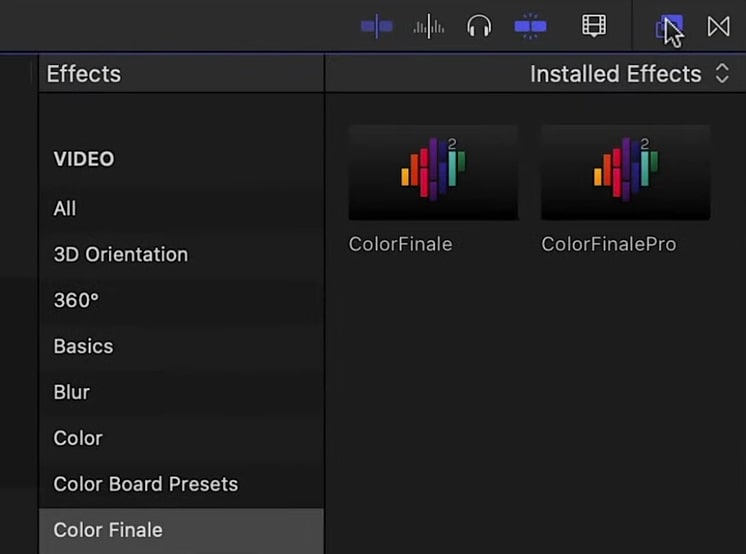
Step 3: Select one or more clips in Final Cut Pro’s Timeline and double-click on a template in the Effects Browser.
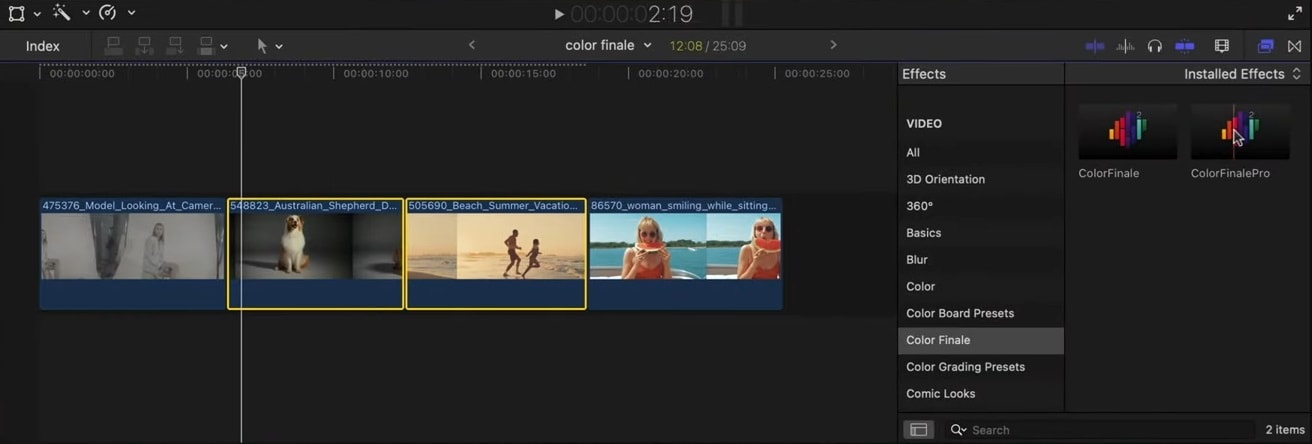
Step 4: You can then make adjustments in the right sidebar. Your options include Exposure, Contrast, Pivot, White Balance, Temperature, Tint, Saturation, Sharpness, Layers, Image Analysis, and more.
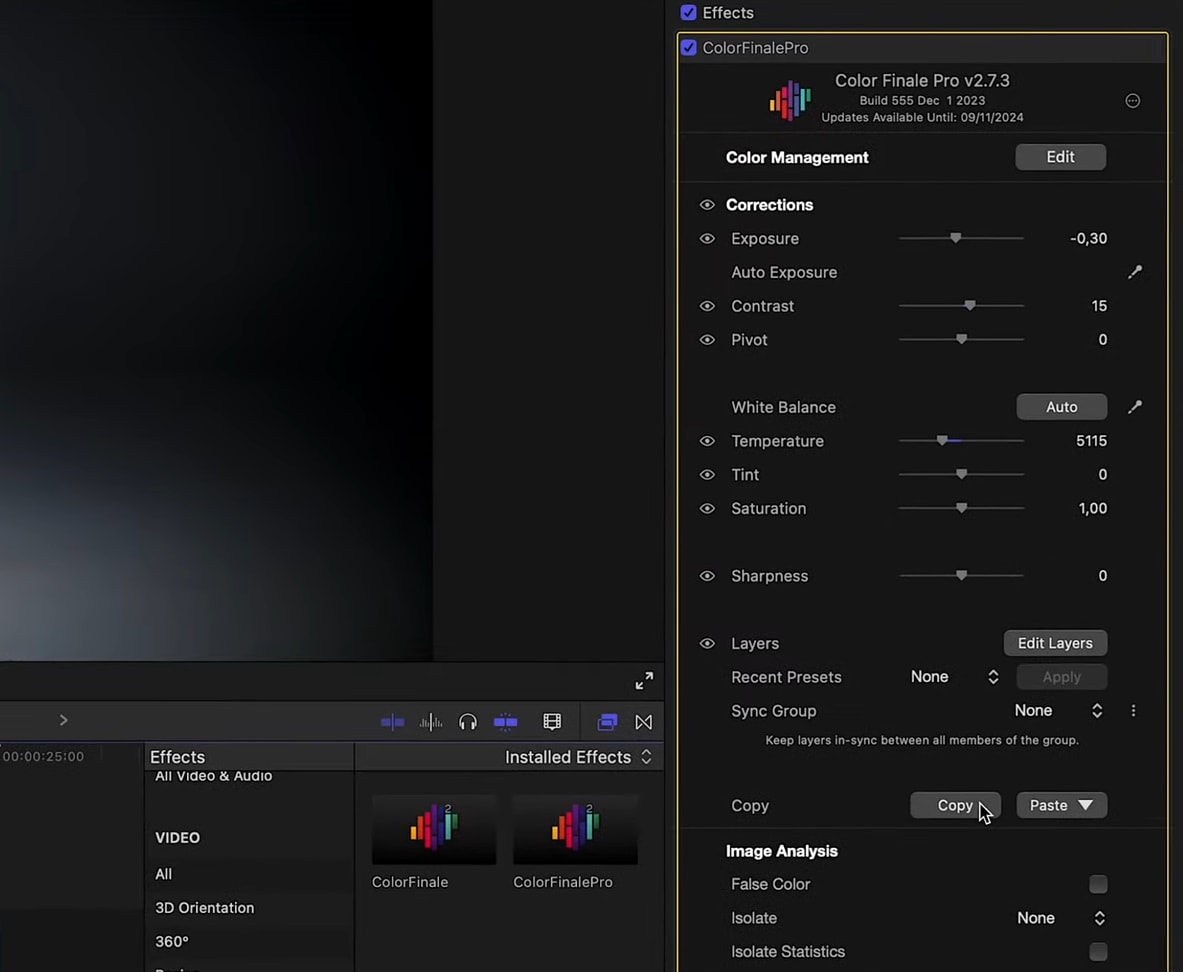
Step 5: To correct colors and handle color grading tasks, adjust these options to your liking and export the clips through Final Cut Pro.
You can also click Edit Layers to open the Layers panel, which hovers over the top of the Final Cut Pro’s user interface. Inside it, you’ll find more Color Finale tools, such as Color Wheels, RGB and HSL Curves, Vector Offsets, Shuffle, Filter, Camera Matrix, and Log Wheels, some of which are only available in Color Finale 2 Pro, and not in the standard version of Color Finale 2.
An Alternative to Color Finale: Wondershare Filmora
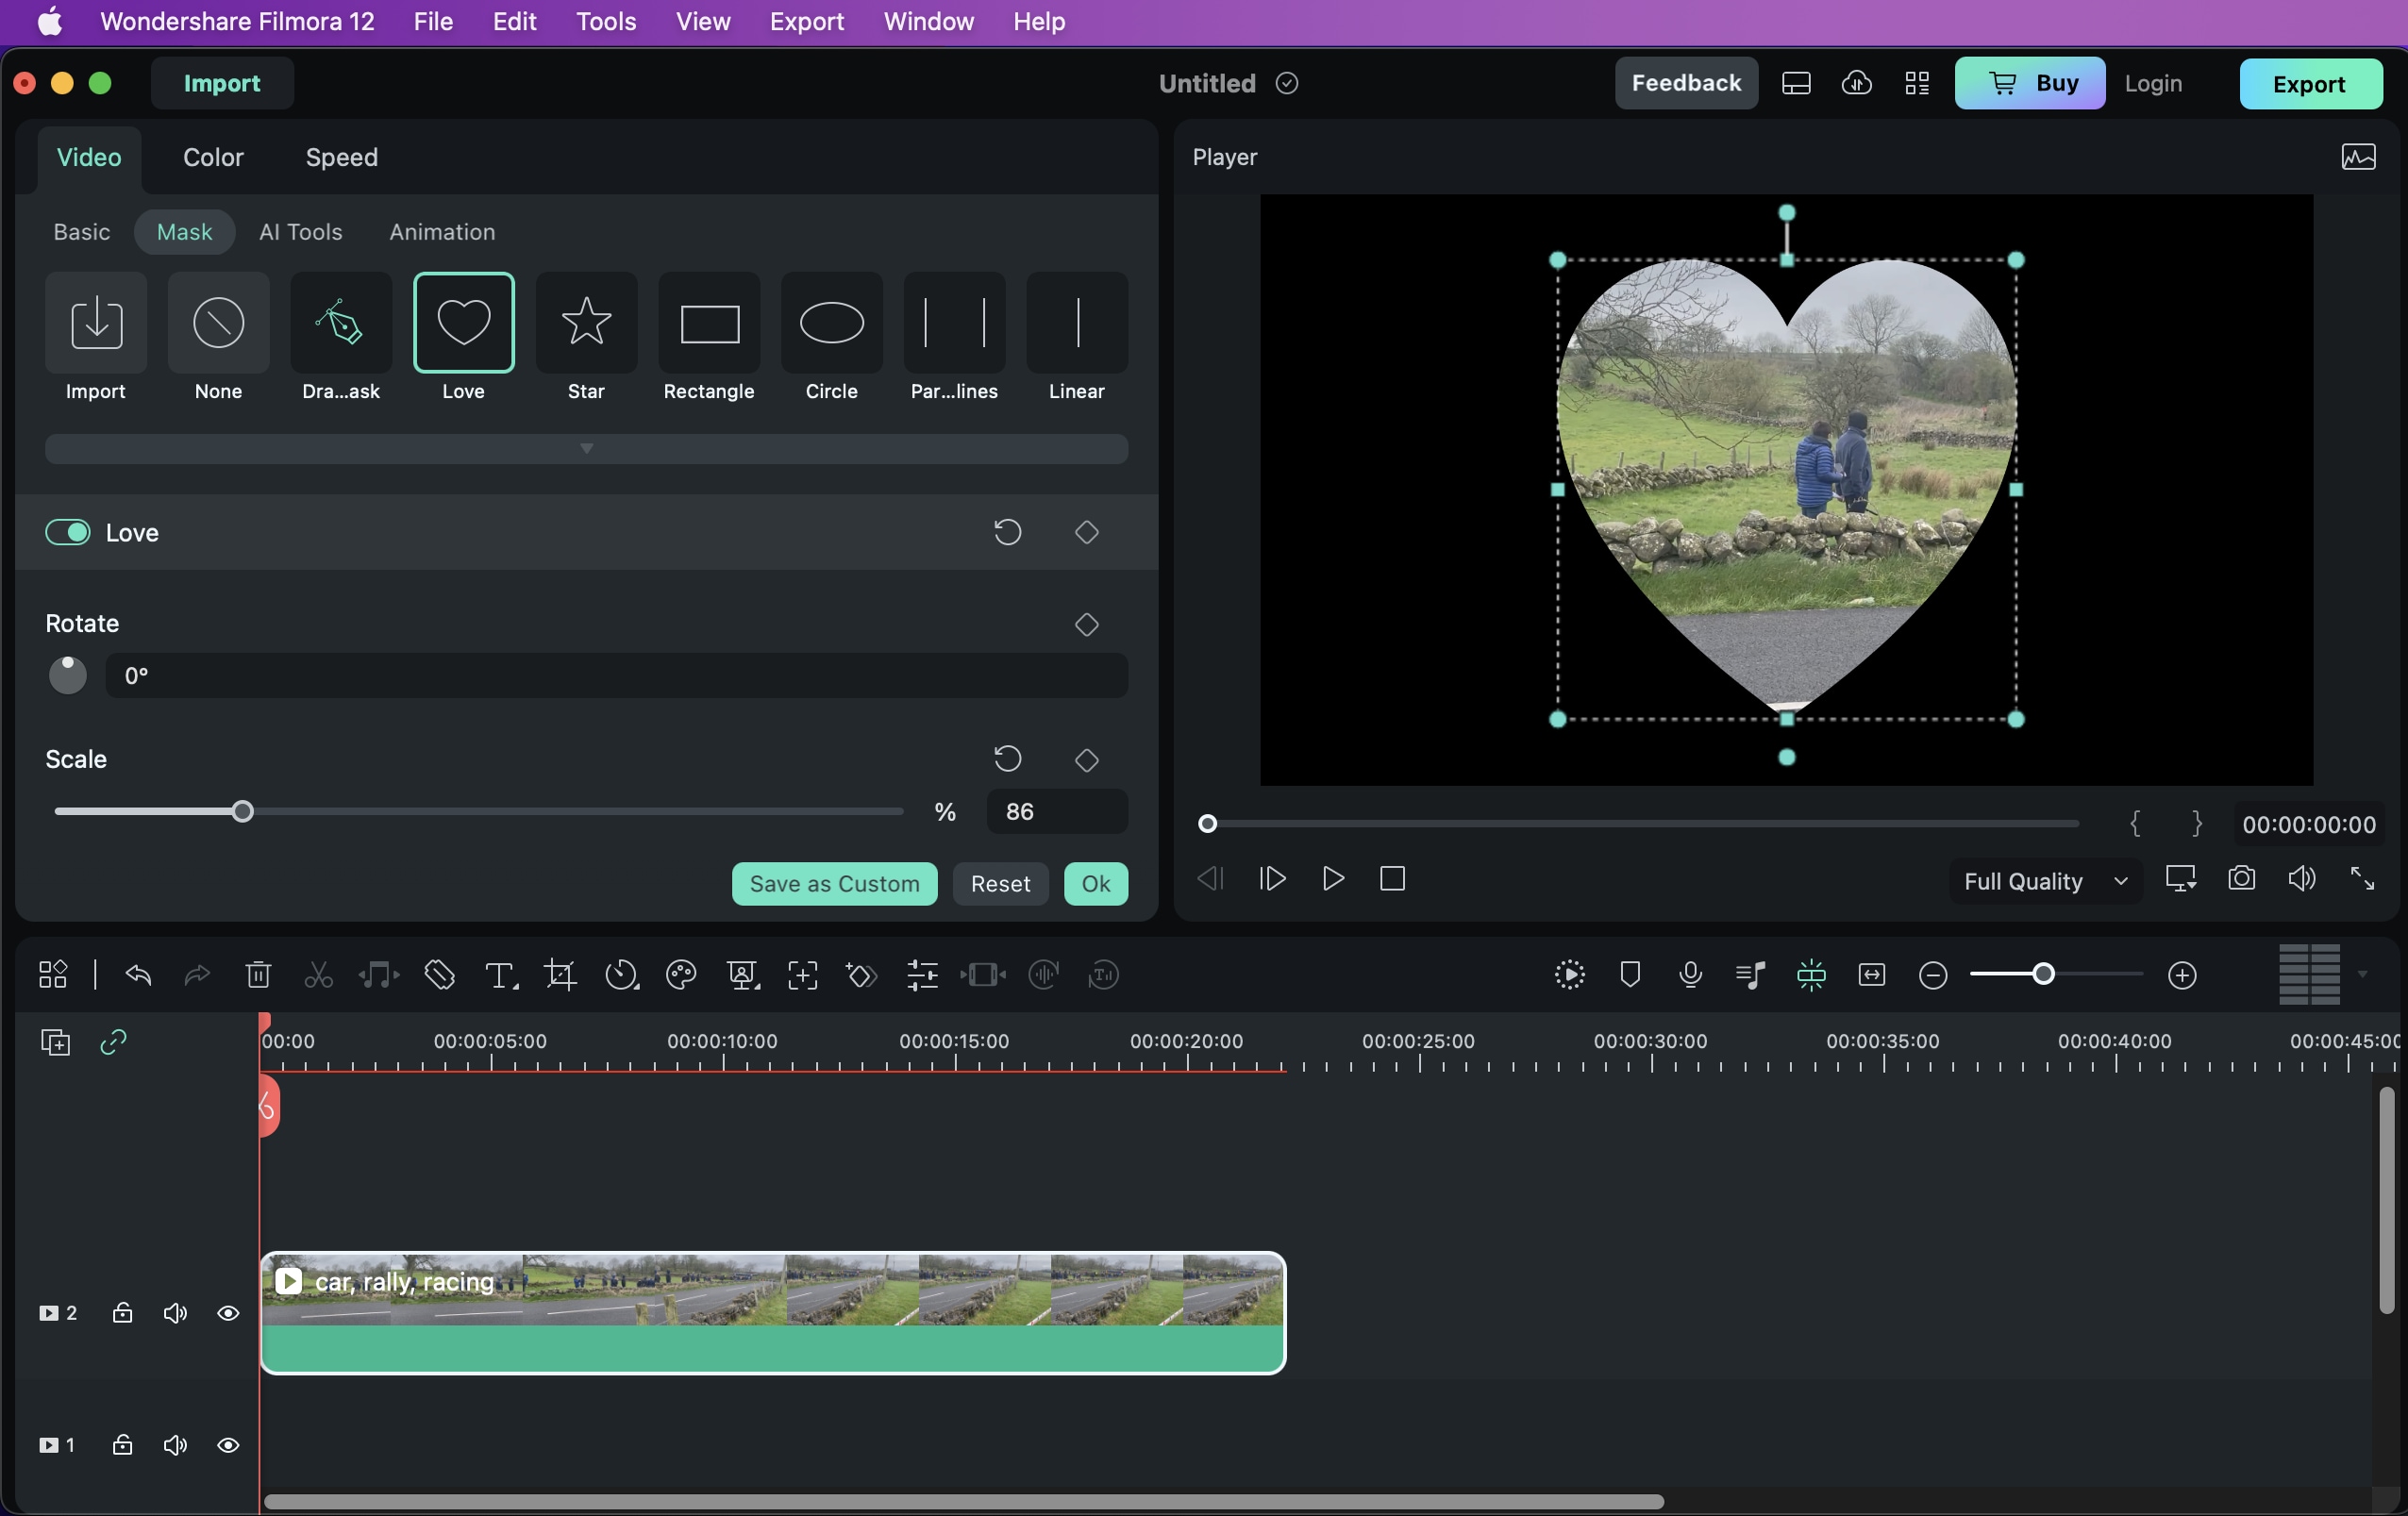
While Color Finale 2 is an excellent color grading plugin for professional post-production processes, the built-in color correction tools of the Final Cut Pro have been slowly catching up to the plugin’s features, making Color Finale, at least the non-pro version, redundant.
In addition, many Mac users have been reporting crashes and bugs after adding plugins to Final Cut Pro, including the Color Finale 2 and Color Finale 2 Pro plugins, which can make your video editing tasks more trouble than they’re worth.
As a result, these drawbacks are prompting more Mac users to look into Color Finale alternatives, and Wondershare Filmora dominates in that area.
Unlike Final Cut Pro, Filmora is a cross-platform professional video editing solution for macOS, Windows, iOS, and Android. Its color grading and correction tools are built-in, meaning you won’t have issues with the software crashing, regardless of the platform you’re using it on.
Key Features of Wondershare Filmora
Whether you’re an amateur or a pro, Filmora’s features will make your video editing workflow seamless and vastly more efficient than any traditional editing application ever could. With that said, let’s see what features Filmora has to offer:
- Video Features – Capable of green screens, motion tracking, and simple yet powerful color correction, Filmora makes video editing seem easy, and its adjustment layers, LUTs resources, and keyframing help editors achieve the desired effect quickly and efficiently.
- Audio Features – From matching your audio to clips with Auto Beat Sync to adding character to your voice with the Voice Changer to making your dialogue stand out with Audio Ducking, Filmora’s audio tools do it all.
- AI Tools – Filmora is an AI-enabled video editor with dozens of AI-enhanced tools, such as text-based editing, object, background, vocal removers, music and sticker generators, copilot editing, and more.
- Text Tools – Whether you need text animations, audio-driven text, or automatic captions, Filmora’s text-to-speech, speech-to-text, and text customization tools cover your needs.
Besides these, Filmora is one of the most well–equipped video editors available today. It has massive libraries of video templates, filters, motion elements, transitions, titles, music, and high-res images. It also has assets like WordArt for advanced text editing and Boris FX and NewBlue FX for high-quality lighting, stylization, and animations.
How to Use Wondershare Filmora for Color Grading
Despite having significantly more editing tools than Final Cut Pro and featuring AI-enhanced options, Wondershare Filmora remains a user-friendly video editor with an intuitive interface that anyone can navigate. The result of this is a seamless color-grading process that even complete beginners can handle, and here’s how:
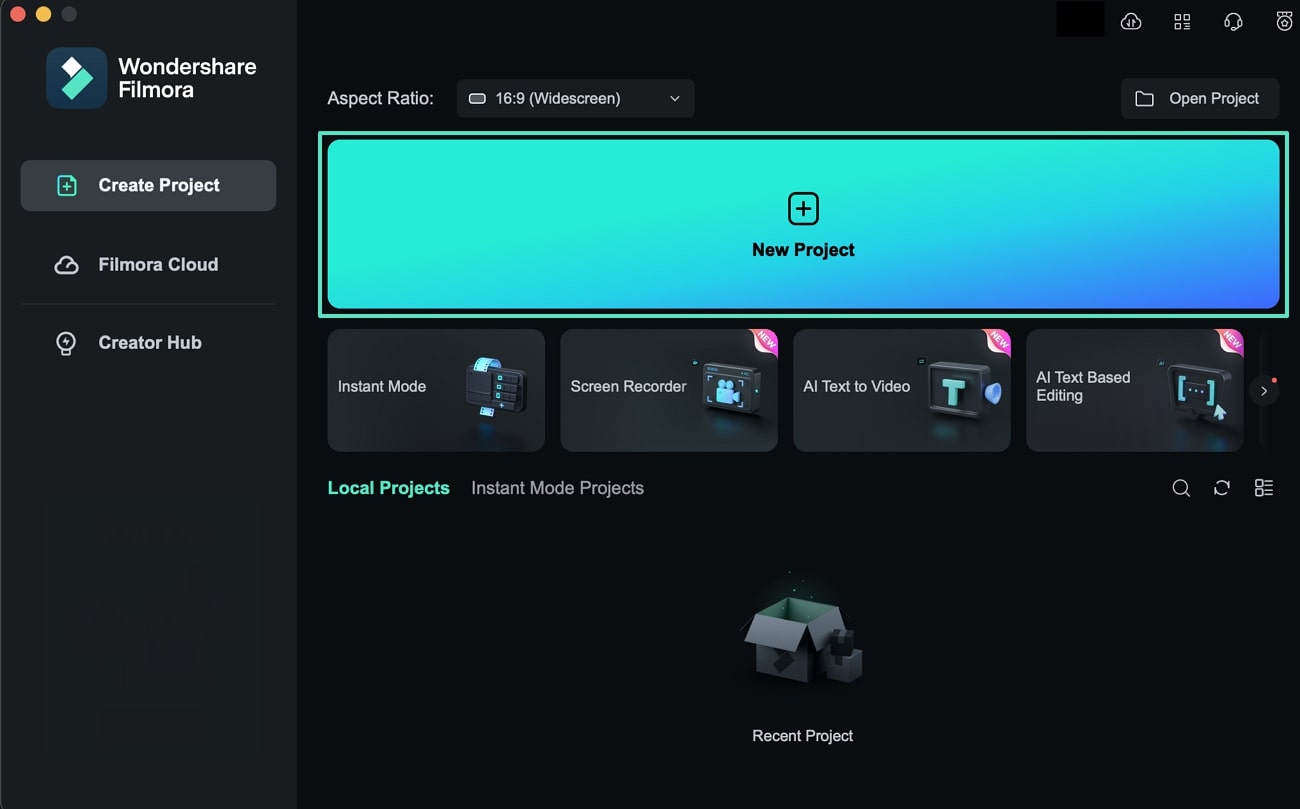
Step 1: Open Filmora on a Mac and hit the New Project button.
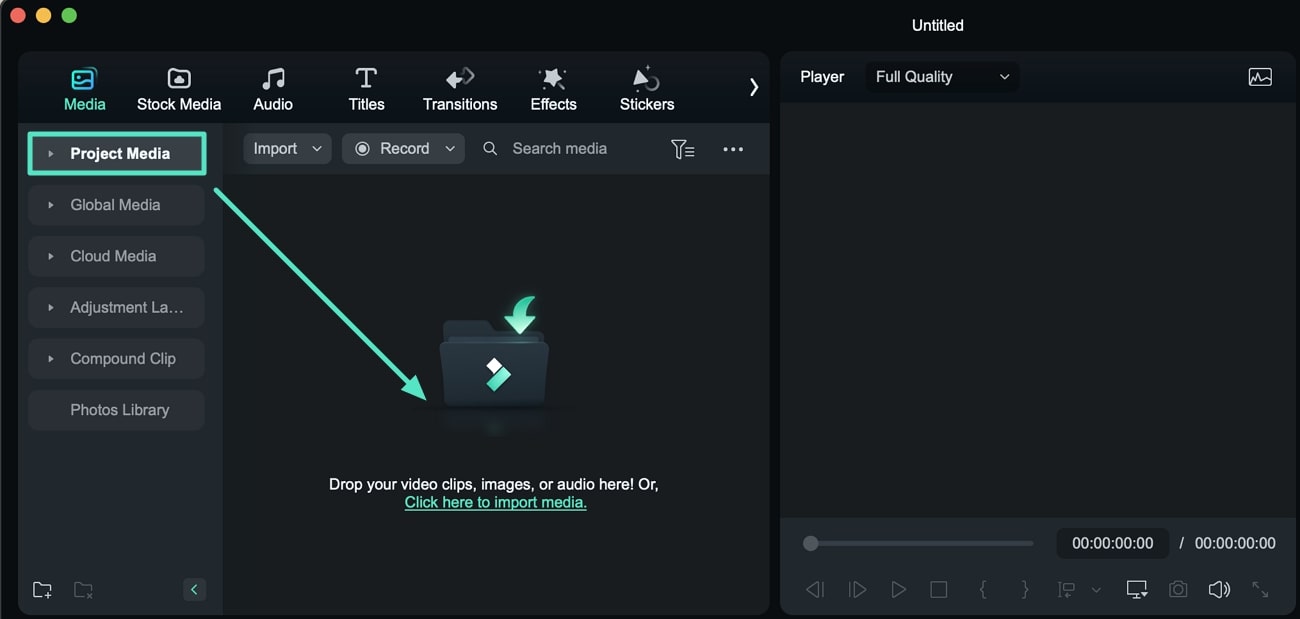
Step 2: In the Media tab, under Project Media, hit the “Click here to import media” option or drag a video into the app to import it.
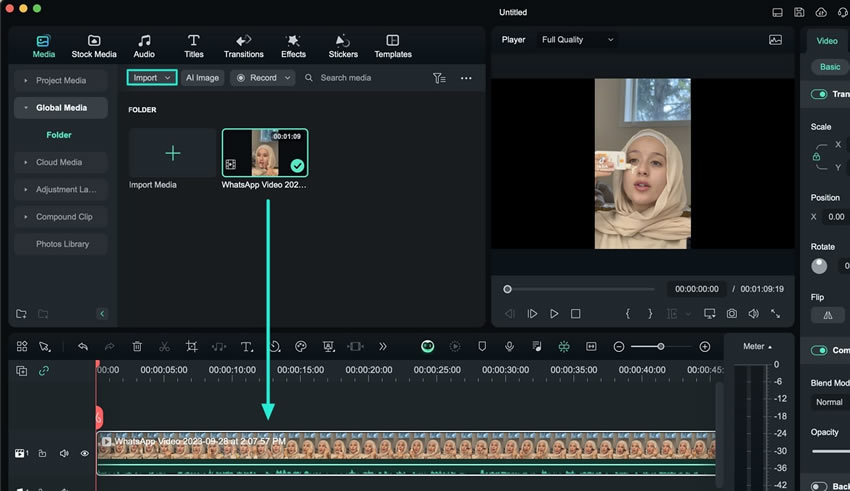
Step 3: Drag and drop the imported video to the Timeline at the bottom of the screen.
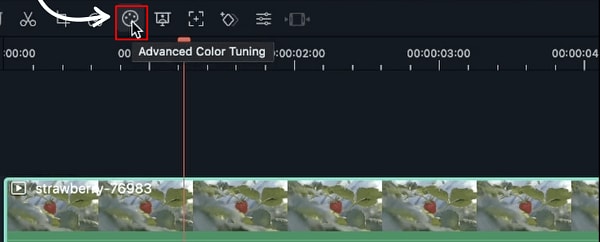
Step 4: Select a video in the Timeline and tap the Advanced Color Tuning button above it.
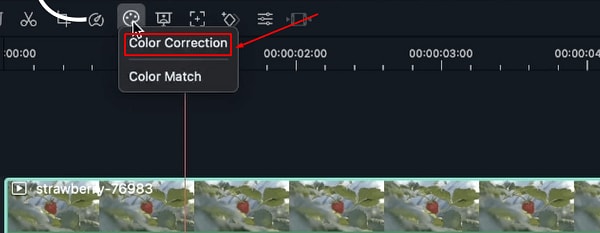
Step 5: Choose the Color Correction option.
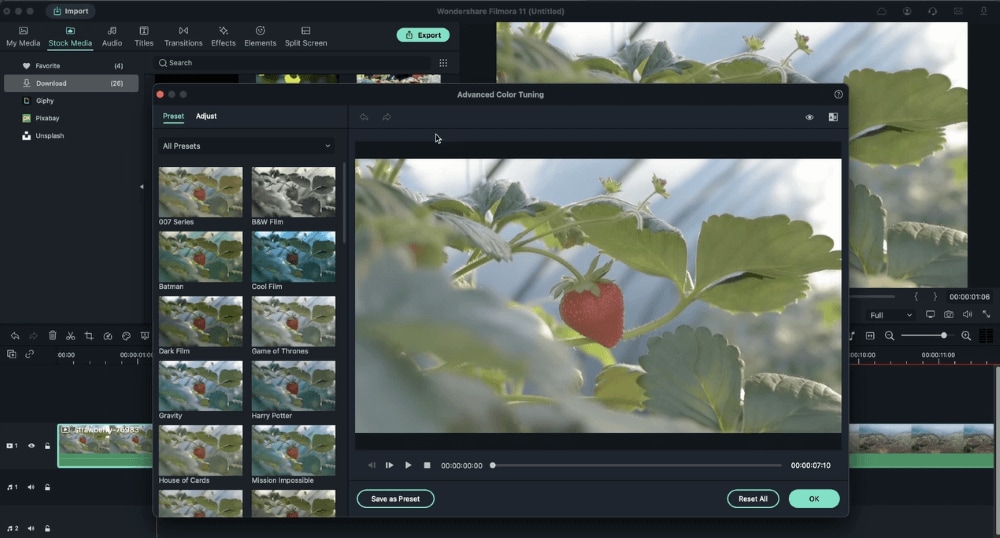
Step 6: In the Preset tab, try one of the already available color correction presets, or hit the Adjust tab and manually adjust the color correction profile.
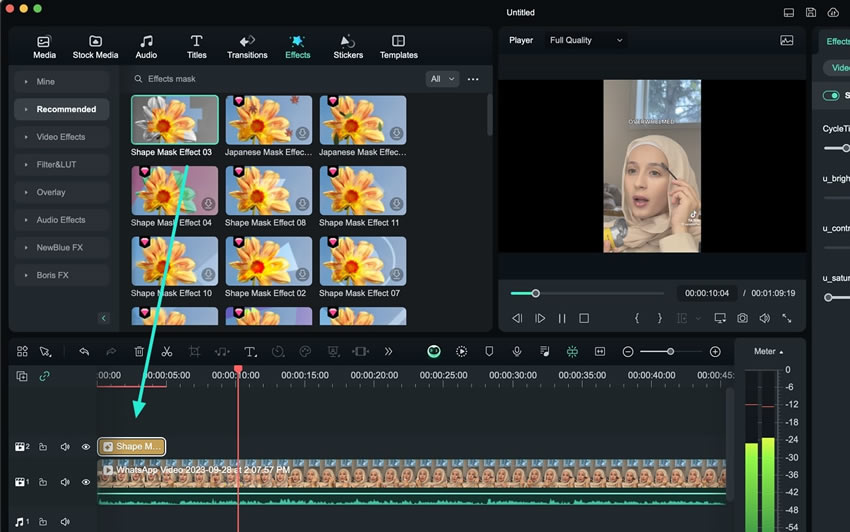
Step 7: Alternatively, find one of the app’s innumerable effects, filters, and LUTs by navigating to the Effects tab and searching for the effect, filter, or LUT you want.
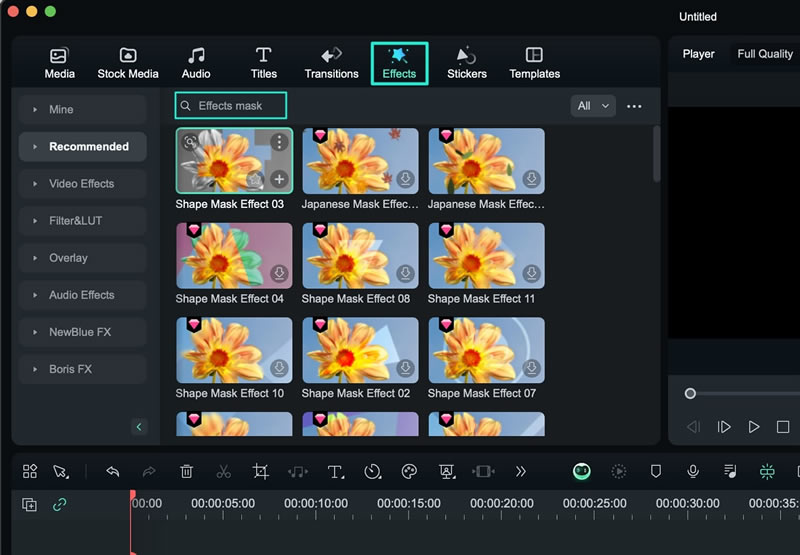
Step 8: Apply the located effect, filter, or LUT by dragging it onto the video in the Timeline.
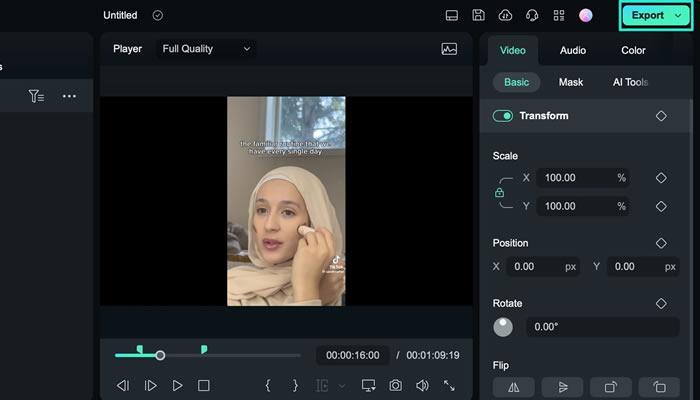
Step 9: When satisfied with the color correction changes, hit the Export button at the top right to save the final video.
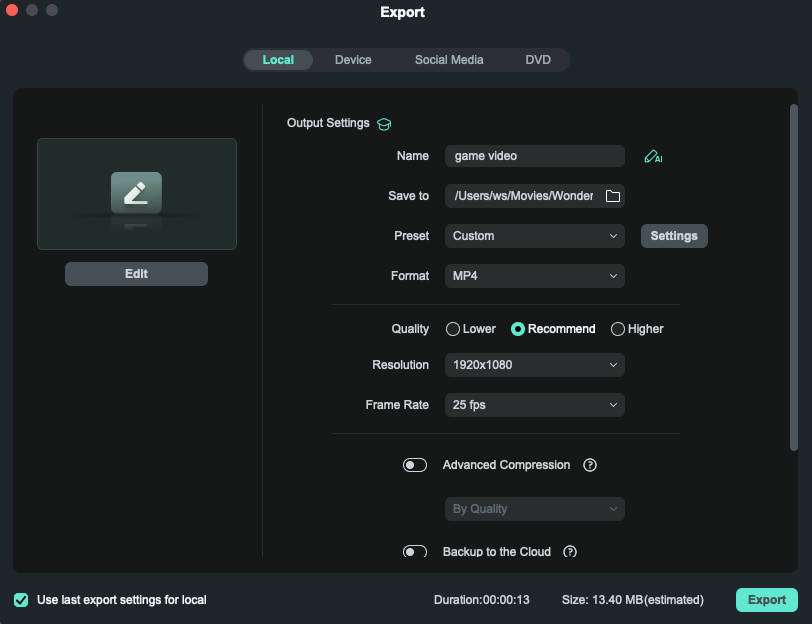
Step 10: Adjust the export settings and click the Export button again to save the color-corrected video to your Mac.
Filmora’s manual color corrections include options like the histogram, white balance, 3D LUT, color settings with vibrance, saturation, contrast, brightness, and exposure, light options such as highlights, shadows, blacks, and whites, HSL settings, vignette, and more.
The video editing software recently received additional AI tools like PreCut, KeyMatrix, and Copilot. These tools complement Filmora’s existing video tools, AI features, and color correction options and allow users to describe what they want to achieve to be guided in the app.
Conclusion
Color Finale is a powerful plugin for Final Cut Pro and one of Mac users’ favorite color grading and correction tools. The plugin significantly enhances Final Cut Pro’s color correction functionality, adding more color grading tools, layers, masking options, presets, and LUTs. At the same time, the Color Finale Transcoder also adds RAW media support to the video editing software.
However, Final Cut Pro equipped with the Color Finale plugin isn’t your only option to handle color corrections and grading on Mac.
Third-party video editing software like Wondershare Filmora is a fantastic Color Finale alternative. It doesn’t suffer from the same drawbacks that Color Finale suffers, as all of Filmora’s tools and effects are built-in, instead of relying on unstable plugins that often cause crashes and bugs on macOS.
The app has extensive libraries of audio/video effects, animations, transitions, presets, and LUTs. Its numerous AI-enhanced features make it a powerful video editing solution and a worthy Color Finale alternative for Mac users.


 100% Security Verified | No Subscription Required | No Malware

