Many professional editors add different types of blur effects to their videos for more enhancements. By adding a suitable blur effect, you can make your video stand out. One of the famous blur effects is the Gaussian blur effect, through which you can smoothen your video efficiently.
To add this effect, you can trust the well-recognized tool such as Adobe Premiere Pro. Thus, by reading this article, you can learn how to create Gaussian blur in Premiere Pro proficiently.
In this article
Part 1: What is Gaussian Blur?
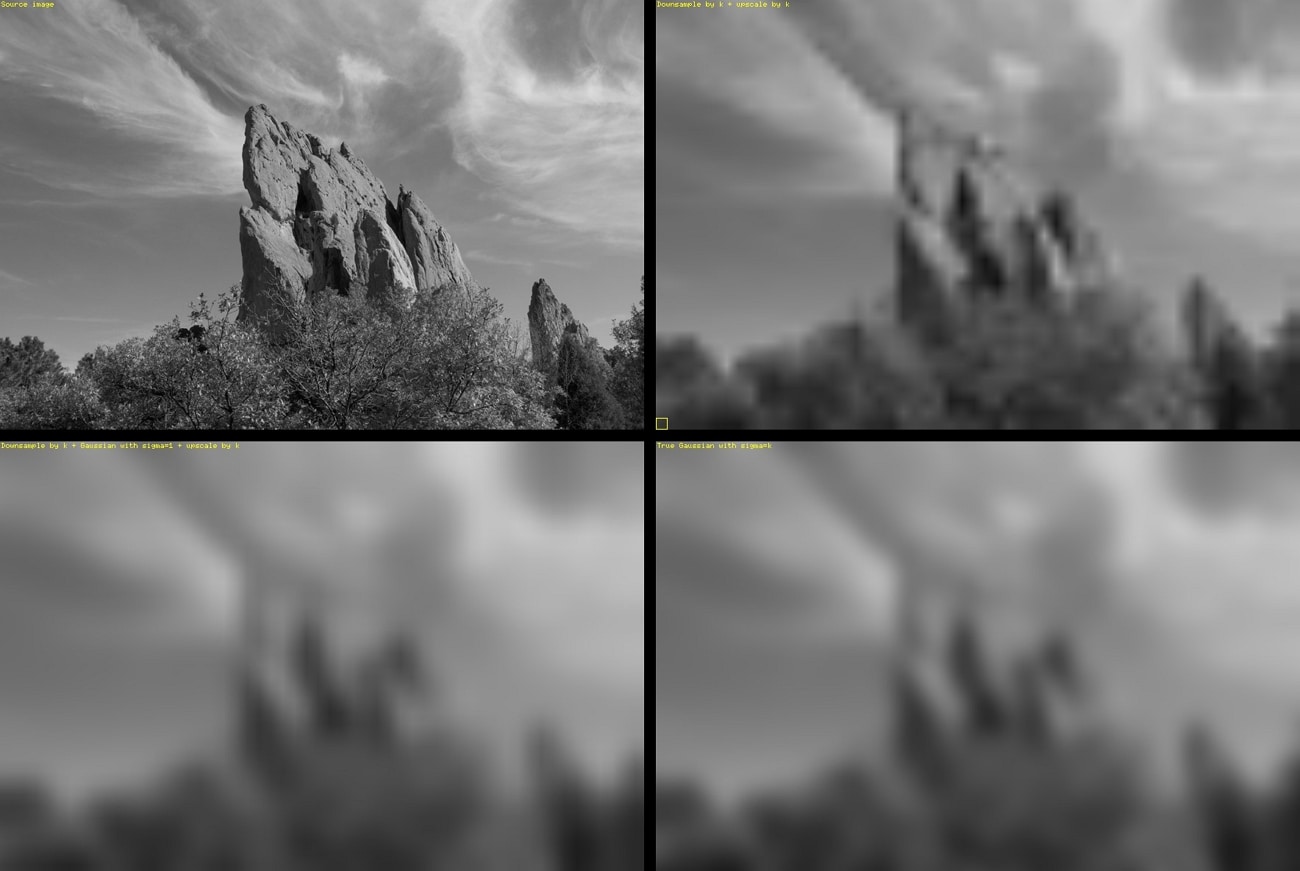
You can apply the Gaussian Blur Effect if you want to soften an image or video. This blur effect was named after a mathematician known as Carl Friedrich Gauss. The Gaussian Blur Effect eliminates the extreme outliers that help in soften the uneven pixels. Hence, it’s a high-end blur effect through which you can eradicate the noise from your video instantly.
Part 2: What Can the Gaussian Blur Be Used For?
In the post-production of videos, many content creators and professionals use the Gaussian blur effect. You can add the Gaussian blur effect to your captured videos within a few clicks. To know about more benefits of the Gaussian blur effect, proceed to the following section:
1. Image Denoising
Image noise can be produced in your videos due to the interference of random signals. These random signals and pixels disturb the human eye in processing the image information. Thus, it can create a bad impression when noise is present in your videos or pictures. To resolve this issue accurately, professionals recommend using the Gaussian blur effect. By adding this effect, you can quickly erase the noise from your videos without any hassle.
2. Add a Natural Transition to Videos
The Gaussian blur effect does not destroy the original harmony of the picture. It adds an average blur to the picture that does not make the video look artificial. Thus, this special blur effect adds a natural transition to the videos effortlessly.
Part 3: How to Create Gaussian Blur Effect in Premiere Pro?
Have you ever used Adobe Premiere Pro? This professional and well-trusted platform is widely used to edit high-end videos using advanced options. On this tool, you can open and edit any video file format, such as 8K and virtual reality. You can add engaging intros and outros to your video clip using this industry-leading tool. Moreover, you can create captions for your videos precisely in your desired way.
Adobe Premiere Pro also allows you to color-correct the videos. You can adjust the elements such as saturation, contrast, hue, and brightness. Furthermore, you can add different types of blur effects, including the Gaussian blur effect. You can also add further alterations to your video file by adding text overlays and other graphics elements.
Steps to Add Gaussian Blur Effect Using Premiere Pro
Are you eager to know how to use Adobe Premiere Pro for Gaussian blur? Read this section to find out the authentic yet easy steps to create the Gaussian blur effect using Premiere Pro:
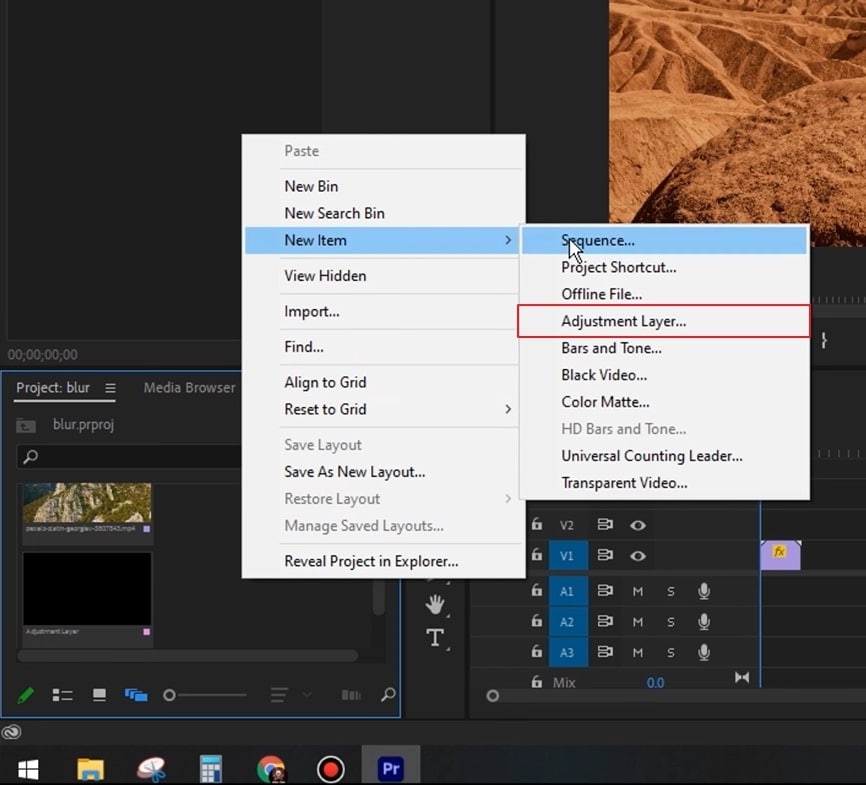
Step1 Proceed to Adobe Premiere Pro tool and upload the video in which you want to add the Gaussian blur effect. Afterward, double-click on the Project Media window and select "New Item." From there, click on "Adjustment Layer."
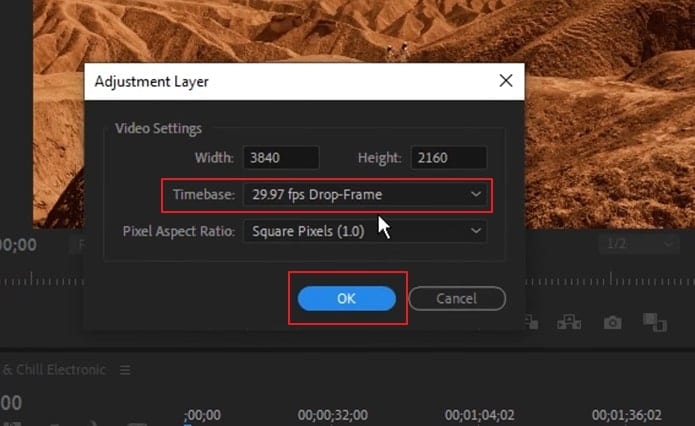
Step2 On the menu of the Adjustment Layer, change the timebase to 60 FPS. Press the “OK” button to proceed. Now add the created adjustment layer to the timeline right above the video clip. Extend it according to the video clip.
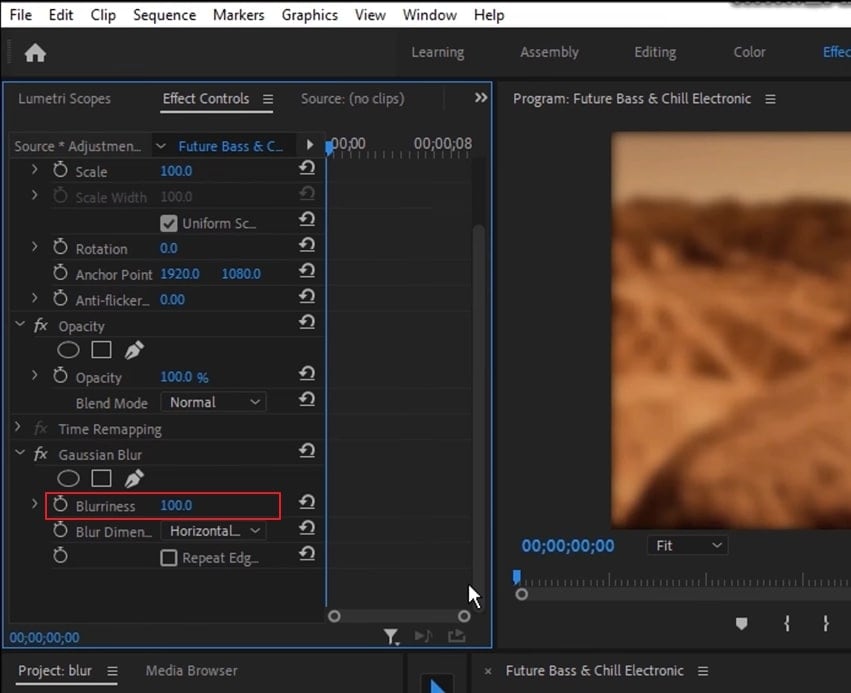
Step3 Now go to the “Effects” section and type “Gaussian” in its search box. From the results, drag and drop the Gaussian blur to the adjustment layer in the timeline. Now you will be able to see the effect controls section on the left side. From there, increase the “Blurriness” to 100%.
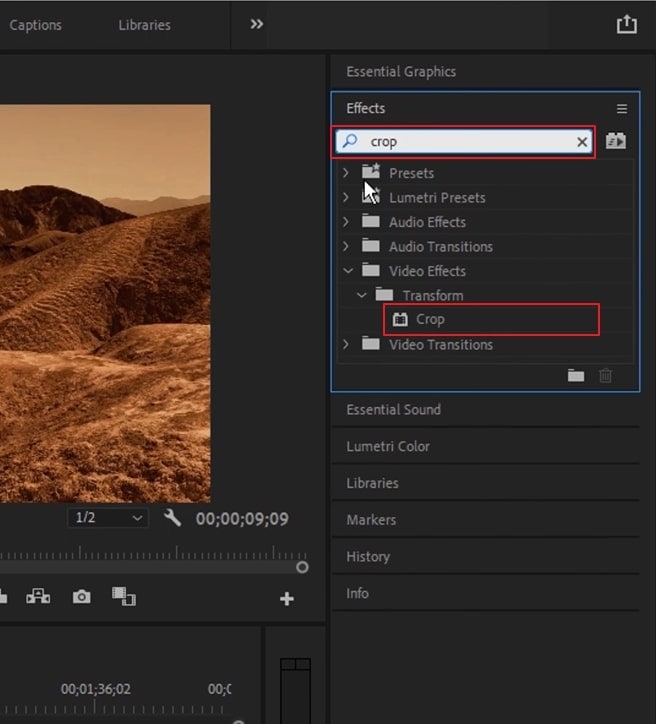
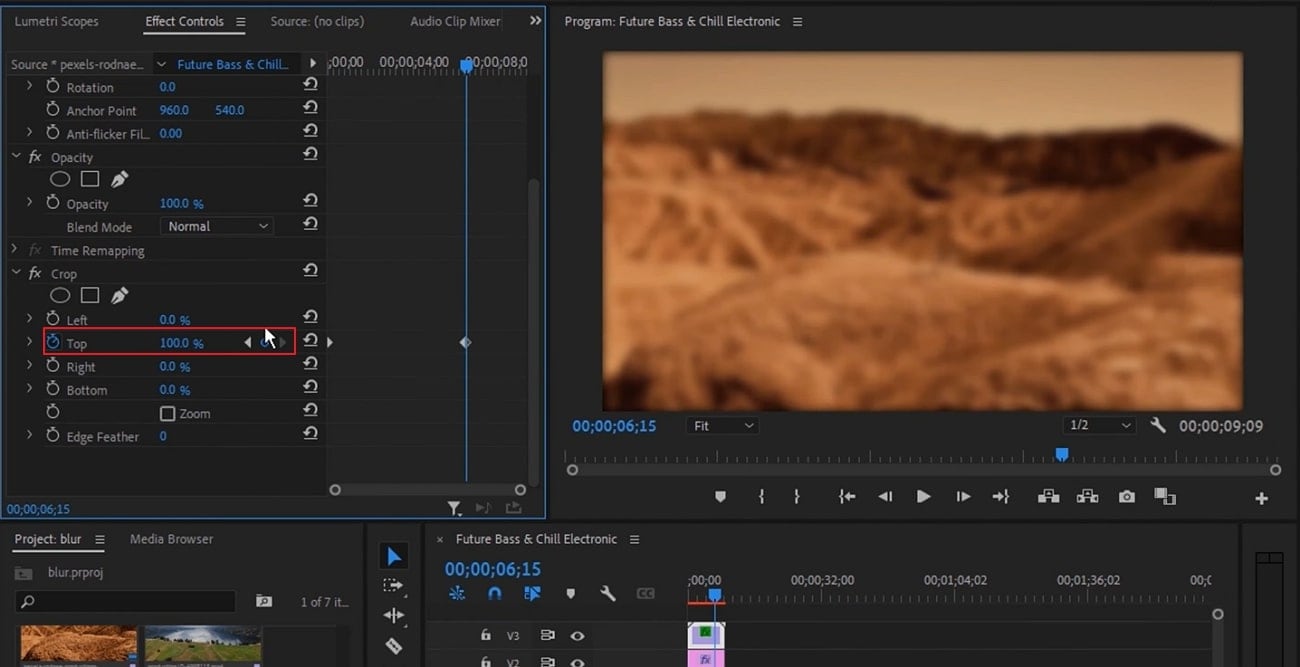
Step4 To create animation, copy your video clip and paste it above the adjustment layer. Head back to the effects section and search for “Crop." Apply it to the top-most video clip. From the left section, change the “Top” to 0%. Once done, turn on its toggle and move the play head a little bit.
Step5 Add a new keyframe and then change the “Top” to 100%. After rendering the video, you can see the final results in the preview window.
Bonus Tips – The Alternative to Premiere Pro to Create Gaussian Blur Effect
Many beginners may find the interface of Adobe Premiere Pro complicated to use. So, if you want to make the whole process of adding a Gaussian blur simple and smooth, try Wondershare Filmora. This compatible tool consists of various templates that you can use to get inspiration for creating videos. You can also add and sync music tracks to your videos efficiently through this easy-to-use tool.
It also contains several kinds of trending effects that can be easily applied to your videos. Also, it does not destroy the original quality of your video. Hence, you should try Filmora, as it has a clean interface that can produce quality results.
Steps to Create Gaussian Blur Effect Using Filmora
Do you want to create Gaussian Blur Effect in your video easily? Read the instructions below for creating it with Filmora:
Step1 Start New Filmora Project
Begin by launching Filmora enhanced video editor on your PC or MacBook. Now click on “Create New Project” and upload the preferred video clip on this tool.

Step2 Search for Square Blur
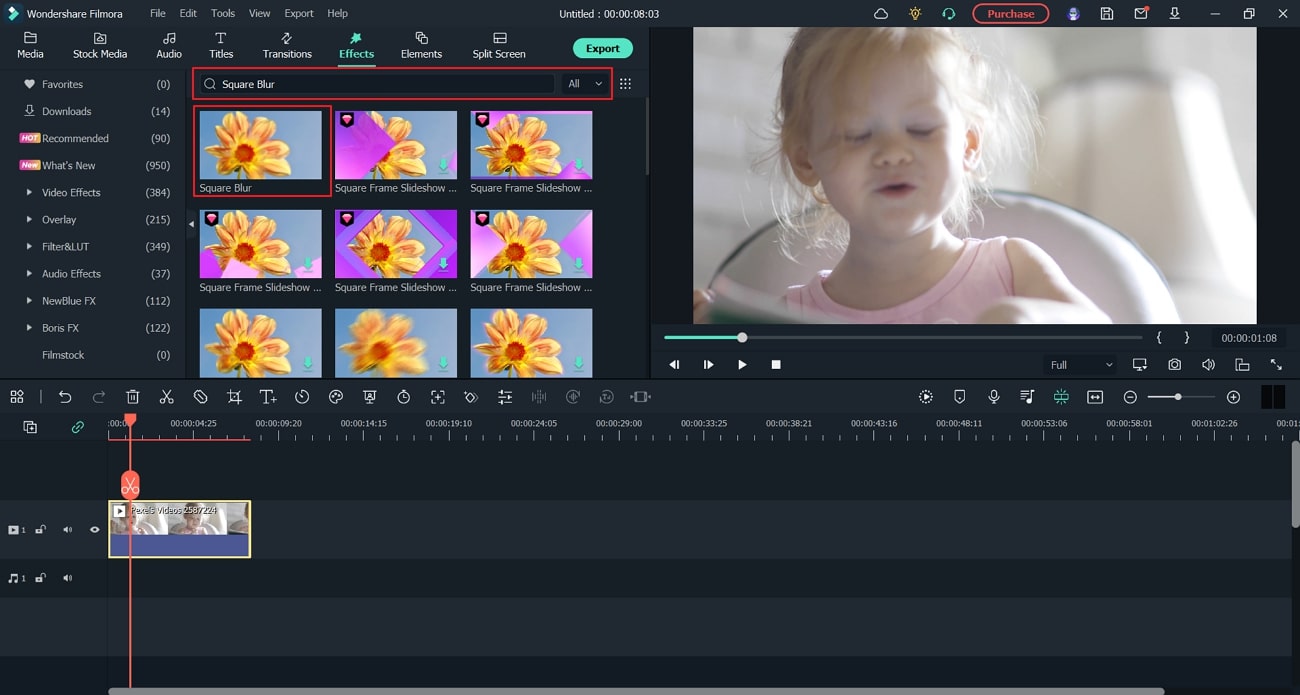
Following this, drag and drop the imported video on the timeline of Filmora. Afterward, head to the “Effects” tab and search for "Square Blur." From the results, select Square Blur and apply it to your video clip in the timeline.
Step3 Adjust the Blur Settings
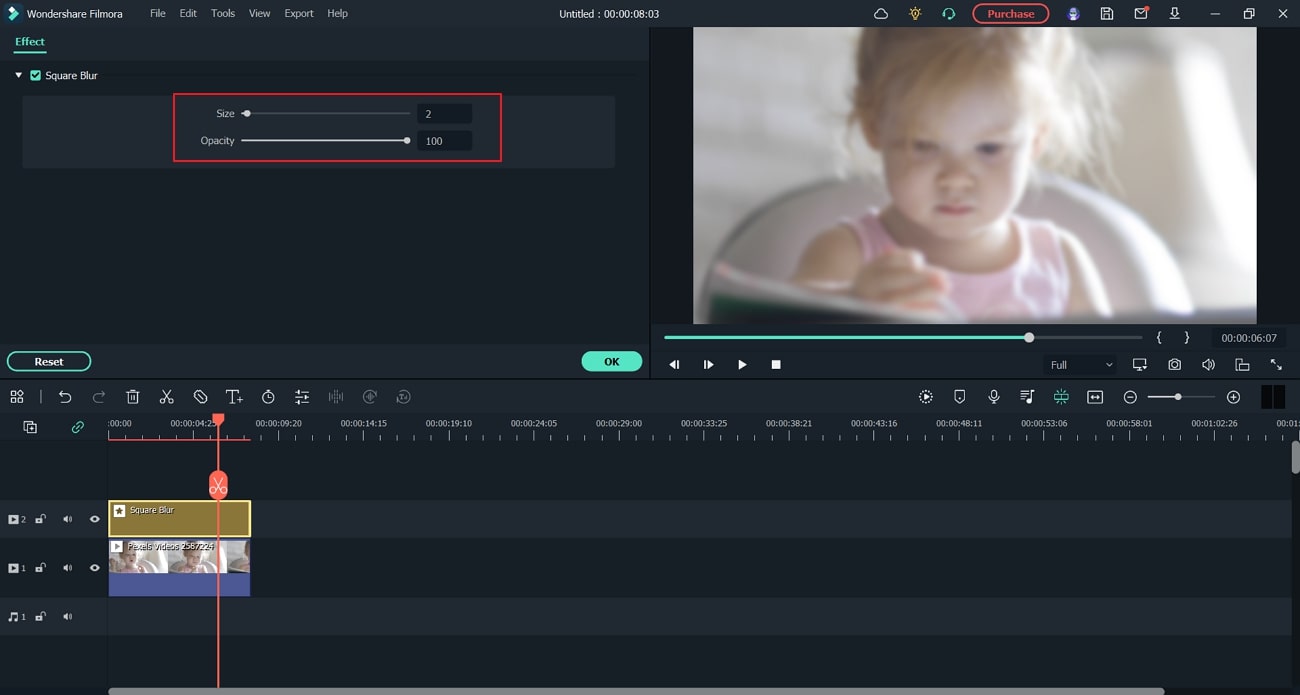
Double-click on the added effect to open its settings. Now you can change the “Opacity” and “Size” according to your preference. Once done, choose the “Export” button to save the video in the desired file format.
Conclusion
Being a professional, you should know the significance of various blur effects. This article has emphasized the Gaussian blur effect that can help you to remove noise from the videos. By reading this article, you can learn how to apply a Gaussian blur effect using Adobe Premiere Pro software. Moreover, we have also discussed Filmora as a better alternative to Adobe Premiere Pro for adding a Gaussian blur effect in the videos.


 100% Security Verified | No Subscription Required | No Malware

