GIMP is a cross-platform image editing software that you can use to edit photos and create graphics. The software is available for Linux, Windows, and macOS and can add a motion blur effect (A sense of movement in the photo), making your pictures look more realistic and professional.
So to help you tone your skills, we've written a comprehensive guide on how to apply the GIMP motion blur effect to your photos!
In this article
Part I. What Is GIMP?
GIMP software, a GNU Image Manipulation Program, is an open-source raster graphics editor used for image editing and retouching, converting between different image formats, free-form drawing, and more.
GIMP is frequently used as a Photoshop alternative. The software boasts a wide range of features, including support for layers, masks, color management, and third-party plugins.
Key Features
Here are some key features of the GIMP software:
- Quickly hide panels and menus to let you switch to a full-screen mode to preview pictures
- Fixes distorted images
- Available for Windows, Linux, Mac OS, and other operating systems
- Automatic image enhancement tool
- Lets you remove all the panels and tools from the workflow except the one you are working with.
- Released under a license called GNU General Public License v3 and later, which makes it free to use and distribute
- Add overlays and crop or resize an image
- Wide range of file formats that it can read and write, making it a versatile tool for working with images
Part II. How To Add The Motion Blur Effect To Your Photos in GIMP?
Below we’ve provided the step-by-step tutorial to add a motion blur effect to your photos in GIMP:
Step1 In the first step, launch a browser on your device, head to the GIMP website, and download the installation file according to your operating system. Now, click the downloaded installer, install the software on your system and launch it.

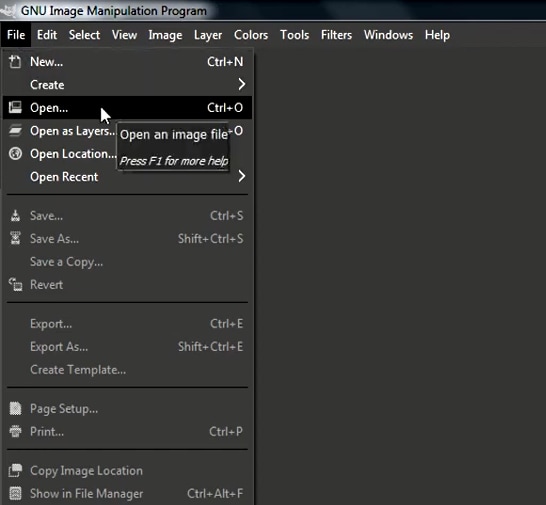
Step2 In the next step, click “File” on the GIMP dashboard, and select “Open” to access the Open Image window. Select your image file from your system and click “Open” to import the file.

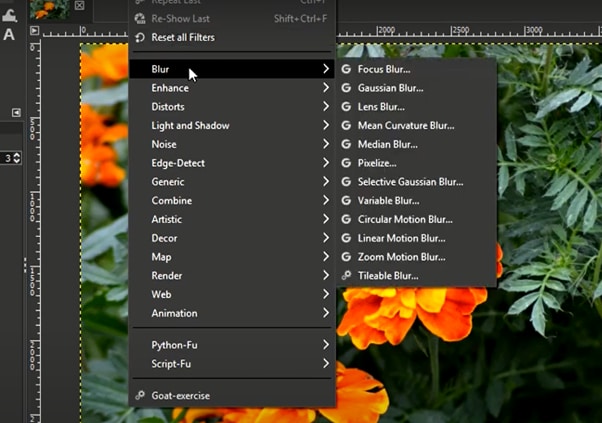
Step3 Next, click the “Filters” option from the top toolbar, select “Blur,” and choose “Motion Blur” from the drop-down menu. A dialogue box will now open where you can preview the effect and adjust the settings, including Blur Type, Blur Center, and Blur Parameters.

Step4 Once you are satisfied with your changes, click “OK” to apply the effect to the image, and make some other edits if needed. Finally, click “File” from the top toolbar, choose “Export As,” click “File Type” to select the format, and select the “Export” option to save your file.
Bonus Tips – The Alternative To GIMP To Create Motion Blur Effect
GIMP is a popular image editor that you can use to create motion blur effects. However, some users find it difficult to use the software for this purpose.
To simplify the process, we recommend using Wondershare Filmora an all-in-one editing software that offers multiple advanced features to help you quickly enhance your project.
Here’s why Filmora is the best alternative to GIMP for creating motion blur effects:
- A user-friendly interface where you can quickly create the motion blur effect without spending hours learning the process
- Advanced video editing tools, such as keyframing, speed ramping, green screen, title editing, motion tracking, screen recorder, and preset templates
- Royalty-free music library where you can access millions of music and soundtracks
- Adds the motion blur effect to your videos as well as images
- Comes with multiple parameters to adjust the effect on your clip or image
To add the radial blur effect to images using Filmora, here are the quick and easy-to-follow steps:
Step1 Download the Filmora software on your PC, launch it, and click “Create New Project” on the main panel. Use the “Click Here to Import your Media File” option to import your photo and drag and drop it into the timeline.

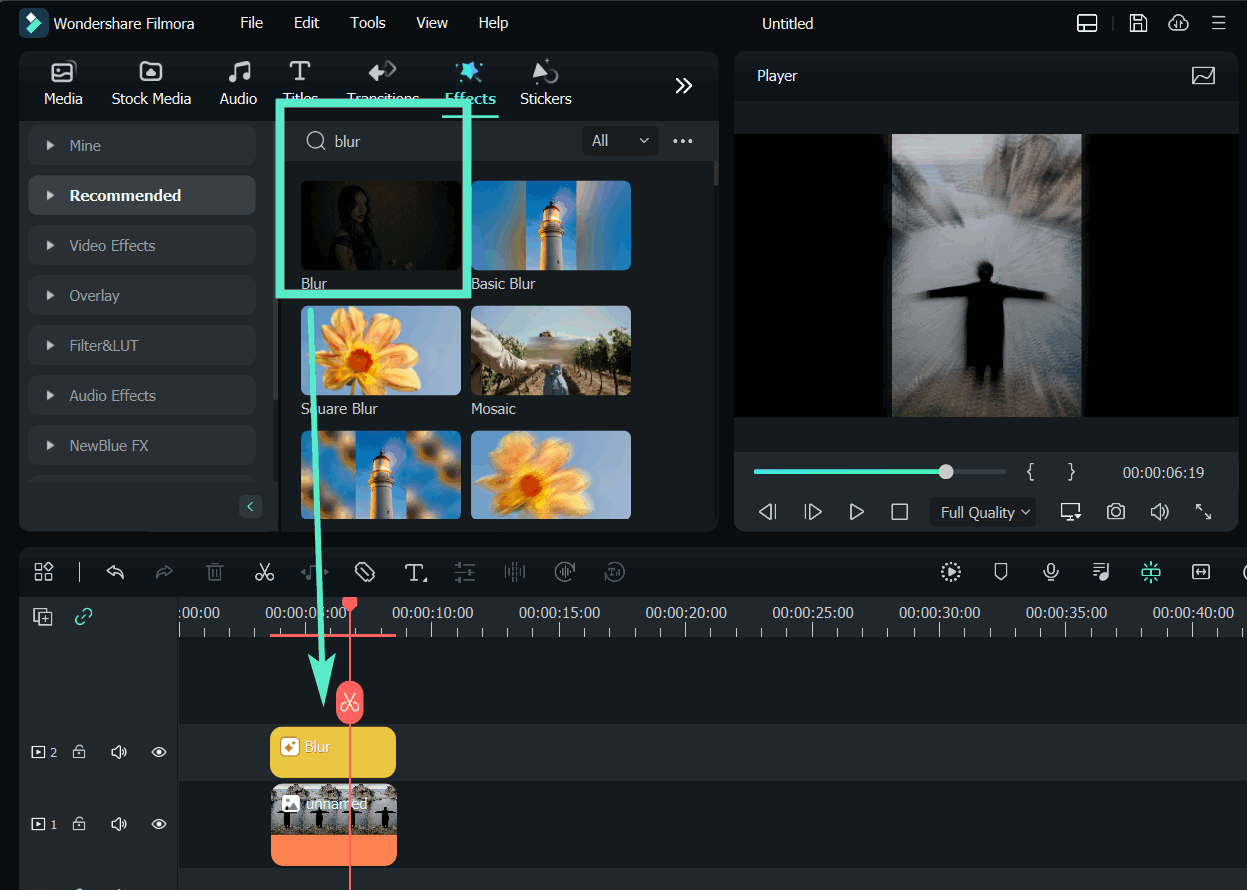
Step2 Now, head to the “Effects” tab from the taskbar. Use the search option to find the Blur effect. Afterward, drag & drop it in the timeline and adjust it on your selected clip.

Step3 Please note that motion blur is now a dynamic effect on the image. That means you can add multiple photos and make them into a slideshow with a blur effect transition. Or, press the “Play” icon to preview your photo and pause the clip where you think motion blur works best.
Step4 Click the effect in the timeline to open its settings. Now, play your clip to preview and adjust the parameters as you want to smooth down the motion effect.
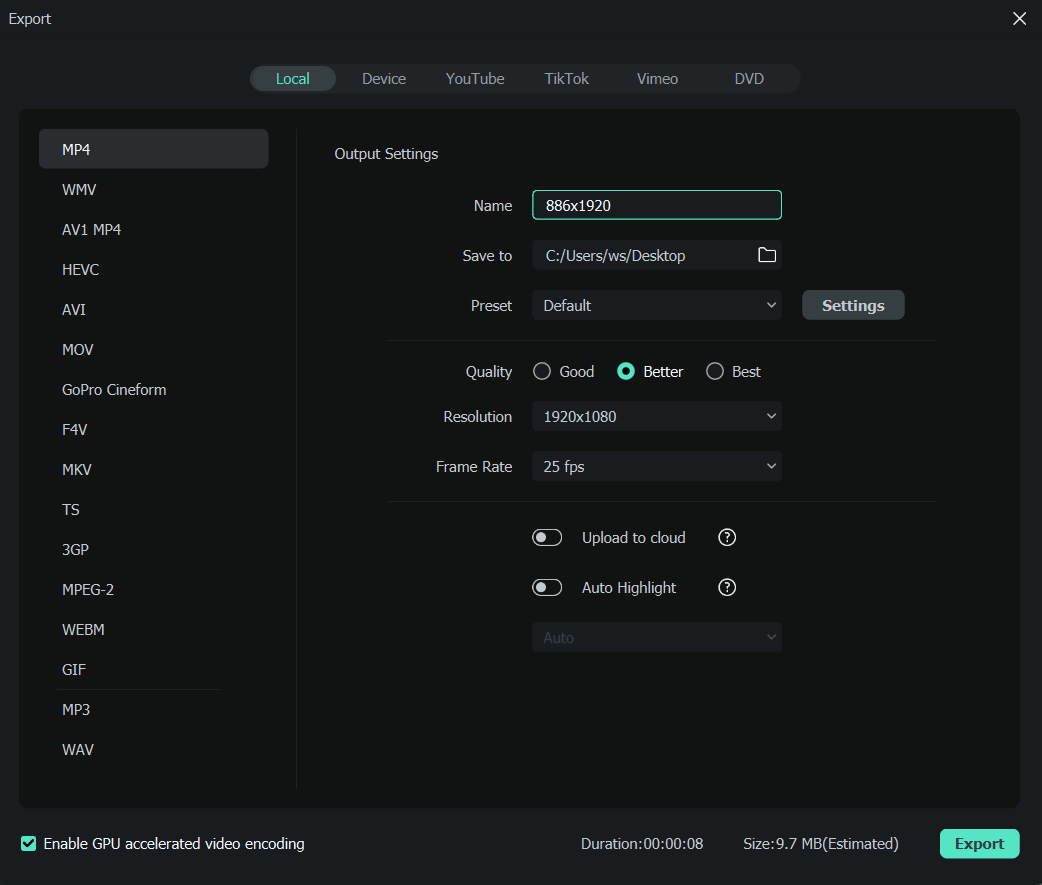
Step5 Once satisfied with the outcome, click the "Export" option, go to the "Local" tab, select a file format to save the images, and click "Export" again to save your project.

Filmora offers many export options, such as your device, YouTube, Vimeo, and DVD, with just a few clicks.
Last Words
In this detailed tutorial, we’ve discussed what GIMP is and its key features. We’ve provided a step-by-step guide to walk you through the process of creating the motion blur effect using the GIMP software.
In addition, we’ve provided a bonus tip to recommend Filmora as the best alternative to GIMP for creating the motion blur effect.
Hopefully, you found this article helpful in resolving your queries, and you can now add a smooth motion blur effect to your images.


 100% Security Verified | No Subscription Required | No Malware

