 100% Security Verified | No Subscription Required | No Malware

In order to make it simple to combine the shot's components into a sequence, video overlays are pieces of film that are often recorded in a dark studio. Using image overlays on a video production is fairly frequent. However, adding pictures to every video you export might be tiresome and time-consuming if you have several films to send. For instance, an overlay video in Premiere Pro might be preferred by you rather than a manual addition of the overlay media.
There is a quick and easy method to know how to overlay a video on a video in Premiere Pro and we've got it covered. However, depending on the kind of element, there may be some color blending that affects the components themselves. Overlays may be filmed on either a green screen or a blue screen. Snow components photographed against a green screen may have a green hue shift, necessitating further color grading before the footage might be used.
In this article
Part 1. Step-by-Step: How to Add and Layer Videos in Premiere Pro
Videos sometimes need a splash of color to elevate them. With the built-in color effects in Adobe Premiere Pro, you can apply overlays to any video, whether you want to add a little drama to a clip or a splash of color to a social media post. We'll demonstrate how to overlay videos in this article. To liven up your intros, make your outros stand out, and spruce up your summer social media posts, add a gradient video overlay effect. Adobe Premiere Pro and gorgeous video clips are all you need.
Steps to Overlay Video in Premiere Pro
Step1Activate Premiere Pro
To build a new sequence, start a new project in Premiere, import your footage, then drag your clip onto the timeline. The clip's parameters will be reflected in the sequence.

Step2Select Overlay Effect
Secondly, choose the Effects workspace (located near the top of your window). This will guarantee that the tools we need are accessible. Alternately, you may go to Window > Workspaces > Effects.

Step3Create a layer of adjustments
Go to File > New > Adjustment Layer to begin. Make sure your Project panel is chosen if the option is not accessible. Your clip and sequence will show up in your Project panel with the adjustment layer. Add the timeline with the adjustment layer selected.

Step4Create the Video Overlay
Transitions, generators, audio effects, and video effects are all included under the Effects panel. We'll begin by selecting the 4-Color Gradient from the "Generate" folder, which contains generators for patterns and gradients, to produce the video overlay effect. Right-click on the adjustment layer in the timeline and drag the appropriate effect there.

Step5Change the Effect Control
In the Effect Controls panel, you may manage and adjust effects. You may change the default effect settings for each element in your timeline, such as size and opacity, under the Effect Controls panel along with any additional effects you've added. To access an item's effect controls, click on it in the timeline.

By selecting the ‘Show all properties' next to the adjustment layer in your timeline, you can get a before-and-after comparison. Increase the value by selecting "blend with original." To change the effect's strength, move this up and down.
Step6Save the Project
Try switching the linear mode to radial. You can make a color transition for circles by doing this. You will be able to highlight various things with color after this transition. The circle's starting point may be animated to follow a certain item in the scene.

To the right of the Presets drop-down menu, choose the Auto Save button. Check the Save Effects Settings box when the Choose a Name dialog box appears. Future exports made with this preset will automatically take into account any Image Overlay settings you've configured.
Part 2. Premiere Pro Easy Alternative to Overlay Video [Filmora]
Any professional video editor may be interested in it since it offers the strength, complexity, and adaptability they need. Users need to be well-versed in a variety of editing techniques in order to use the tools properly. Therefore, it's not really the best option for a novice or someone who hasn't mastered video editing. We advise using Filmora as a substitute because of this. It is user-friendly for all users and is crammed with numerous theme effects shops to spruce up your video effects, such as transitions, filters, overlays, titles, etc.
| Feature | Filmora | Premiere Pro |
| Workflow | Direct drag/drop, PIP icon (mobile). | Adjustment layers, Effects workspace. |
| Ease of Use | Simple, user-friendly, quick application. | Multi-step, requires more concept understanding. |
| Overlay Content Sources | Built-in library, AI-generated assets. | Adobe Stock, external import. |
| Best For | Beginners, casual creators, quick small-to-medium project production. | Professional editors, complex projects, demanding precise control. |
Filmora is a powerful and creative video editing program that is really simple to use. With a wide variety of sophisticated video editing tools, Filmora boasts a highly user-friendly interface. Both novice and experienced video editors may utilize the many creative features that Filmora offers. Filmora is the best option if you're looking for a video editing program that's not only inexpensive but also offers a variety of features and functions. The program not only has a fantastic user interface, but it also offers strong capabilities that let video editors create precisely the films they desire.

 secure download

Steps to Use Filmora to Overlay Videos:
Step1Launch Filmora
Run the software and switch to Video editor mode. Next, add the image or movie to the media library. Now drag and drop the primary video into the video track or click the "Import Media" button to add it.

Step2Import Media to Overlay
Find the image or video in the media library that you want to overlay over the backdrop video and right-click on it. The image or video overlay may be resized and positioned here as desired.

Step3Spice up with Effects
There are several choices available for adding extra effects to the video. By selecting the effect tab, you may look for more effects as well. The decision to switch to a green screen or include other components into the film is entirely up to you.

Step4Customize Effects and Save
Inside the Effects window, press Ok and once you have applied the required effects to see the modifications appear on the screen. You may also add element movements to make the video seem more entertaining. Once the editing and effect adding are complete, you may export the video on the go.
🤩 Posts You Might Be Interested In:
- How to Add Shapes In Premiere Pro: Step-By-Step With A Simpler Alternative
- Everything You Need To Know About Making a PhotoMontage
- Top 10 Best Free Image Overlay Apps for Android and iPhone
- How To Overlay Photos on a Computer (Desktop & Online)
How To Overlay Video in Filmora Mobile
You can layer videos anytime with your smartphone. The Filmora mobile app can help you combine clips for picture-in-picture effects or multi-angle views. It's great for quick touch-ups, spontaneous projects, or trend-driven content. You can edit anywhere without worrying about crashes or storage issues. While adding overlay in Premiere Pro is ideal for larger projects, Filmora makes it easy to create everyday videos.
secure download
Here's how to overlay a video with Filmora Mobile:
Step 1: Start a New Project and Import Video
Open the Filmora mobile app and tap the New Project button or the + icon. Select the primary video you want to use as the background and import it to the timeline. This will be the base layer of your project.
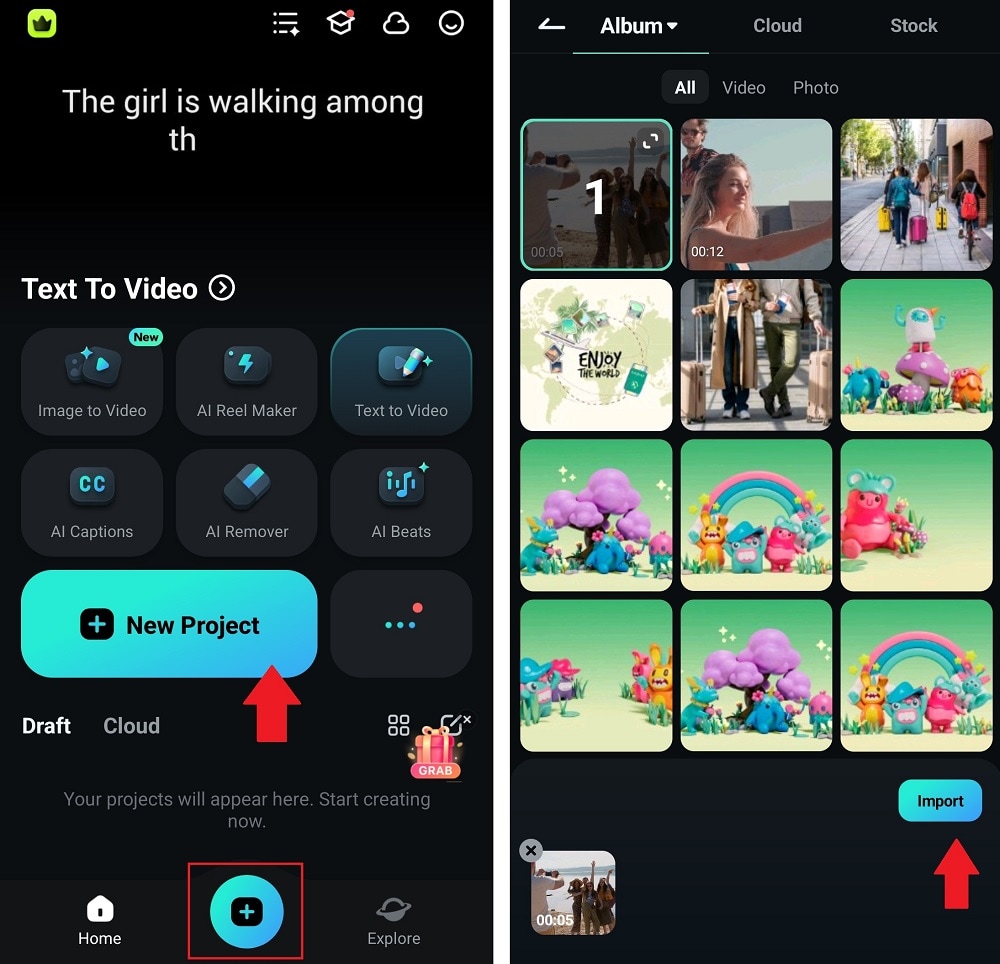
Step 2: Add the Overlay Video
Tap the PIP (Picture-in-Picture) icon from the bottom menu. Choose the video or photo you want to overlay, then tap the check icon to add it. The overlay clip will appear on a separate track below the main video in the timeline.
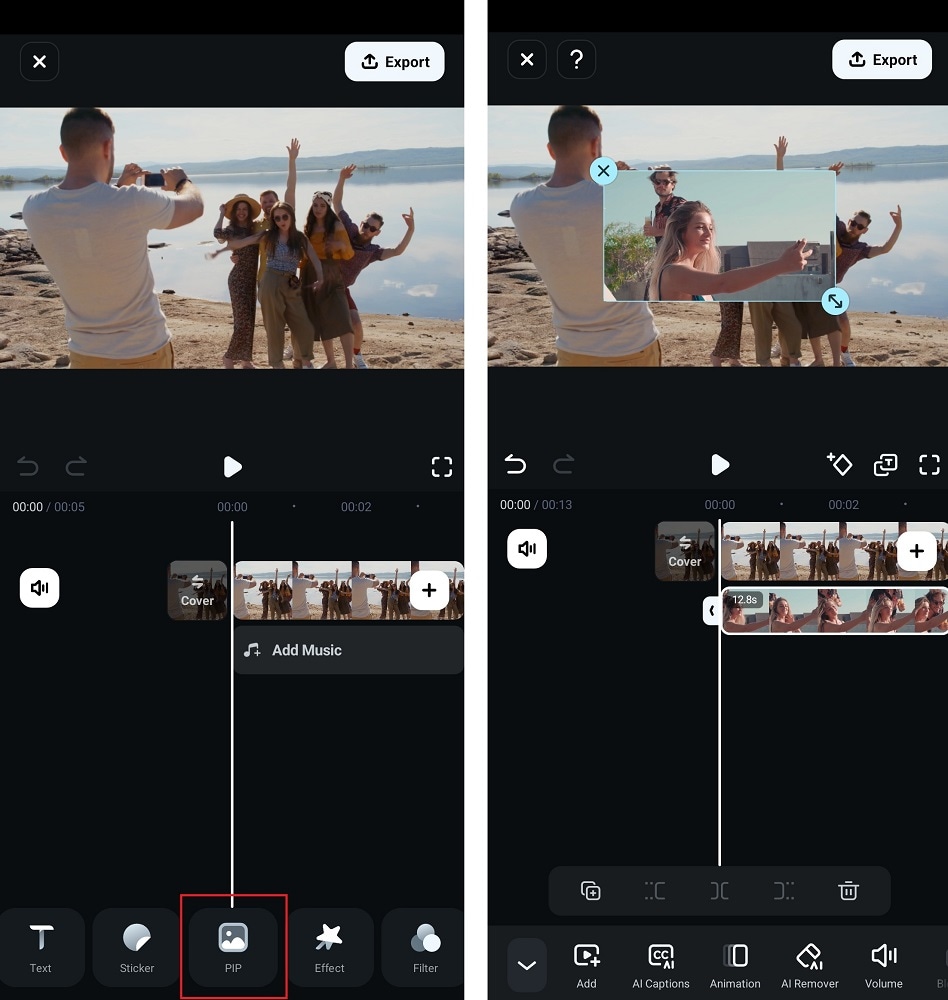
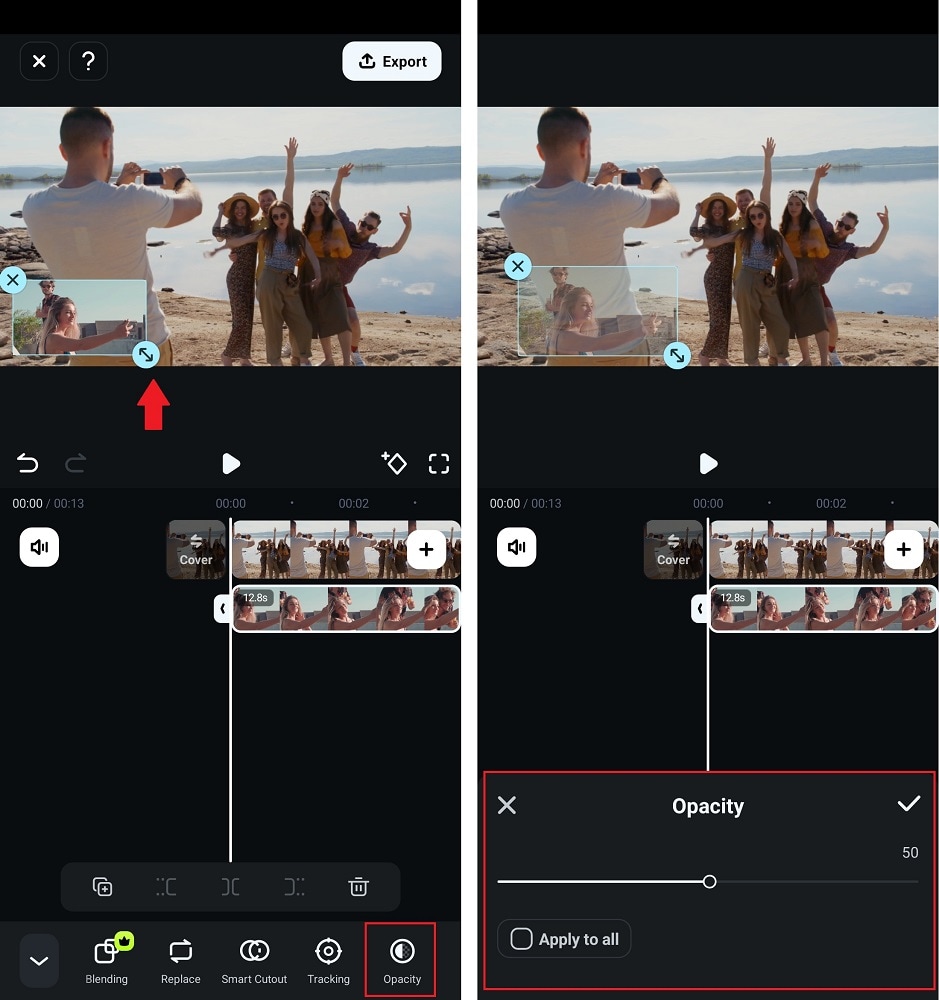
Step 3: Adjust the Overlay and Export
Pinch the overlay clip on the preview window to resize or move it. Then, put it in a corner for a picture-in-picture effect or center it for a blended look. For a full-screen overlay, enlarge the clip by pinching and stretching it in the preview window until it fills the screen.
Use the Opacity tool to adjust transparency or add effects and filters for more creative layering. Once satisfied, tap Export to save the video with an overlay to your phone.
Conclusion
An image or animation that you contribute to your movies as a video overlay will display below the video and cover the video. Overlay editing is the kind of editing that is most often utilized. It just covers over whatever is in the timeline at the location where you wish to add that clip. If necessary, you may also review the comprehensive instructions for adding images or movies as an overlay to a video, which helps in improving the video quality. With Filmora, video overlays allow for the sharing of additional information without interfering with the viewing of the video.
