Slow-motion videos are in trend on social media platforms. You can shoot the footage in slow-motion mode or slow it down while editing the video. Similarly, if you are making a funny video, there are surely going to be parts where the video speeds up. Sped-up video clips have always been part of comic relief and entertainment for the audience. You will need a feature-rich video editor to customize the speed of your video.
DaVinci Resolve has established itself as a complete video editor. You can edit your video, correct the color, add visual effects and edit audio parts. You can undoubtedly change video speed in DaVinci Resolve. However, DaVinci Resolve's user interface is slightly complex for beginners. We will instruct on how you can speed up a video using DaVinci Resolve. We will also suggest you an easier alternative if you are not in favor of DaVinci Resolve.
In this article
- Part 1. What are the Scenarios When You Need to Speed Up Video?
- Part 2. Speed Up Video using DaVinci Resolve
- Part 3. Pros and Cons
- Part 4. A Simpler Alternative to DaVinci Resolve to Change Video Speed
- Part 5. Change Speed with Filmora Mobile [Alternative for Mobile Devices]
- Part 6. Comparison Between DaVinci Resolve and Filmora
Part 1. What are the Scenarios When You Need to Speed Up Video?
There are several scenarios when speeding up a video becomes a necessity. Here are the most probable ones that you can relate to.
- Boring But Necessary Parts - There could be some sections in a long video that are necessary but boring to watch. You can't bore your viewers and let them leave your video midway. Hence, you can speed up those sections to pass them away quickly.
- Funny Videos - The subject's actions in the video look very funny when you speed them up. Therefore, if you make funny videos to entertain your viewers, speeding up certain sections of your video with funny audio in the background should be a regular thing.
- Short Videos - Short-duration videos are extremely popular on social media platforms.
- People upload them as Stories and Statuses to entertain their followers regularly. Therefore, a sped-up video can shorten the duration, accommodate the necessary content, and fit the video duration requirements of the respective social media platforms.
- Timelapse Videos - Timelapse videos are a treat to watch. You can shoot the video in timelapse mode or speed up the video while editing. That is how you can fit hours of a video into a few minutes or seconds of video duration.
Part 2. Speed Up Video using DaVinci Resolve
DaVinci Resolve is a professional video editor where you can change your video's speed in several ways. You can instantly change your video clip's speed by mentioning the speed in terms of percentage.
You can also use the advanced Speed Ramp option to customize the video speed unevenly. Besides, there are retime curves to adjust the video speed at your convenience. Let us go through the detailed guide on how to speed up the video in DaVinci Resolve 17.
Method 1. Change Clip Speed Option
The simplest way is through the Change Clip Speed option. You can explicitly mention the speed percentage as needed. To speed it up, mention speed percentage above 100. If you want to slow it down, the speed percentage will be below 100. Here are the steps you need to execute.
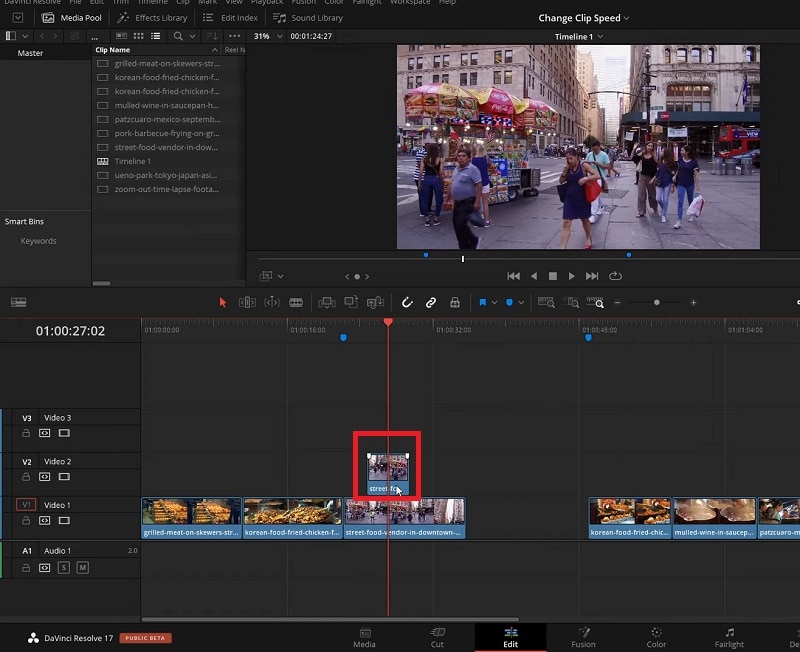
Step1 After you have placed the video clip onto the timeline, select the clip and right-click on it.
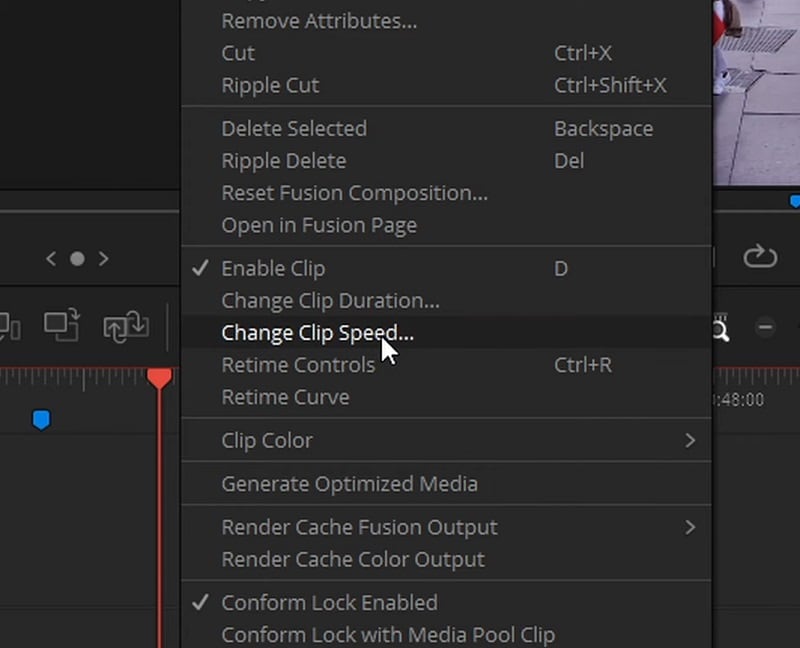
Step2 Tap "Change Clip Speed…" option.
Step3 Once the Change Clip Speed dialog box opens, modify the speed from 100% to something higher if you want to speed it up.
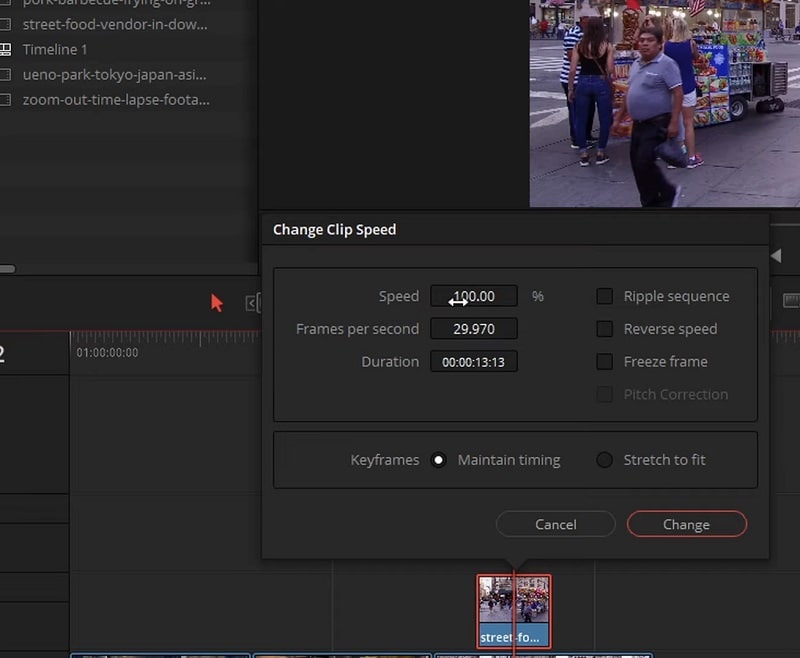
Step4 Click on the Change button when you are happy with the result.
Method 2. Speed Ramping Option
Speed ramping is a process where you can vary the speed of your video unevenly. It means you can speed up some portions while slowing down others. This is achieved through retime controls that let you edit the video clips in sections using speed points. Here are the steps to illustrate the process.
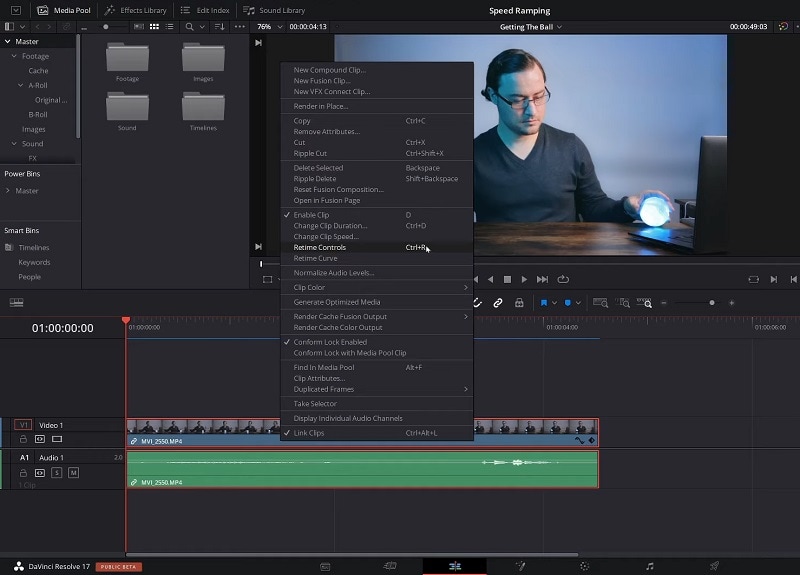
Step1 Right-click the video clip on your timeline. From the menu, select the Retime Controls option.
Step2 Move the play head where you want to change the speed. Click the arrow next to 100% and select the Add Speed Point option. Similarly, move the play head to another point and add a new speed point.
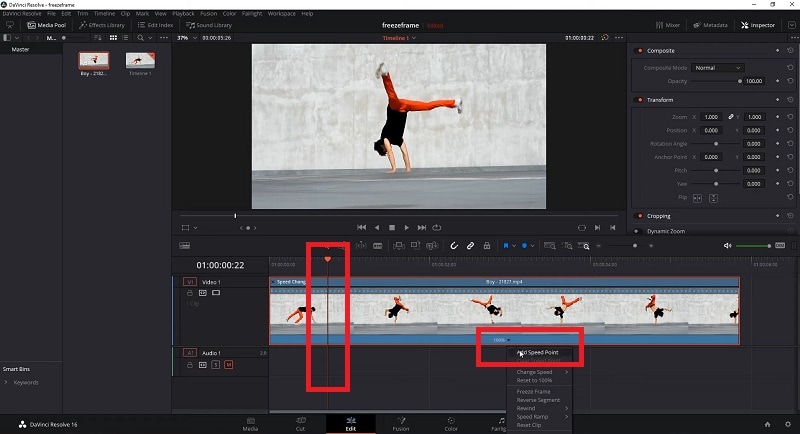
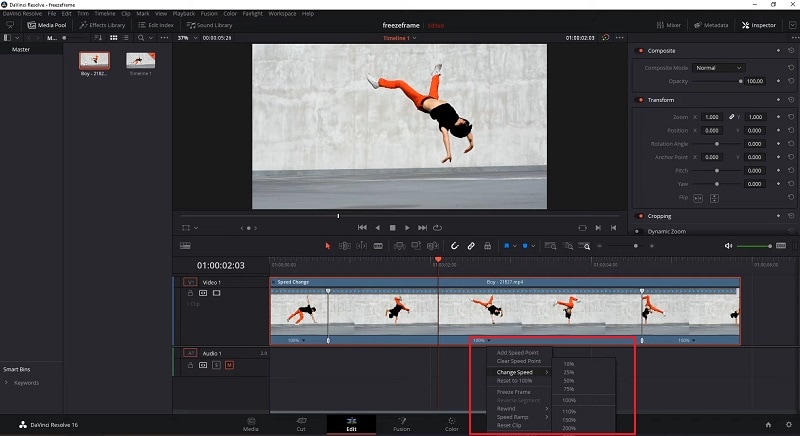
Step3 Click on the arrow next to 100% to change the speed between two-speed points. Go to the Change Speed option and select from the preset. Based on your preset speed selection, the video's speed within the speed points will change.
Part 3. Pros and Cons
Every video editor has its advantages as well as drawbacks. So if you think about changing video speed through DaVinci Resolve, check its pros and cons.
The cons are too grave to ignore. The learning curve is also steep too. Many look for an easier alternative to DaVinci Resolve speed ramp transition.
Part 4. A Simpler Alternative to DaVinci Resolve to Change Video Speed
Wondershare Filmora is perfectly suitable for you if you are looking for an easier alternative to DaVinci Resolve. Filmora comes with a simple user interface. You get almost the same features as you get in DaVinci Resolve as a video editor. Focusing on changing video speed, Filmora has similar options as DaVinci Resolve, but they are easier to operate.
Anyone can instantly change the speed of the entire or part of a video. There are uniform speed and simplified speed ramping options available for advanced users. You can customize the speed of a video clip as you need. There is not going to be any jittery motion when the speed is changed. In short, Filmora is tailor-made to fulfill all your demands for speeding up videos in easier steps.
How Do You Change Video Speed in Filmora?
There are basically three ways to change video speed in Filmora. You can choose from presets for instant change. You can customize the video speed as well as use speed ramping for an advanced level of video speed change. We will now illustrate how to change video speed in Wondershare Filmora.
Watch this video to discover all the methods to change video speed in Filmora.
Method 1. Select From Speed Presets
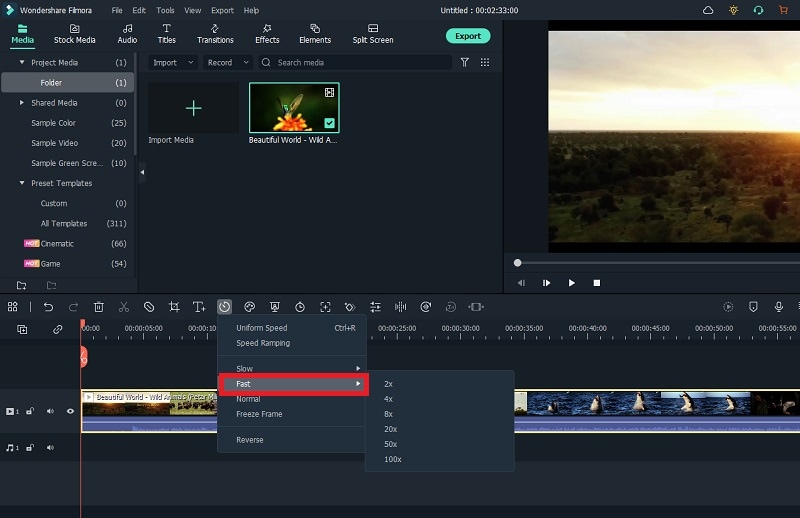
You can instantly select from Speed Presets if you want to change your video speed in fewer steps. There are fast speed presets as well as slow speed presets available. Follow these steps to choose a speed preset.
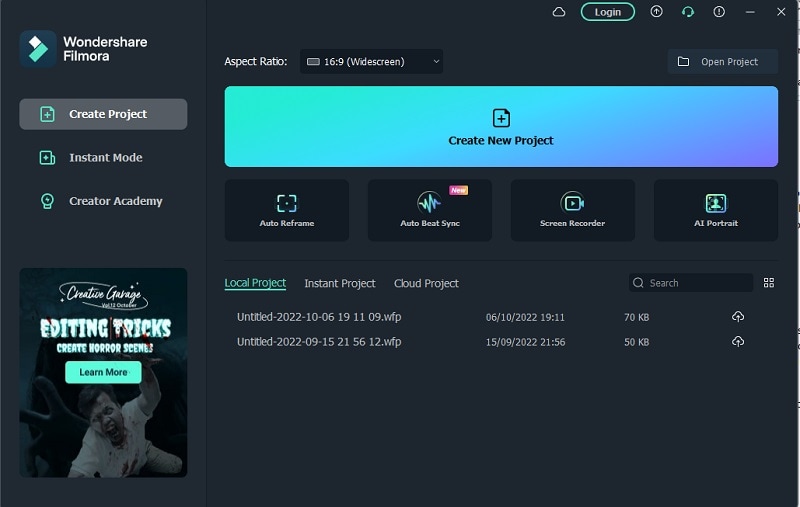
Step1 Install Filmora on your computer (Windows or macOS). Open Filmora and select Create New Project.
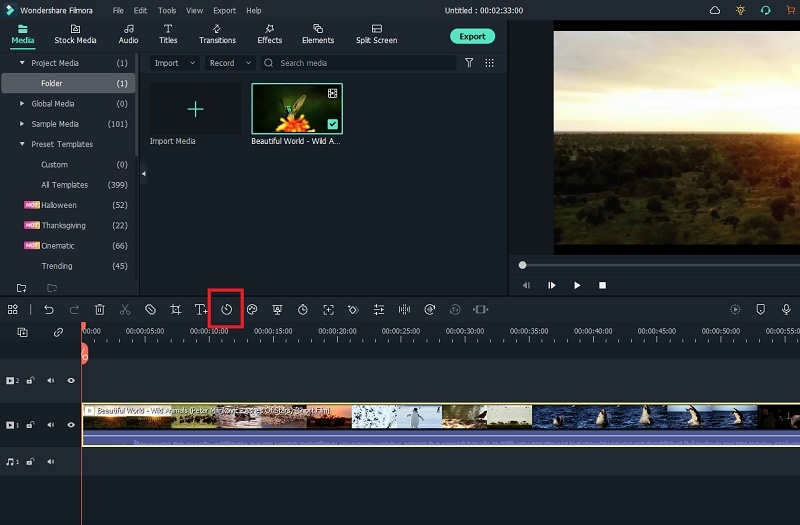
Step2 Drag the video file from your computer to Filmora's timeline. Choose video and tap Speed icon that you can find at the top of the timeline.
Step3 From the menu, go to the Fast or the Slow option and select a speed preset. Finally, you can export the file to save it to your computer.
Method 2. Alter Uniform Speed
If you want to customize the video speed as per your need, the Uniform Speed option is for you. You can select from 0.01X to 100X speed. The selected speed will be applicable to the entire video clip uniformly. Here are the steps to set uniform speed.
Step1 Once you have the video on the timeline, click on the Speed icon.
Step2 Choose the Uniform Speed option, which will open the Uniform Speed tab.
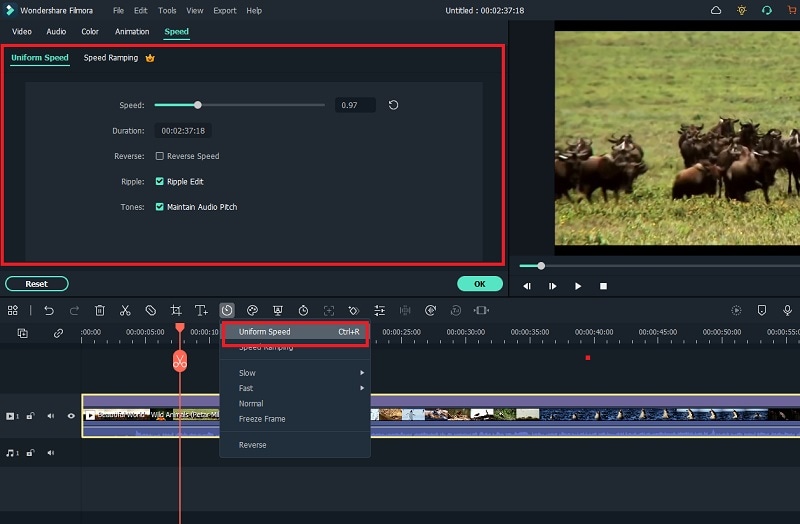
Step3 Adjust the speed slider to change the video speed as you need.
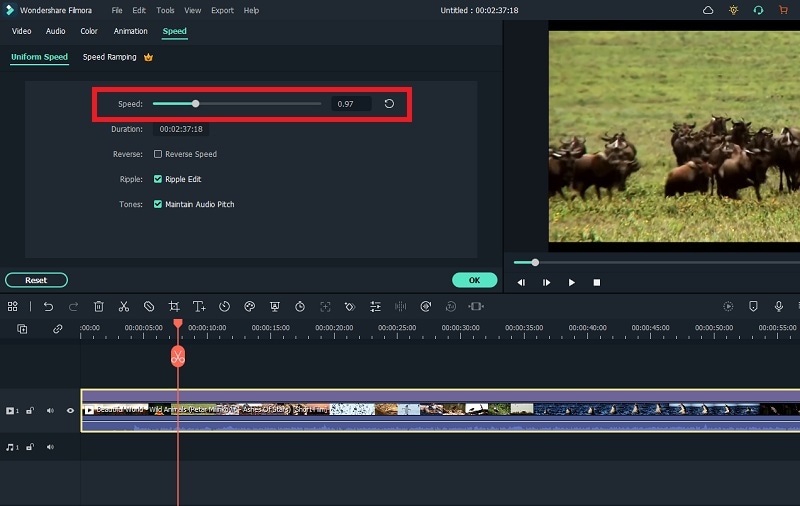
Step4 After setting the speed, click on the Ok button. Then you can export the video in any file format.
Method 3. Use Speed Ramping
Speed ramping provides you with a graph to customize the video speed. You can speed up and slow down different parts of your video as you think appropriate. As per the graph's crests and troughs, the video's speed varies. Here are the steps to execute.
Step1 Place the video file onto the timeline and go to the Speed icon.
Step2 Select the Speed Ramping option. This will open the Speed Ramping tab.
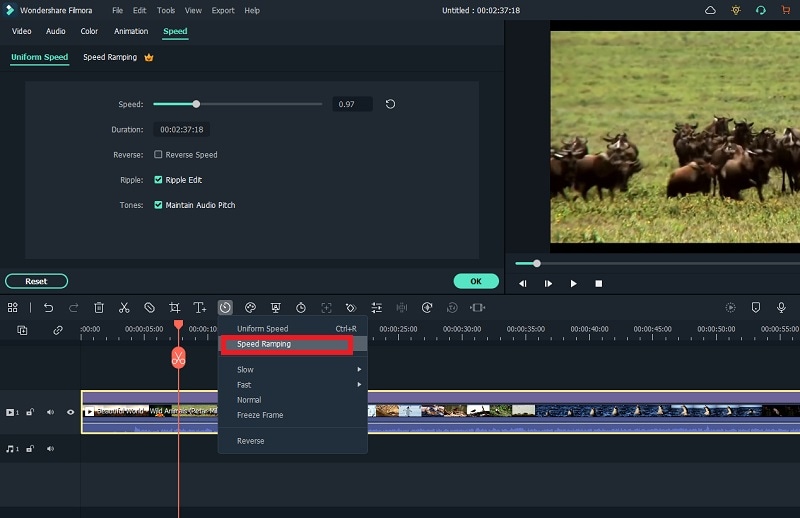
Step3 You can select any preset or select the Customize option. When you select the Customize option, you can edit the graph accordingly.
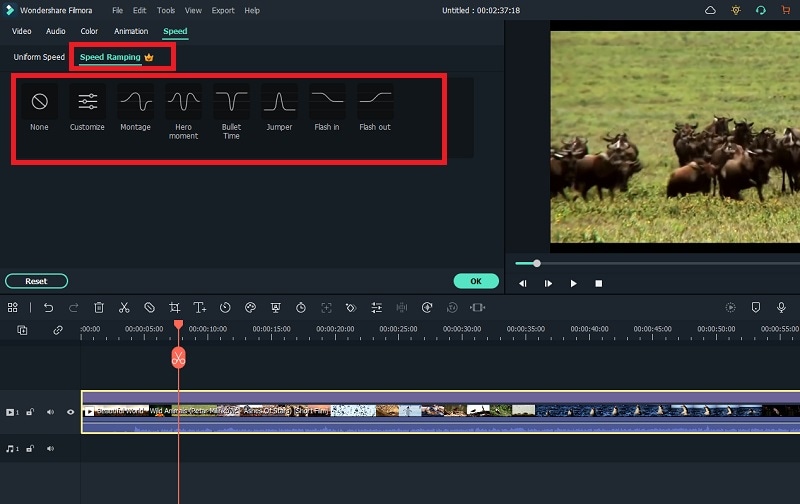
Step4 Click on the Ok button, followed by the Export button, to save the video.
Part 5. Change Speed with Filmora Mobile [Alternative for Mobile Devices]
DaVinci Resolve is a professional-grade video editing app used by professionals, but is desktop oriented with a steep learning curve. If you're in search of an easier mobile-friendly alternative to edit video speed, Filmora Mobile is an excellent choice.
It enables you to speed up or slow down videos effortlessly by just tapping repeatedly—no complicated options or costly equipment required. From trimming short video segments to polishing full movies, Filmora Mobile does this job effortlessly and stress-free.
Step1 Import your video
Launch Filmora Mobile and tap "New Project" or the "+" icon to start.
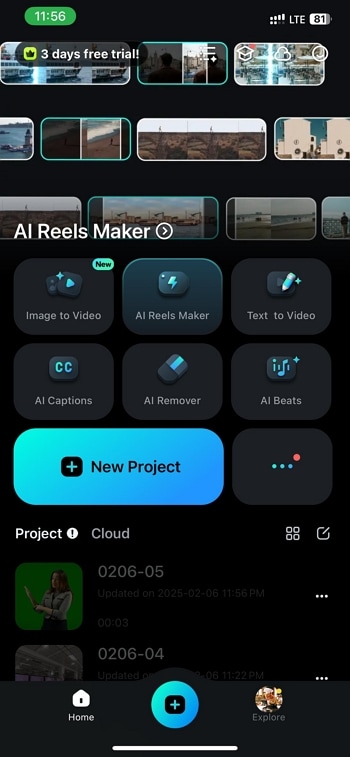
Choose the video from your gallery and tap "Import" to place it on the timeline.

Step2 Open the speed control tool
Tap on the "Trim" from the bottom toolbar to open the editing options.

Scroll through the toolbar and select "Speed" to access the speed adjustment settings.

Step3 Change the video speed
Adjust the speed slider to speed up or reduce playing speed. Pulling to the right speeds up the video whereas pulling to the left slows down the video.

Step4 Preview and save
Play the video to check the changes. Once you are satisfied with the result, tap "Export" to save your high-quality edited video.

For mobile users who need a quick and user-friendly way to adjust video speed, Filmora Mobile is a much more convenient alternative to DaVinci Resolve.
Part 6: Comparison Between DaVinci Resolve and Filmora
| Parameters | DaVinci Resolve | Filmora |
| Change Video Speed Options | Too Many | Appropriate |
| Video Speed Presets | Limited | Ample |
| Ease of Speed Change | Slightly Complicated | Very Easy |
| Export Options | Limited | Ample |
| Application Stability | Less stable | Highly stable |
| Average Rating | 3/5 | 4.5/5 |
| Pricing | High | Reasonable |
| Best For | Advanced video editors | Beginners and advanced video editors |
Conclusion
We have answered how you can use the speed ramp DaVinci Resolve 17 to speed up your video. We have also illustrated the steps to change speed settings in DaVinci Resolve. But many users look for an easier video editor to avoid DaVinci Resolve's complicacy. Wondershare Filmora is that intuitive video editor where you can change video speed as you need. You can instantly choose from presets and customize the video speed throughout.


 100% Security Verified | No Subscription Required | No Malware


