
 100% Security Verified | No Subscription Required | No Malware

We use LUTs to instantly elevate color grading from vintage to professional cinematic looks. While desktop software like Filmora offers the most power, the rise of social media has sparked a massive demand for fresh LUTs for VN on mobile. Many creators now seek a VN LUTs free download to level up their phone edits.
With apps like VN Editor, applying free cinematic LUTs for VN is simpler than ever. Ready to take your colors even further? Try Filmora to unlock advanced presets and creative tools that go beyond mobile limits!
In this article

Part 1: Your Free Cinematic VN LUTs Pack (Direct Download)
VN Editor is a great application that allows you to add or apply LUTs. With this tool, you can easily import your LUTs and apply them to your digital media. There are many VN LUTs available, both paid and free. Here is a list of some of the best paid and free LUTs that you can use in VN Editor.
1. Cinematic LUT by Alexey_P
Enhance your videos with the Cinematic LUT, giving them a professional and cinematic look. This LUT adds a touch of cinematic magic to your footage by highlighting rich and deep colors. The warm tones create a cinematic atmosphere, transporting your audience into a movie-like world. Furthermore, this is a suitable LUT pack for shooting a short film or a travel vlog.

2.5 Free Vintage LUTs
You can give your viewers a retro feel with this Vintage LUT pack. This LUT pack brings back the nostalgic charm of old photographs and videos. It provides a soft, warm color palette with desaturation tones, giving your videos a vintage look. Moreover, this pack offers five different vintage LUTs, that you can use for your media files. Additionally, you can recreate an old retro look using these LUTs.

3.Food LUTs
Make your food videos and photography look even more appetizing with this pack. These LUTs enhance your food's colors, making them vibrant and mouthwatering. Moreover, it brings out the natural hues of the ingredients, making them appear fresh. It is an excellent LUT pack, from showcasing culinary creations to sharing recipes or running a food blog.

4. Moody Video LUTs
Moody LUTs is an amazing color preset pack of 15 to create a moody and dramatic atmosphere. You can use this pack to add deep contrasts, shadows, and cool tones to your videos. In addition to this, it creates a sense of mystery and intensity with its color grading. It's perfect for storytelling, fashion shoots, or adding a touch of drama to your media content.

5. Night Sky Lightroom Presets and LUTs
It is an incredible color preset and LUTs pack to enhance the beauty of the night sky. This pack offers 10 LUTs for free and 25 LUTs in the paid version. It intensifies the greens, blues and adds a subtle glow to your digital media. Additionally, you can transform ordinary nighttime media into breathtaking moments. This pack will beautify your night sky by highlighting the details and enhancing the color tones.

Filmora now offers 100+ top-quality 3D LUTs cover a broad range of scenarios. Transform your videos with Filmora's powerful 3D LUTs.

Part 2: Filter for VN - LUTs Presets: A Great Option for LUT Editing in VN Editor
Introducing Filter for VN - LUTs Presets, an exceptional companion app for VN Editor. This companion application is available on Android devices. You can import LUTs directly into your VN Editor for color grading using this app. Furthermore, this app has a collection of over 1000 free LUTs. These LUTs are used as color presets to transform your media in different styles and tones.
Additionally, this app offers different LUTs for the night sky, cinematic look, and more. Similarly, there are many cinematic LUTs for VN video editing that you can use. Moreover, you can use diverse color filters to bring a fresh perspective to your stories. You can apply and use different color filters using this application. In addition to this, it even offers 4K support, ensuring ultra-high-definition and crisp videos.

Part 3: How to Add LUTs in VN Editor?
If you want to apply LUTs for VN Editor, then follow these steps. Following these simple steps, you can easily import, apply, and save LUTs using the VN Editor app.
Step1 Importing LUTs
Install the VN Editor and open the app to select the “+” icon, and a new window will appear. From there, you can choose the “Creation Kits” option to select “Filters.” After selecting the Filters option, go to the “My Filter” section. You will see the “Import Filter” button, which allows you to import your LUT from the desired location.

Step2Applying LUTs and Adjusting Intensity
After selecting your desired LUT, your LUT will be imported into the VN Editor. After that, you can find your desired LUT in the “Filters” section. You can select your LUT and apply it to your media file. Adjust the intensity of the LUT according to your preference.

Step3Saving the File
After making your adjustments, tap the “Save” button. Your file will be saved with the applied LUT and your desired modifications.

Part 4:Best alternative for VN LUTs – Filmora LUTs
You’ve tried various LUTs in VN Editor, but you might find some features a bit rigid or the process a little complex. In that case, why not try Filmora LUTs? It’s a more intuitive and powerful alternative, perfect for those who want to quickly elevate their videos. With a wide range of presets and customization options, Filmora allows you to easily create stunning effects. Now, let’s explore why Filmora LUTs are the perfect alternative to VN LUTs, and how they can enhance your VN LUT RSP editing experience to help you produce professional-level videos effortlessly!
How to preset LUTs in Filmora Desktop
Here are the steps on how to preset LUTs to your videos with Filmora.
Step1:Start by installing Wondershare Filmora and launching the editor. From the main interface, select 'New Project' to begin adding LUTs to your video.

 secure download

Step2:Next, import your video and drag it into the 'Timeline.' In the 'Color' section, toggle the 'LUT' option. From the 'LUT Presets,' choose your preferred preset, like 'NLog 709 Cinematic.

Step3:Adjust the intensity using the 'Strength' slider, then click 'Save as Custom' for future use. Once you're happy with the result, click 'Export' to finalize the process.

How to Apply Filters in Filmora Desktop
Filmora offers a wide range of video types and LUTs essential for all creators. Simply click on the filters to access the comprehensive LUT library. Let’s take a closer look.
Step1:Open your project, go to the Filters tab, and then select the filter that you want and add it to your project.
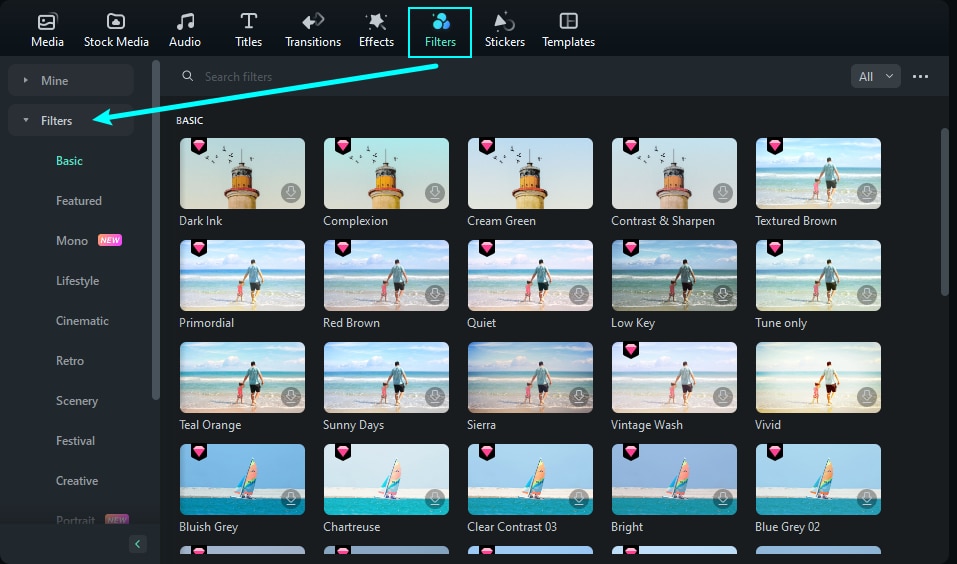
Step2:You can select the filter you want from categories like Cinematic, Portrait, Retro, and others, then drag it to the timeline.
 secure download
 How to Apply Filters in Filmora Mobile
Adding filters in Filmora Desktop is easy, but what about on mobile? Whether it's a travel vlog or a sudden burst of creative inspiration, Filmora Mobile allows you to effortlessly add stunning filters to your videos, instantly enhancing the effect!
Step1:Install Filmora, tap 'New Project,' import your video, select the 'Filter' tool, choose a filter, adjust intensity, and apply.

Step2:Preview the video, then click 'Export' in the top-right corner. Choose the resolution and frame rate, then hit 'Export' again to download the final video.

Filmora for Mobile Filmora for Mobile Filmora for Mobile Filmora for Mobile Filmora for Mobile
Edit Videos on Your Mobile Phone with 1-Click!
- • Powerful Brand New AI Features.
- • User-friendly video editing for beginners.
- • Full-featured video editing for professional.


