
 100% Security Verified | No Subscription Required | No Malware


 ChatGPT
 Perplexity
 Gemini
 Claude
 Grok
Grok

There are many ways to transition between scenes in cinema, and it is up to the director to make the final cut. Today, this effect has grown and developed along with the industry, so let’s dive into the subject matter and see why all the hype about the wipe effect.
In this article
Let’s Define the Wipe Transition

A wipe transition is an effect between scenes in which the footage of the latter scene is revealed periodically, following a specified path across the screen. Depending on that path and whether it is moving inward or outward, wipe transitions can be categorized into five distinct categories.
Category 1: From the side of the screen

In this category, one scene pushes the other away either from left to right or vice versa, erasing the former and slowly revealing the latter scene. It is meant to mimic the turning of book pages.
Category 2: From the top or bottom

Here, again, one scene pushes the other away, erasing the former and slowly revealing the latter. However, instead of going from side to side, it goes from top to bottom or vice versa. This has more or less the same effect as the first category, but it gives directors creative freedom.
Category 3: Clockwise or counterclockwise

As opposed to the previous two examples, which were linear, this transition is circular in nature. The latter scene is revealed periodically following a clockwise or counterclockwise motion, as shown in the GIF above. This effect is excellent to show the passage of time.
Category 4: Diagonal movement

This category is similar to the first two ones in that it is, again, linear. However, here, the new scene is revealed following the diagonal of the screen. This is another good option for directors to unleash their creative potential.
Category 5: From the middle outward

This is the final category where, instead of beginning at the end of the screen, the transition begins in the middle of the screen and reveals the next scene by moving outward. This can also be reversed, and the transition can start from both ends of the screen and finish in the middle.
Now that you have learned about different types of wipe transition effects used in films, let’s move on and talk about how to use this effect in your own work.
How to Use the Wipe Transition in Premiere Pro?
When it comes to power and versatility, only a handful of choices can top Premiere Pro in the video editing world, and there are many reasons for this. The most important one is that Adobe, the company behind the software, has been around for decades and has spent years perfecting it.
However, with great power comes a steep learning curve, so it will take time to master everything that this tool has to offer. But then again, adding the wipe transition in Premiere Pro is not that difficult. Let us show you how to do it.
Step 1: Open Adobe Premiere, load a new project, and add two photos or videos to your timeline. For this tutorial, we have added two identical images, one in color and the other in black and white. Add them to the timeline one on top of another, just like belo w.
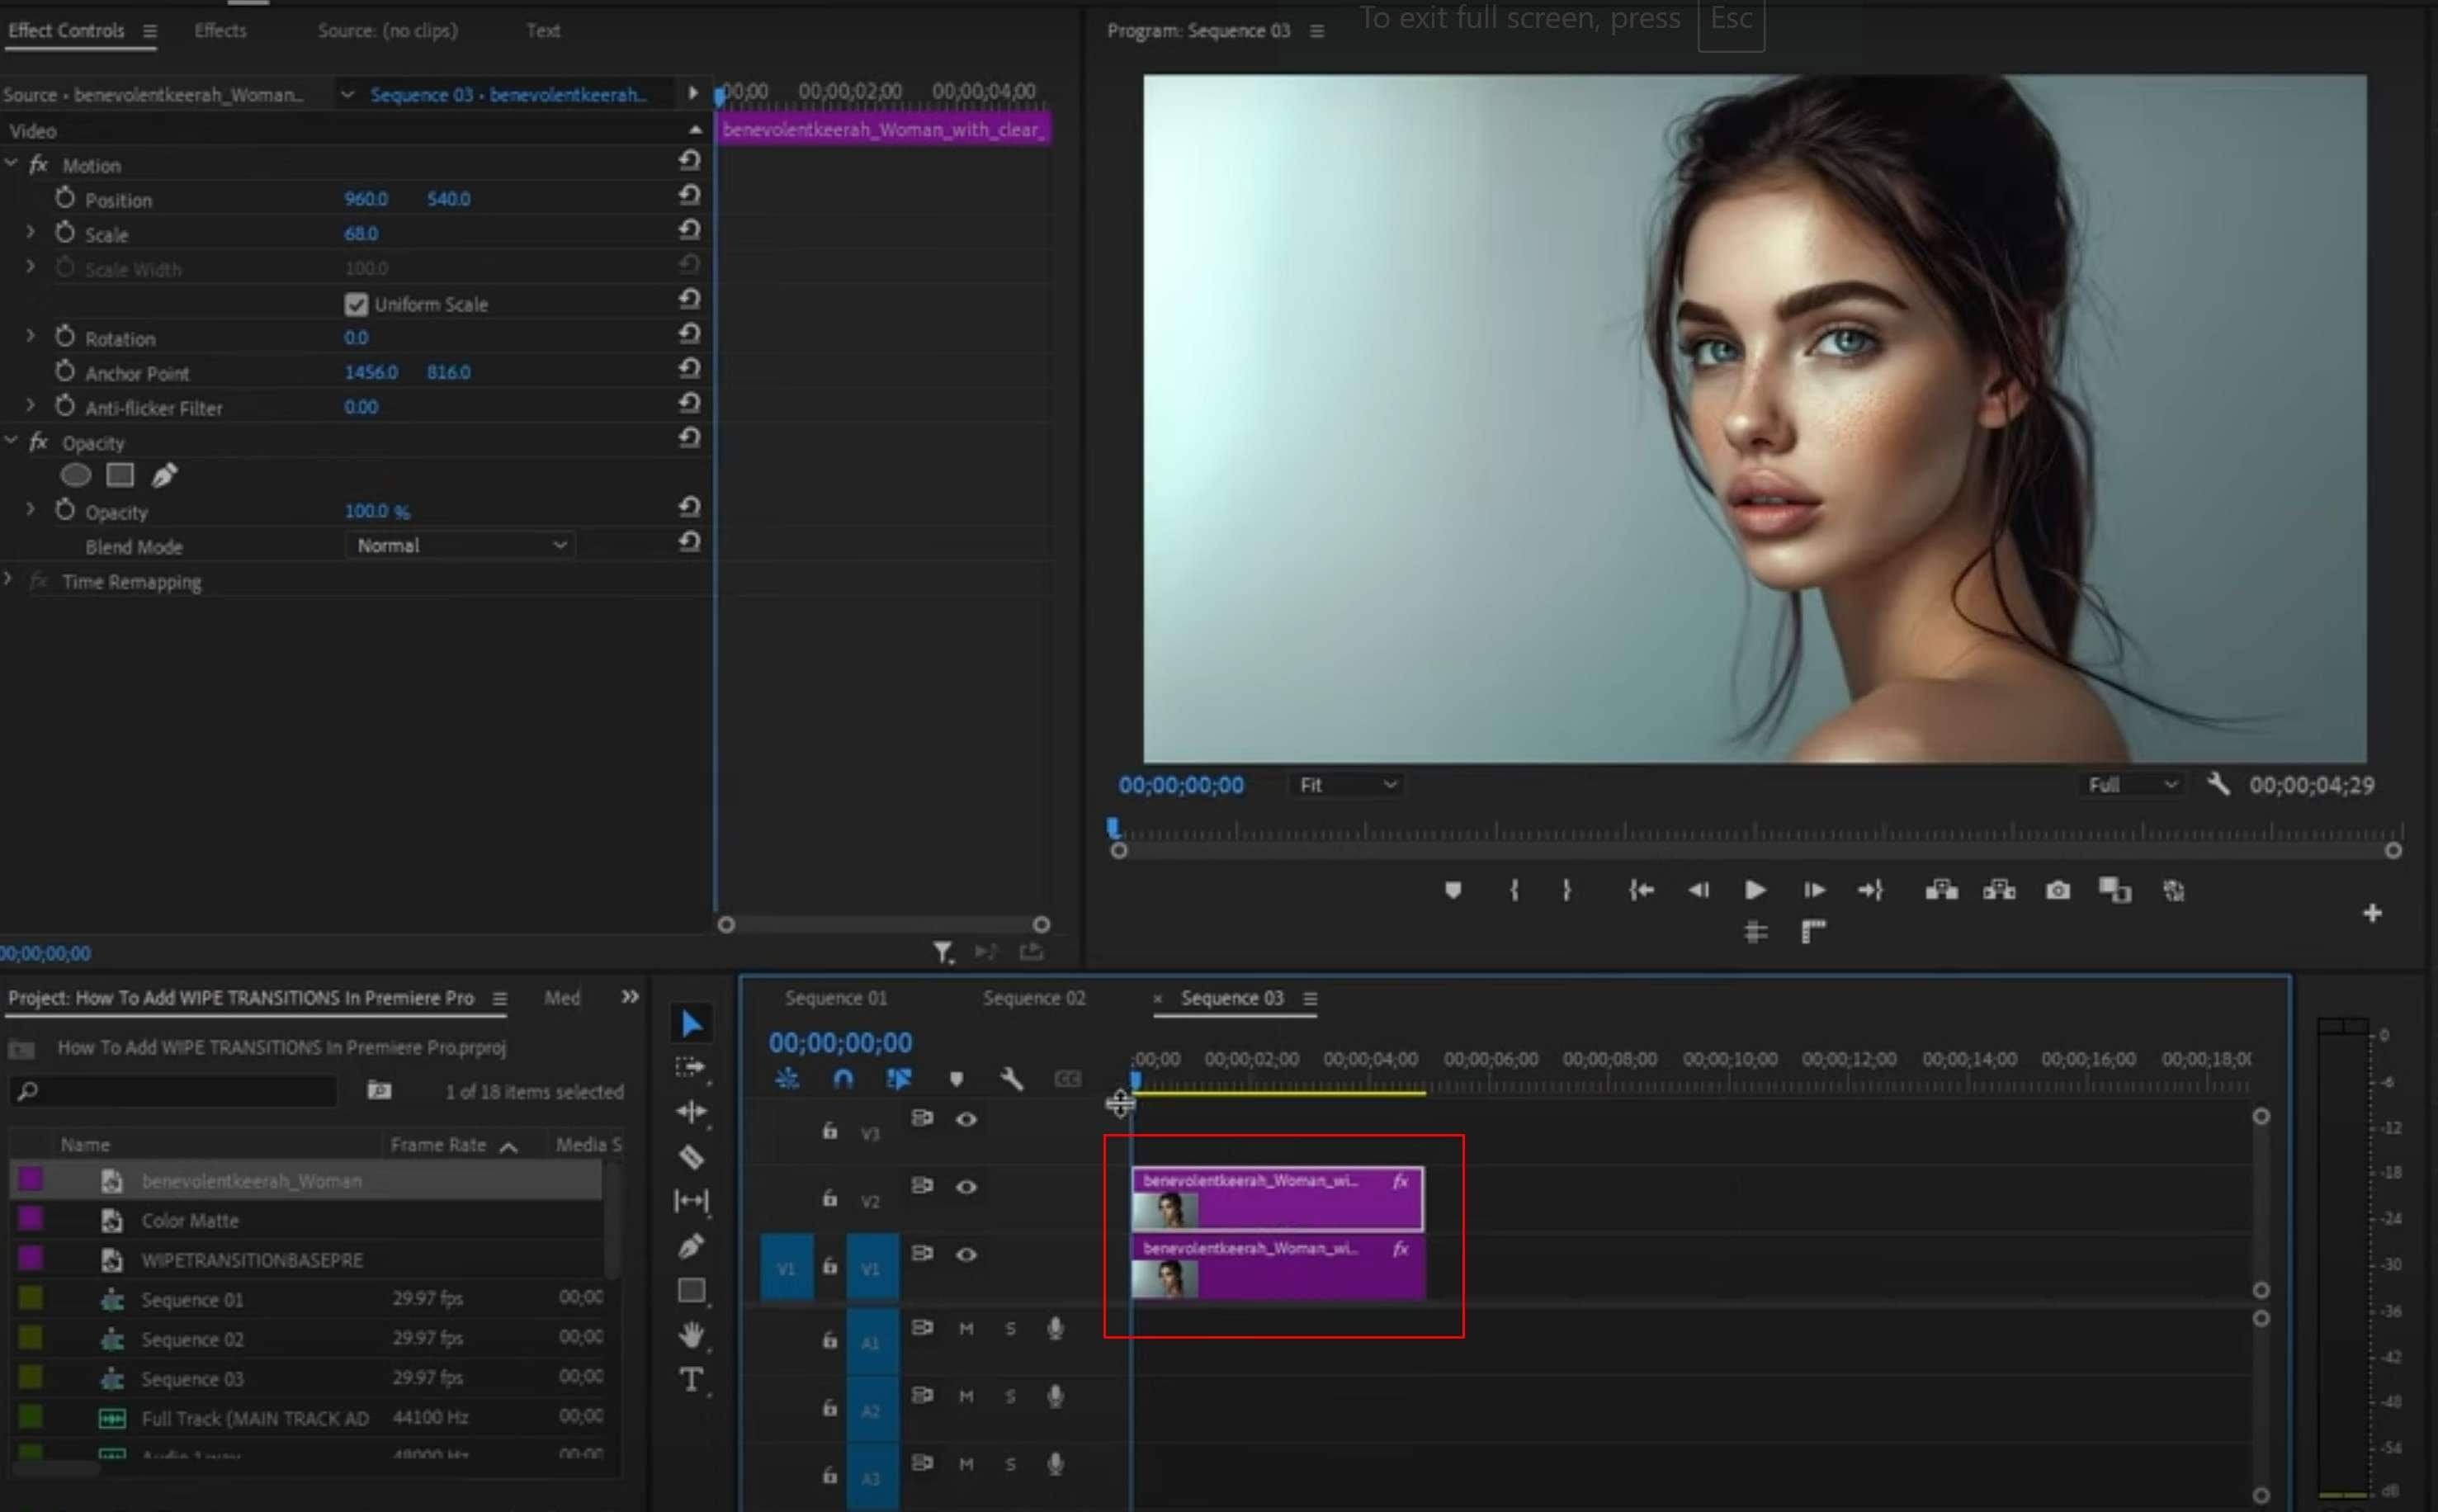
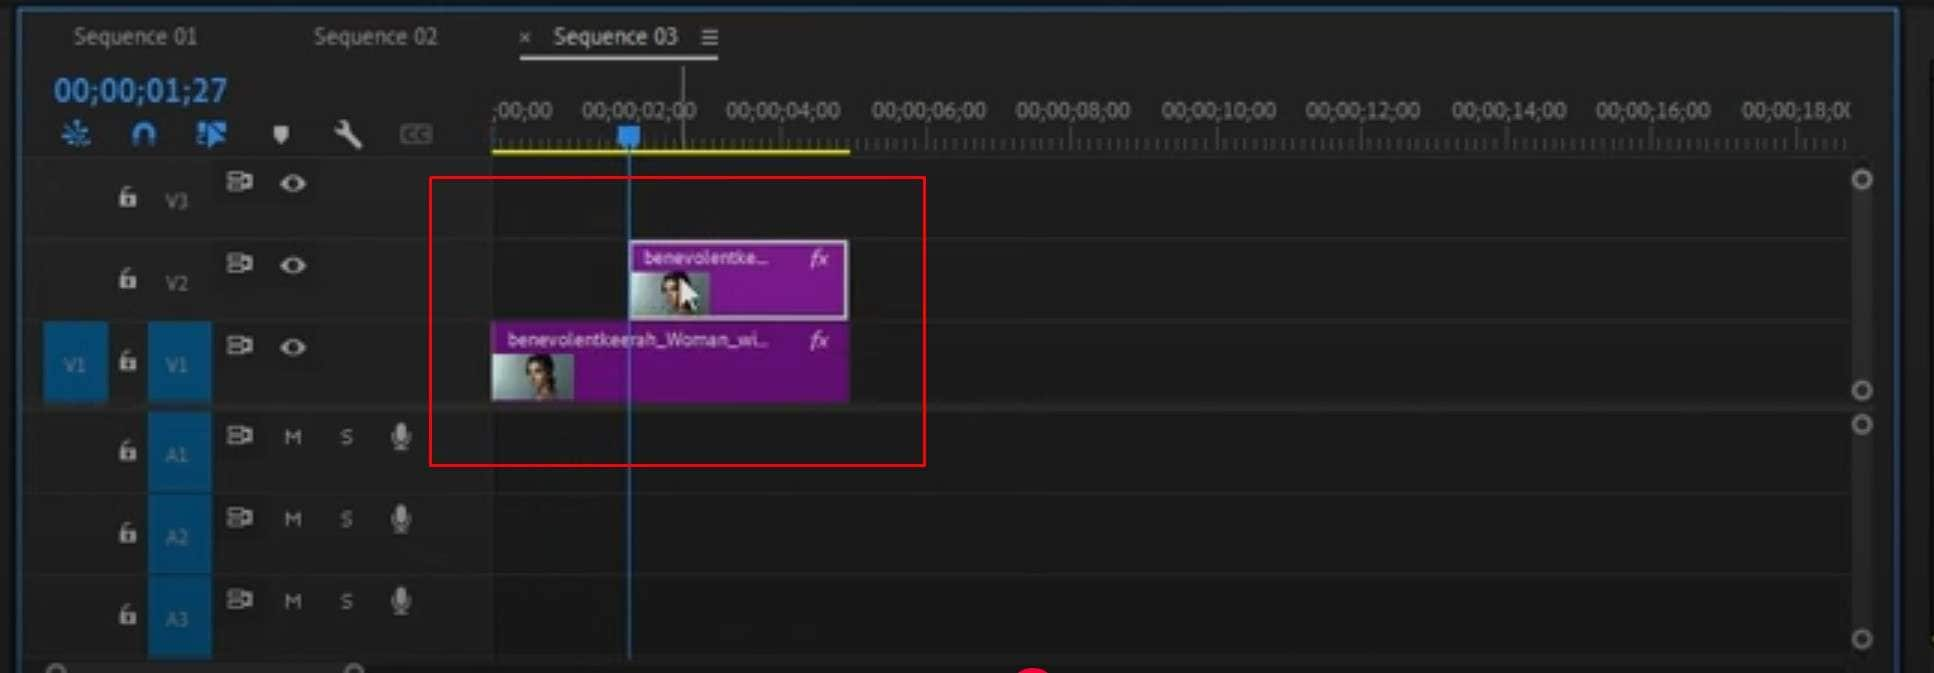
Step 2: Trim the upper media file to where you want to begin the wipe transition effect.
Step 3: Now, click on Effects on the upper-left side of the screen and find the Wipe effect. You can also search for it in the search bar. Then simply drag it to the beginning of the upper media clip.
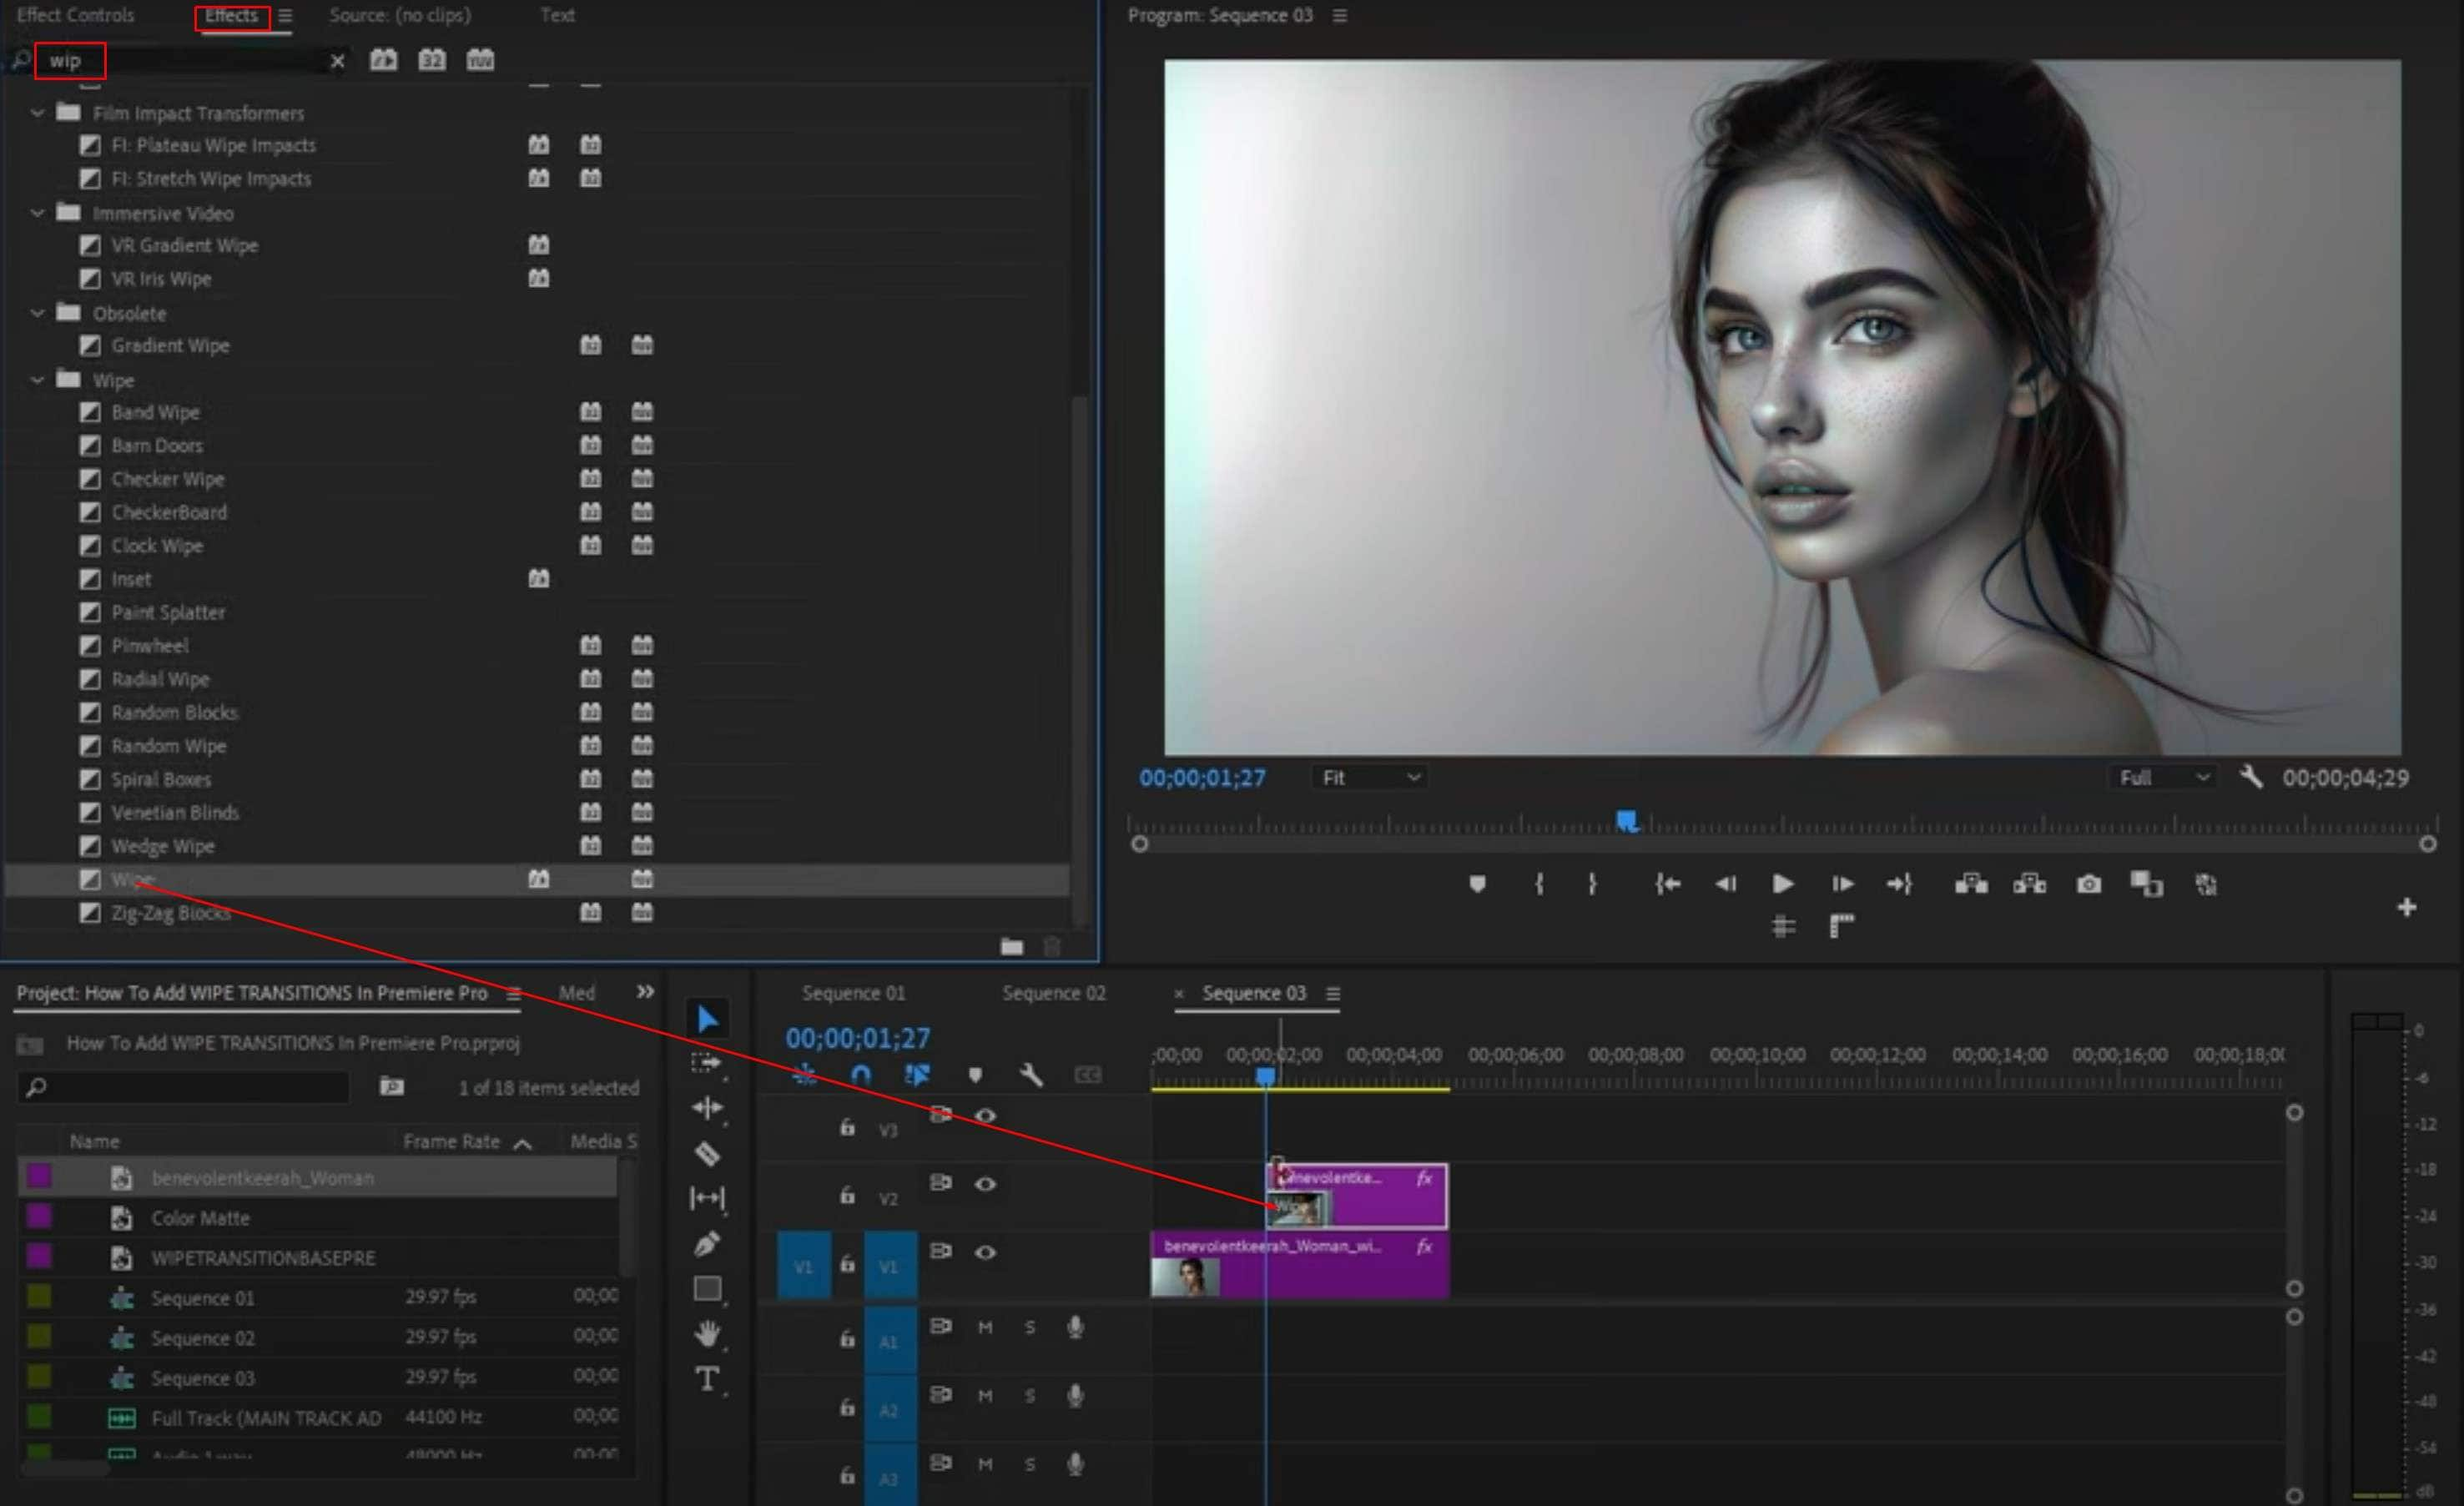
You have now successfully added the wipe effect to your image or video file in Premiere Pro. Great job! Now what? Should you spend days, weeks, months, or even years learning everything there is to know about Premiere Pro, or is there a more intuitive option?
We are here to introduce you to Filmora, an excellent video editing software solution that offers almost everything you can find in a program like Premiere Pro, but all of it is given to the user through a very easy interface.
Check out our guide to adding the wipe transition in Filmora and see how it compares to Premiere Pro.
How to Add Wipe Transitions in Filmora

Let’s get into the steps and see how this is done in Filmora.
Powerful AI video editor for all creators


Of course, before we begin, you should make sure to download and install Filmora. You will need a desktop or laptop device. Granted, this is also possible using the mobile version of Filmora, and the steps are more or less the same, so we’ll stick to the desktop version here.
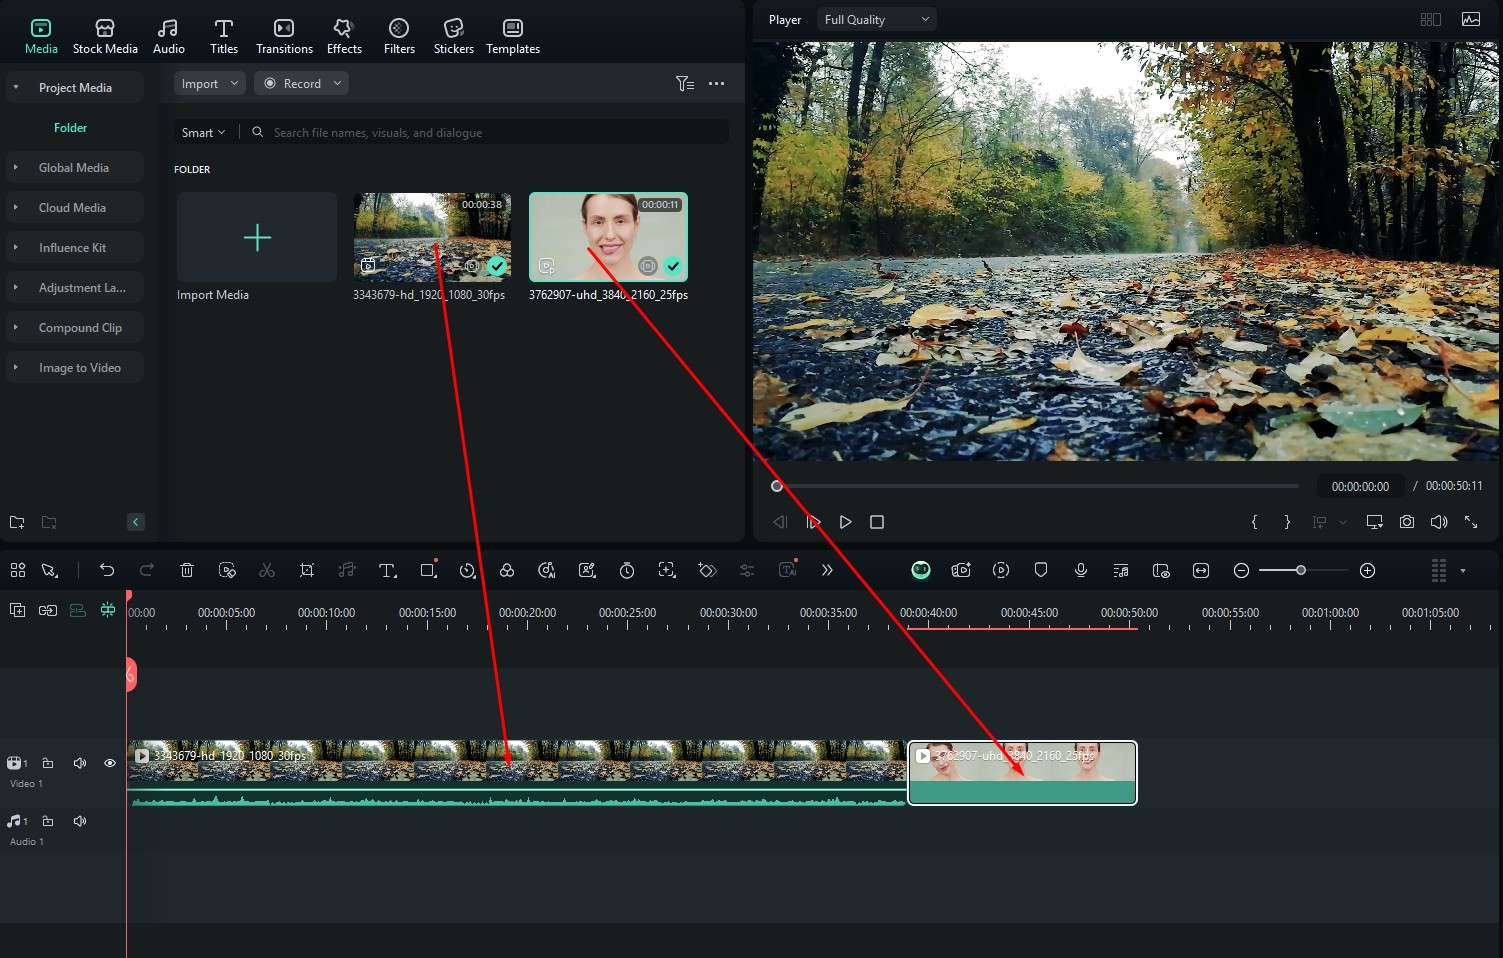
When the installation process is finished, run the program and create a new project. Then, proceed to import two files. They can be two images, two videos, or an image and a video; the choice is yours. We will go with two videos.
Step 1: Drag everything to the timeline, one after the other.
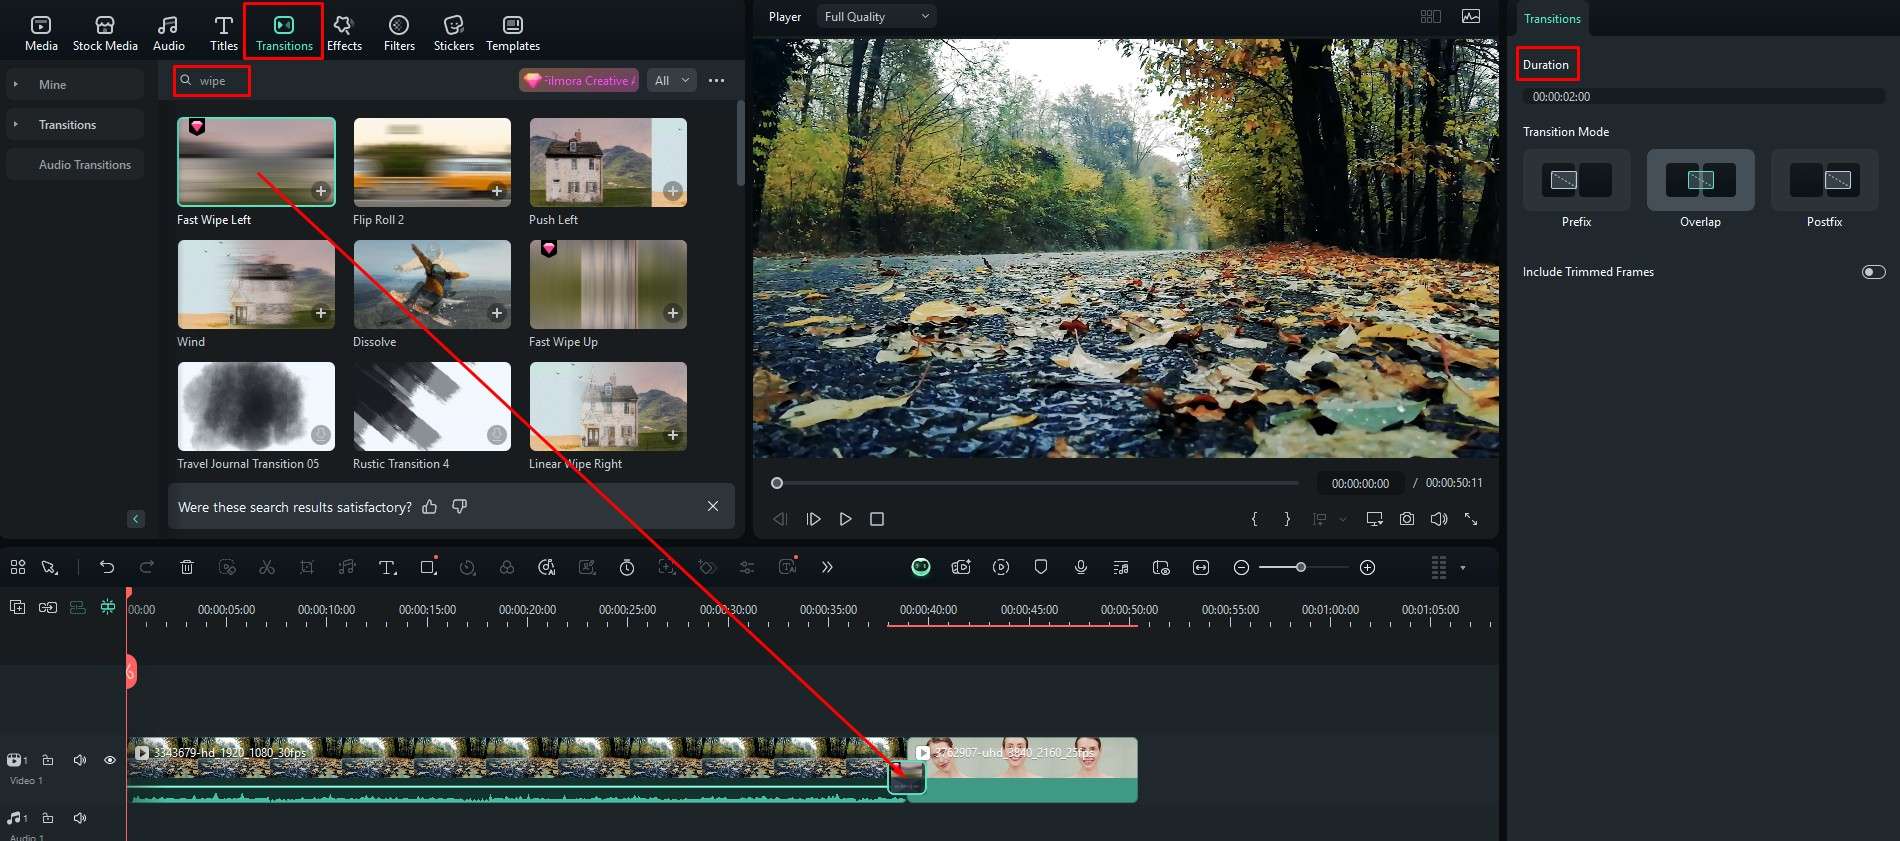
Step 2: Under Transitions, search for ”wipe” and find an effect that you like. You can preview each one in the player. When you find the one that suits you, drag it between the two files in the timeline and adjust the duration on the right.
Great job! You’re done! As you can see, everything is clear when you use Filmora. Everything is designed to flow naturally. To further illustrate this, we have prepared another section.
Check Out Some Cool AI Features You Can Use as an Aspiring Filmmaker
The development team at Wondershare poured their heart and soul into these AI tools, making them helpful assistants in your video editing journey. There are so many options here, but we will let you explore them. Here are three AI tools provided by Filmora, to give you a taste of what to expect.
 secure download
 Instant Cutter
There are instances when you just want to trim a certain video and move on. Instead of opening a project, trimming the video, and then exporting, the team at Wondershare developed the Instant Cutter to eliminate some of the steps. Here’s how it works.
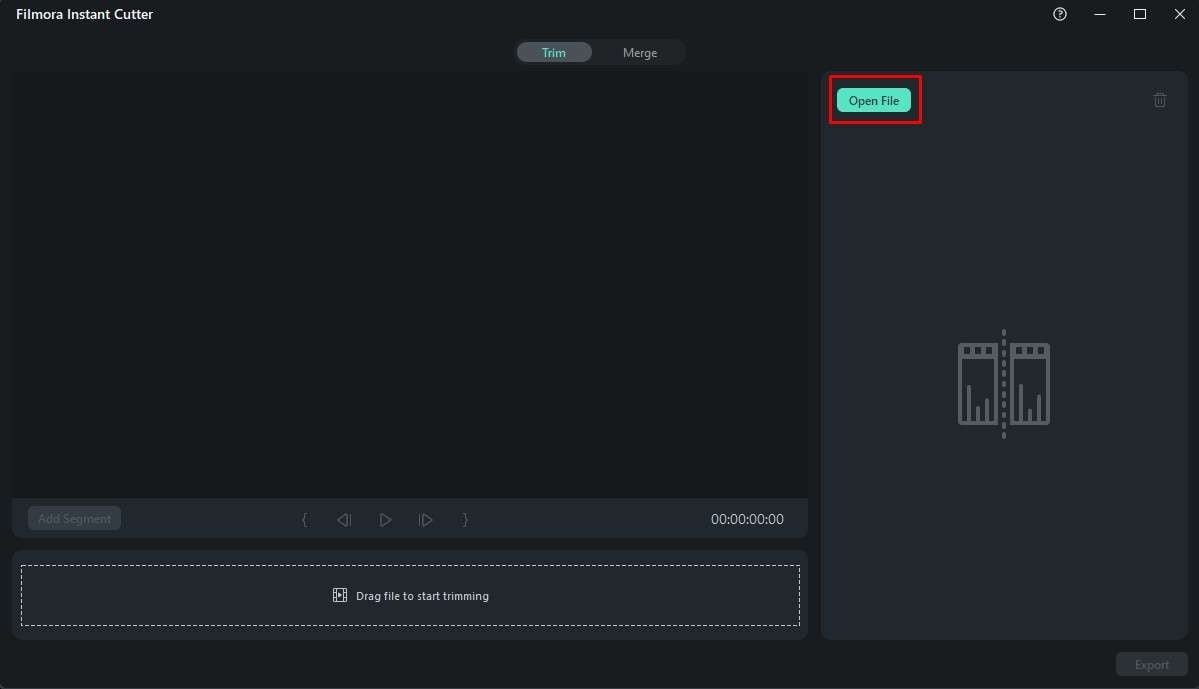
Step 1: Find the Toolbox section right after you launch Filmora. Here, scroll down to find the Instant Cutter.

Step 2: Click on Open File and add a video from your device.
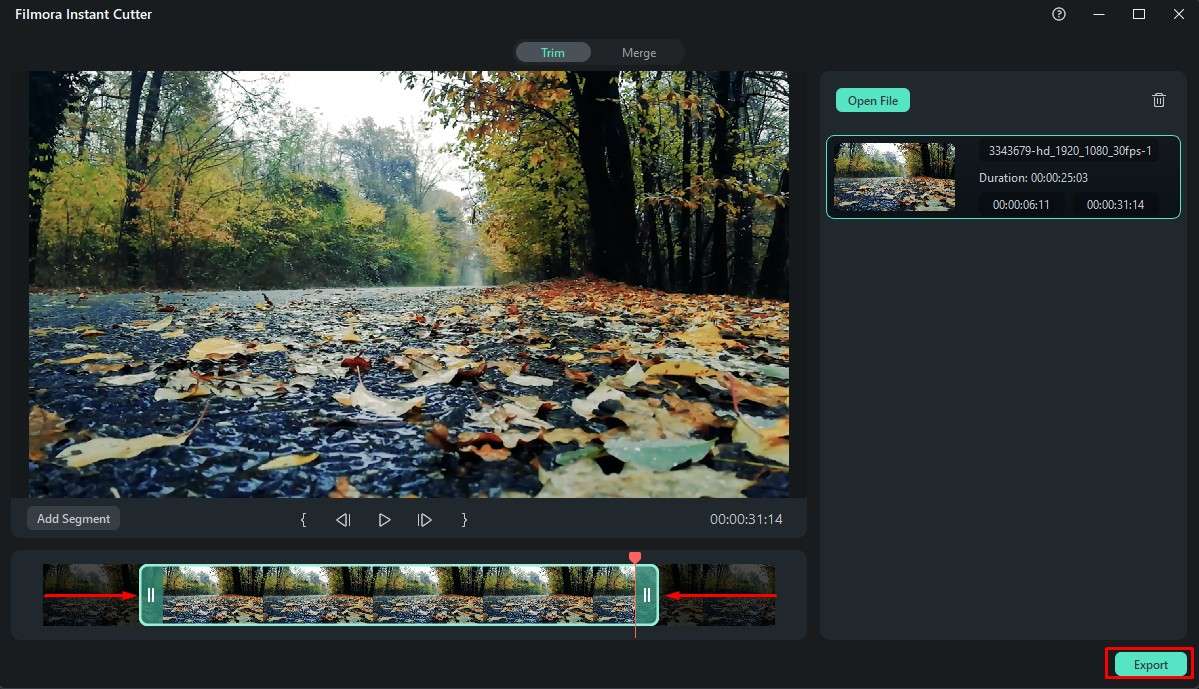
Step 3: Trim the video and find the perfect beginning and ending and then click on Export. Simple and easy.
Auto Reframe
Filmmakers and video creators need a fast way to change the aspect ratio of their video footage. That’s where this smart tool comes into play. The tutorial below will explain how to use it.
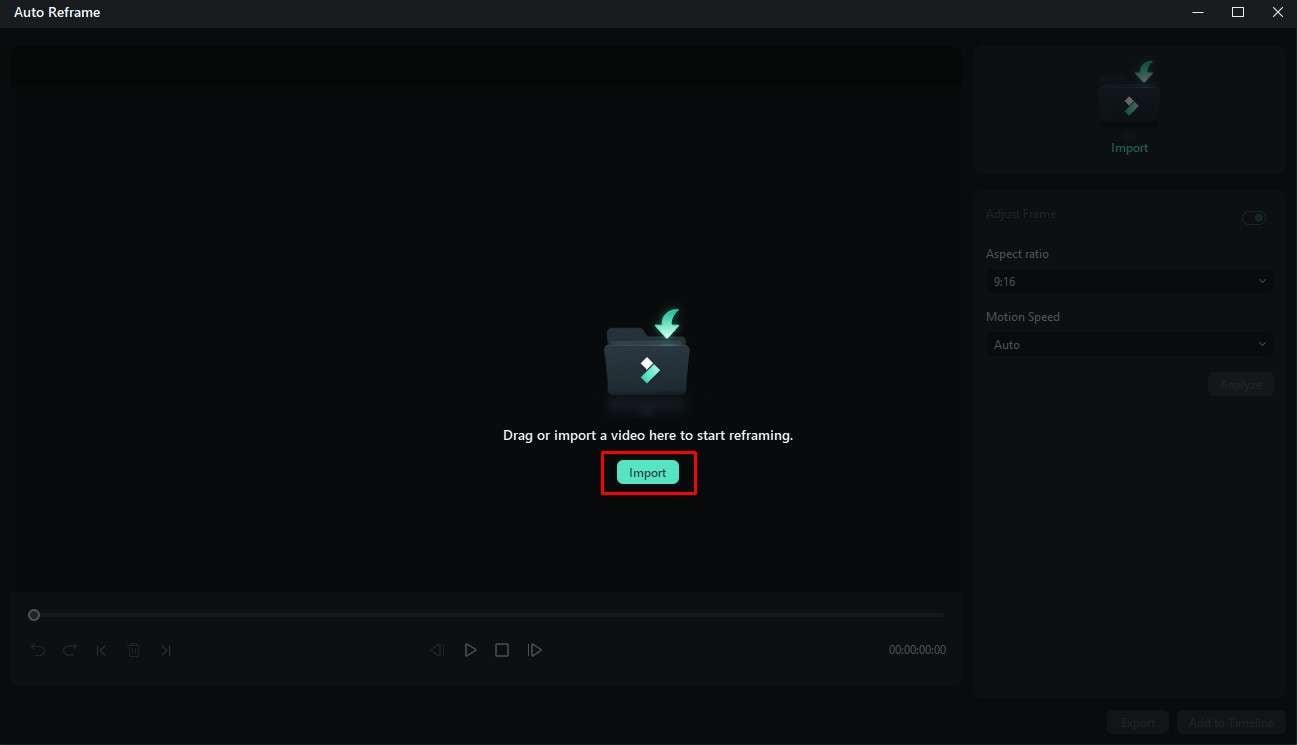
Step 1: Again, go to Filmora’s Toolbox, but now select Auto Reframe.

Step 2: Now, click on Import and add the video from your drive.
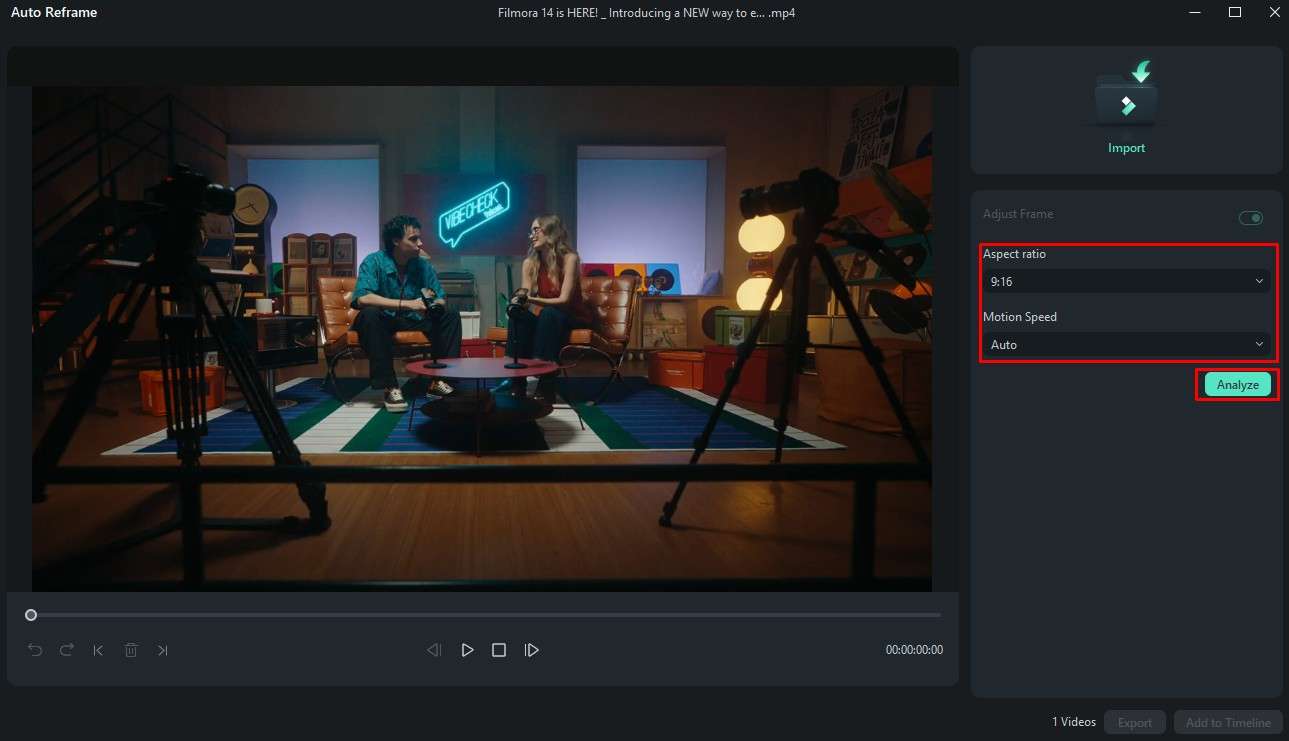
Step 3: Adjust the Aspect Ratio and Motion Speed intended for the reframed video. Then, click on Analyze.
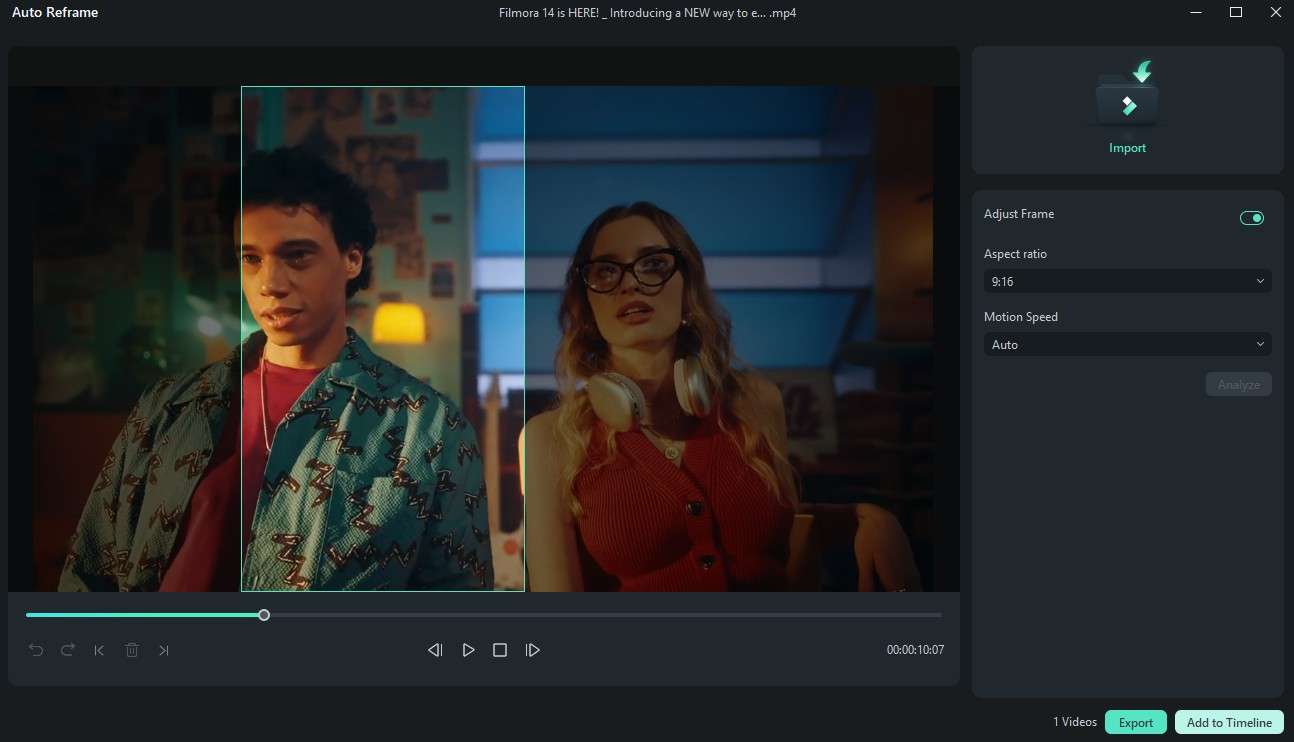
Step 4: After the AI analyzes the footage, you can review the results and you can choose to export the reframed video or add it to the timeline for further editing.
Chroma Key
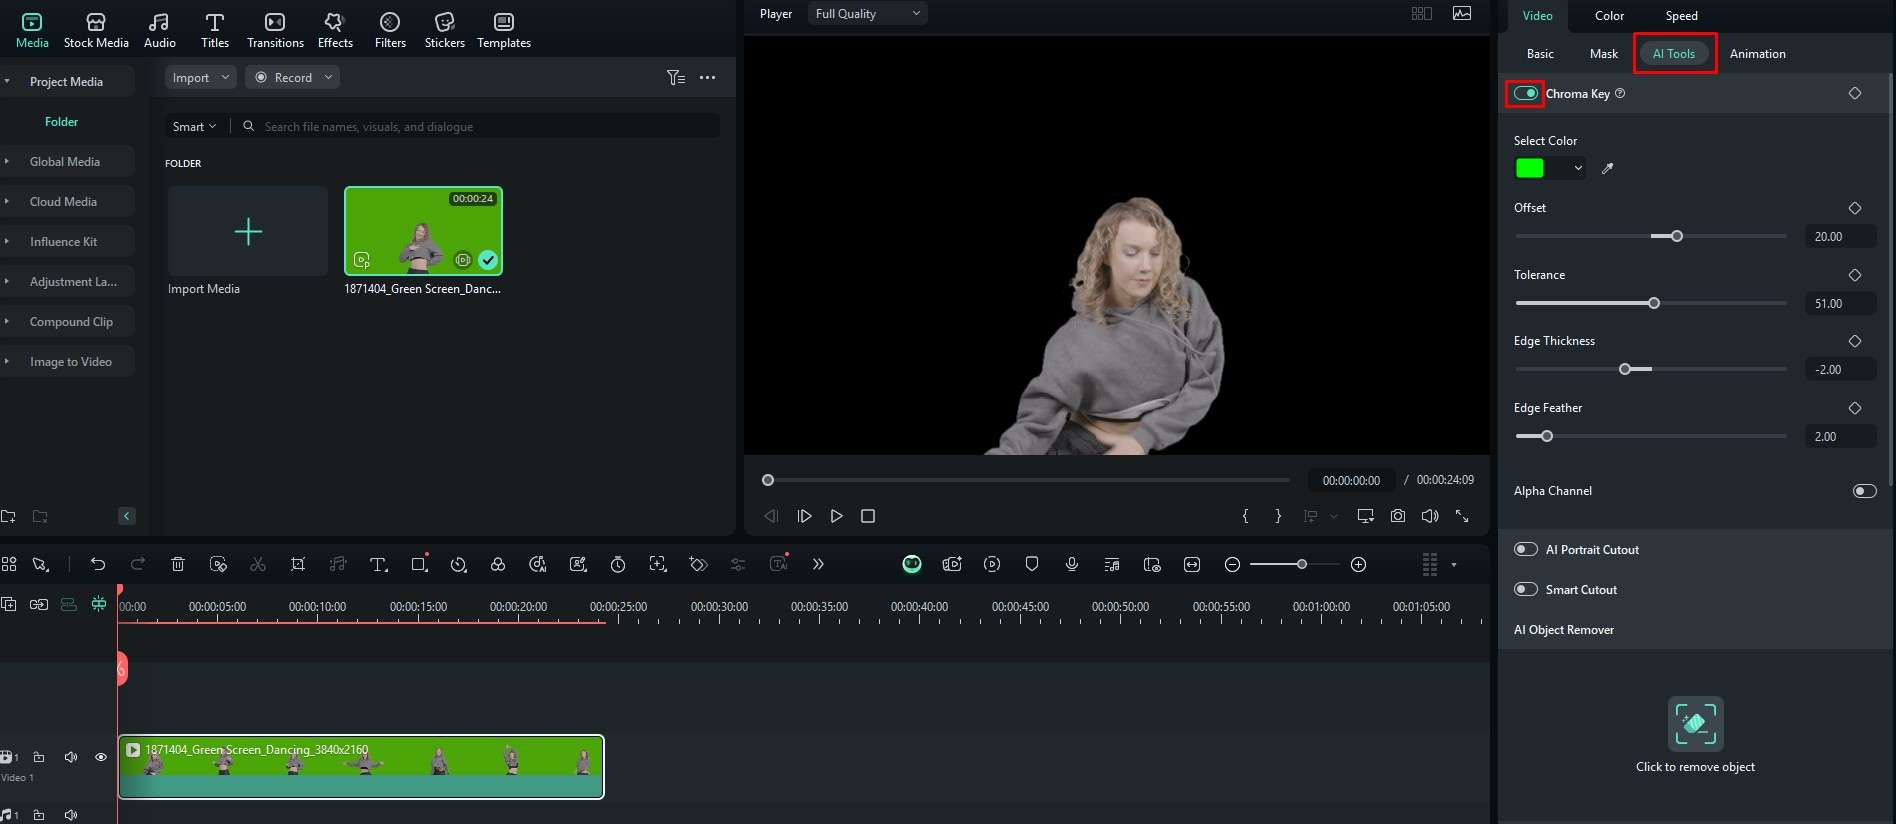
So many filmmakers and video creators use green screen technology these days, and your chosen video editing tool must have support for this. Luckily, Filmora does have Chroma Key support, and using it is very easy.
All you have to do is click on the media file in the timeline and then go to AI Tools on the right. Here, you just have to toggle the Chroma Key on, and that’s it.
Conclusion
If you are looking for a powerful video editor that can help you apply the wipe transition with ease and provide you with other useful tools for basic and advanced video, image, and audio editing, then you needn’t look any further, as you have found Filmora. It is also packed to the brim with AI features, and you can try it out and see how it works for you. If you are used to Premiere Pro, you might want to give it a try because why not?
